1.创建工程temp,创建应用test01app,在应用test01app下创建一个文件存放目录temp_file。这里创建工程和应用就不再啰嗦新手第一天请看我的其他文章有从入门级到实例
2.编写文件上传页面upload.html
<!DOCTYPE html>
<html lang="en">
<head>
<meta charset="UTF-8">
<title>Monkey测试结果检测</title>
</head>
<body>
<form method="post" action="" enctype="multipart/form-data">
{% csrf_token %}
<h1>Monkey 测试</h1><small>monkey_test</small><br>
请输入测试执行人:<input type="text" name="people"><br>
请输入测试 版本 :<input type="text" name="version"><br>
请上传monkey日志文件:<br>
<input type="file" name="myfile"><br>
<input type="submit" value="上传">
</form>
<h1>分析结果:</h1><hr>
<table border="1">
<thead>
<tr>
<td>ID</td>
<td>测试执行人</td>
<td>测试执行版本</td>
<td>BUG数量统计</td>
<td>备注</td>
</tr>
</thead>
<tbody>
<tr>
<td>{'people'}</td>
<td></td>
<td></td>
<td></td>
<td></td>
</tr>
</tbody>
</table>
</body>
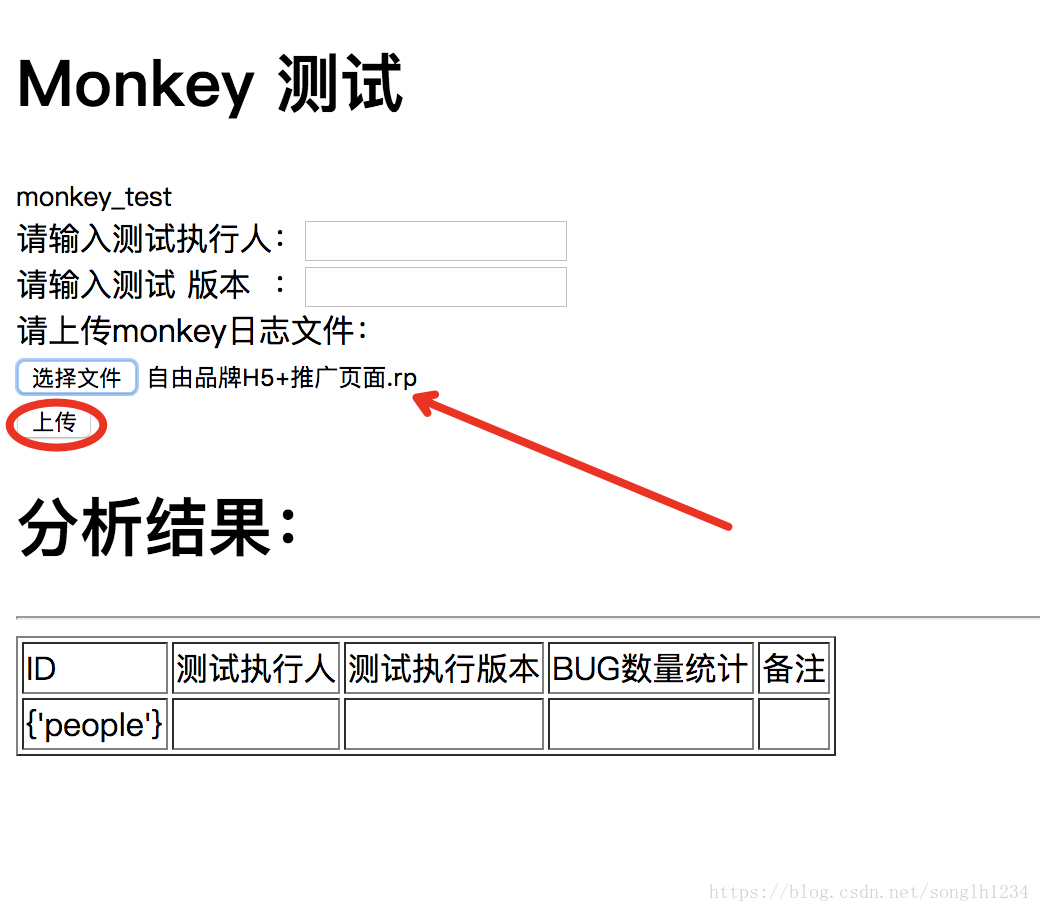
</html>upload.html的页面展示如下:

3.编写views.py视图,实现上传逻辑。此处open中的./test01app/temp_file/%s表示:在当前目录(temp)下的应用(test01app)下的temp_file文件目录下创建一个名字是%s的文件,%s通过File.name获取上传文件的文件名,并将文件名赋给%s
from django.shortcuts import render
from django.http import HttpResponse
#import os

# Create your views here.
def upload_file(request):
    # 请求方法为POST时,进行处理
    if request.method == "POST":
        # 获取上传的文件,如果没有文件,则默认为None
        File = request.FILES.get("myfile", None)
        if File is None:
            return HttpResponse("没有需要上传的文件")
        else:
            #打开特定的文件进行二进制的写操作
            #print(os.path.exists('/temp_file/'))
            with open("./test01app/temp_file/%s" % File.name, 'wb+') as f:
                #分块写入文件
                for chunk in  File.chunks():
                    f.write(chunk)
            return HttpResponse("UPload over!")
    else:
        return  render(request, "test01app/upload.html")
4.配置项目urls.py,打开项目的urls.py

from django.contrib import admin
from django.urls import path, include

urlpatterns = [
    path('admin/', admin.site.urls),
    path('temp/', include('test01app.urls'))
]
5.配置应用的urls.py,在应用test01app下创建urls.py并写入
from test01app import views
from django.urls import path
urlpatterns = [
path('upload/', views.upload_file),
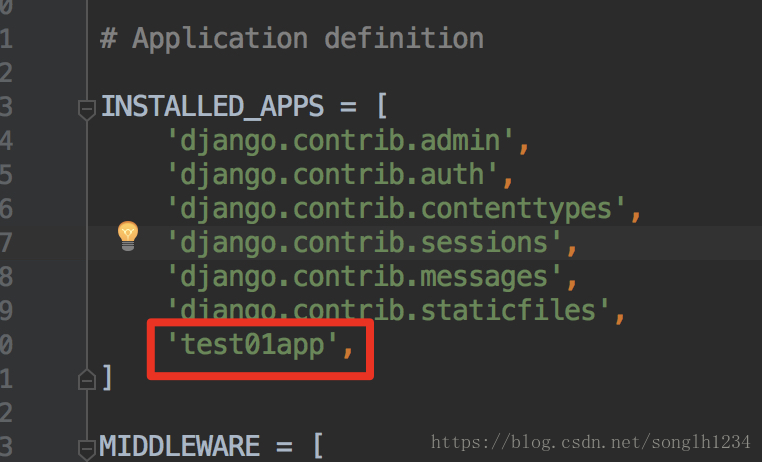
]6.配置项目的settings.py,在标示处添加创建的应用名称
7.启动服务运行,输入http://127.0.0.1:8000/temp/upload/,选择本地文件如下所示,点击上传,提示UPloadover上传完成,进入到我的工程目录中查看,发现我的temp_file目录下多了一个文件,文件上传成功!!!!!!!!!!