###apache###
企业中常用的web服务,用来提供http:// (超文本传输协议)
httpd是apaceh服务器守护的进程
1.apache安装
yum install httpd -y ##apache软件的安装
yum install httpd—manual ##apache的手册
systemctl start httpd
systemctl enable httpd
systemctl start firewalld
firewall-cmd --list-all · ##列出火墙信息
firewall-cmd --permanent --add-server=http ##永久允许http
firewall-cmd --reload ##火墙的重新加载策略
netstat -antlupe|grep httpd ##查看监听端口,默认端口80
cd /var/www/html ##apache的 / 目录,默认发布目录
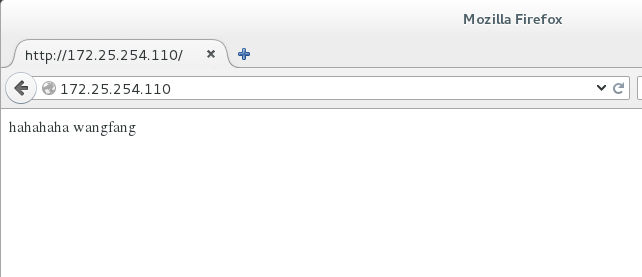
vim index.html ##默认发布文件 /var/www/html/index.html
<h1> hahahaha wangfang </h1>


测试:
在火狐浏览器上输入 172.25.254.110 ##会出现 hahahaha wangfang
ls
index.html
vim westos
<h1> wangfang westos's index.html </h1>

在火狐浏览器上输入172.25.254.110/westos ##会出现wangfang westos's index.html

yum install httpd—manual ##apache的手册
测试:
172.25.254.110/manual
2.apache的基础信息
主配置目录 /etc/httpd/conf
主配置文件 /etc/httpd/conf/httpd.conf
子配置目录 /etc/httpd/conf.d/
子配置文件 /etc/httpd/conf.d/*.conf
默认发布目录 /var/www/html
默认发布文件 index.html
默认端口 80
默认安全上下文 httpd_sys_content_t
程序开启默认用户 apache
apache日志 /etc/httpd/logs/*
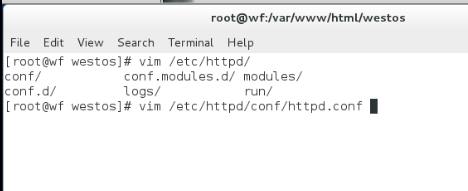
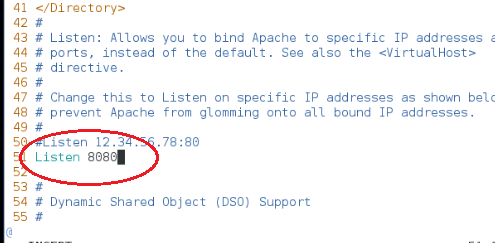
(1)修改默认端口:
vim /etc/httpd/conf/httpd.conf
43 Listen 8080 ##修改默认端口为8080
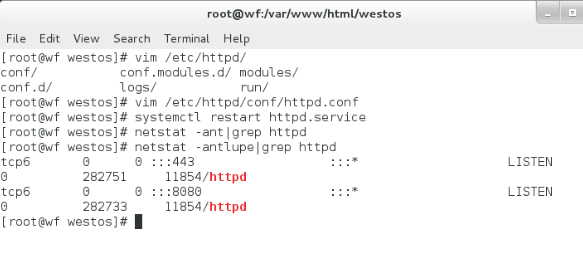
firewall-cmd --permanent --add-port=8080/tcp
firewall-cmd --reload
netstat -antlupe|grep httpd ##查看监听端口,默认端口80
(2)修改默认发布文件:
vim /etc/httpd/conf/httpd.conf
DocumetRoot "/westos/html" ##目录
<Directory "/westos">
Require all granted
</Directory>
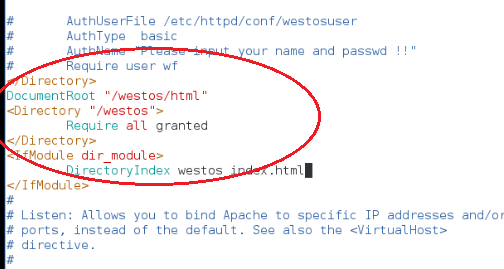
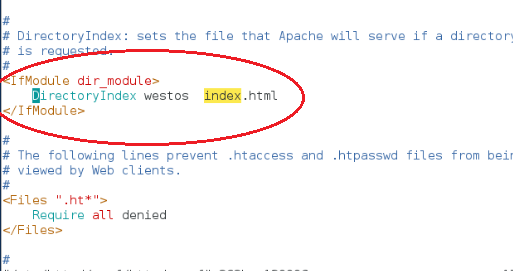
<IfModule dir_module> ##文件
DirectoryIndex westos index.html
</IfModule>
测试:
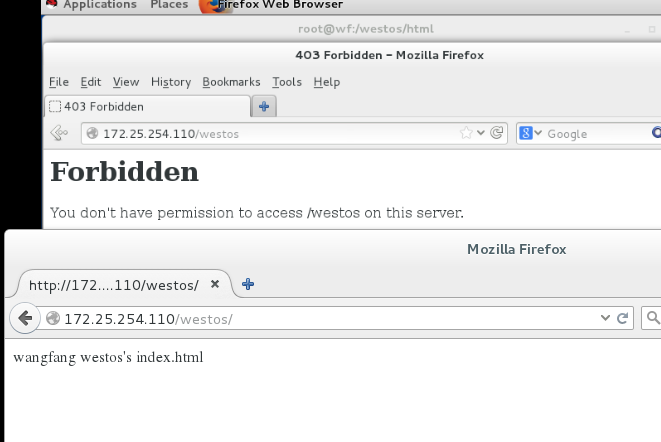
172.25.254.110 ##会出现westos里的内容
3.apache的访问控制
(1)
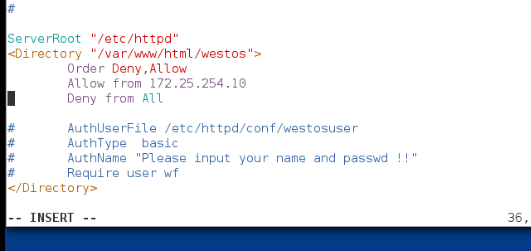
vim /etc/httpd/conf/httpd.conf
<Directory "/var/www/html/westos">
Order Allow,Deny ##这里的命令,先读取allow,后读取deny
Allow from All ##先允许全部人访问
Deny from 172.25.254.110 ##再在允许访问的名单中将110这个ip覆盖掉
</Directory> ##除了110都可以访问
<Directory "/var/www/html/westos">
Order Deny,Allow ##这里的命令,先读取deny,后读取allow
Allow from 172.25.254.110 ##先禁止全部人访问
Deny from all ##再在禁止访问的名单中将110这个ip,设为允许访问
</Directory> ##除了110都不能访问
(2)设定用户登陆
cd /etc/httpd/conf/
htpasswd -cm westosuser wf ##建立用户(会要求设置密码)
htpasswd -m westosuser lsy
注意:当有一个用户存在的时候。就不能用 -cm 来建立新的用户,如果这样建立会将原来的用户覆盖掉。重新添加用户应该用 -m 。如果本身没有用户存在,则需要用 -cm

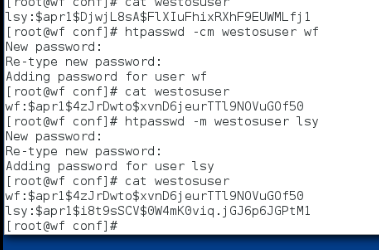
创建好用户后可以用 cat westosuser 这个命令查看
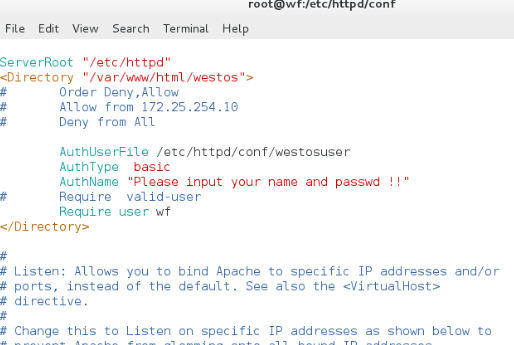
在设置好用户后,就可以设置用户输入账户和密码查看:(ps:要将上面的注释掉)
vim /etc/httpd/conf/httpd.conf
<Directory "/var/www/html/westos">
# Order Allow,Deny
# Allow from All
# Deny from 172.25.254.110
AuthUserFile /etc/httpd/conf/westosuser
AuthTYpe basic
AuthName "please input your name and passwd !!"
#Require user wf ##只允许wf用户访问
Require valid-user ##允许所有有效用户访问,必须要写,不写的话,就没有密码验证的对话框
</Directory>
systemctl restart httpd

测试:
172.25.254.110/westos

4.apache的虚拟主机(为了访问不同的页面)
cd /var/www/
mkdir -p virtual/news/html
mkdir -p virtual/news/html
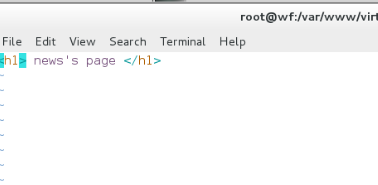
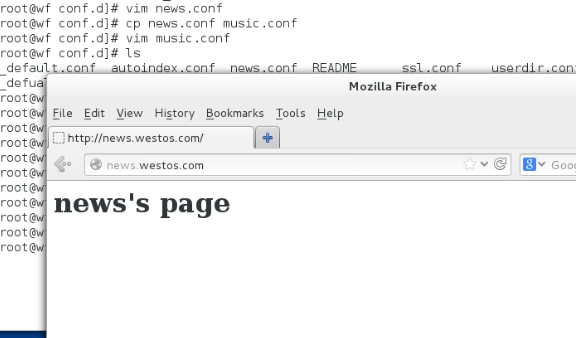
vim /var/www/virtual/news/html/index.html
<h1> news's page </h1>
vim /var/www/virtual/music/html/index.html
<h1> music's page </h1>

cd /etc/httpd/conf.d/
vim a_default.conf
<Virtualhost _default_:80>
DocumentRoot /var/www/html
CustomLog logs/dedfault.log combined
</Virtualhost>
vim news.conf
<VirtualHost *:80>
ServerName news.westos.com
DocumentRoot /var/www/virtual/news/html
CustomLog logs/news.log combined
</VirtualHost>
<Directory "/var/www/virtual/news/html">
Require all granted
</Directory>
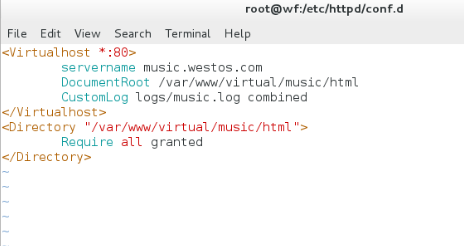
vim music.conf
<VirtualHost *:80>
ServerName music.westos.com
DocumentRoot /var/www/virtual/music/html
CustomLog logs/music.log combined
</VirtualHost>
<Directory "/var/www/virtual/music/html">
Require all granted
</Directory>
systemctl restart httpd
测试:
vim /etc/hosts ##做域名解析
172.25.254.110 www.westos.com news.westos.com music.westos.com


5.php 和 cgi
cd /var/www/html/
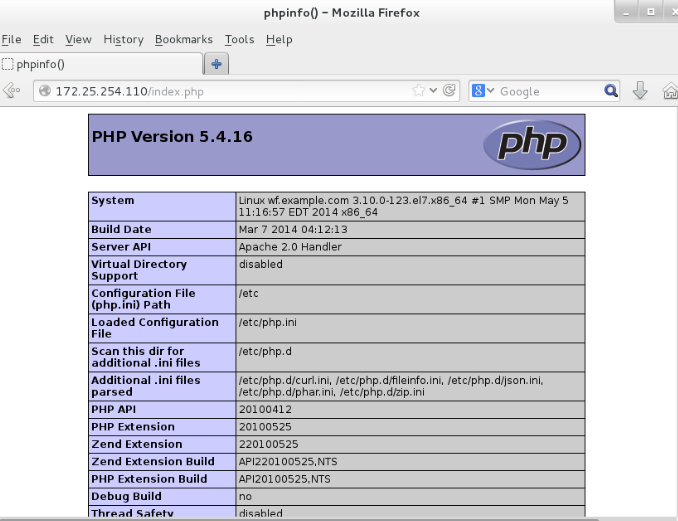
vim index.php
<?php
phpinfo();
?>
yum install php -y

测试:
172.25.254.110/index.php
cd /var/www/html/
mkdir cgi
cd cgi/
vim index.cgi
#!/usr/bin/perl
print "Content-type:text/html\n\n";
print "Hello,wf.";
chmod 755 index.cgi
./index.cgi

vim a_dedault.conf
<Virtualhost _default_:80>
DocumentRoot /var/www/html
CustomLog logs/dedfault.log combined
</Virtualhost>
<Directory "/var/www/html/cgi">
Options +ExecCGI
AddHandler cgi-script .cgi
</Directory>

测试:
172.25.254.110/cgi/index.cgi

6.apache的签证
yum install mod_ssl -y
cd /etc/httpd/conf
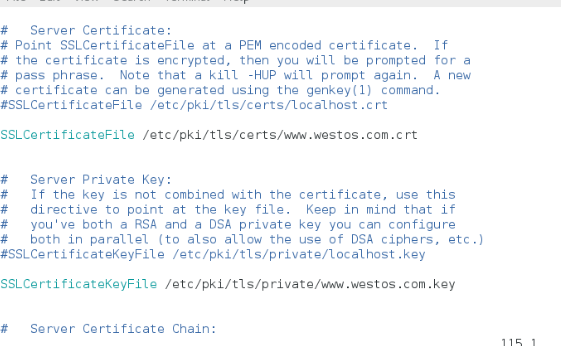
vim ssl.conf
SSLCertificateFile /etc/pki/tls/certs/www.westos.com.crt ##证书
SSLCertificateKeyFile /etc/pki/tls/private/www.westos.com.key ##密钥
systemctl restart httpd
yum install crypto-utiles -y
genkey www.westos.com ##获得证书
systemctl restart httpd
6.网页重写(加密访问) 将 hppt:// 变成 hppts://
cd /etc/httpd/conf.d
cp news.conf login.conf
vim login.conf
<VirtualHost *:80>
ServerName login.westos.com
DocumentRoot /var/www/virtual/login/html
CustomLog logs/login.log combined
</VirtualHost>
<Directory "/var/www/virtual/login/html">
Require all granted
</Directory>
vim /var/www/virtual/login/html/index.html
<h1> login's page </h1>
测试:
需要手动加 https://
vim news.conf
<VirtualHost *:443>
ServerName login.westos.com
DocumentRoot /var/www/virtual/login/html
CustomLog logs/login.log combined
SSLCertificateFile /etc/pki/tls/certs/www.westos.com.crt
SSLCertificateKeyFile /etc/pki/tls/private/www.westos.com.key
SSLEngine on
</VirtualHost>
<Directory "/var/www/virtual/login/html">
Require all granted
</Directory>
<VirtualHost *:80>
ServerName login.westos.com
RewriteEngine on
RewriteRule ^(/.*)$ https://%{HTTP_HOST}$1 [redirect=301]
</VirtualHost>
测试:
不需要手动加 login.westos.com
注意:
^(/.*)$ ##客户在浏览器地址栏中输入的所有字符
https:// ##强制客户加密访问
%{HTTP_HOST} ##客户请求主机
$1 ##表示 ^(/.*)$ 的值
[redirect=301] ##临时重写 302永久转换

7.squid(FQ)
在没有权限查看某网站,另一个主机可以访问的时候,可以在可以访问的主机上装squid,然后开启服务,开通端口,在访问不了的主机上,输入可查看主机的ip和端口,就可以查看某网站
yum install squid -y
systemctl start squid
vim /etc/squid/squid.conf
http_access allow all
http_port 3128
cache_dir ufs /var/spool/squid 100 16 256

测试:
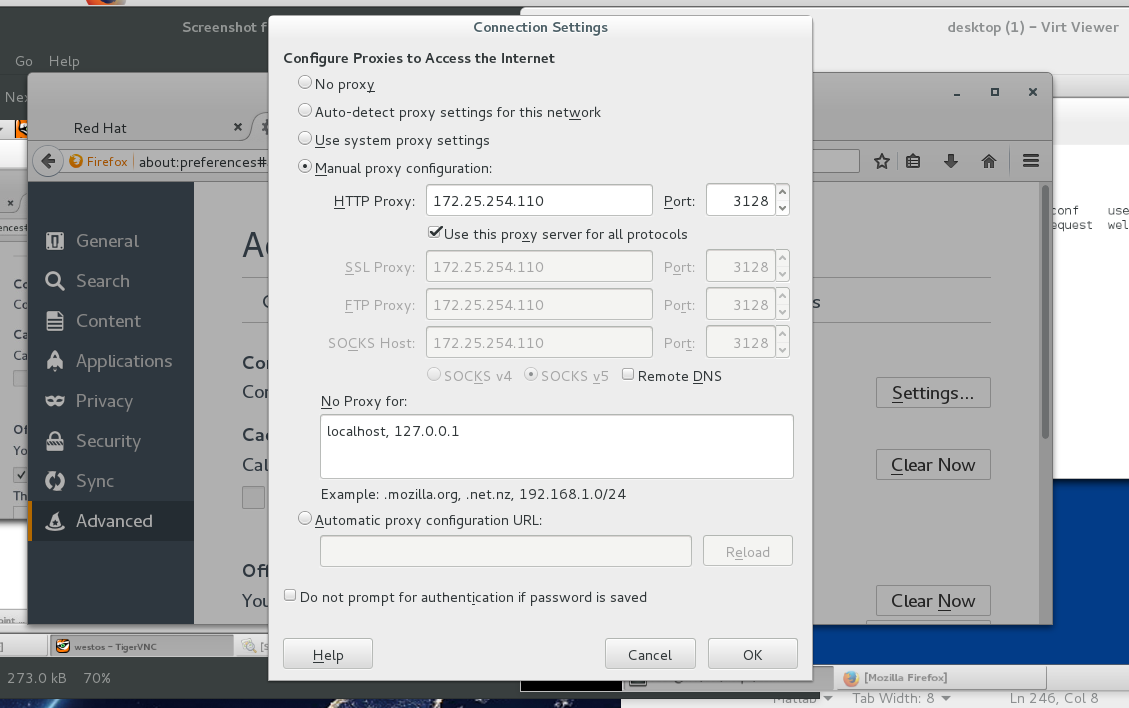
在真机上,preferences -> Advanced -> network -> setting -> Manual proxy configuration -> 172.25.254.110 3128
8.辅助squid
yum install squid -y
systemctl start squid
vim /etc/squid/squid.conf
http_access allow all
http_port 80 vhost vport
cache_peer 172.25.254.110 parent 80 0 proxy-only round-robin originserver name=web1 weight=3
cache_peer 172.25.254.111 parent 80 0 proxy-only round-robin originserver name=web2
cache_peer_domain web1 web2 www.westos.com
cache_dir ufs /var/spool/squid 100 16 256