服务提供者:
开发步骤:
第一步:
(1 )创建 Maven 工程(WAR )dubboxdemo-service ,在 pom.xml 中引入依赖
<project xmlns="http://maven.apache.org/POM/4.0.0" xmlns:xsi="http://www.w3.org/2001/XMLSchema-instance"
	xsi:schemaLocation="http://maven.apache.org/POM/4.0.0 http://maven.apache.org/xsd/maven-4.0.0.xsd">
	<modelVersion>4.0.0</modelVersion>
	<groupId>com.zhouqing</groupId>
	<artifactId>dubboxdemo-service</artifactId>
	<version>0.0.1-SNAPSHOT</version>
	<packaging>war</packaging>

	<properties>
		<spring.version>4.2.4.RELEASE</spring.version>
	</properties>
	<dependencies>
		<!-- Spring -->
		<dependency>
			<groupId>org.springframework</groupId>
			<artifactId>spring-context</artifactId>
			<version>${spring.version}</version>
		</dependency>
		<dependency>
			<groupId>org.springframework</groupId>
			<artifactId>spring-beans</artifactId>
			<version>${spring.version}</version>
		</dependency>
		<dependency>
			<groupId>org.springframework</groupId>
			<artifactId>spring-webmvc</artifactId>
			<version>${spring.version}</version>
		</dependency>
		<dependency>
			<groupId>org.springframework</groupId>
			<artifactId>spring-jdbc</artifactId>
			<version>${spring.version}</version>
		</dependency>
		<dependency>
			<groupId>org.springframework</groupId>
			<artifactId>spring-aspects</artifactId>
			<version>${spring.version}</version>
		</dependency>
		<dependency>
			<groupId>org.springframework</groupId>
			<artifactId>spring-jms</artifactId>
			<version>${spring.version}</version>
		</dependency>
		<dependency>
			<groupId>org.springframework</groupId>
			<artifactId>spring-context-support</artifactId>
			<version>${spring.version}</version>
		</dependency>
		<!-- dubbo 相关 -->
		<dependency>
			<groupId>com.alibaba</groupId>
			<artifactId>dubbo</artifactId>
			<version>2.8.4</version>
		</dependency>
		<dependency>
			<groupId>org.apache.zookeeper</groupId>
			<artifactId>zookeeper</artifactId>
			<version>3.4.6</version>
		</dependency>
		<dependency>
			<groupId>com.github.sgroschupf</groupId>
			<artifactId>zkclient</artifactId>
			<version>0.1</version>
		</dependency>
		<dependency>
			<groupId>javassist</groupId>
			<artifactId>javassist</artifactId>
			<version>3.11.0.GA</version>
		</dependency>
	</dependencies>
	<build>
		<plugins>
			<plugin>
				<groupId>org.apache.maven.plugins</groupId>
				<artifactId>maven-compiler-plugin</artifactId>
				<version>2.3.2</version>
				<configuration>
					<source>1.7</source>
					<target>1.7</target>
				</configuration>
			</plugin>
			<plugin>
				<groupId>org.apache.tomcat.maven</groupId>
				<artifactId>tomcat7-maven-plugin</artifactId>
				<configuration>
					<!-- 指定端口 -->
					<port>8081</port>
					<!-- 请求路径 -->
					<path>/</path>
				</configuration>
			</plugin>
		</plugins>
	</build>
</project>
(2 )在工程的 webapps 下创建 WEB-INF 文件夹,创建 web.xml
<?xml version="1.0" encoding="UTF-8"?>
<web-app xmlns:xsi="http://www.w3.org/2001/XMLSchema-instance"
	xmlns="http://java.sun.com/xml/ns/javaee"
	xsi:schemaLocation="http://java.sun.com/xml/ns/javaee
http://java.sun.com/xml/ns/javaee/web-app_2_5.xsd"
	version="2.5">
	<!-- 加载 spring 容器 -->
	<context-param>
		<param-name>contextConfigLocation</param-name>
		<param-value>classpath:applicationContext*.xml</param-value>
	</context-param>
	<listener>
		<listener-class>org.springframework.web.context.ContextLoaderListener</listener-class>
	</listener>
</web-app>
(3 )创建业务接口
创建包 com.zhouqing.service,用于存放业务接口,创建接口
package com.zhouqing.service;
/**
 * 业务接口
 * @author wuhui
 *
 */
public interface UserService {
	public String getName();

}
(4 )创建业务实现类
创建包 com.zhouqing.service.Impl ,用于存放业务实现类。创建业务实现类:
package com.zhouqing.service.Impl;

import com.alibaba.dubbo.config.annotation.Service;
import com.zhouqing.service.UserService;
/**
 * 业务实现类
 * @author wuhui
 *
 */
@Service
public class UserServiceIml implements UserService {

	@Override
	public String getName() {

		return "wuhui";
	}

}
注意:Service 注解与原来不同,需要引入 com.alibaba 包下的
(5 )编写配置文件
在 src/main/resources 下创建 applicationContext-service.xml ,内容如下:
<?xml version="1.0" encoding="UTF-8"?>
<beans xmlns="http://www.springframework.org/schema/beans"
xmlns:xsi="http://www.w3.org/2001/XMLSchema-instance" xmlns:p="http://www.springframework.org/schema/p"
xmlns:context="http://www.springframework.org/schema/context"
xmlns:dubbo="http://code.alibabatech.com/schema/dubbo" xmlns:mvc="http://www.springframework.org/schema/mvc"
xsi:schemaLocation="http://www.springframework.org/schema/beans
http://www.springframework.org/schema/beans/spring-beans.xsd
http://www.springframework.org/schema/mvc
http://www.springframework.org/schema/mvc/spring-mvc.xsd
http://code.alibabatech.com/schema/dubbo
http://code.alibabatech.com/schema/dubbo/dubbo.xsd
http://www.springframework.org/schema/context
http://www.springframework.org/schema/context/spring-context.xsd">
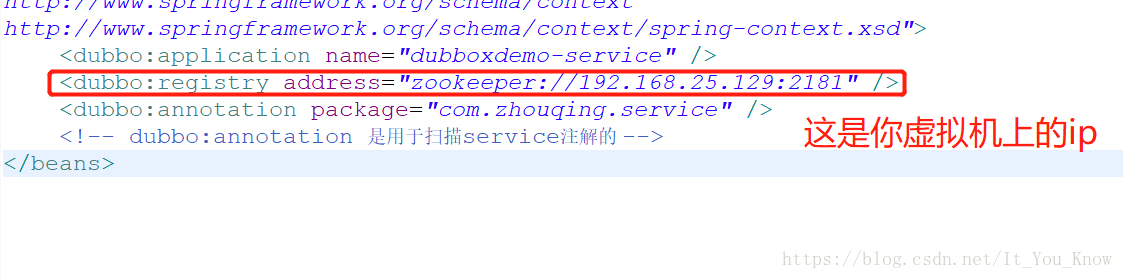
<dubbo:application name="dubboxdemo-service" />
<dubbo:registry address="zookeeper://192.168.25.129:2181" />
<dubbo:annotation package="com.zhouqing.service" />
<!-- dubbo:annotation 是用于扫描service注解的 -->
</beans>注意:
(6 )测试运行
tomcat7:run
服务消费者:
开发步骤:
第二步:
(1 )创建 Maven 工程(WAR) )dubboxdemo-web ,在 pom.xml 引入依赖 ,同“dubboxdemo-
service”工程。区别就是把 tomcat 插件的运行端口改为 8082 。
(2 )在 webapps 目录下创建 WEB-INF 目录,并创建 web.xml
<?xml version="1.0" encoding="UTF-8"?>
<web-app xmlns:xsi="http://www.w3.org/2001/XMLSchema-instance"
	xmlns="http://java.sun.com/xml/ns/javaee"
	xsi:schemaLocation="http://java.sun.com/xml/ns/javaee
http://java.sun.com/xml/ns/javaee/web-app_2_5.xsd"
	version="2.5">
	<!-- 解决 post 乱码 -->
	<filter>
		<filter-name>CharacterEncodingFilter</filter-name>
		<!-- <filter- class> org.springframework.web.filter.CharacterEncodingFilter
			</filter-class> -->
		<filter-class>org.springframework.web.filter.CharacterEncodingFilter</filter-class>
		<init-param>
			<param-name>encoding</param-name>
			<param-value>utf-8</param-value>
		</init-param>
		<init-param>
			<param-name>forceEncoding</param-name>
			<param-value>true</param-value>
		</init-param>
	</filter>
	<filter-mapping>
		<filter-name>CharacterEncodingFilter</filter-name>
		<url-pattern>/*</url-pattern>
	</filter-mapping>
	<servlet>
		<servlet-name>springmvc</servlet-name>
		<servlet-class>
			org.springframework.web.servlet.DispatcherServlet
		</servlet-class>
			<!-- 指定加载的配置文件 ,通过参数 contextConfigLocation 加载 -->
			<init-param>
				<param-name>contextConfigLocation</param-name>
				<param-value>classpath:applicationContext-web.xml</param-value>
			</init-param>
	</servlet>
	<servlet-mapping>
		<servlet-name>springmvc</servlet-name>
		<url-pattern>*.do</url-pattern>
	</servlet-mapping>
</web-app>
(3 )拷贝业务接口
将“dubboxdemo-service”工程的 com.zhouqing.service 包以及下面的接口拷贝至此
工程。
(4)编写 Controller
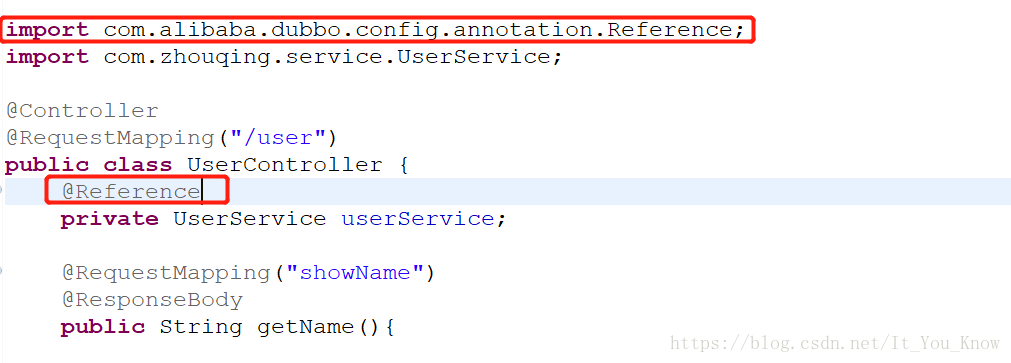
package com.zhouqing.Controller;

import org.springframework.stereotype.Controller;
import org.springframework.web.bind.annotation.RequestMapping;
import org.springframework.web.bind.annotation.ResponseBody;

import com.alibaba.dubbo.config.annotation.Reference;
import com.zhouqing.service.UserService;

@Controller
@RequestMapping("/user")
public class UserController {
	@Reference
	private UserService userService;

	@RequestMapping("showName")
	@ResponseBody
	public String getName(){


		return userService.getName();


	}

}
注意:这里使用的注解是@Reference,
(5 )编写 spring 配置文件
在 src/main/resources 下创建 applicationContext-web.xml
<?xml version="1.0" encoding="UTF-8"?>
<beans xmlns="http://www.springframework.org/schema/beans"
	xmlns:xsi="http://www.w3.org/2001/XMLSchema-instance" xmlns:p="http://www.springframework.org/schema/p"
	xmlns:context="http://www.springframework.org/schema/context"
	xmlns:dubbo="http://code.alibabatech.com/schema/dubbo" xmlns:mvc="http://www.springframework.org/schema/mvc"
	xsi:schemaLocation="http://www.springframework.org/schema/beans
http://www.springframework.org/schema/beans/spring-beans.xsd
http://www.springframework.org/schema/mvc
http://www.springframework.org/schema/mvc/spring-mvc.xsd
http://code.alibabatech.com/schema/dubbo
http://code.alibabatech.com/schema/dubbo/dubbo.xsd
http://www.springframework.org/schema/context
http://www.springframework.org/schema/context/spring-context.xsd">
	<mvc:annotation-driven>
		<mvc:message-converters register-defaults="false">
			<bean class="org.springframework.http.converter.StringHttpMessageConverter">
				<constructor-arg value="UTF-8" />
			</bean>
		</mvc:message-converters>
	</mvc:annotation-driven>
	<!-- 引用 dubbo 服务 -->
	<dubbo:application name="dubboxdemo-web" />
	<dubbo:registry address="zookeeper://192.168.25.129:2181" />
	<dubbo:annotation package="com.zhouqing.Controller" />
</beans>
(6 )测试运行(注意:在测试时,需要启动zookeeper服务,如果没有安装虚拟机或者zookeeper,请看我以前的博客安装)
tomcat7:run
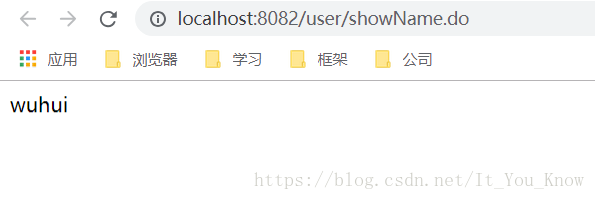
在浏览器输入 http://localhost:8082/user/showName.do,查看浏览器输出结果