为什么要自定义application context
在学习spring容器初始化的过程中,发现spring容器预留了一些扩展点,我们可以写子类来做功能扩展,例如AbstractApplicationContext类的initPropertySources、postProcessBeanFactory、onRefresh等方法都是空方法,留给子类来扩展用;
在传统spring框架下的扩展方式
传统的spring框架下使用哪个ApplicationContext实现类,是自己写代码来指定的,下面是基于spring框架的应用的启动代码:
public static void main(String[] args) {
        ClassPathXmlApplicationContext context = new ClassPathXmlApplicationContext("classpath:applicationContext.xml");
        Simple bean = context.getBean(Simple.class);
        bean.execute();
        context.close();
    }
如果我们要用自定的ApplicationContext实现类,只要将上面的ClassPathXmlApplicationContext改成我们做的类即可;
探寻SpringBoot框架下的扩展方式
先看一段代码,以下是一个SpringBoot应用启动的代码:
@SpringBootApplication
public class CustomizeapplicationcontextApplication {
public static void main(String[] args) {
SpringApplication springApplication = new SpringApplication(CustomizeapplicationcontextApplication.class);
springApplication.run(args);
}
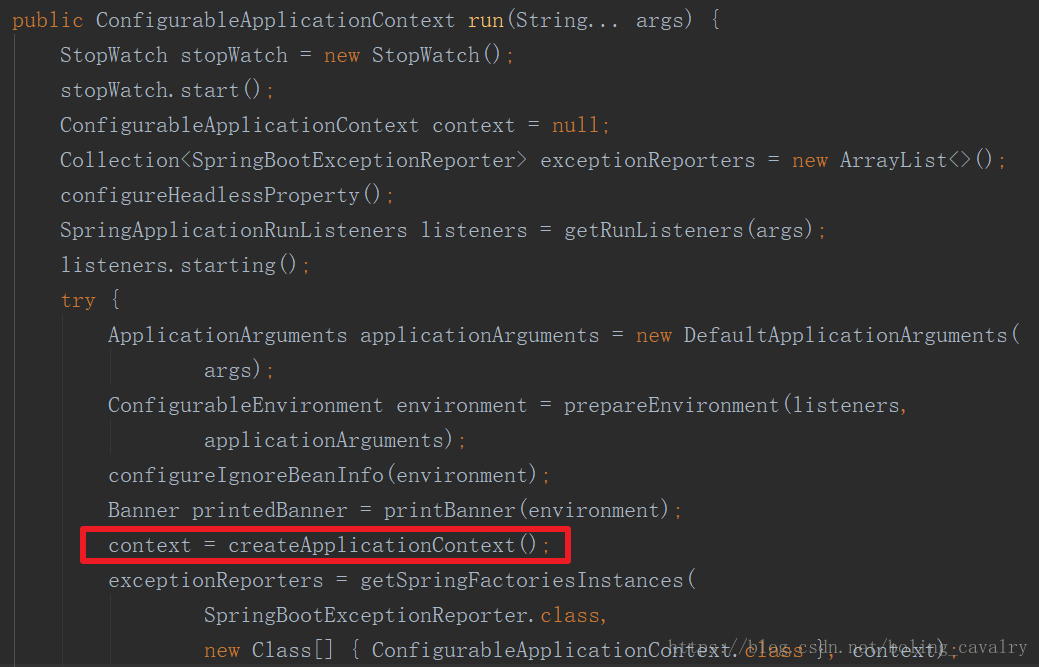
}从上述代码可知,我们需要去查看SpingApplication的run方法源码,那里应该有ApplicationContext初始化相关的信息,在SpingApplication的run方法中,果然找到了有用信息,如下图红框所示,是createApplicationContext方法创建了ApplicationContext实现类:
去看看createApplicationContext方法,如下图:

上图中有两点需要注意:
1. 红框中显示,ApplicationContext实现类来自成员变量applicationContextClass,只要我们能设置成员变量applicationContextClass,就达到了目的:在应用中使用自定义的ApplicationContext实现类;
2. 绿框中显示,如果没有设置成员变量applicationContextClass,就把AnnotationConfigServletWebServerApplicationContext作为ApplicationContext实现类,用在spring环境中,所以,我们在自定义ApplicationContext实现类时,用AnnotationConfigServletWebServerApplicationContext作为父类最合适(除了我们自己扩展的东西,其他部分都和默认的保持一致);
如何设置自定义的ApplicationContext实现类
从createApplicationContext方法可以看出,设置了成员变量applicationContextClass,就达到了使用自定义ApplicationContext实现类的目的,那么如何设置成员变量applicationContextClass呢?就在下面这个setApplicationContextClass方法:
public void setApplicationContextClass(
            Class<? extends ConfigurableApplicationContext> applicationContextClass) {
        this.applicationContextClass = applicationContextClass;
        if (!isWebApplicationContext(applicationContextClass)) {
            this.webApplicationType = WebApplicationType.NONE;
        }
    }
我们只要在启动应用的时候,在调用springApplication的run方法之前先调用setApplicationContextClass方法就能指定ApplicationContext实现类了;
分析到此,您是否和我一样有疑虑:setApplicationContextClass方法会不会被在其他地方被调用,导致我们的设置无效呢?通过以下两种方法来检查:
1. 在IntelliJ IDEA中,通过”Find Usages”的方式查找该方法被调用的地方,结果只发现了一处SpringBootServletInitializer类的onStartup方法,这是war包形式的应用在配置Initializer的时候才会用到,main方法启动的方式中不会用到;
2. 在setApplicationContextClass方法中打断点,debug启动应用,确认不会走进来;
实战使用自定义的ApplicationContext实现类
理论分析完毕,可以实战验证了:
1. 基于maven创建一个SpringBoot的web应用,pom.xml如下:
<?xml version="1.0" encoding="UTF-8"?>
<project xmlns="http://maven.apache.org/POM/4.0.0" xmlns:xsi="http://www.w3.org/2001/XMLSchema-instance"
    xsi:schemaLocation="http://maven.apache.org/POM/4.0.0 http://maven.apache.org/xsd/maven-4.0.0.xsd">
    <modelVersion>4.0.0</modelVersion>

    <groupId>com.bolingcavalry</groupId>
    <artifactId>customizeapplicationcontext</artifactId>
    <version>0.0.1-SNAPSHOT</version>
    <packaging>jar</packaging>

    <name>customizeapplicationcontext</name>
    <description>Demo project for Spring Boot</description>

    <parent>
        <groupId>org.springframework.boot</groupId>
        <artifactId>spring-boot-starter-parent</artifactId>
        <version>2.0.4.RELEASE</version>
        <relativePath/> <!-- lookup parent from repository -->
    </parent>

    <properties>
        <project.build.sourceEncoding>UTF-8</project.build.sourceEncoding>
        <project.reporting.outputEncoding>UTF-8</project.reporting.outputEncoding>
        <java.version>1.8</java.version>
    </properties>

    <dependencies>
        <dependency>
            <groupId>org.springframework.boot</groupId>
            <artifactId>spring-boot-starter-web</artifactId>
        </dependency>

        <dependency>
            <groupId>org.springframework.boot</groupId>
            <artifactId>spring-boot-starter-test</artifactId>
            <scope>test</scope>
        </dependency>
    </dependencies>

    <build>
        <plugins>
            <plugin>
                <groupId>org.springframework.boot</groupId>
                <artifactId>spring-boot-maven-plugin</artifactId>
            </plugin>
        </plugins>
    </build>
</project>
2. 创建类CustomizeApplicationContext,继承自AnnotationConfigServletWebServerApplicationContext,重写了父类的几个方法,如下:
package com.bolingcavalry.customizeapplicationcontext;

import org.apache.commons.logging.Log;
import org.apache.commons.logging.LogFactory;
import org.springframework.beans.factory.config.ConfigurableListableBeanFactory;
import org.springframework.boot.web.servlet.context.AnnotationConfigServletWebServerApplicationContext;

/**
 * @Description : 自定义的ApplicationContext实现类
 * @Author : [email protected]
 * @Date : 2018-08-11 17:12
 */
public class CustomizeApplicationContext extends AnnotationConfigServletWebServerApplicationContext {

    Log logger = LogFactory.getLog(CustomizeApplicationContext.class);

    @Override
    protected void initPropertySources() {
        super.initPropertySources();
        logger.info("execute override initPropertySources");
    }

    @Override
    protected void postProcessBeanFactory(ConfigurableListableBeanFactory beanFactory) {
        super.postProcessBeanFactory(beanFactory);
        logger.info("execute override postProcessBeanFactory");
    }

    @Override
    protected void onRefresh() {
        super.onRefresh();
        logger.info("execute override onRefresh");
    }
}
3. 启动类CustomizeapplicationcontextApplication的main方法中,调用setApplicationContextClass方法,将ApplicationContext实现类设置为CustomizeApplicationContext:
package com.bolingcavalry.customizeapplicationcontext;

import org.springframework.boot.SpringApplication;
import org.springframework.boot.autoconfigure.SpringBootApplication;

@SpringBootApplication
public class CustomizeapplicationcontextApplication {

    public static void main(String[] args) {
        SpringApplication springApplication = new SpringApplication(CustomizeapplicationcontextApplication.class);
        springApplication.setApplicationContextClass(CustomizeApplicationContext.class);
        springApplication.run(args);
    }
}
4. 启动应用,查看日志如下,CustomizeApplicationContext中重写的方法都被执行了,并且initPropertySources被执行了两次,那是因为除了AbstractApplicationContext类中有调用,在ServletWebServerApplicationContext类的onRefresh中会执行createWebServer方法,而createWebServer方法中也会调用一次initPropertySources方法:
2018-08-11 17:21:18.833  INFO 5132 --- [           main] c.CustomizeapplicationcontextApplication : Starting CustomizeapplicationcontextApplication on zhaoqinwin10 with PID 5132 (D:\temp\201808\09\customizeapplicationcontext\target\classes started by 12167 in D:\temp\201808\09\customizeapplicationcontext)
2018-08-11 17:21:18.840  INFO 5132 --- [           main] c.CustomizeapplicationcontextApplication : No active profile set, falling back to default profiles: default
2018-08-11 17:21:18.957  INFO 5132 --- [           main] c.b.c.CustomizeApplicationContext        : Refreshing com.bolingcavalry.customizeapplicationcontext.CustomizeApplicationContext@5906ebcb: startup date [Sat Aug 11 17:21:18 CST 2018]; root of context hierarchy
2018-08-11 17:21:18.958  INFO 5132 --- [           main] c.b.c.CustomizeApplicationContext        : execute override initPropertySources
2018-08-11 17:21:18.967  INFO 5132 --- [           main] c.b.c.CustomizeApplicationContext        : execute override postProcessBeanFactory
2018-08-11 17:21:20.085  INFO 5132 --- [           main] o.s.b.w.embedded.tomcat.TomcatWebServer  : Tomcat initialized with port(s): 8080 (http)
2018-08-11 17:21:20.102  INFO 5132 --- [           main] o.apache.catalina.core.StandardService   : Starting service [Tomcat]
2018-08-11 17:21:20.103  INFO 5132 --- [           main] org.apache.catalina.core.StandardEngine  : Starting Servlet Engine: Apache Tomcat/8.5.32
2018-08-11 17:21:20.106  INFO 5132 --- [ost-startStop-1] o.a.catalina.core.AprLifecycleListener   : The APR based Apache Tomcat Native library which allows optimal performance in production environments was not found on the java.library.path: [C:\jdk\bin;C:\WINDOWS\Sun\Java\bin;C:\WINDOWS\system32;C:\WINDOWS;C:\ProgramData\Oracle\Java\javapath;C:\Program Files (x86)\Intel\iCLS Client\;C:\Program Files\Intel\iCLS Client\;C:\Windows\system32;C:\Windows;C:\Windows\System32\Wbem;C:\Windows\System32\WindowsPowerShell\v1.0\;C:\Program Files (x86)\Intel\Intel(R) Management Engine Components\DAL;C:\Program Files\Intel\Intel(R) Management Engine Components\DAL;C:\Program Files (x86)\Intel\Intel(R) Management Engine Components\IPT;C:\Program Files\Intel\Intel(R) Management Engine Components\IPT;C:\Program Files (x86)\NVIDIA Corporation\PhysX\Common;C:\Program Files\Intel\WiFi\bin\;C:\Program Files\Common Files\Intel\WirelessCommon\;C:\software\apache-maven-3.3.3\bin\;C:\software\Git\bin;E:\work\dubbo\zookeeper-3.3.6/bin;E:\work\dubbo\zookeeper-3.3.6/conf;D:\soft\gradle-1.1\bin;C:\jdk\bin;C:\software\svn\bin;D:\software\AndroidSdk\platform-tools;D:\software\calibre\;D:\software\gradle-2.14.1\bin;C:\WINDOWS\system32;C:\WINDOWS;C:\WINDOWS\System32\Wbem;C:\WINDOWS\System32\WindowsPowerShell\v1.0\;C:\Program Files\Git\cmd;C:\Users\12167\AppData\Local\Microsoft\WindowsApps;C:\Users\12167\AppData\Local\Programs\Fiddler;%USERPROFILE%\AppData\Local\Microsoft\WindowsApps;.]
2018-08-11 17:21:20.226  INFO 5132 --- [ost-startStop-1] o.a.c.c.C.[Tomcat].[localhost].[/]       : Initializing Spring embedded WebApplicationContext
2018-08-11 17:21:20.227  INFO 5132 --- [ost-startStop-1] o.s.web.context.ContextLoader            : Root WebApplicationContext: initialization completed in 1273 ms
2018-08-11 17:21:20.305  INFO 5132 --- [ost-startStop-1] o.s.b.w.servlet.ServletRegistrationBean  : Servlet dispatcherServlet mapped to [/]
2018-08-11 17:21:20.310  INFO 5132 --- [ost-startStop-1] o.s.b.w.servlet.FilterRegistrationBean   : Mapping filter: 'characterEncodingFilter' to: [/*]
2018-08-11 17:21:20.310  INFO 5132 --- [ost-startStop-1] o.s.b.w.servlet.FilterRegistrationBean   : Mapping filter: 'hiddenHttpMethodFilter' to: [/*]
2018-08-11 17:21:20.310  INFO 5132 --- [ost-startStop-1] o.s.b.w.servlet.FilterRegistrationBean   : Mapping filter: 'httpPutFormContentFilter' to: [/*]
2018-08-11 17:21:20.310  INFO 5132 --- [ost-startStop-1] o.s.b.w.servlet.FilterRegistrationBean   : Mapping filter: 'requestContextFilter' to: [/*]
2018-08-11 17:21:20.330  INFO 5132 --- [           main] c.b.c.CustomizeApplicationContext        : execute override initPropertySources
2018-08-11 17:21:20.330  INFO 5132 --- [           main] c.b.c.CustomizeApplicationContext        : execute override onRefresh
实战源码下载
本章实战的源码可以在github下载,地址和链接信息如下表所示:
| 名称 | 链接 | 备注 |
|---|---|---|
| 项目主页 | https://github.com/zq2599/blog_demos | 该项目在GitHub上的主页 |
| git仓库地址(https) | https://github.com/zq2599/blog_demos.git | 该项目源码的仓库地址,https协议 |
| git仓库地址(ssh) | [email protected]:zq2599/blog_demos.git | 该项目源码的仓库地址,ssh协议 |
这个git项目中有多个文件夹,本章源码在文件夹customizeapplicationcontext下,如下图红框所示:

至此,我们通过查看SpringApplication的源码,搞清楚了spring环境的ApplicationContext实现类在SpringBoot框架下如何指定,也做了一次简单的自定义实战,今后在研究和学习spring过程中,如果需要扩展spring容器就能在SpringBoot环境下进行了,相比传统的war包部署、以及指定多个jar包的classpath等操作,springboot应用的单个jar包更方便省事。