一、用@Resource注解完成属性装配
前面我们讲过spring的依赖注入有两种方式:
- 使用构造器注入。
- 使用属性setter方法注入。
但其实还有一种注入方式,我们没讲,那就是使用Field注入(用于注解方式)。在详细讲解这种方式之前,我们还须知道以下的知识点。
注入依赖对象可以采用手工装配或自动装配,在实际应用中建议使用手工装配,因为自动装配会产生未知情况,开发人员无法预见最终的装配结果。
手工装配依赖对象,在这种方式中又有两种编程方式:
在xml配置文件中,通过在bean节点下配置,如:
<bean id="personService" class="cn.itcast.service.impl.PersonServiceBean">
        <constructor-arg index="0" type="java.lang.String" value="xxx" /> // 构造器注入
        <property name="name" value="zhao" /> // 属性setter方法注入
</bean><context:annotation-config/>这个配置隐式注册了多个对注解进行解析处理的处理器:
- AutowiredAnnotationBeanPostProcessor
- CommonAnnotationBeanPostProcessor
- PersistenceAnnotationBeanPostProcessor
- RequiredAnnotationBeanPostProcessor
接下来我们就来讲解用@Resource注解如何完成属性注入。首先新建一个普通的Java Project,名称为spring_anno,并迅速搭建好spring的开发环境。
接着在src目录下新建一个cn.itcast.dao包,并在该包下创建PersonDao接口,其代码为:
public interface PersonDao {

    void add();

}
紧接着在src目录下新建一个cn.itcast.dao.impl包,并在该包下创建PersonDao接口的实现类——PersonDaoBean.java,其代码为:
public class PersonDaoBean implements PersonDao {
    @Override
    public void add() {
        System.out.println("执行PersonDaoBean中的add()方法");
    }
}
接下来在src目录下新建一个cn.itcast.service包,并在该包下创建PersonService接口,其代码为:
public interface PersonService {

    void save();

}
紧接着仍在src目录下新建一个cn.itcast.service.impl包,并在该包下创建PersonService接口的实现类——PersonServiceBean.java,其代码为:
public class PersonServiceBean implements PersonService {
    private PersonDao personDao;
    private String name;

    public PersonServiceBean() {}

    public PersonServiceBean(PersonDao personDao, String name) {
        this.personDao = personDao;
        this.name = name;
    }

    @Override
    public void save() {
        System.out.println(name);
        personDao.add();
    }
}
在java代码中使用@Autowired或@Resource注解方式进行装配,这两个注解的区别是:@Autowired默认按类型装配,@Resource默认按名称装配,当找不到与名称匹配的bean才会按类型装配。在本文中我们将关注点着重放在@Resource注解上。
@Resource注解和@Autowired一样,同样也可以标注在字段或属性的setter方法上,但它默认按名称装配。名称可以通过@Resource的name属性指定,如果没有指定name属性,当注解标注在字段上时,即默认取字段的名称作为bean名称寻找依赖对象,当注解标注在属性的setter方法上时,即默认取属性名作为bean名称寻找依赖对象。如:

@Resource(name="personDaoBean")
private PersonDao personDao; // 用于字段上

@Resource
public void setPersonDao(PersonDao personDao) { // 用于属性的setter方法上
    this.personDao = personDao;
}
注意:如果没有指定name属性,并且按照默认的名称仍然找不到依赖对象时, @Resource注解会回退到按类型装配。但一旦指定了name属性,就只能按名称装配了。
我们首先将@Resource注解用在字段上,修改PersonServiceBean类的代码如下:
public class PersonServiceBean implements PersonService {
    @Resource private PersonDao personDao;
    private String name;

    public PersonServiceBean() {}

    public PersonServiceBean(PersonDao personDao, String name) {
        this.personDao = personDao;
        this.name = name;
    }

    @Override
    public void save() {
        // System.out.println(name);
        personDao.add();
    }
}
注意:当我们使用注解方式注入属性时,一定要往项目中导入spring-aop-4.2.5.RELEASE.jar包,不然就会报异常。
接下来,我们就要将Spring的配置文件——beans的内容置为:
<?xml version="1.0" encoding="UTF-8"?>
<beans xmlns="http://www.springframework.org/schema/beans"
    xmlns:xsi="http://www.w3.org/2001/XMLSchema-instance"
    xmlns:context="http://www.springframework.org/schema/context"
    xsi:schemaLocation="http://www.springframework.org/schema/beans
        http://www.springframework.org/schema/beans/spring-beans.xsd
        http://www.springframework.org/schema/context
        http://www.springframework.org/schema/context/spring-context-4.2.xsd">

    <context:annotation-config/>

    <bean id="personDao" class="cn.itcast.dao.impl.PersonDaoBean"></bean>
    <bean id="personService" class="cn.itcast.service.impl.PersonServiceBean"></bean>
</beans>
最后,在src目录下新建一个junit.test包,并在该包下新建一个单元测试类——SpringTest.java,其代码为:
public class SpringTest {

    @Test
    public void instanceSpring() {
        AbstractApplicationContext ctx = new ClassPathXmlApplicationContext("beans.xml");
        PersonService personService = (PersonService) ctx.getBean("personService");
        personService.save();
        ctx.close();
    }

}
测试instanceSpring()方法,可发现Eclipse控制台打印:

若我们将Spring的配置文件中的
<bean id="personDao" class="cn.itcast.dao.impl.PersonDaoBean"></bean>改为:
<bean id="personDaoxxxx" class="cn.itcast.dao.impl.PersonDaoBean"></bean>再次测试instanceSpring()方法,仍可发现Eclipse控制台打印:

并没有异常发生。
我们也可通过@Resource的name属性指定名称,告诉@Resource按名称注入,如将PersonServiceBean类中的字段
@Resource private PersonDao personDao;修改为:
@Resource(name="personDaoxxxx") private PersonDao personDao;紧接着测试instanceSpring()方法,仍可发现Eclipse控制台打印:

当然了,我们也可以将@Resource注解用在属性的setter方法上,如将PersonServiceBean类的代码修改为:
public class PersonServiceBean implements PersonService {
    private PersonDao personDao;
    private String name;

    @Resource
    public void setPersonDao(PersonDao personDao) {
        this.personDao = personDao;
    }

    public PersonServiceBean() {}

    public PersonServiceBean(PersonDao personDao, String name) {
        this.personDao = personDao;
        this.name = name;
    }

    @Override
    public void save() {
        // System.out.println(name);
        personDao.add();
    }
}
测试instanceSpring()方法,仍可发现Eclipse控制台打印:

二、编码剖析@Resource注解的实现原理
上文我们已经学会使用@Resource注解注入属性。学是学会了,但也仅限于会使用而已,故我们要深入剖析其内部原理,才算真正明白。接下来我们就来编码剖析@Resource注解的实现原理,但这都是建立在用@Resource注解完成属性装配的案例基础上的。
由于我们要使用dom4j工具来读取Sping的配置文件——beans.xml,所以需要将dom4j所需的jar包导入项目中。dom4j所需的jar包为:
- dom4j-1.6.1.jar
- jaxen-1.1-beta-6.jar
使用dom4j工具读取到诸如
<bean id="personService" class="cn.itcast.service.impl.PersonServiceBean">
    ...
</bean>
这样的内容时,务必需要将读取到的bean的信息存到一个JavaBean对象中。于是我们可在junit.test包下创建这样一个JavaBean——BeanDefinition.Java,其代码为:
/**
 * 将读取到的bean的信息存到一个JavaBean对象中
 *
 */
public class BeanDefinition {
    private String id;
    private String className;
    private List<PropertyDefinition> propertys = new ArrayList<PropertyDefinition>();

    public BeanDefinition(String id, String className) {
        this.id = id;
        this.className = className;
    }
    public String getId() {
        return id;
    }
    public void setId(String id) {
        this.id = id;
    }
    public String getClassName() {
        return className;
    }
    public void setClassName(String className) {
        this.className = className;
    }
    public List<PropertyDefinition> getPropertys() {
        return propertys;
    }
    public void setPropertys(List<PropertyDefinition> propertys) {
        this.propertys = propertys;
    }
}接着,我们还要在junit.test包下新建一个JavaBean——PropertyDefinition.java,该JavaBean专门用于存放<property ...>的信息,其代码如下:
/**
* 该JavaBean专门用户存放<property>的信息
*
*/
public class PropertyDefinition {
private String name;
private String ref;
private String value;
public String getValue() {
return value;
}
public void setValue(String value) {
this.value = value;
}
public PropertyDefinition(String name, String ref, String value) {
this.name = name;
this.ref = ref;
this.value = value;
}
public String getName() {
return name;
}
public void setName(String name) {
this.name = name;
}
public String getRef() {
return ref;
}
public void setRef(String ref) {
this.ref = ref;
}
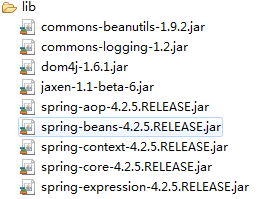
}我们模拟Spring容器注入基本类型属性时,须将本身为字符串的值转成相应的属性类型的值,所以就要用到commons-beanutils工具,即要将commons-beanutils-1.9.2.jar包导入到项目中去。这样,项目中共须jar包有:
接下来,我们在junit.test包中新建一个注解类——ItcastResource.java,其代码如下:
@Retention(RetentionPolicy.RUNTIME)
@Target({ElementType.FIELD, ElementType.METHOD})
public @interface ItcastResource {
    public String name() default "";
}
以上所有事情做好之后,我们就要对传智播客版的Spring容器修修改改了,即将ItcastClassPathXMLApplicationContext类的代码修改为:
/**
 * 传智播客版Spring容器
 *
 */
public class ItcastClassPathXMLApplicationContext {
    private List<BeanDefinition> beanDefines = new ArrayList<BeanDefinition>();
    private Map<String, Object> sigletons = new HashMap<String, Object>();

    public ItcastClassPathXMLApplicationContext(String filename) {
        this.readXML(filename);
        this.instanceBeans();
        this.injectObject();
        this.annotationInject();
    }

    private void annotationInject() {
        for (String beanName : sigletons.keySet()) {
            Object bean = sigletons.get(beanName);
            if (bean != null) {
                try {
                    PropertyDescriptor[] ps = Introspector.getBeanInfo(bean.getClass()).getPropertyDescriptors();
                    for (PropertyDescriptor propertyDesc : ps) {
                        Method setter = propertyDesc.getWriteMethod(); // 获取属性的setter方法
                        if (setter != null && setter.isAnnotationPresent(ItcastResource.class)) { // setter方法存在注解
                            ItcastResource resource = setter.getAnnotation(ItcastResource.class);
                            Object value = null;
                            if (resource.name() != null && !"".equals(resource.name())) { // 指定了注解的name属性
                                value = sigletons.get(resource.name());
                            } else {
                                value = sigletons.get(propertyDesc.getName());
                                if (value == null) {
                                    for (String key : sigletons.keySet()) {
                                        // isAssignableFrom(xxx)方法判断propertyDesc.getPropertyType()获得的类型是否是xxx的接口或父类,或者是xxx本身
                                        if (propertyDesc.getPropertyType().isAssignableFrom(sigletons.get(key).getClass())) {
                                            value = sigletons.get(key);
                                            break;
                                        }
                                    }
                                }
                            }
                            setter.setAccessible(true); // 允许访问私有的setter方法
                            setter.invoke(bean, value); // 把引用对象注入到属性中
                        }
                    }
                    Field[] fields = bean.getClass().getDeclaredFields();
                    for (Field field : fields) {
                        if (field.isAnnotationPresent(ItcastResource.class)) {
                            ItcastResource resource = field.getAnnotation(ItcastResource.class);
                            Object value = null;
                            if (resource.name() != null && !"".equals(resource.name())) { // 指定了注解的name属性
                                value = sigletons.get(resource.name());
                            } else {
                                value = sigletons.get(field.getName());
                                if (value == null) {
                                    for (String key : sigletons.keySet()) {
                                        // isAssignableFrom(xxx)方法判断field.getPropertyType()获得的类型是否是xxx的接口或父类,或者是xxx本身
                                        if (field.getType().isAssignableFrom(sigletons.get(key).getClass())) {
                                            value = sigletons.get(key);
                                            break;
                                        }
                                    }
                                }
                            }
                            field.setAccessible(true); // 允许访问private字段
                            field.set(bean, value);
                        }
                    }

                } catch (Exception e) {
                    e.printStackTrace();
                }
            }
        }
    }

    /**
     * 为bean对象的属性(依赖)注入值
     */
    private void injectObject() {
        for (BeanDefinition beanDefinition : beanDefines) {
            Object bean = sigletons.get(beanDefinition.getId());
            if (bean != null) {
                try {
                    PropertyDescriptor[] ps = Introspector.getBeanInfo(bean.getClass()).getPropertyDescriptors();
                    for (PropertyDefinition propertyDefinition : beanDefinition.getPropertys()) {
                        for (PropertyDescriptor propertyDesc : ps) {
                            if (propertyDefinition.getName().equals(propertyDesc.getName())) {
                                Method setter = propertyDesc.getWriteMethod(); // 获取属性的setter方法,private
                                if (setter != null) { // 最好判断有无setter方法,因为属性可以没有setter方法
                                    /*
                                    Object value = sigletons.get(propertyDefinition.getRef());
                                    setter.setAccessible(true); // 允许访问私有的setter方法
                                    setter.invoke(bean, value); // 把引用对象注入到属性中
                                    */

                                    Object value = null;
                                    if (propertyDefinition.getRef() != null && !"".equals(propertyDefinition.getRef().trim()) ) {
                                        value = sigletons.get(propertyDefinition.getRef());
                                    } else { // 注入基本类型
                                        value = ConvertUtils.convert(propertyDefinition.getValue(), propertyDesc.getPropertyType()); // 把本身为字符串的值转成相应的属性类型的值
                                    }
                                    setter.setAccessible(true); // 允许访问私有的setter方法
                                    setter.invoke(bean, value); // 把引用对象注入到属性中
                                }
                                break;
                            }
                        }
                    }
                } catch (Exception e) {
                    e.printStackTrace();
                }

            }
        }
    }

    /**
     * 完成bean的实例化
     */
    private void instanceBeans() {
        for (BeanDefinition beanDefinition : beanDefines) {
            try {
                if (beanDefinition.getClassName() != null && !"".equals(beanDefinition.getClassName().trim())) {
                    sigletons.put(beanDefinition.getId(), Class.forName(beanDefinition.getClassName()).newInstance());
                }
            } catch (Exception e) {
                e.printStackTrace();
            }
        }
    }

    /**
     * 读取xml配置文件
     * @param filename
     */
    private void readXML(String filename) {
        SAXReader saxReader = new SAXReader();
        Document document = null;
        try {
            URL xmlpath = this.getClass().getClassLoader().getResource(filename);
            document = saxReader.read(xmlpath);
            Map<String, String> nsMap = new HashMap<String, String>();
            nsMap.put("ns", "http://www.springframework.org/schema/beans");// 加入命名空间
            XPath xsub = document.createXPath("//ns:beans/ns:bean");// 创建beans/bean查询路径
            xsub.setNamespaceURIs(nsMap);// 设置命名空间
            List<Element> beans = xsub.selectNodes(document);// 获取文档下所有bean节点
            for (Element element : beans) {
                String id = element.attributeValue("id");// 获取id属性值
                String clazz = element.attributeValue("class"); // 获取class属性值
                BeanDefinition beanDefine = new BeanDefinition(id, clazz);

                XPath propertysub = element.createXPath("ns:property");
                propertysub.setNamespaceURIs(nsMap); // 设置命名空间
                List<Element> propertys = propertysub.selectNodes(element);
                for (Element property : propertys) {
                    String propertyName = property.attributeValue("name");
                    String propertyRef = property.attributeValue("ref");
                    // System.out.println(propertyName + "=" + propertyRef);

                    String propertyValue= property.attributeValue("value");

                    PropertyDefinition propertyDefinition = new PropertyDefinition(propertyName, propertyRef, propertyValue);
                    beanDefine.getPropertys().add(propertyDefinition);
                }

                beanDefines.add(beanDefine);
            }
        } catch (Exception e) {
            e.printStackTrace();
        }
    }

    /**
     * 获取bean实例
     * @param beanName
     * @return
     */
    public Object getBean(String beanName) {
        return this.sigletons.get(beanName);
    }
}
传智播客版Spring容器写好之后,我们就要试验一把了。首先将@ItcastResource注解使用在属性的setter方法上,如将PersonServiceBean类的代码修改为:
public class PersonServiceBean implements PersonService {
    private PersonDao personDao;
    private String name;

    @ItcastResource
    public void setPersonDao(PersonDao personDao) {
        this.personDao = personDao;
    }

    public PersonServiceBean() {}

    public PersonServiceBean(PersonDao personDao, String name) {
        this.personDao = personDao;
        this.name = name;
    }

    @Override
    public void save() {
        // System.out.println(name);
        personDao.add();
    }
}
接着我们将单元测试类——SpringTest.java的代码修改为:
public class SpringTest {

    @Test
    public void instanceSpring() {
        ItcastClassPathXMLApplicationContext ctx = new ItcastClassPathXMLApplicationContext("beans.xml");
        PersonService personService = (PersonService) ctx.getBean("personService");
        personService.save();
    }

}
测试instanceSpring()方法,可看到Eclipse控制台打印:

当然了,我们也可将@ItcastResource注解用在字段上,如将PersonServiceBean类的代码修改为:
public class PersonServiceBean implements PersonService {
    @ItcastResource private PersonDao personDao;
    private String name;

    public void setPersonDao(PersonDao personDao) {
        this.personDao = personDao;
    }

    public PersonServiceBean() {}

    public PersonServiceBean(PersonDao personDao, String name) {
        this.personDao = personDao;
        this.name = name;
    }

    @Override
    public void save() {
        // System.out.println(name);
        personDao.add();
    }
}
再次测试instanceSpring()方法,仍可看到Eclipse控制台打印:
