原文地址:https://blog.csdn.net/qq877507054/article/details/62039639
Axis下载地址: http://ws.apache.org/axis2/
在本文使用了目前Axis2的最新版本1.4.1。读者可以下载如下两个zip包:
axis2-1.4.1-bin.zip
axis2-1.4.1-war.zip
其中axis2-1.4.1-bin.zip文件中包含了Axis2中所有的jar文件, axis2-1.4.1-war.zip文件用于将WebService发布到Web容器中。
将axis2-1.4.1-war.zip文件解压到相应的目录,将目录中的axis2.war文件放到<Tomcat安装目录>\webapps目录中(本文使用的Tomcat的版本是6.x),并启动Tomcat。
在浏览器地址栏中输入如下的URL:
如果在浏览器中显示出如图1所示的页面,则表示Axis2安装成功。
一:与web项目的整合
① 新建一个动态的web工程 (Dynamic Web project)
本例中新建的工程名为:AxisWebDemo
② 将上次下载的 axis2-1.6.4-war.zip 文件解压到相应的目录,将目录中的axis2.war文件放到Tomcat服务器的webapps目录中(本文使用的Tomcat的版本是7.x),并启动Tomcat。 这时在Tomcat的webapps文件夹中会出现一个 名为 axis2 的文件夹(其实这就是部署好的 axis2工程),如下图

③ 将 axis2 下的 axis2-web 文件夹移动到我们 AxisWebDemo 工程的 WebContent目录下
将WEB-INF 下的 lib 、conf 、modules文件夹移动到 AxisWebDemo工程的 WEB-INF目录下 ,结构如下图:

④ 在src右键,新建package : com.elgin.webservice
在这个包中新建一个我们需要发布的 WebService 服务的类: WebServiceDemo
代码如下:
- package com.elgin.webservice;
- public class WebServiceDemo {
- public String sayHello(String name){
- return "hello " + name;
- }
- public int getAge(){
- return 26;
- }
- }
⑤ 在 AxisWebDemo 工程的 WEB-INF 下新建如下层次结构目录 : services/webservices/META-INF/services.xml ,如下图所示:
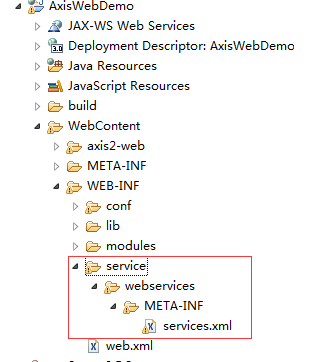
经过我的验证,发现:目录层次必须是 services / 任意名称文件夹 / META-INF / services.xml ,否则 WebService发布会失败 ,也就是说上图的层次中 ,只有webservice这个文件夹的名字是可以自由指定,其它的文件、文件夹名字都是固定的!
services.xml 配置文件内容:
- <?xml version="1.0" encoding="UTF-8"?>
- <serviceGroup>
- <!- name属性配置WebService的名称 ->
- <service name="myService">
- <description>Web Service</description>
- <!-- ServiceClass属性配置提供WebService服务类的全类名 -->
- <parameter name="ServiceClass">com.elgin.webservice.WebServiceDemo</parameter>
- <messageReceivers>
- <messageReceiver mep="http://www.w3.org/2004/08/wsdl/in-out" class="org.apache.axis2.rpc.receivers.RPCMessageReceiver" />
- <messageReceiver mep="http://www.w3.org/2004/08/wsdl/in-only" class="org.apache.axis2.rpc.receivers.RPCInOnlyMessageReceiver" />
- </messageReceivers>
- </service>
- </serviceGroup>
⑥ 在 AxisWebDemo 工程的 web.xml 文件中加入axis2的配置支持:
- <!-- 加入axis2支持 -->
- <servlet>
- <servlet-name>AxisServlet</servlet-name>
- <servlet-class>org.apache.axis2.transport.http.AxisServlet</servlet-class>
- <load-on-startup>1</load-on-startup>
- </servlet>
- <servlet-mapping>
- <servlet-name>AxisServlet</servlet-name>
- <url-pattern>/services/*</url-pattern>
- </servlet-mapping>
经过以上6个步骤 , axis2 已经整合到工程中了 ,把项目加入的Tomcat中,启动Tomcat服务器 ,在浏览器中输入以下URL:
http://localhost:8080/AxisWebDemo/services/listServices
如果出现下图所示的信息,说明你的 WebService服务发布成功了
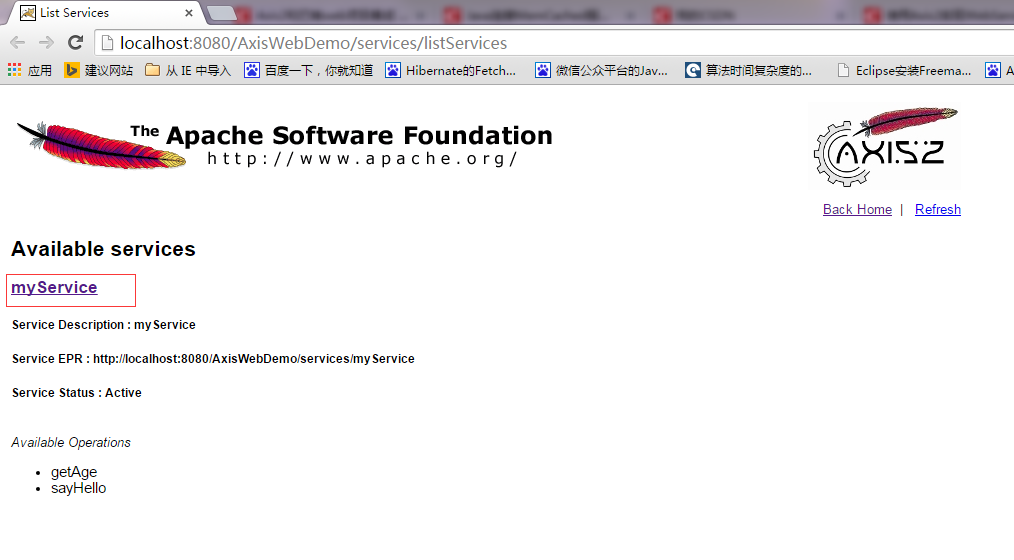
上图中的 myService 即是你在 services.xml 中配置的 WebService的名称
输入下面URL:
http://localhost:8080/AxisWebDemo/services/myService?wsdl
出现下图所显示的关于服务的xml信息:
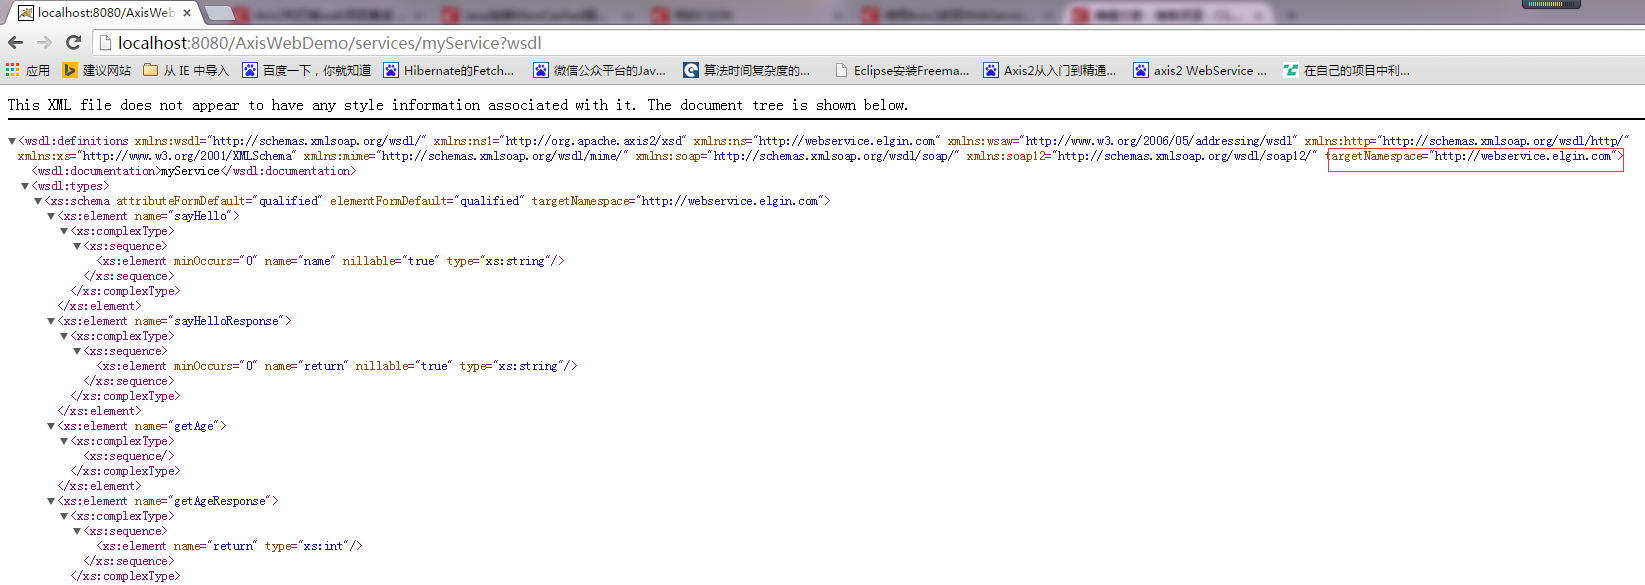
注意上图中 <wsdl:definitions> 元素中的 targetNamespace的值 ,上一篇介绍中也提到过 ,是提供WebService服务的类所在的包名倒过来。
三、调用上面工程中发布的WebService服务:
Java调用代码:
- package com.elgin.webservice.axis2;
- import java.io.File;
- import java.io.FileInputStream;
- import java.io.IOException;
- import javax.xml.namespace.QName;
- import org.apache.axis2.AxisFault;
- import org.apache.axis2.addressing.EndpointReference;
- import org.apache.axis2.client.Options;
- import org.apache.axis2.rpc.client.RPCServiceClient;
- public class RPCClient {
- public static String address2="http://localhost:8080/AxisWebDemo/services/myService?wsdl";
- public static void main(String[] args) throws IOException{
- testWebDemo();
- }
- @SuppressWarnings("rawtypes")
- public static Object[] invoke(String method,Object[] params,Class[] classes) throws AxisFault{
- //使用RPC方式调用WebService
- RPCServiceClient client=new RPCServiceClient();
- Options option=client.getOptions();
- //指定调用的URL
- EndpointReference reference=new EndpointReference(address2);
- option.setTo(reference);
- /*
- * 设置要调用的方法
- * http://ws.apache.org/axis2 为默认的(无package的情况)命名空间,
- * 如果有包名,则为 http://axis2.webservice.elgin.com ,包名倒过来即可
- * method为方法名称
- *
- */
- QName qname=new QName("http://webservice.elgin.com", method);
- //调用远程方法,并指定方法参数以及返回值类型
- Object[] result=client.invokeBlocking(qname,params,classes);
- return result;
- }
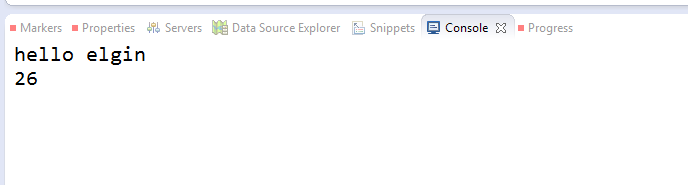
- public static void testWebDemo() throws AxisFault{
- Object[] result=invoke("sayHello", new Object[]{"elgin"}, new Class[]{String.class});
- System.out.println(result[0]);
- result=invoke("getAge", new Object[]{}, new Class[]{int.class});
- System.out.println(result[0]);
- }
- }
运行结果:
原文地址:Axis2与Web项目整合
二:Axis2与spring整合
① 新建项目 AxisSpringDemo,并在其中加入 Axis2 与 Spring 相关的 jar 包
Spring所需 Jar :
- aopalliance-1.0.jar
- aspectjrt.jar
- aspectjweaver.jar
- spring-aop-3.2.1.RELEASE.jar
- spring-beans-3.2.1.RELEASE.jar
- spring-context-3.2.1.RELEASE.jar
- spring-core-3.2.1.RELEASE.jar
- spring-expression-3.2.1.RELEASE.jar
- spring-tx-3.2.1.RELEASE.jar
- spring-web-3.2.1.RELEASE.jar
- activation-1.1.jar
- axiom-api-1.2.15.jar
- axiom-impl-1.2.15.jar
- axis2-adb-1.6.4.jar
- axis2-jaxws-1.6.4.jar
- axis2-kernel-1.6.4.jar
- axis2-spring-1.6.4.jar
- axis2-transport-http-1.6.4.jar
- axis2-transport-local-1.6.4.jar
- axis2-xmlbeans-1.6.4.jar
- commons-fileupload-1.3.1.jar
- commons-httpclient-3.1.jar
- commons-io-2.1.jar
- commons-logging-1.1.1.jar
- geronimo-stax-api_1.0_spec-1.0.1.jar
- httpcore-4.0.jar
- jsr311-api-1.1.1.jar
- mail-1.4.jar
- neethi-3.0.2.jar
- woden-api-1.0M9.jar
- wsdl4j-1.6.2.jar
- xml-resolver-1.2.jar
- XmlSchema-1.4.7.jar
- <!-- 加入Spring支持 -->
- <context-param>
- <param-name>contextConfigLocation</param-name>
- <param-value>classpath:applicationContext.xml</param-value>
- </context-param>
- <listener>
- <listener-class>org.springframework.web.context.ContextLoaderListener</listener-class>
- </listener>
- <!--加入Axis2支持 -->
- <servlet>
- <servlet-name>AxisServlet</servlet-name>
- <servlet-class>org.apache.axis2.transport.http.AxisServlet</servlet-class>
- <load-on-startup>1</load-on-startup>
- </servlet>
- <servlet-mapping>
- <servlet-name>AxisServlet</servlet-name>
- <url-pattern>/services/*</url-pattern>
- </servlet-mapping>
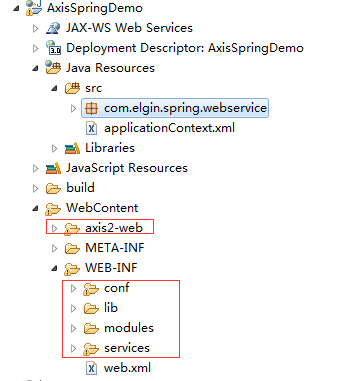
④ 在src下新建包 com.elgin.spring.webservice ,并新建提供WebService服务的类 SpringWebServiceDemo ,代码如下:
- package com.elgin.spring.webservice;
- import java.util.Random;
- import org.springframework.stereotype.Component;
- @Component("springWebService")
- public class SpringWebServiceDemo {
- public String springHello(){
- return "hello spring-axis2";
- }
- public int getAge(){
- return new Random().nextInt(80);
- }
- public void update(){
- System.out.println("update something..");
- }
- }
⑤ 在类路径下新建 Spring配置文件 :applicationContxt.xml 配置文件
- <?xml version="1.0" encoding="UTF-8"?>
- <beans xmlns="http://www.springframework.org/schema/beans"
- xmlns:xsi="http://www.w3.org/2001/XMLSchema-instance" xmlns:aop="http://www.springframework.org/schema/aop"
- xmlns:context="http://www.springframework.org/schema/context" xmlns:tx="http://www.springframework.org/schema/tx"
- xsi:schemaLocation="http://www.springframework.org/schema/beans http://www.springframework.org/schema/beans/spring-beans-3.2.xsd
- http://www.springframework.org/schema/aop http://www.springframework.org/schema/aop/spring-aop-3.2.xsd
- http://www.springframework.org/schema/context http://www.springframework.org/schema/context/spring-context-3.2.xsd
- http://www.springframework.org/schema/tx http://www.springframework.org/schema/tx/spring-tx-3.2.xsd">
- <!-- 配置spring注解扫描的包 -->
- <context:component-scan base-package="com.elgin"></context:component-scan>
- <!-- 或者不用注解的形式加载bean,改用配置的方式
- <bean id="springWebService" class="com.elgin.spring.webservice.SpringWebServiceDemo ">
- 利用property可以对SpringService类进行初始化,比如<property name="name" value="姚明" /><property name="job" value="职业男篮" />,在配置完SpringService类后,就可以直接在程序中FileSystemXmlApplicationContext类或其他类似功能的类读取applicationContext.xml文件中的内容,并获得SpringService类的对象实例。但现在我们并不这样做,而是将SpringService类发布成WebService。在Tomcat的webapps项目中的WEB-INF\lib目录中有一个axis2-spring-1.4.1.jar文件, 该文件用于将被装配JavaBean的发布成WebService。
- -->
- </beans>
⑥ 配置 Axis2的WebService服务:
同上一篇所说:在 AxisWebDemo 工程的 WEB-INF 下新建如下层次结构目录 : services/springServices/META-INF/services.xml
services.xml配置内容:
- <?xml version="1.0" encoding="UTF-8"?>
- <serviceGroup>
- <service name="springService">
- <description>Web Service</description>
- <!--
- SpringBeanName作用类似于普通配置中的ServiceClass,都是用来创建服务类对象,只不过普通配置使用反射来创建
- 加入Spring之后,对象的创建交给了Spring的IOC容器,SpringBeanName指定要发布成WebService的Java类在applicationContext.xml文件中装配,
- SpringBeanName参数是JavaBean的名称。SpringBeanName固定的不能改 ,因为springWebService是spring中注册的实现类得id
- 如果不使用spring,可以使用ServiceClass属性,ServiceClass参数要指定要发布成WebService的Java类,并指定全类名的方式:com.elgin.spring.webservice.SpringWebServiceDemo -->
- <parameter name="SpringBeanName">springWebService</parameter>
- <!-- 通过ServiceObjectSupplier参数指定SpringServletContextObjectSupplier类来获得Spring的ApplicationContext对象 -->
- <parameter name="ServiceObjectSupplier">org.apache.axis2.extensions.spring.receivers.SpringServletContextObjectSupplier</parameter>
- <!--
- 在这里最值得注意的是<messageReceivers>元素,该元素用于设置处理WebService方法的处理器。
- 例如,getAge方法有一个返回值,因此,需要使用可处理输入输出的RPCMessageReceiver类,
- 而update方法没有返回值,因此,需要使用只能处理输入的RPCInOnlyMessageReceiver类。
- -->
- <messageReceivers>
- <messageReceiver mep="http://www.w3.org/2004/08/wsdl/in-out" class="org.apache.axis2.rpc.receivers.RPCMessageReceiver" />
- <messageReceiver mep="http://www.w3.org/2004/08/wsdl/in-only" class="org.apache.axis2.rpc.receivers.RPCInOnlyMessageReceiver" />
- </messageReceivers>
- </service>
- </serviceGroup>
- <?xml version="1.0" encoding="UTF-8"?>
- <web-app version="2.5"
- xmlns="http://java.sun.com/xml/ns/javaee"
- xmlns:xsi="http://www.w3.org/2001/XMLSchema-instance"
- xsi:schemaLocation="http://java.sun.com/xml/ns/javaee
- http://java.sun.com/xml/ns/javaee/web-app_2_5.xsd">
- <servlet>
- <servlet-name>AxisServlet</servlet-name>
- //注册axis2的servlet
- <servlet-class>org.apache.axis2.transport.http.AxisServlet</servlet-class>
- <load-on-startup>1</load-on-startup>
- </servlet>
- <servlet-mapping>
- <servlet-name>AxisServlet</servlet-name>
- <url-pattern>/services/*</url-pattern>
- </servlet-mapping>
- //加载spring的配置文件
- <context-param>
- <param-name>contextConfigLocation</param-name>
- <param-value>classpath*:applicationContext.xml</param-value>
- </context-param>
- //增加spring监听器
- <listener>
- <listener-class>org.springframework.web.context.ContextLoaderListener</listener-class>
- </listener>
测试总结:
经过上述的步骤,配置结束,将项目装载的 Tomcat ,启动 ,浏览器输入:http://localhost:8080/AxisSpringDemo/services/listServices 出现如下界面说明我们的服务已经发布成功了

访问
http://localhost:8080/WebService/services/springService?wsdl
可以查看wsdl (springService为service.xml中service的name)
通过上面的测试可以发现:
加入Spring之后,除了spring的引入以及配置,唯一不同的地方就是 services.xml 的配置发生了变化
三 在maven下与spring整合
原文地址:https://blog.csdn.net/qq_22871607/article/details/54343326
第一步:pom.xml导入axis2的依赖 我用1.6.2版本的
<!--axis2版本指定-->
<axis2.version>1.6.2</axis2.version>
<!--axis2 begin-->
<dependency>
<groupId>org.apache.axis2</groupId>
<artifactId>axis2</artifactId>
<version>${axis2.version}</version>
</dependency>
<dependency>
<groupId>org.apache.axis2</groupId>
<artifactId>axis2-spring</artifactId>
<version>${axis2.version}</version>
</dependency>
<dependency>
<groupId>org.apache.axis2</groupId>
<artifactId>axis2-transport-http</artifactId>
<version>${axis2.version}</version>
</dependency>
<dependency>
<groupId>org.apache.axis2</groupId>
<artifactId>axis2-transport-local</artifactId>
<version>${axis2.version}</version>
</dependency>
<dependency>
<groupId>org.apache.axis2</groupId>
<artifactId>axis2-xmlbeans</artifactId>
<version>${axis2.version}</version>
</dependency>
<!--axis2 end-->
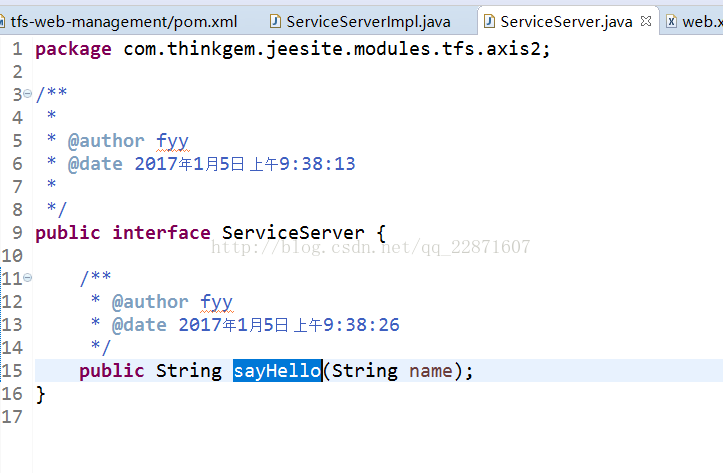
第二步:创建要发布的接口与实现类(可以不写接口,直接实现类)
接口:
实现类:(实现类上面加上@Component注解,通过spring扫描)

第三步:修改web.xml的配置文件,添加如下内容
<!-- Axis2 -->
<servlet>
<servlet-name>AxisServlet</servlet-name>
<servlet-class>org.apache.axis2.transport.http.AxisServlet</servlet-class>
<load-on-startup>2</load-on-startup>
</servlet>
<servlet-mapping>
<servlet-name>AxisServlet</servlet-name>
<url-pattern>/services/*</url-pattern>
</servlet-mapping>
第四步:如果你的项目之前没有配置过spring监听器的话,需要做如下配置
<listener>
<listener-class>org.springframework.web.context.ContextLoaderListener</listener-class>
</listener>
第五步:配置spring把axis2交给spring来管理

代码:
<?xml version="1.0" encoding="UTF-8"?>
<beans xmlns="http://www.springframework.org/schema/beans"
       xmlns:xsi="http://www.w3.org/2001/XMLSchema-instance"
       xsi:schemaLocation="http://www.springframework.org/schema/beans http://www.springframework.org/schema/beans/spring-beans.xsd">

    <description>Srping 整合axis2</description>
    <!--axis2交給srping來管理-->
    <bean id ="applioationContext" class="org.apache.axis2.extensions.spring.receivers.ApplicationContextHolder"/>
    <!--配置需要提供的服務,已用注解來代替-->
    <!--<bean id ="serviceServerImpl" class="com.amt.web.service.*impl"></bean>-->

</beans>
第六步:配置services.xml文件
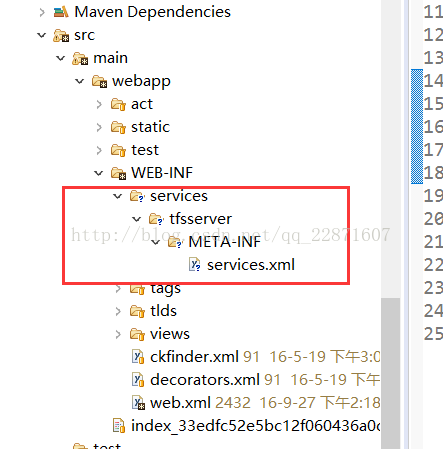
services.xml内容如下
<?xml version="1.0" encoding="UTF-8"?>
<!-- 通过ServiceObjectSupplier参数指定SpringServletContextObjectSupplier类来获得Spring的ApplicationContext对象 -->
<service name="ServiceServer">
<description>axis2</description>
<!-- 通过ServiceObjectSupplier参数指定SpringServletContextObjectSupplier类来获得Spring的ApplicationContext对象 -->
<parameter name="ServiceObjectSupplier" locked="false">
org.apache.axis2.extensions.spring.receivers.SpringServletContextObjectSupplier
</parameter>
<!--
SpringBeanName固定的不能改
serviceServerImpl是spring中注册的实现类得id,@Component注解
-->
<parameter name="SpringBeanName">serviceServerImpl</parameter>
<!--
<messageReceivers>元素,该元素用于设置处理WebService方法的处理器。
例如,getGreeting方法有一个返回值,因此,需要使用可处理输入输出的RPCMessageReceiver类,
而update方法没有返回值,因此,需要使用只能处理输入的RPCInOnlyMessageReceiver类。
-->
<messageReceivers>
<messageReceiver mep="http://www.w3.org/2004/08/wsdl/in-only"
class="org.apache.axis2.rpc.receivers.RPCInOnlyMessageReceiver"/>
<messageReceiver mep="http://www.w3.org/2004/08/wsdl/in-out"
class="org.apache.axis2.rpc.receivers.RPCMessageReceiver"/>
</messageReceivers>
</service>
第七步:部署tomcat并启动服务访问
输入:http://localhost:8181/ROOT/services/ServiceServer?wsdl

传递参数:

到这里wsdl能够浏览并显示出来说明已经配置成功了。
当然如果想要可以看到服务,可以复制axis2包下的

到项目的wabapp下,然后访问:http://localhost:8082/ROOT/axis2-web/

即可看到所有提供的服务了。
整体的结构:

到这里基本的已经全部配置完毕
访问
http://localhost:8080/WebService/services/springService?wsdl
可以查看wsdl (springService为service.xml中service的name)
通过上面的测试可以发现:
加入Spring之后,除了spring的引入以及配置,唯一不同的地方就是 services.xml 的配置发生了变化