接5。
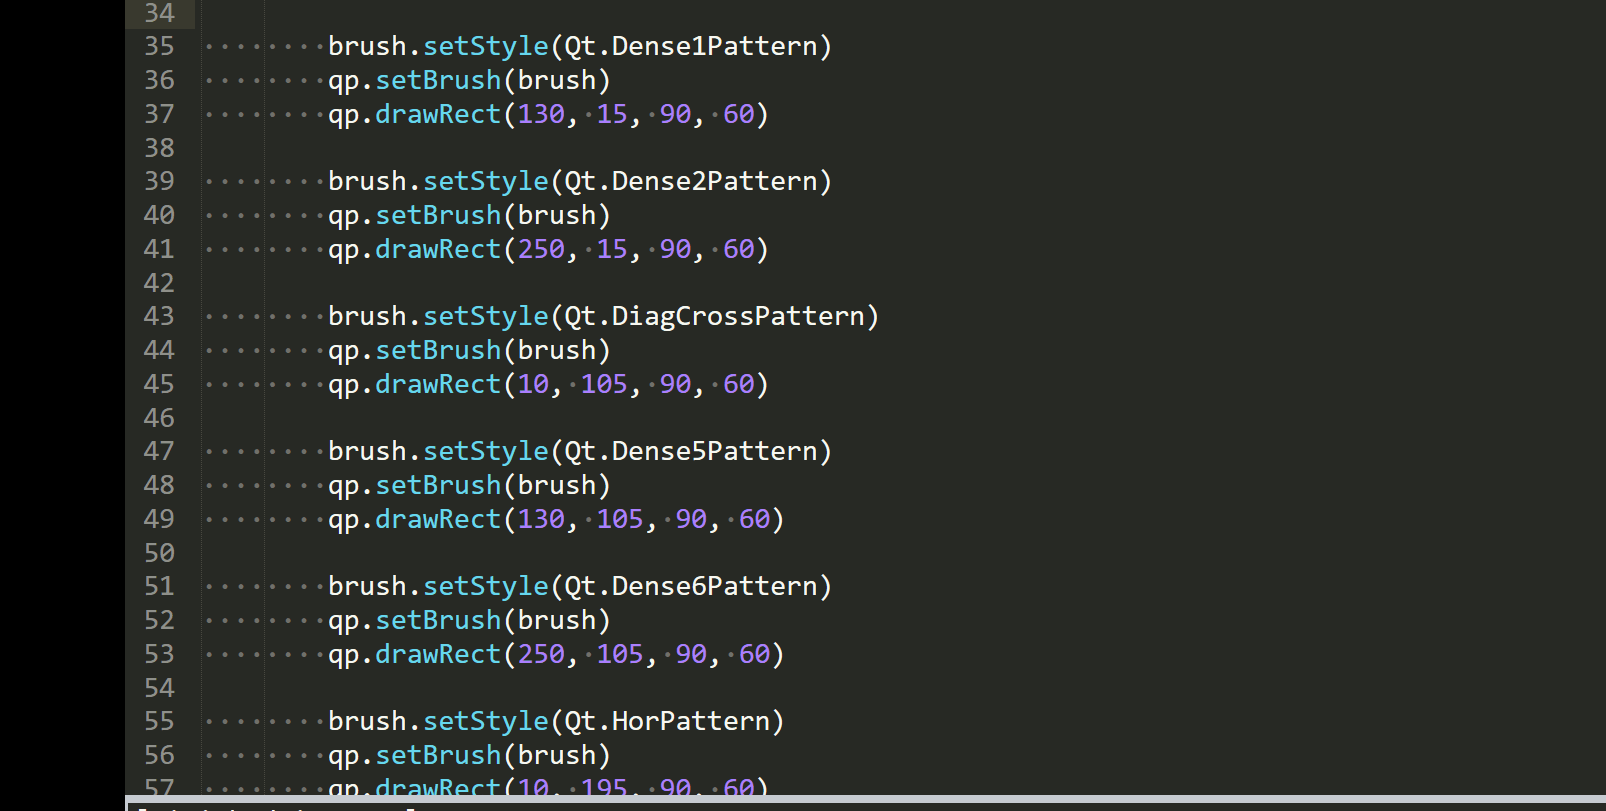
QBrush
QBrush是一个基本的图形对象。它用于绘制图形形状的背景,例如矩形,椭圆或多边形。画笔可以有三种不同的类型:预定义画笔,渐变或纹理图案。
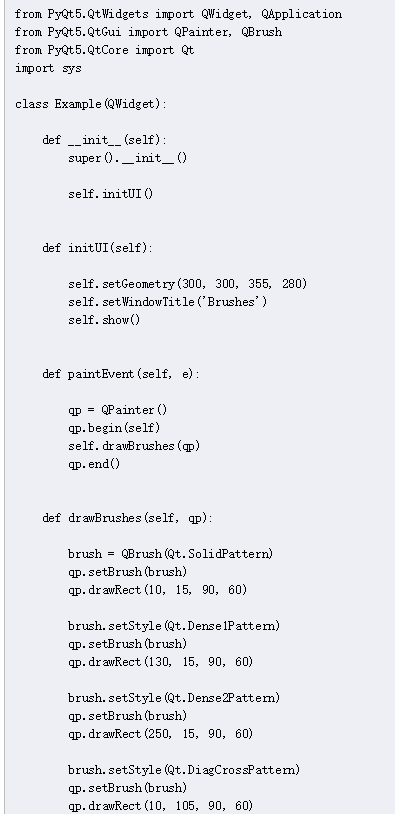

在我们的例子中,我们绘制了九个不同的矩形。


然后到http://doc.qt.io/qt-5/qt.html


效果:
Bézier curve
贝塞尔曲线是一条立方线。PyQt5中的Bézier曲线可以用QPainterPath。画家路径是由许多图形构建块组成的对象,例如矩形,椭圆,线和曲线。

此示例绘制Bézier曲线。


path.cubicTo(30, 30, 200, 350, 350, 30)6个参数的意义上面给出来了,当前位置是moveTo给出来的。

qreal其实就是double双精度类型。


渲染的效果还是很明显的,线条明显平滑许多。
PyQt5中的自定义小部件
PyQt5有一组丰富的小部件。但是,没有工具包可以提供程序员在其应用程序中可能需要的所有小部件。工具包通常只提供最常见的小部件,如按钮,文本小部件或滑块。如果需要更专业的小部件,我们必须自己创建它。使用工具包提供的绘图工具创建自定义小部件。有两种基本可能性:程序员可以修改或增强现有小部件,或者他可以从头开始创建自定义小部件。
烧录部件
这是我们可以在Nero,K3B或其他CD / DVD刻录软件中看到的小部件。


在我们的示例中,我们有QSlider一个自定义小部件。滑块控制自定义小部件。此小组件以图形方式显示介质的总容量和可用的可用空间。我们的自定义窗口小部件的最小值为1,最大值为OVER_CAPACITY。如果我们达到MAX_CAPACITY值,我们开始绘制红色。这通常表示过度烧录。刻录小部件位于窗口底部。这是使用一个QHBoxLayout和一个QVBoxLayout实现的。


class Communicate(QObject):
updateBW = pyqtSignal(int)
这是前面讲过的自定义信号的步骤,这里就是定义了一个更新burning Widget的信号,所以叫做updateBW。


poinrSize是字体大小,weight就是宽度。


0是最瘦的,99最宽。
size = self.size()
w = size.width()
h = size.height()
step = int(round(w / 10))
till = int(((w / OVER_CAPACITY) * self.value))
full = int(((w / OVER_CAPACITY) * MAX_CAPACITY))

这几行计算一些下面要用到的值,这些值会随着窗口大小变化而变化,step是上面尺子里每一格的长度,一共有10格,所以除以10,还做了四舍五入,不过其实round和我们的四舍五入还有点不一样。
其实不需要再int一下了。till是计算目前值的位置,full是max值的位置,也就是黄色和粉色的分界线。
if self.value >= MAX_CAPACITY:
qp.setPen(QColor(255, 255, 255))
qp.setBrush(QColor(255, 255, 184))
qp.drawRect(0, 0, full, h)
qp.setPen(QColor(255, 175, 175))
qp.setBrush(QColor(255, 175, 175))
qp.drawRect(full, 0, till-full, h)
else:
qp.setPen(QColor(255, 255, 255))
qp.setBrush(QColor(255, 255, 184))
qp.drawRect(0, 0, till, h)
这一段代码是画颜色和框的。如果现在的值已经超过了最大值或者等于最大值。就以这个烧录部件的左上角为左上角,长是full,高是h填充一个黄色的矩形,边框是白色,因为RGB(255,255,255)是白的。

然后以full,0为左上角,长是till-full高是h填充一个粉色的矩形,边框是粉色。

如果当前值小于max,那么就以这个烧录部件的左上角为左上角,长是till,高是h填充一个黄色的矩形,边框是白色。
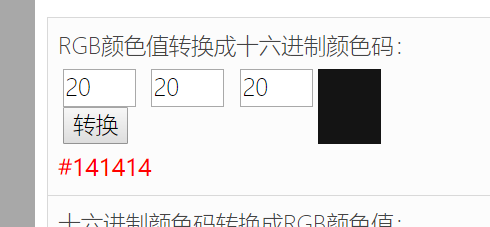
pen = QPen(QColor(20, 20, 20), 1, Qt.SolidLine)
qp.setPen(pen)
qp.setBrush(Qt.NoBrush)
qp.drawRect(0, 0, w-1, h-1)
j = 0
for i in range(step, 10*step, step):
qp.drawLine(i, 0, i, 5)
metrics = qp.fontMetrics()
fw = metrics.width(str(self.num[j]))
qp.drawText(i-fw/2, h/2, str(self.num[j]))
j = j + 1
这段代码是画刻度和边框,还加上写刻度的。里面的循环是画刻度以及写读数的。
self.num = [75, 150, 225, 300, 375, 450, 525, 600, 675]


width也是类似的意思。
metrics = qp.fontMetrics()
fw = metrics.width(str(self.num[j]))
qp.drawText(i-fw/2, h/2, str(self.num[j]))
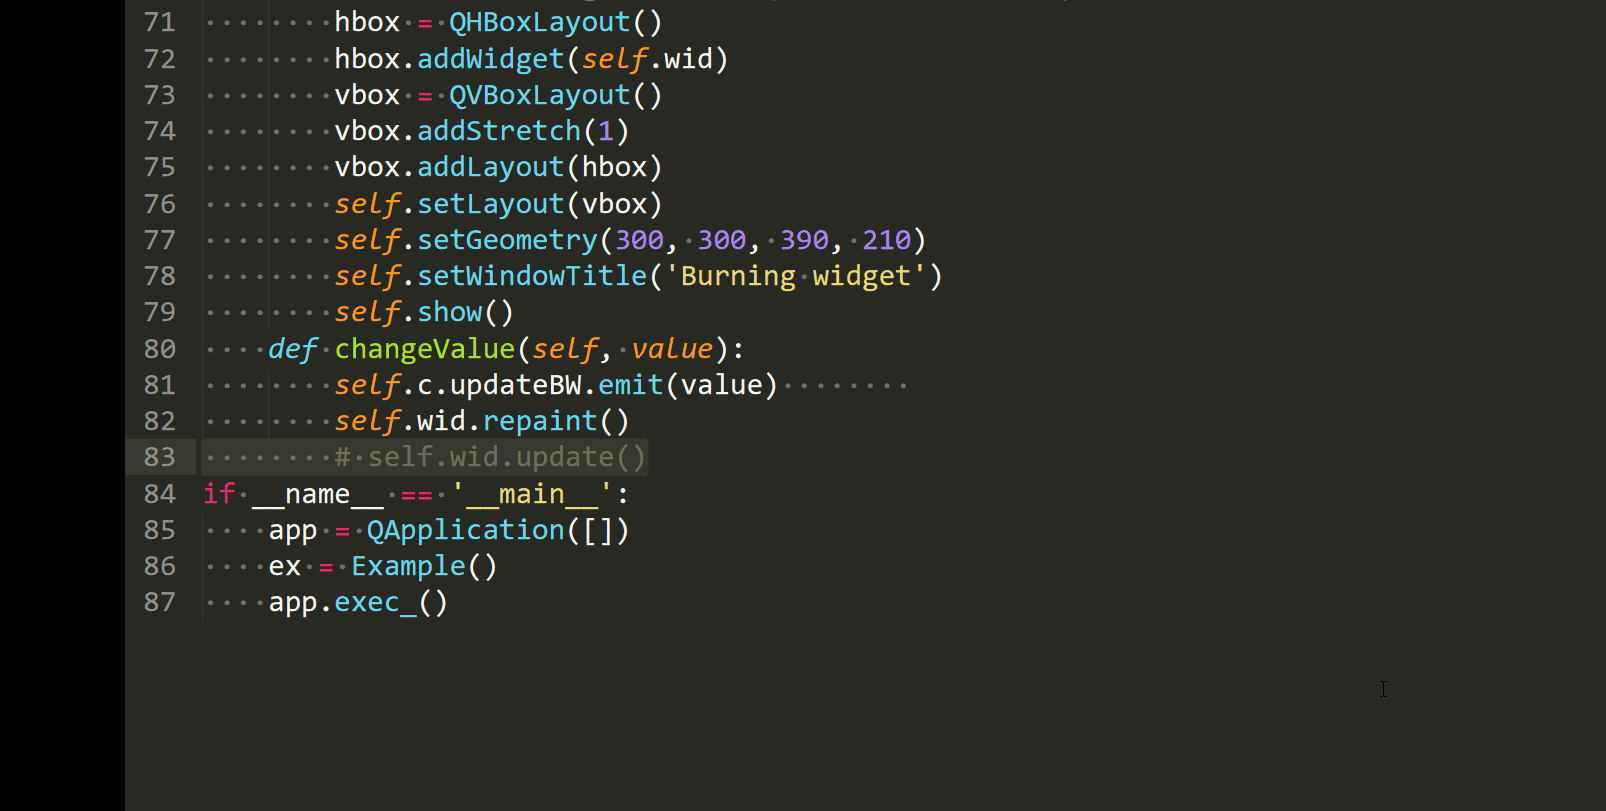
这几句就是为了让度数以刻度线为中心。然后我来叙述一下滑块值变化,烧录条跟着动的过程。
self.c.updateBW[int].connect(self.wid.setValue)
sld.valueChanged[int].connect(self.changeValue)
其实这两句应该反着看,因为是滑块的valueChanged信号先到来,然后把当前值送给了changeValue,然后在changeValue里,我们发射了updateBW信号,并且还做了很重要的一步,就是 self.wid.repaint()。
def changeValue(self, value):
self.c.updateBW.emit(value)
self.wid.repaint()


然后在selfValue里面更新self.value。
def setValue(self, value):
self.value = value
其实update和repain的效果差不多。但是不能没有。
其实我们可以直接用 sld.valueChanged.connect(self.wid.setValue),不过setValue得改成下面的。
def setValue(self, value):
self.repaint()
self.value = value
还有其实
pen = QPen(QColor(20, 20, 20), 1, Qt.SolidLine)
qp.setPen(pen)
qp.setBrush(Qt.NoBrush)
这个 qp.setBrush(Qt.NoBrush)很关键。

因为如果你不重设Brush的话,就会延续上面的Brush,所以就会出现值没超过700的时候全是黄色的,超过的时候全是粉色的这种情况。
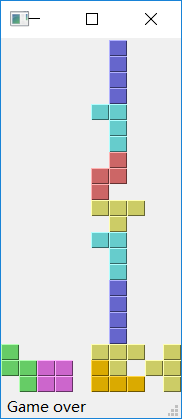
PyQt5中的俄罗斯方块
俄罗斯方块游戏是有史以来最受欢迎的电脑游戏之一。原始游戏由俄罗斯程序员Alexey Pajitnov于1985年设计和编程。从那时起,俄罗斯方块几乎在每个计算机平台上都有很多变化。俄罗斯方块被称为下降块益智游戏。在这个游戏中,我们有七种不同的形状,称为tetrominoes:S形,Z形,T形,L形,线形,镜面L形和方形。这些形状中的每一个都形成有四个正方形。形状慢慢降落。俄罗斯方块游戏的目的是移动和旋转形状,使它们尽可能地适合。如果我们设法形成一行,该行将被销毁,我们会得分。我们玩俄罗斯方块游戏,直到我们达到顶峰。PyQt5是一个旨在创建应用程序的工具包。还有其他图书馆旨在创建电脑游戏。不过,PyQt5和其他应用程序工具包可用于创建简单的游戏。创建计算机游戏是提高编程技能的好方法。
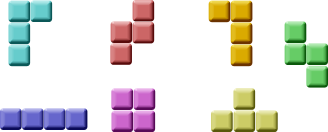
首先,我们还没有Tetris游戏的图像,我们使用PyQt5编程工具包中提供的绘图API绘制了tetrominoes。在每个计算机游戏的背后,都有一个数学模型,俄罗斯方块也是。
游戏背后的一些想法:
-
我们使用
QtCore.QBasicTimer()来创建游戏周期。 -
绘制上图中这些俄罗斯方块的tetrominoes。
-
形状在逐个方块的基础上移动(不是逐个像素)。
The code consists of four classes: Tetris, Board, Tetrominoe and Shape. The Tetris class sets up the game. The Board is where the game logic is written. The Tetrominoe class contains names for all tetris pieces and the Shape class contains the code for a tetris piece.(下面的代码包括四个类,Tetris, Board, Tetrominoe 和 Shape。Tetris类创建了游戏,Board里写的是游戏的逻辑,Tetrominoe类包含所有俄罗斯碎片的名字,Shape类包含了创建俄罗斯碎片的代码。)


游戏简化了一点,以便更容易理解。游戏启动后立即启动。我们可以通过按键p暂停游戏。空格键将会把一个碎片立即下降到底部。游戏以恒定速度进行,没有实现加速。分数是我们删除的行数。
我们下面分别对四个类进行分析。先来看Tetrominoe类。
class Tetrominoe(object):
NoShape = 0
ZShape = 1
SShape = 2
LineShape = 3
TShape = 4
SquareShape = 5
LShape = 6
MirroredLShape = 7
这里面只是一些数字对应俄罗斯碎片的形状,这些数字后面随机产生碎片的时候会用得到。
1是Z形的代号,2是S形的,直线形的是3,T形的是4,正方形的是5,L形的是6,镜子形的是7。然后来看Shape类。
class Shape(object):(继承自object类,这个object可以不写)
coordsTable = (
((0, 0), (0, 0), (0, 0), (0, 0)),
((0, -1), (0, 0), (-1, 0), (-1, 1)),
((0, -1), (0, 0), (1, 0), (1, 1)),
((0, -1), (0, 0), (0, 1), (0, 2)),
((-1, 0), (0, 0), (1, 0), (0, 1)),
((0, 0), (1, 0), (0, 1), (1, 1)),
((-1, -1), (0, -1), (0, 0), (0, 1)),
((1, -1), (0, -1), (0, 0), (0, 1))
)

def __init__(self):
self.coords = [[0,0] for i in range(4)]

self.pieceShape = Tetrominoe.NoShape(一开始没有默认的图形)
self.setShape(Tetrominoe.NoShape)
def shape(self):
'''returns shape'''(返回形状)
return self.pieceShape
def setShape(self, shape):
'''sets a shape'''(这是设置形状的)
table = Shape.coordsTable[shape]
for i in range(4):
for j in range(2):
self.coords[i][j] = table[i][j]
self.pieceShape = shape
def setRandomShape(self):
'''chooses a random shape'''(这个函数是用来生成随机形状的碎片的)
self.setShape(random.randint(1, 7))
def x(self, index):
'''returns x coordinate'''
return self.coords[index][0]
def y(self, index):
'''returns y coordinate'''
return self.coords[index][1]
def setX(self, index, x):
'''sets x coordinate'''
self.coords[index][0] = x
def setY(self, index, y):
'''sets y coordinate'''
self.coords[index][1] = y
def minX(self):
'''returns min x value'''
m = self.coords[0][0]
for i in range(4):
m = min(m, self.coords[i][0])
return m
def maxX(self):
'''returns max x value'''
m = self.coords[0][0]
for i in range(4):
m = max(m, self.coords[i][0])
return m
def minY(self):
'''returns min y value'''
m = self.coords[0][1]
for i in range(4):
m = min(m, self.coords[i][1])
return m
def maxY(self):
'''returns max y value'''
m = self.coords[0][1]
for i in range(4):
m = max(m, self.coords[i][1])
return m
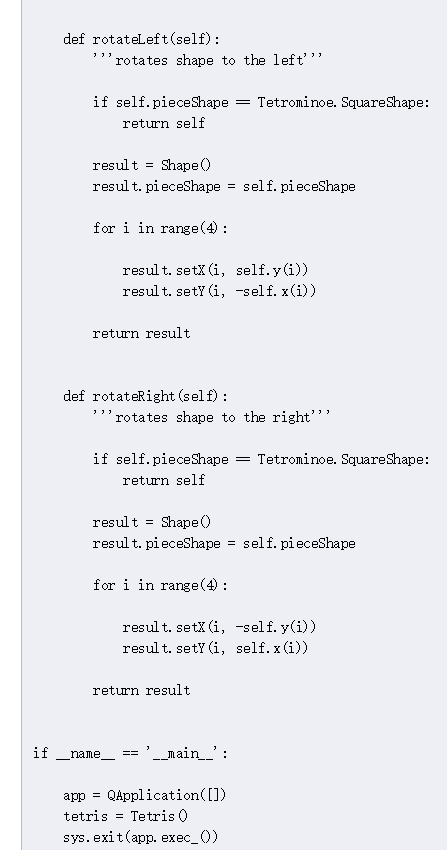
def rotateLeft(self):
'''rotates shape to the left'''(这个函数是用来左转的)
if self.pieceShape == Tetrominoe.SquareShape:(如果是正方形左转没有用)
return self
result = Shape()
result.pieceShape = self.pieceShape
for i in range(4):
result.setX(i, self.y(i))
result.setY(i, -self.x(i))(这两句就是左转的算法

左转90度相当于坐标轴xy右转或者说顺时针转90度,ab是旋转后新的坐标系,a是横坐标,b是纵坐标,不难看出,a=y,b=-x。)
return result
def rotateRight(self):
'''rotates shape to the right'''
if self.pieceShape == Tetrominoe.SquareShape:
return self
result = Shape()
result.pieceShape = self.pieceShape
for i in range(4):
result.setX(i, -self.y(i))
result.setY(i, self.x(i))(右转和上面分析类似)
return result
接下来来看关键的逻辑处理部分Board。
class Board(QFrame)(它继承了QFrame)
msg2Statusbar = pyqtSignal(str)(这里定义了一个信号msg3Statusbar,意思就是在状态栏显示信息,pyqtSignal必须定义在QObject或者它的子类中。

QFrame算是QObject的孙子)
BoardWidth = 10
BoardHeight = 22
(这两个参数的意思 是一行方块有十个小块,最多有22列)
Speed = 300
def __init__(self, parent):
super().__init__(parent)(这是后面实例化要用的格式,这里先准备一下)
self.initBoard()
def initBoard(self):
'''initiates board'''
self.timer = QBasicTimer()
self.isWaitingAfterLine = False
self.curX = 0
self.curY = 0
self.numLinesRemoved = 0(消去的行数,一开始是0)
self.board = []
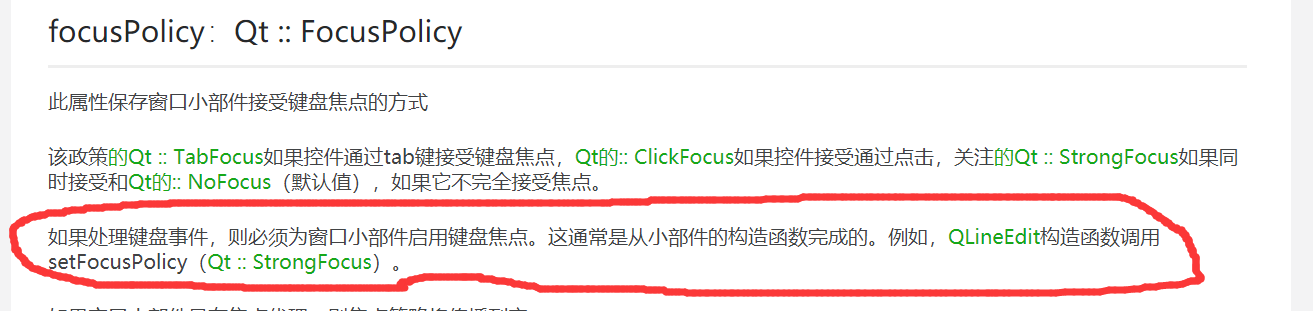
self.setFocusPolicy(Qt.StrongFocus)

self.isStarted = False(开始标志)
self.isPaused = False(暂停标志)
self.clearBoard()
def shapeAt(self, x, y):
'''determines shape at the board position'''
return self.board[(y * Board.BoardWidth) + x]
def setShapeAt(self, x, y, shape):
'''sets a shape at the board'''
self.board[(y * Board.BoardWidth) + x] = shape
(例子里时用一维数组来存窗口中每一个小方块里对应的图形,比如说第0行,第三列对应的就是self.board的第213个元素,为什么不是13呢?这是因为这里定义的存储方式是从下到上,从左到右递增,而窗口的位置是以左上角为00,自上而下是递增的。)
def squareWidth(self):
'''returns the width of one square'''
return self.contentsRect().width() // Board.BoardWidth

def squareHeight(self):
'''returns the height of one square'''
return self.contentsRect().height() // Board.BoardHeight
(//是整除以,这是计算每一个小方块的宽,高,contentsRect返回的参数是留有余地的,也就是离边界还有一定距离的)

def start(self):
'''starts game'''
if self.isPaused:
return(如果现在还是停止的,就不开始)
self.isStarted = True
self.isWaitingAfterLine = False
self.numLinesRemoved = 0
self.clearBoard()
self.msg2Statusbar.emit(str(self.numLinesRemoved))(显示消去的行数)
self.newPiece()
self.timer.start(Board.Speed, self)(启动计时器)
def pause(self):
'''pauses game'''
if not self.isStarted:
return(如果还没开始,哪里来的暂停)
self.isPaused = not self.isPaused(取反,暂停和开始都是p键)
if self.isPaused:
self.timer.stop()(如果要暂停,就先停止计时器)
self.msg2Statusbar.emit("paused")(状态栏显示暂停)
else:
self.timer.start(Board.Speed, self)
self.msg2Statusbar.emit(str(self.numLinesRemoved))(暂停后在按p键,就又开始计时)
self.update()(更新绘图)
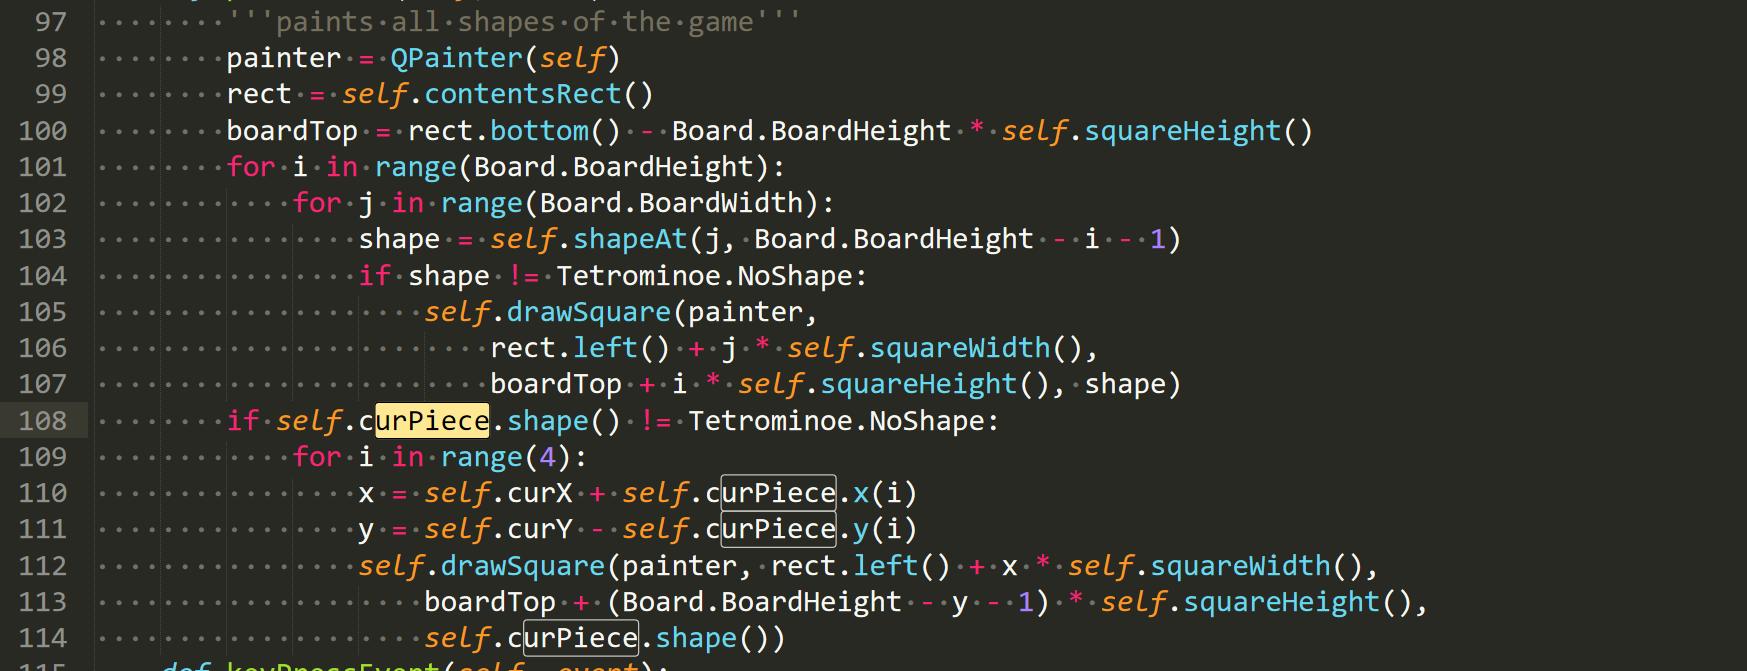
def paintEvent(self, event):
'''paints all shapes of the game'''
painter = QPainter(self)
rect = self.contentsRect()
boardTop = rect.bottom() - Board.BoardHeight * self.squareHeight()(计算游戏结束高度)
for i in range(Board.BoardHeight):
for j in range(Board.BoardWidth):
shape = self.shapeAt(j, Board.BoardHeight - i - 1)
(查看10*22个网格对应的形状,这里Board.BoardHeight - i - 1的原因就是上面位置和人的习惯是反着来的,i=0时,Board.BoardHeight - i - 1=21)
if shape != Tetrominoe.NoShape:
self.drawSquare(painter,rect.left() + j * self.squareWidth(), boardTop + i \
* self.squareHeight(), shape)(如果这个位置是有图形的,我们就按照要求画图)
if self.curPiece.shape() != Tetrominoe.NoShape:
for i in range(4):
x = self.curX + self.curPiece.x(i)
y = self.curY - self.curPiece.y(i)
self.drawSquare(painter, rect.left() + x * self.squareWidth(),
boardTop + (Board.BoardHeight - y - 1) * self.squareHeight(),
self.curPiece.shape())
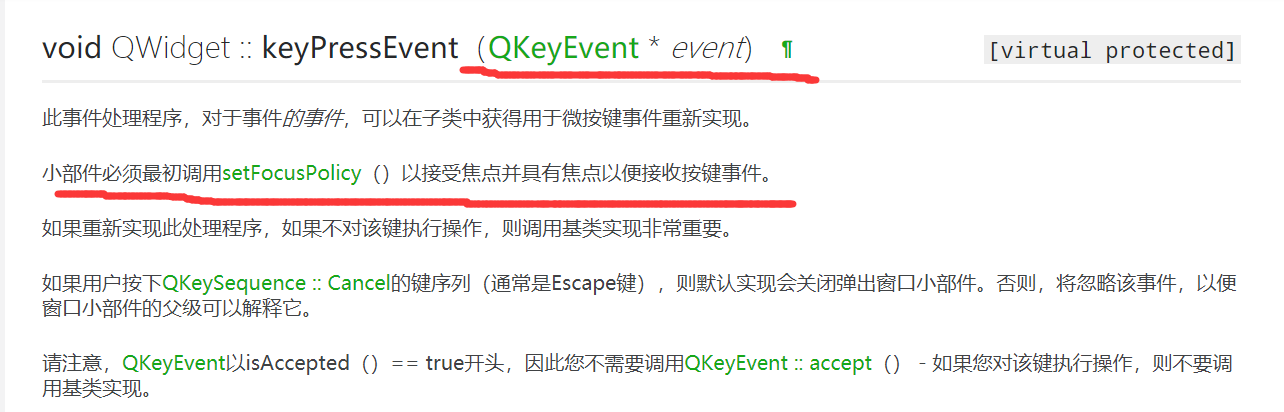
def keyPressEvent(self, event):
'''processes key press events'''
if not self.isStarted or self.curPiece.shape() == Tetrominoe.NoShape:
super(Board, self).keyPressEvent(event)
return(如果没有开始或者self.curPiece.shape() == Tetrominoe.NoShape,就继承一下按键事件)
key = event.key()

每一个按键都对应有值。

if key == Qt.Key_P:
self.pause()
return
if self.isPaused:
return(如果目前时暂停状态,而且按的不是p才能走到这一步。)
elif key == Qt.Key_Left:
self.tryMove(self.curPiece, self.curX - 1, self.curY)(如果是键盘上的左键,那么就向左移动一格)
elif key == Qt.Key_Right:
self.tryMove(self.curPiece, self.curX + 1, self.curY)
elif key == Qt.Key_Down:
self.tryMove(self.curPiece.rotateRight(), self.curX, self.curY)(下键右转)
elif key == Qt.Key_Up:
self.tryMove(self.curPiece.rotateLeft(), self.curX, self.curY)
elif key == Qt.Key_Space:
self.dropDown()(空格键直接下落)
elif key == Qt.Key_D:
self.oneLineDown()(这个是加快下落速度的而已)
else:
super(Board, self).keyPressEvent(event)(如果不是这些键,就直接继承按键事件,其实这句可以不要的)
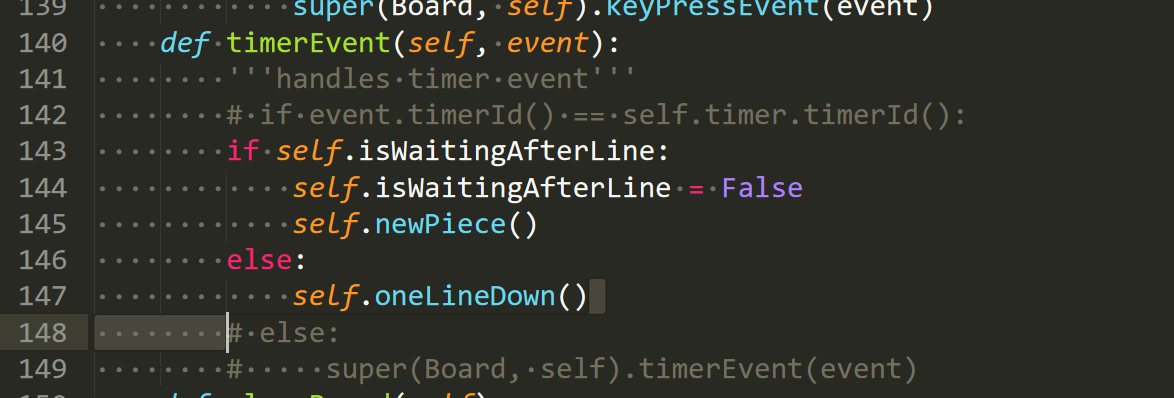
def timerEvent(self, event):
'''handles timer event'''
if event.timerId() == self.timer.timerId():


(这一句其实可以不要,因为我们这个例子中只有一个计时器。)
if self.isWaitingAfterLine:(如果有行消去)
self.isWaitingAfterLine = False
self.newPiece()(产生新碎片)
else:
self.oneLineDown()(没有行消去,当前碎片下落)
else:
super(Board, self).timerEvent(event)(这两句也可以不要,当然只是对于这个例子来说)
def clearBoard(self):
'''clears shapes from the board'''
for i in range(Board.BoardHeight * Board.BoardWidth):
self.board.append(Tetrominoe.NoShape)
(这其实是一个初始化self,board的函数)
def dropDown(self):
'''drops down a shape'''
newY = self.curY
while newY > 0:
if not self.tryMove(self.curPiece, self.curX, newY - 1):
break
newY -= 1(如果碎片的下降没有超出规定的board范围,就一直循环下落,直到最底)
self.pieceDropped()(进入碎片落地处理函数)
def oneLineDown(self):
'''goes one line down with a shape'''
if not self.tryMove(self.curPiece, self.curX, self.curY - 1):(如果落下一行就落到了最底或者要和其它的碎片重合)
self.pieceDropped()
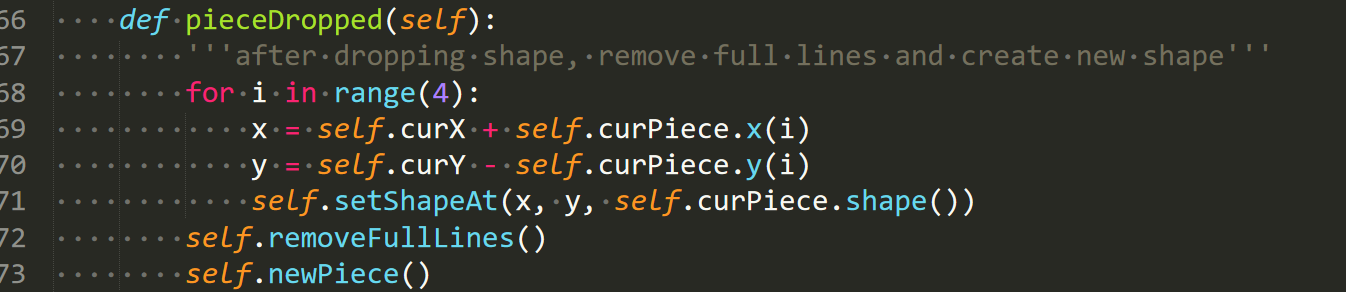
def pieceDropped(self):
'''after dropping shape, remove full lines and create new shape'''
for i in range(4):
x = self.curX + self.curPiece.x(i)
y = self.curY - self.curPiece.y(i)
self.setShapeAt(x, y, self.curPiece.shape())(更新落下之后的图片)
self.removeFullLines()(消去行)
if not self.isWaitingAfterLine:(如果没有行需要消去)
self.newPiece()(我们还是要产生新的碎片)
(其实有没有行消去我们都需要产生新的碎片,这个下面待会还要吐槽)
def removeFullLines(self):
'''removes all full lines from the board'''
numFullLines = 0
rowsToRemove = []
for i in range(Board.BoardHeight):
n = 0
for j in range(Board.BoardWidth):
if not self.shapeAt(j, i) == Tetrominoe.NoShape:(如果这个地方不是空的)
n = n + 1
if n == 10:
rowsToRemove.append(i)(一行一共就10个)
rowsToRemove.reverse()(颠倒一下还是因为我们的习惯和qt中位置的定位不同,我们习惯从下到上递增,而qt相反)
for m in rowsToRemove:
for k in range(m, Board.BoardHeight):
for l in range(Board.BoardWidth):
self.setShapeAt(l, k, self.shapeAt(l, k + 1))(上一行的图形移到下一行)
numFullLines = numFullLines + len(rowsToRemove)
if numFullLines > 0:(如果确实有行需要消去)
self.numLinesRemoved = self.numLinesRemoved + numFullLines
self.msg2Statusbar.emit(str(self.numLinesRemoved))(计算消去的行数,并显示)
self.isWaitingAfterLine = True
self.curPiece.setShape(Tetrominoe.NoShape)
self.update()
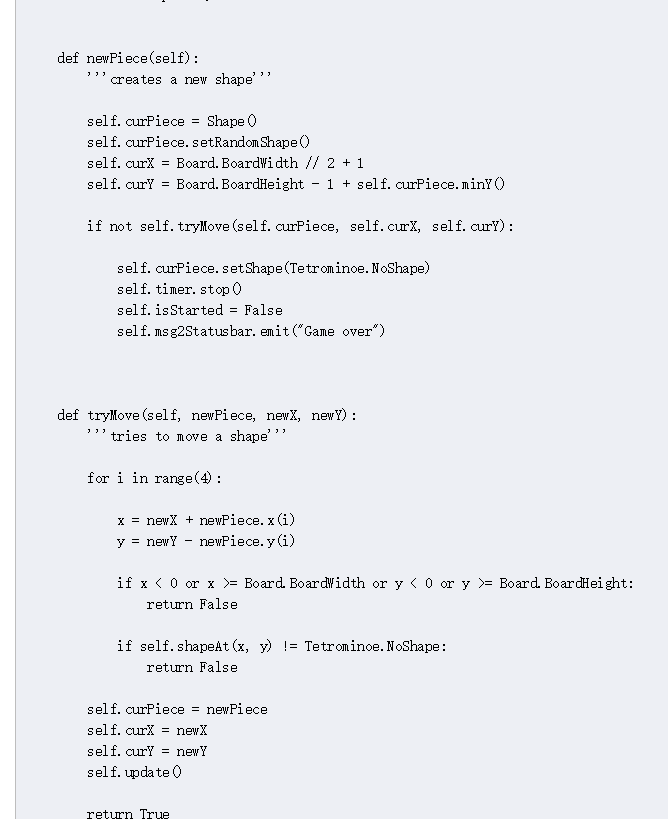
def newPiece(self):
'''creates a new shape'''
self.curPiece = Shape()
self.curPiece.setRandomShape()
self.curX = Board.BoardWidth // 2 + 1
self.curY = Board.BoardHeight - 1 + self.curPiece.minY(这两句是设置了初始碎片坐标系原点的位置,self.curY = Board.BoardHeight - 1 + self.curPiece.minY这个式子应该这么看,self.curY -(self.curPiece.minY)=Board.BoardHeight - 1,因为self.curPiece.minY是负的,并且在这个例子里面,

其实应该倒过来,即y轴正方向朝下。这一句是为了确保开始的时候碎片的全部方块都在board里面。)

if not self.tryMove(self.curPiece, self.curX, self.curY):(如果新产生的这个碎片要和别的碎片重合的话)
self.curPiece.setShape(Tetrominoe.NoShape)
self.timer.stop()
self.isStarted = False
self.msg2Statusbar.emit("Game over"))(游戏结束)
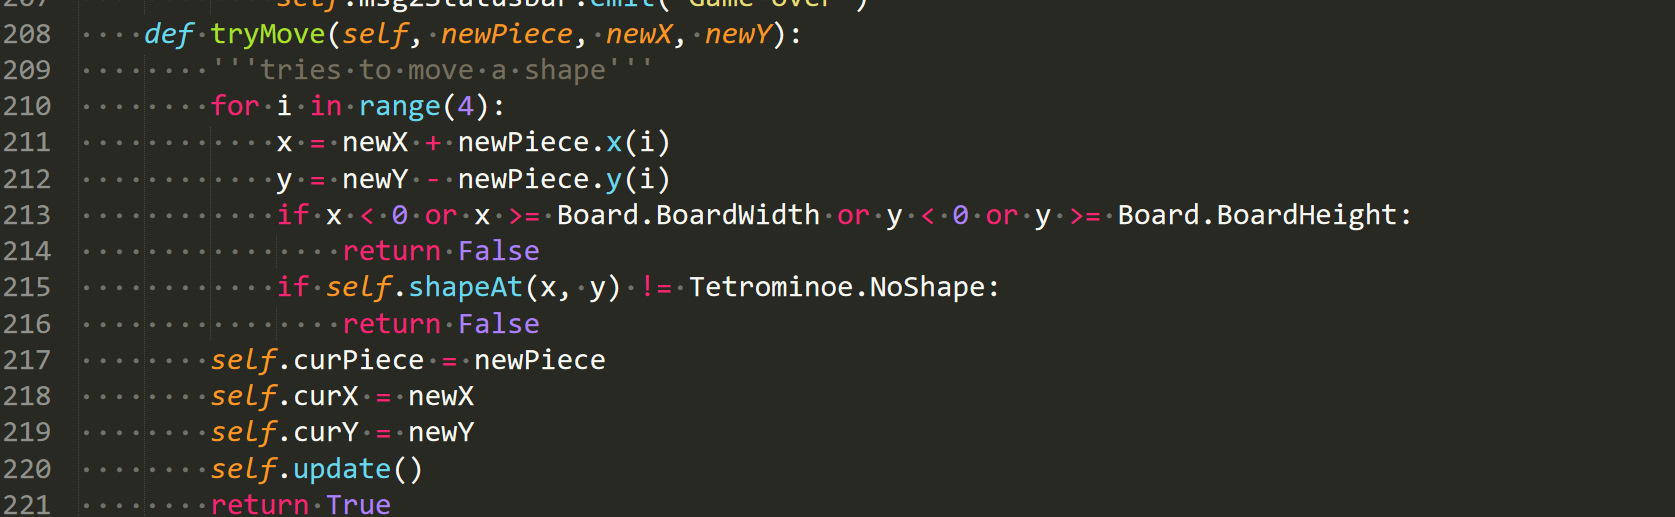
def tryMove(self, newPiece, newX, newY):
'''tries to move a shape'''
for i in range(4):
x = newX + newPiece.x(i)
y = newY - newPiece.y(i)(更新碎片的位置)
if x < 0 or x >= Board.BoardWidth or y < 0 or y >= Board.BoardHeight:
return False
(这个判断是把碎片的位置)
if self.shapeAt(x, y) != Tetrominoe.NoShape:
return False
(这个是不允许碎片重合,碎片是堆叠的)
self.curPiece = newPiece
self.curX = newX
self.curY = newY(更新碎片坐标系原点的位置)
self.update()
return True
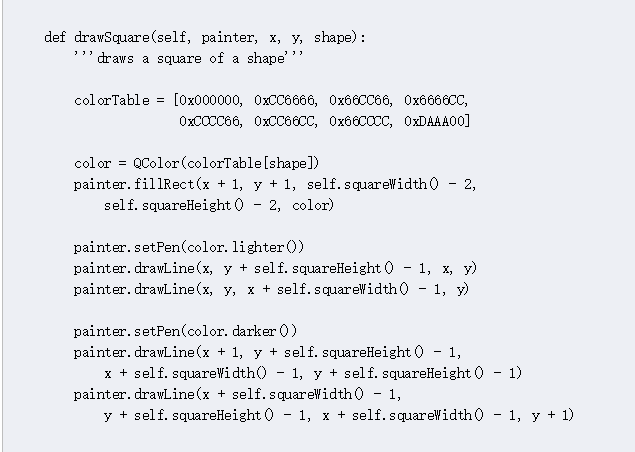
def drawSquare(self, painter, x, y, shape):
'''draws a square of a shape'''
colorTable = [0x000000, 0xCC6666, 0x66CC66, 0x6666CC,
0xCCCC66, 0xCC66CC, 0x66CCCC, 0xDAAA00]


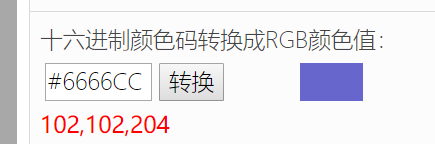
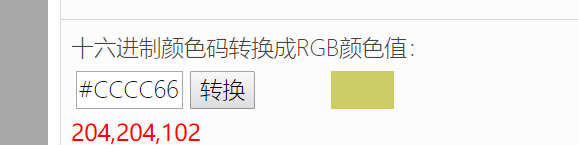


color = QColor(colorTable[shape])
painter.fillRect(x + 1, y + 1, self.squareWidth() - 2,
self.squareHeight() - 2, color)

QColor QColor::lighter(int factor = 150) const


painter.setPen(color.lighter())
painter.drawLine(x, y + self.squareHeight() - 1, x, y)
painter.drawLine(x, y, x + self.squareWidth() - 1, y)
painter.setPen(color.darker())
painter.drawLine(x + 1, y + self.squareHeight() - 1,
x + self.squareWidth() - 1, y + self.squareHeight() - 1)
painter.drawLine(x + self.squareWidth() - 1,
y + self.squareHeight() - 1, x + self.squareWidth() - 1, y + 1)
(这四条线就是边框)。
为什么要画两次?因为产生新碎片的时候用的是self.curPiece。最后还有一个类
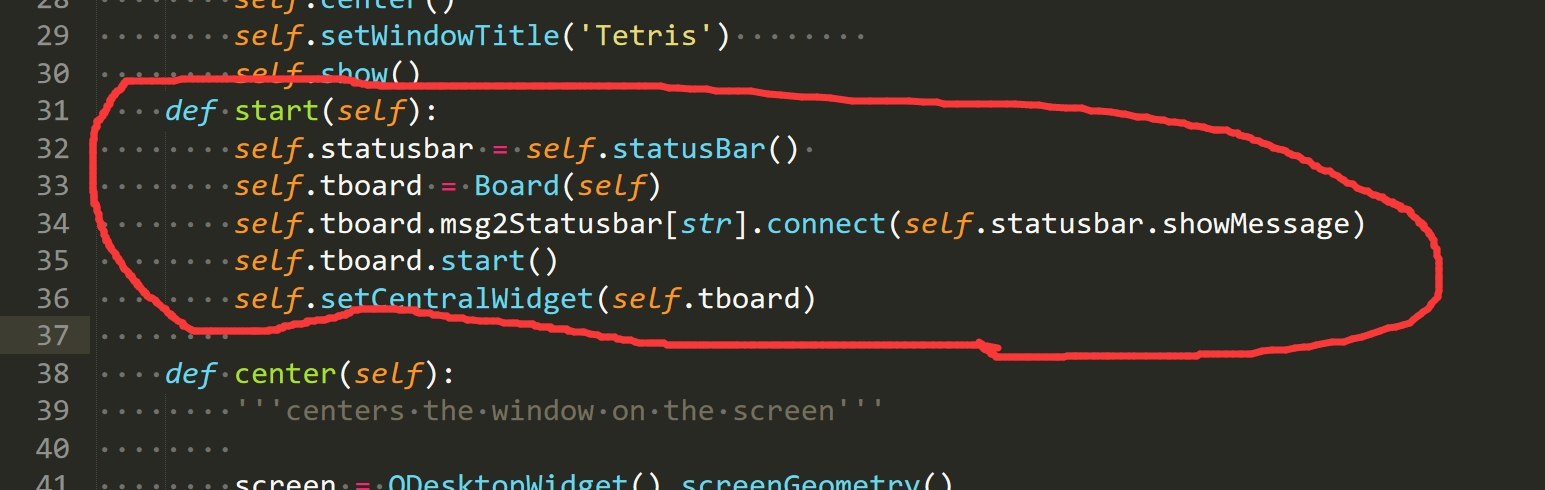
class Tetris(QMainWindow):
def __init__(self):
super().__init__()
self.initUI()
def initUI(self):
'''initiates application UI'''
self.tboard = Board(self)
self.setCentralWidget(self.tboard)
self.statusbar = self.statusBar()
self.tboard.msg2Statusbar[str].connect(self.statusbar.showMessage)
self.tboard.start()(初始化)
self.resize(180, 380)
self.center()
self.setWindowTitle('Tetris')
self.show()
def center(self):
'''centers the window on the screen'''(移动屏幕到中央)
screen = QDesktopWidget().screenGeometry()
size = self.geometry()
self.move((screen.width()-size.width())/2,
(screen.height()-size.height())/2)

描述一下这个游戏的大概过程,首先初始化完成以后。先落下一碎片,我们不按暂停的话就进入
然后进入

然后进入
然后返回值是true。进入
在这个函数里面更新了ShapeAt信息。然后
然后

当然这只是最简单的一个过程,中间还没有显示update的跳转,update其实又跳转到了paintEvent里面。其它再复杂的过程其实也都是在这基础上的。
我们先来演示一下:

我们来稍微改进一下,加一个菜单,里面有开始,退出。还有当消掉的行数超过一定值,速度会变快。第一步先实现添加菜单。画圈的是我改动的地方。


效果见下一讲。