在自动化测试的时候,通常都会把最常用的功能封装起来,实现通用性。
该篇博客是实现了getDriver方法的封装。
第一次封装的时候,是使用的传参。
@Parameters(value = {"driverType","dirvePath","fireFoxInstallPath","fireFoxVersion"})
    public void getDriver(String driverType, String dirvePath, String fireFoxInstallPath, String fireFoxVersion) {
        if (driverType.equals("ie")) {
            driver = getIEDriver(dirvePath);
        } else if (driverType.equals("chrome")) {
            driver = getChromeDriver(dirvePath);

        } else if (driverType.equals("fireFox")) {
            driver = getFireFoxDriver(dirvePath, fireFoxInstallPath, fireFoxVersion);

        }
    }


    private WebDriver getFireFoxDriver(String dirvePath, String fireFoxInstallPath, String fireFoxVersion) {
        System.setProperty(SystemProperty.BROWSER_BINARY, fireFoxInstallPath);

        if ("3.X".equals(fireFoxVersion)) {
            System.setProperty(GeckoDriverService.GECKO_DRIVER_EXE_PROPERTY, dirvePath);


        }

        return new FirefoxDriver();
    }

    private WebDriver getChromeDriver(String dirvePath) {
        System.setProperty(ChromeDriverService.CHROME_DRIVER_EXE_PROPERTY, dirvePath);
        return new ChromeDriver();
    }

    private WebDriver getIEDriver(String dirvePath) {
        DesiredCapabilities capabilities = new DesiredCapabilities();
        capabilities.setCapability(InternetExplorerDriver.IGNORE_ZOOM_SETTING, true);
        capabilities.setCapability(InternetExplorerDriver.INTRODUCE_FLAKINESS_BY_IGNORING_SECURITY_DOMAINS, true);
        System.setProperty(InternetExplorerDriverService.IE_DRIVER_EXE_PROPERTY, dirvePath);
        return new InternetExplorerDriver(capabilities);
    }
下面是testNG 的配置文件:
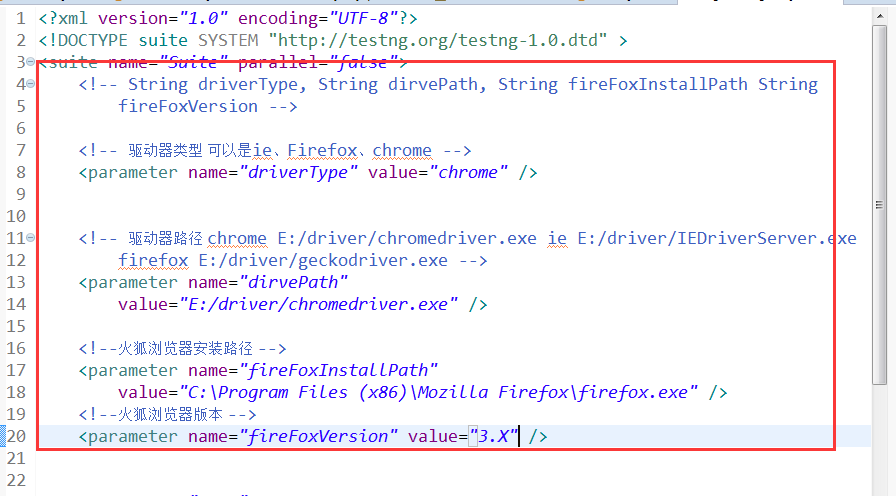
可以看到,这种实现方式,会使我们的配置文件变得比较庞大,不够清晰。每次切换 启动的浏览器类型的时候,要一项项修改配置文件,比较麻烦。
考虑到上述缺点,笔者重新换了实现方式。使用读取配置文件、反射的方法来切换浏览器的启动。
下面是实现方法:
1.准备配置文件:
<?xml version="1.0" encoding="UTF-8"?>
<!--  只需要修改下面的driverIndex 就可以去创建对应index的驱动-->
<driver driverIndex="3">

    <!-- 谷歌浏览器配置文件 -->
    <name value="org.openqa.selenium.chrome.ChromeDriver" index="0">
        <properties>
            <property
                name="ChromeDriverService.CHROME_DRIVER_EXE_PROPERTY"
                value="E:/driver/chromedriver.exe" />
        </properties>
    </name>

    <!-- 火狐浏览器 对应的selenium3.x版本 的配置文件 -->
    <name value="org.openqa.selenium.firefox.FirefoxDriver"
        seleniumVersion="3.x" index="1">
        <properties>
            <property name="SystemProperty.BROWSER_BINARY"
                value="C:\Program
        Files (x86)\Mozilla Firefox\firefox.exe" />
            <property
                name="GeckoDriverService.GECKO_DRIVER_EXE_PROPERTY"
                value="E:/driver/geckodriver.exe" />
        </properties>
    </name>

    <!-- 火狐浏览器 对应的selenium2.x版本 的配置文件 -->
    <name value="org.openqa.selenium.firefox.FirefoxDriver"
        seleniumVersion="2.x" index="2">
        <properties>
            <property name="SystemProperty.BROWSER_BINARY"
                value="C:\Program
        Files (x86)\Mozilla Firefox\firefox.exe" />
        </properties>
    </name>

    <!--IE浏览器配置文件 -->
    <name value="org.openqa.selenium.ie.InternetExplorerDriver"
        index="3">
        <properties>
            <property
                name="InternetExplorerDriverService.IE_DRIVER_EXE_PROPERTY"
                value="E:/driver/IEDriverServer.exe" />
        </properties>
        <capabilities>
            <capability
                name="InternetExplorerDriver.IGNORE_ZOOM_SETTING" />
            <capability
                name="InternetExplorerDriver.INTRODUCE_FLAKINESS_BY_IGNORING_SECURITY_DOMAINS" />
        </capabilities>
    </name>
</driver>
下面是实现浏览器切换的代码:
package com.claire.jing.utils;


import java.util.List;
import org.dom4j.Document;
import org.dom4j.DocumentException;
import org.dom4j.Element;
import org.dom4j.io.SAXReader;
import org.openqa.selenium.WebDriver;
import org.openqa.selenium.remote.DesiredCapabilities;

public class GetDriverUtil {
    private static Class clazz;
    private static Object obj ;

    public static void main(String[] args) throws InterruptedException {
        WebDriver driver = getDriver();
        driver.get("http://www.baidu.com");

        Thread.sleep(10000);
        driver.quit();
    }

    public static WebDriver getDriver() {
        Document document = null;
        Element driverNameElement= null;
        String driverName =null;

        SAXReader reader = new SAXReader();
        try {
            document = reader.read(GetDriverUtil.class.getResourceAsStream("/driverProperties.xml"));
        } catch (DocumentException e) {

            e.printStackTrace();
        }

        /**
         * 下面是通过解析XML,获取到驱动的类全名
         */
        Element rootElement = document.getRootElement(); //获取到根节点
        int index = Integer.parseInt(rootElement.attributeValue("driverIndex"));//获取到根节点上的driverIndex并转成int类型


        //获取到所有"name"子节点,遍历,找出与根节点中的driverIndex相同的,将其value属性值获取出来,作为类全名用于反射
        List<Element> driverNameElements = rootElement.elements("name");
        for (Element driverNameElement1 : driverNameElements) {
            int i = Integer.parseInt(driverNameElement1.attributeValue("index"));
            if (i == index) {
                driverName = driverNameElement1.attributeValue("value");//获取到name子节点的“value”属性值
                driverNameElement = driverNameElement1;//将该节点赋值给driverElement,后续根据它来获得子节点
            }

        }


        /**
         * 通过类全名,反射出驱动类来
         */
        try {
            clazz = Class.forName(driverName);
        } catch (ClassNotFoundException e) {

            e.printStackTrace();
        }

        /**
         * 下面是解析XML中的系统参数以及能力参数
         */

        Element propertiesElement = driverNameElement.element("properties");
        List<Element> propertyElements = propertiesElement.elements("property");

        //设置系统参数
        for (Element property : propertyElements) {

            System.setProperty(property.attributeValue("name"), property.attributeValue("value"));

        }

        //设置能力(ie的话,需要设置忽略域设置等级 以及忽略页面百分比的能力)
        Element capabilitiesElement = driverNameElement.element("capabilities");
        if (capabilitiesElement != null) {
            //创建能力对象
            DesiredCapabilities realCapabilities = new DesiredCapabilities();
            //获得能力列表
            List<Element> capabilitiesElements = capabilitiesElement.elements("capability");
            for (Element capability : capabilitiesElements) {
                //遍历能力列表,并给能力赋值
                realCapabilities.setCapability(capability.attributeValue("name"), true);
            }
        }


        /*
         * 通过反射,创建驱动对象
         */

        try {
            obj = clazz.newInstance();
        } catch (InstantiationException e) {
            e.printStackTrace();
        } catch (IllegalAccessException e) {
            e.printStackTrace();
        }

        WebDriver driver = (WebDriver) obj;
        return driver;
    }

}
实现了只要修改配置文件中的driverIndex的值,就能去启动对应的浏览器。