SpringBoot静态资源处理
Boot默认约定静态资源目录
Boot在src/main/resources,有以下几个约定目录,静态资源jpg、html、css、js放入浏览器可以直接访问。
- public (优先级最低)
- static
- resources
- META-INF/resources(优先级最高)
每次浏览器访问静态资源,Boot会从优先级高的文件夹开始寻找。
Boot自定义静态资源目录
在启动类子包下,添加配置类
@Configuration
public class ResourcesConfig extends WebMvcConfigurerAdapter{

    @Override
    public void addResourceHandlers(ResourceHandlerRegistry registry) {
        registry.addResourceHandler("/myresources/**")
            .addResourceLocations("classpath:/myresources/");
    }

}
提示:自定义目录优先级最高;如果请求是/ **,会将默认4个目录取消。建议不要映射/ **请求
thymeleaf模板技术
模板技术=模板文件+数据对象==》HTML响应界面输出
velocity=.vm模板文件(VTL表达式)+数据对象
freemark=.ftl模板文件(FTL表达式)+数据对象
thymeleaf=*.html模板文件(th表达式)+数据对象
JSP-->Servlet(EL+JSTL)-->HTML响应界面
SpringBoot对thymeleaf模板技术提供了支持,在html模板文件中可以使用th表达式直接访问ModelAndView中的Model数据。
/hello.do-->DispatcherServlet-->HandlerMapping-->HelloController-->ModelAndView-->thymeleaf引擎-->/templates/hello.html(th表达式)
-
在pom.xml中引入spring-boot-starter-thymeleaf工具包
<!-- thymeleaf --> <dependency> <groupId>org.springframework.boot</groupId> <artifactId>spring-boot-starter-thymeleaf</artifactId> </dependency> -
编写HelloController
@Controller public class HelloController { @RequestMapping("/hello.do") public ModelAndView say(){ ModelAndView mav = new ModelAndView(); mav.setViewName("hello");//默认/templates/hello.html模板文件 mav.getModel().put("msg", "Hello Thymeleaf"); return mav; } } -
在src/main/resources下创建templates/hello.html模板文件
<!DOCTYPE html>
<html xmlns:th="http://www.thymeleaf.org">
    <head>
    <meta charset="UTF-8"/>
    <title>Insert title here</title>
    </head>
    <body>
        <h1>Thymeleaf 模板技术</h1>
        <h2 th:text="${msg}"></h2>
    </body>
</html>
提示:xmlns:th命名空间引入;html语法严格要求,标记有开始要有结束
-
启动MyBootApplication测试
浏览器输入:http://localhost:xxx/hello.do
提示:thymeleaf模板文件默认位置为/templates;扩展名为.html,如果需要修改可以在application.properties中指定
spring.thymeleaf.prefix=classpath:/xxx/
spring.thymeleaf.suffix=.xxx
(扩展)Java调用Rest服务
-
采用HttpURLConnection
URL restURL = new URL(url); HttpURLConnection conn = (HttpURLConnection) restURL.openConnection(); conn.setRequestMethod("POST"); conn.setDoOutput(true); conn.getInputStream(); ... ... -
采用HttpClient工具
提前下载apache的httpclient工具包,然后代码如下:
HttpClient httpClient = new DefaultHttpClient(); HttpGet req = new HttpGet(url); HttpResponse resp = httpClient.execute(req); HttpEntity entity = resp.getEntity(); InputStream input = entity.getContent(); -
采用Spring提供的RestTemplate对象
@Controller
public class ListController {

    @Autowired//自动配置已经创建了该对象
    private RestTemplateBuilder templateBuilder;

    @RequestMapping("/list.do")
    public String showList(ModelMap model){
        List<Dept> list = new ArrayList<Dept>();
        //调用http://localhost:8888/dept服务获取部门信息
        RestTemplate restTemplate = templateBuilder.build();
        List<Map<String,Object>> restList =
                restTemplate.getForObject(
                    "http://localhost:8888/dept", List.class);
        //... 省略
        //将List<Map>转成List<Dept>
		for(Map<String,Object> map:restList){
			//将map对象信息封装成dept对象
			try {
				Dept dept =  new Dept();
				BeanUtils.populate(dept, map);//map中key名和dept中属性名一致
				list.add(dept);
			} catch (Exception e) {
				e.printStackTrace();
			}
		}
		model.put("depts", list);
		return "list";//templates/list.html
    }
}
SpringBoot对JavaWeb支持
Servlet组件
-
编写Servlet组件,然后追加@WebServlet标记
@WebServlet(urlPatterns="/myservlet.do") public class MyServlet extends HttpServlet{ public void service( HttpServletRequest request,HttpServletResponse response) throws IOException{ String name = request.getParameter("name"); PrintWriter out = response.getWriter(); if(name==null || "".equals(name)){ out.println("Hello Servlet"); }else{ out.println("Hello "+name); } out.close(); } } -
在主启动类前添加@ServletComponentScan
@SpringBootApplication
@ServletComponentScan//扫描servlet组件
public class MyBootApplication {

    public static void main(String[] args) {
        SpringApplication.run(MyBootApplication.class, args);
    }

}
Filter组件
-
编写Filter组件,追加@WebFilter注解
//@WebFilter(urlPatterns="/myservlet.do") @WebFilter(servletNames={"myservlet"}) public class MyFilter implements Filter{ @Override public void destroy() { // TODO Auto-generated method stub } @Override public void doFilter(ServletRequest request, ServletResponse response, FilterChain chain) throws IOException, ServletException { request.setCharacterEncoding("UTF-8"); chain.doFilter(request, response); System.out.println("---执行了MyFilter--"); } @Override public void init(FilterConfig arg0) throws ServletException { // TODO Auto-generated method stub } } -
主入口类添加@ServletComponentScan
Listener组件
-
编写Listener组件,追加@WebListener标记
@WebListener public class MyListener implements ServletContextListener,HttpSessionListener{ ServletContext application; @Override public void contextDestroyed(ServletContextEvent arg0) { application.removeAttribute("count"); } @Override public void contextInitialized(ServletContextEvent arg0) { application = arg0.getServletContext(); application.setAttribute("count", 0); } @Override public void sessionCreated(HttpSessionEvent arg0) { Integer count = (Integer)application.getAttribute("count"); count++; application.setAttribute("count", count); } @Override public void sessionDestroyed(HttpSessionEvent arg0) { Integer count = (Integer)application.getAttribute("count"); count--; application.setAttribute("count", count); } } -
主入口类添加@ServletComponentScan
SpringBoot使用AOP
SpringBoot定时任务调度
启动立刻执行的任务
-
编写任务实现类,实现CommandLineRunner接口
@Component public class MyTask1 implements CommandLineRunner{ @Override public void run(String... args) throws Exception { System.out.println("开始执行任务1"); } } -
编写任务实现类,实现ApplicationRunner接口
@Component
@Order(2)
public class MyTask2 implements ApplicationRunner{

    @Override
    public void run(ApplicationArguments args) throws Exception {
        System.out.println("开始执行任务2");
    }

}
提示:多个任务时,可以使用@Order(2)指定任务调用顺序,1、2、3...。
定时周期性调用任务
-
编写任务类,追加@EnableScheduling和@Scheduled标记
@Component
@EnableScheduling//启用定时计划
public class MyTask3 {

    @Scheduled(cron="0/5 * * * * ?")
    public void run(){
        System.out.println("定时执行任务3:"+new Date());
    }

}
每隔5秒中调用一次。
-
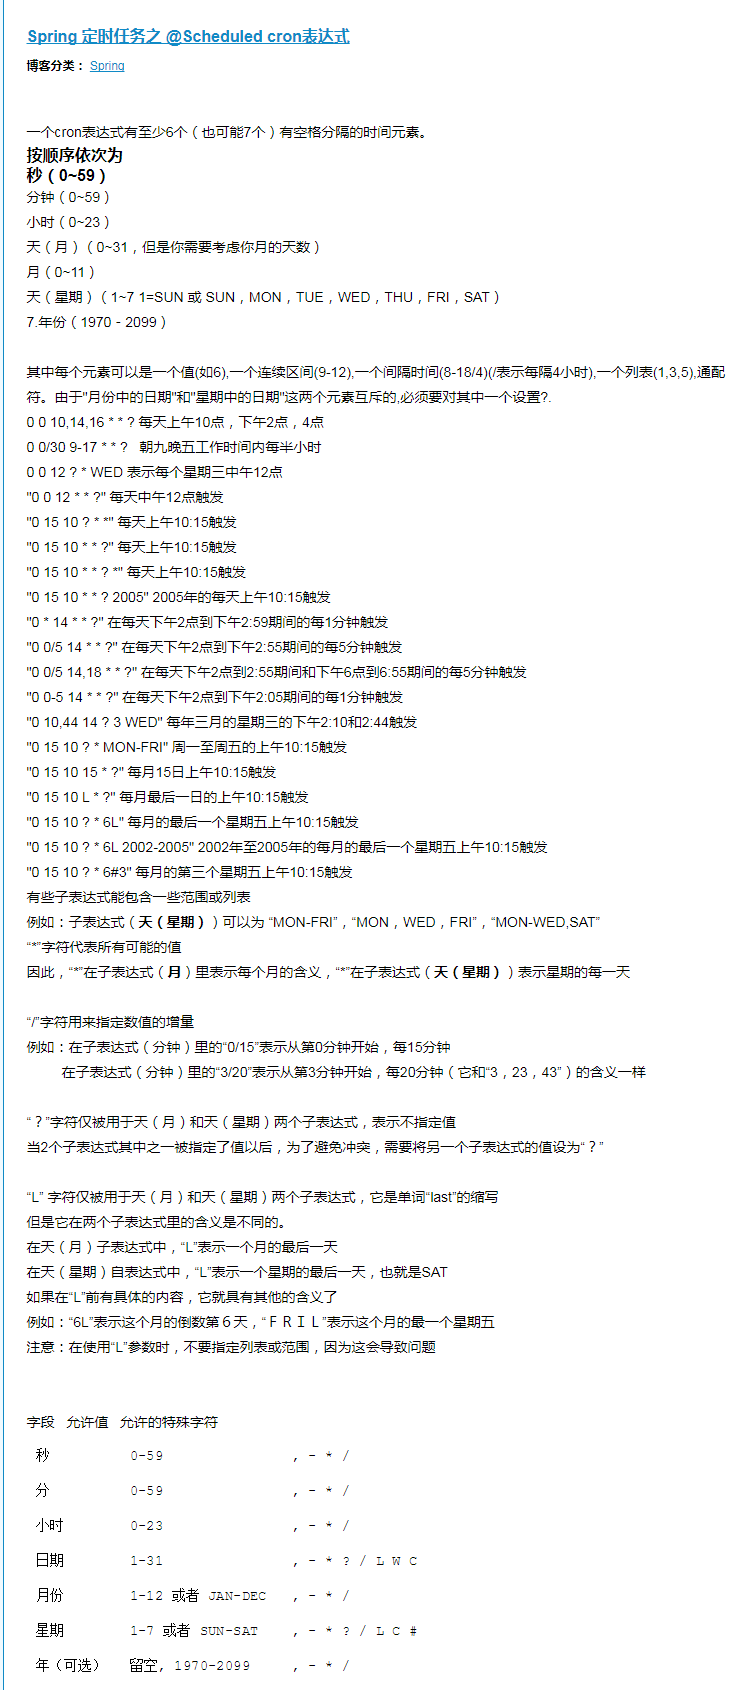
corn表达式
参考下面资料
Maven 中央仓库地址
1、http://www.sonatype.org/nexus/ 私服nexus工具使用
2、http://mvnrepository.com/ (推荐)
3、http://repo1.maven.org/maven2
4、http://maven.aliyun.com/nexus/content/groups/public/ 阿里云 (强力推荐)
5、http://repo2.maven.org/maven2/ 私服nexus工具使用
6、http://uk.maven.org/maven2/
7、http://repository.jboss.org/nexus/content/groups/public
8、http://maven.oschina.net/content/groups/public/ oschina可惜啦,以前一直用这个,不过现在有阿里云来擦屁股啦
9、http://mirrors.ibiblio.org/maven2/
10、http://maven.antelink.com/content/ repositories/central/
11、http://nexus.openkoala.org/nexus/content/groups/Koala-release/
12、http://maven.tmatesoft.com/content/groups/public/
其实,国内maven镜像虽然快,但是更新比较慢,国外的仓库由于国内网络的原因,下载简直不能忍,但是更新很快,可以根据自身的情况选择,有些人会花些钱开代理访问外网比较快,建议使用原装。下面是maven库配置
oschina-repo 开源中国镜像 central 可以根据自己的网络情况选填上面的url