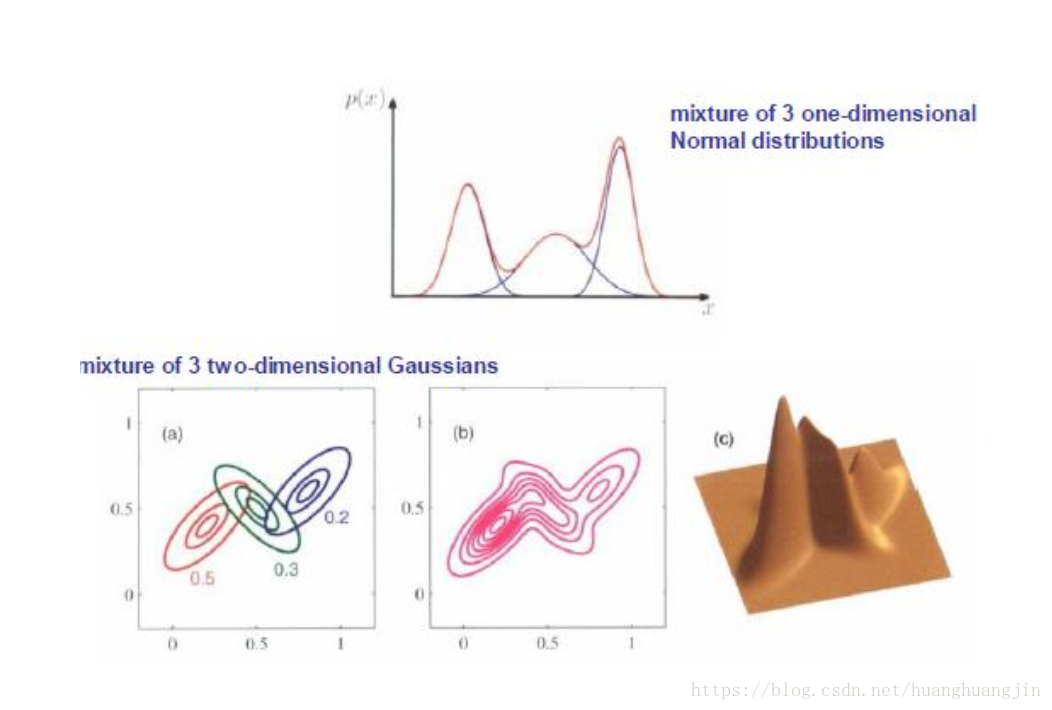
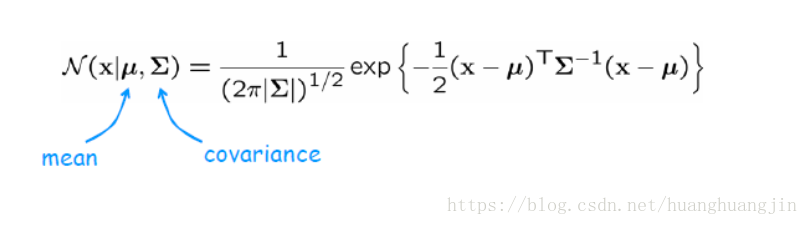
高斯分布与概率密度分布 - PDF :
GMM方法跟K-Means相比较,属于软分类
实现方法-期望最大化(E-M)
停止条件-收敛,或规定的循环次数
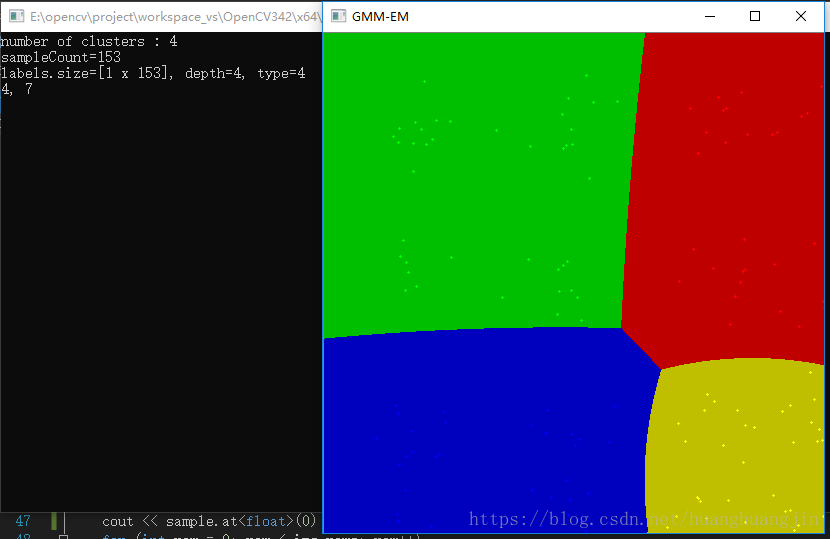
代码: 样本数据训练与预言
    #include "../common/common.hpp"

    void main(int argc, char** argv)
    {
        Mat img = Mat::zeros(500, 500, CV_8UC3);
        RNG rng(12345);

        Scalar colorTab[] = {
            Scalar(0, 0, 255), // 红
            Scalar(0, 255, 0), // 绿
            Scalar(255, 0, 0), // 蓝
            Scalar(0, 255, 255), // 黄
            Scalar(255, 0, 255) // 品红
        };

        int numCluster = rng.uniform(2, 5);
        printf("number of clusters : %d\n", numCluster);

        int sampleCount = rng.uniform(5, 1000);
        cout << "sampleCount=" << sampleCount << endl;
        Mat points(sampleCount, 2, CV_32FC1); // 2列,单通道,与KMeans的数据聚类不一样
        Mat labels;

        // 生成随机数
        for (int k = 0; k < numCluster; k++)
        {
            Point center;
            center.x = rng.uniform(0, img.cols);
            center.y = rng.uniform(0, img.rows);
            Mat pointChunk = points.rowRange(k*sampleCount / numCluster, k == numCluster - 1 ? sampleCount : (k + 1)*sampleCount / numCluster);
            rng.fill(pointChunk, RNG::NORMAL, Scalar(center.x, center.y), Scalar(img.cols*0.05, img.rows*0.05));
        }
        randShuffle(points, 1, &rng);

        Ptr<cv::ml::EM> em_model = cv::ml::EM::create(); // 生成 EM 期望最大化
        em_model->setClustersNumber(numCluster); // 设置分类数
        em_model->setCovarianceMatrixType(cv::ml::EM::COV_MAT_SPHERICAL); // 协方差矩阵类型
        em_model->setTermCriteria(TermCriteria(TermCriteria::EPS + TermCriteria::COUNT, 100, 0.1)); // 迭代条件,EM训练比KMeans耗时,可能会不收敛,所以迭代次数设大点
        em_model->trainEM(points, noArray(), labels, noArray()); // EM训练,获得分类结果,参数labels与KMeans的labels参数意思一样
        // labels.size=[1 x 153], depth=4, type=4    CV_32S
        cout << "labels.size=" << labels.size() << ", depth=" << labels.depth() << ", type=" << labels.type() << endl;

        // classify every image pixels
        Mat sample(1, 2, CV_32FC1);
        sample.at<float>(0, 0) = 4;
        sample.at<float>(0, 1) = 7;
        cout << sample.at<float>(0) << ", " << sample.at<float>(1) << endl; // 4, 7
        for (int row = 0; row < img.rows; row++)
        {
            for (int col = 0; col < img.cols; col++)
            {
                sample.at<float>(0) = (float)col;
                sample.at<float>(1) = (float)row;
                Vec2d predict = em_model->predict2(sample, noArray()); // 预言
                int response = cvRound(predict[1]); // response 就是给出的当前的分类
                Scalar c = colorTab[response];
                circle(img, Point(col, row), 1, c*0.75, -1); // 以EM预言的分类结果,将img当前点用不同颜色绘制出来
            }
        }

        // draw the clusters
        for (int i = 0; i < sampleCount; i++)
        {
            Point p(cvRound(points.at<float>(i, 0)), points.at<float>(i, 1));
            circle(img, p, 1, colorTab[labels.at<int>(i)], -1); // 用不同颜色在img上绘制上面随机产生的分类点
        }

        imshow("GMM-EM", img);

        waitKey(0);
    }
效果图
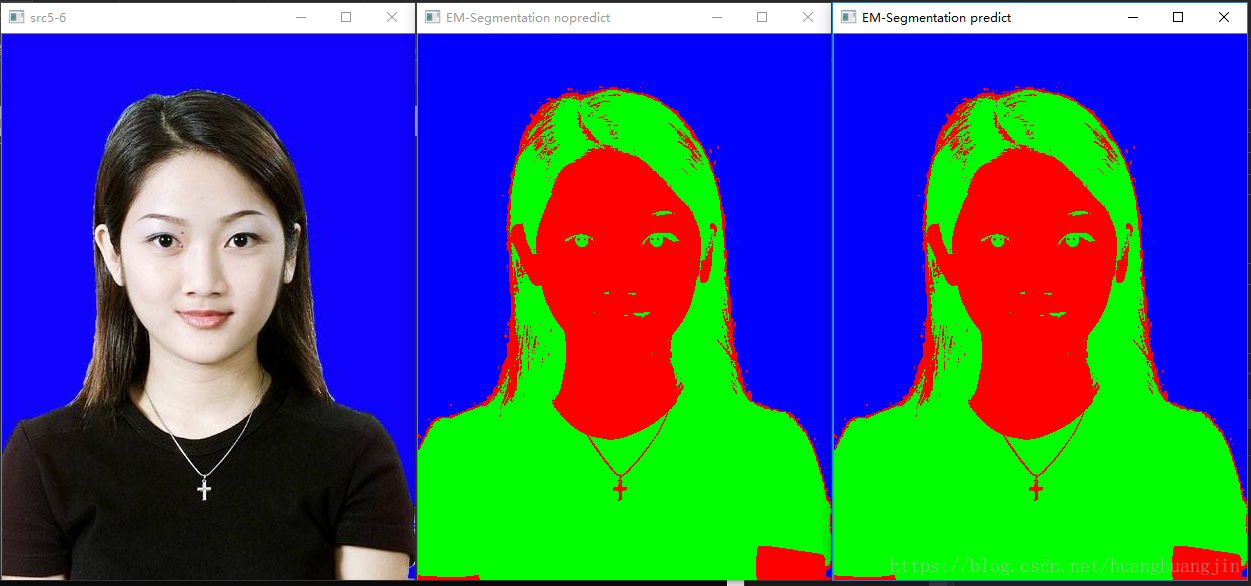
代码: 图像分割
    #include "../common/common.hpp"

    using namespace cv::ml;

    void main(int argc, char** argv)
    {
        Mat src = imread(getCVImagesPath("images/toux.jpg"));
        imshow("src5-6", src);

        // 初始化
        int numCluster = 3;
        const Scalar colors[] = {
            Scalar(255, 0, 0),
            Scalar(0, 255, 0),
            Scalar(0, 0, 255),
            Scalar(255, 255, 0)
        };

        int width = src.cols;
        int height = src.rows;
        int dims = src.channels();
        int nsamples = width*height;
        Mat points(nsamples, dims, CV_64FC1); // 这里不同于KMeans,需要 CV_64F 的深度,用 CV_32F 会报错
        Mat labels;

        // 图像RGB像素数据转换为样本数据
        int index = 0;
        for (int row = 0; row < height; row++) // 这里的步骤与KMeans是一样的
        {
            for (int col = 0; col < width; col++)
            {
                index = row*width + col;
                Vec3b bgr = src.at<Vec3b>(row, col);
                points.at<double>(index, 0) = static_cast<int>(bgr[0]);
                points.at<double>(index, 1) = static_cast<int>(bgr[1]);
                points.at<double>(index, 2) = static_cast<int>(bgr[2]);
            }
        }

        double time = getTickCount();
        // EM Cluster Train
        Ptr<EM> em_model = EM::create(); // 生成 EM 期望最大化,其图像分割的方式是基于机器学习的方式
        em_model->setClustersNumber(numCluster); // 设置分类数
        em_model->setCovarianceMatrixType(EM::COV_MAT_SPHERICAL); // 协方差矩阵类型
        em_model->setTermCriteria(TermCriteria(TermCriteria::EPS + TermCriteria::COUNT, 100, 0.1)); // 迭代条件,EM训练比KMeans耗时,可能会不收敛,所以迭代次数设大点
        em_model->trainEM(points, noArray(), labels, noArray()); // EM训练,获得分类结果,参数labels与KMeans的labels参数意思一样,速度比KMeans要慢很多
        // labels.size=[1 x 225498], depth=4, type=4    CV_32S
        cout << "labels.size=" << labels.size() << ", depth=" << labels.depth() << ", type=" << labels.type() << endl;
        cout << "train time=" << (getTickCount() - time) / getTickFrequency() * 1000 << endl; // train time=10425.8  训练所需的时间很长

        // 对每个像素标记颜色与显示
        Mat result_nopredict = Mat::zeros(src.size(), CV_8UC3);
        Mat result_predict = Mat::zeros(src.size(), CV_8UC3);
        Mat sample(dims, 1, CV_64FC1); // 也只能用 CV_64F
        time = getTickCount();
        int r = 0, g = 0, b = 0;
        for (int row = 0; row < height; row++)
        {
            for (int col = 0; col < width; col++)
            {
                // 获取训练的分类结果,放到 result_nopredict 中
                index = row*width + col;
                int label = labels.at<int>(index, 0);
                Scalar c = colors[label];
                result_nopredict.at<Vec3b>(row, col)[0] = c[0];
                result_nopredict.at<Vec3b>(row, col)[1] = c[1];
                result_nopredict.at<Vec3b>(row, col)[2] = c[2];

                // 通过预言获得分类结果,因为EM训练用的是src的颜色数据,所以用src的颜色数据做预言,得到的结果与 result_nopredict 是一模一样的
                b = src.at<Vec3b>(row, col)[0];
                g = src.at<Vec3b>(row, col)[1];
                r = src.at<Vec3b>(row, col)[2];
                sample.at<double>(0) = b;
                sample.at<double>(1) = g;
                sample.at<double>(2) = r;
                Vec2d predict = em_model->predict2(sample, noArray()); // 预言,预言的时间是很短的
                int response = cvRound(predict[1]); // response 就是目标颜色数据在EM训练中预言的分类
                c = colors[response];
                result_predict.at<Vec3b>(row, col)[0] = c[0];
                result_predict.at<Vec3b>(row, col)[1] = c[1];
                result_predict.at<Vec3b>(row, col)[2] = c[2];

            }
        }
        printf("execution time(ms) : %.2f\n", (getTickCount() - time) / getTickFrequency() * 1000); // execution time(ms) : 1600.31
        imshow("EM-Segmentation nopredict", result_nopredict); // 从效果看,KMeans更好些
        imshow("EM-Segmentation predict", result_predict);

        waitKey(0);
    }