1.什么是服务容错保护
基于Netfix的开源框架Hystrix实现的,该框架的目标在于通过控制那些远程访问系统、服务、和第三方库的节点,从而对延迟和故障提供更强大的容错能力。Hystrix具备服务降级,服务熔断、线程和信号隔离、请求缓存、请求合并以及服务监控等强大功能
2.项目实战
打上注解的时候可以用@springCloudApplication注解,,可以看出一般spring cloud客户端都需要服务容错和eureka客户端这两大自动配置服务
//@EnableDiscoveryClient
//@EnableCircuitBreaker
//@SpringBootApplication
@SpringCloudApplication
public class DemoApplication {

    @Bean
    @LoadBalanced
    RestTemplate restTemplate(){

        return new RestTemplate();

    }

    public static void main(String[] args) {
        SpringApplication.run(DemoApplication.class, args);
    }
}
写上@HystrixComman注解,把备用方法的方法名写上去。如果线程阻塞或者节点无法访问都会触发备用方法
@Service
public class ConsumerService {

    @Autowired
    private RestTemplate restTemplate;

    @HystrixCommand(fallbackMethod = "helloError")
    public String helloConsumer(){

        return restTemplate.getForEntity("http://HELLO-SERVICE/hello",String.class).getBody();
    }

    public String helloError(){
        return "error";
    }
}
3.原理分析
1.创建HystrixCommand 或HystrixObervableCommand 对象
HystrixCommand :用在依赖的服务返回单个操作结果的时候
HystrixObervableCommand :用在依赖的服务返回多个操作结果的时候
使用的设计模式是命令模式
命令模式:将来自客户端的请求封装成一个对象,从而让你可以使用不同的请求对客户端进行参数化。它可以被用于实现”行为请求者“与”行为实现者“的解耦,以便使两者可以适应变化
意图:将一个请求封装成一个对象,从而使您可以用不同的请求对客户进行参数化。
(个人理解:将请求封装成对象,可以使用多种不同的请求对象进行命令的请求)
- Receiver:接受者,真正的处理具体的业务逻辑
- Command:抽象命令,里面定义了一系列命令操作。当命令对象被调用时候就会去调用接受者
- ConcreteCommand:命令的具体实现类,在这里就是绑定了接受者和命令对象的关系,耦合在一起
- Invoke:调用者,它持有命令对象,通过发送命令,让接受者执行某些命令
2.命令执行
从hystrix在执行时候会创建command对象
HystrixCommand 实现下面的执行方式
execute() 同步执行 ,从依赖的服务返回一个单一的结果对象,或是在发生错误的时候抛出异常

queue() 异步执行,直接返回一个Future对象,其中包含了服务执行结束时要返回的的单一结果对象
HystrixObservableCommand
observe() 返回 Observable 对象,它代表了操作的多个结果,它是一个HotObervable
toObserve() 返回Obervable对象,也代表了操作的多个结果,但它返回的是一个ColdObservable
在Hystrix底层中大量使用的是Rxjava响应式编程,主要解决异步混乱问题。
HotObervable:无论事件源是否有订阅者,都会在创建事件后进行发布,每一个订阅者都可能是从事件源的中途开始的
ColdObservable:只有有订阅者才会发布事件,不然不会发布而一直等待
public R execute() {
        try {
            return this.queue().get();
        } catch (Exception var2) {
            throw Exceptions.sneakyThrow(this.decomposeException(var2));
        }
    }

    public Future<R> queue() {
        final Future<R> delegate = this.toObservable().toBlocking().toFuture();
        Future<R> f = new Future<R>() {
            public boolean cancel(boolean mayInterruptIfRunning) {
                if (delegate.isCancelled()) {
                    return false;
                } else {
                    if ((Boolean)HystrixCommand.this.getProperties().executionIsolationThreadInterruptOnFutureCancel().get()) {
                        HystrixCommand.this.interruptOnFutureCancel.compareAndSet(false, mayInterruptIfRunning);
                    }

                    boolean res = delegate.cancel(HystrixCommand.this.interruptOnFutureCancel.get());
                    if (!HystrixCommand.this.isExecutionComplete() && HystrixCommand.this.interruptOnFutureCancel.get()) {
                        Thread t = (Thread)HystrixCommand.this.executionThread.get();
                        if (t != null && !t.equals(Thread.currentThread())) {
                            t.interrupt();
                        }
                    }

                    return res;
                }
            }

            public boolean isCancelled() {
                return delegate.isCancelled();
            }

            public boolean isDone() {
                return delegate.isDone();
            }

            public R get() throws InterruptedException, ExecutionException {
                return delegate.get();
            }

            public R get(long timeout, TimeUnit unit) throws InterruptedException, ExecutionException, TimeoutException {
                return delegate.get(timeout, unit);
            }
        };
        if (f.isDone()) {
            try {
                f.get();
                return f;
            } catch (Exception var6) {
                Throwable t = this.decomposeException(var6);
                if (t instanceof HystrixBadRequestException) {
                    return f;
                } else if (t instanceof HystrixRuntimeException) {
                    HystrixRuntimeException hre = (HystrixRuntimeException)t;
                    switch(hre.getFailureType()) {
                    case COMMAND_EXCEPTION:
                    case TIMEOUT:
                        return f;
                    default:
                        throw hre;
                    }
                } else {
                    throw Exceptions.sneakyThrow(t);
                }
            }
        } else {
            return f;
        }
    }
3.结果是否被缓存
缓存功能打开并且缓存命中,那么缓存的结果会以Observable对象返回
4.断路器是否打开
如果没有缓存结果,那么就表明没有Observable对象返回,所以接着继续判断断路器是否打开,如果打开了那么hystrix不会执行相应的命令而是直接跳到fallback里面执行备用方法。如果断路器没打开接着继续判断。
5.线程池/请求队列/信号量是否占满
如果三者之一已经占满,那么直接跳到fallback里面执行备用方法
6.HystrixObservableCommand.construt()或HystrixCommand.run()
HystrixObservableCommand.construt() :返回Observable对象发射多个结果
HystrixCommand.run() : 返回单一结果或者抛出异常
如果上述方法调用超时,那么直接跳到fallback方法。同时,如果当前命令没有被取消或者中断,那么他最终会忽略返回值。
如果命令调用成功没有异常且返回了结果,那么hystrix记录日志和监控报告后将结果返回
run情况下返回observale,并调用onComplete的结束通知
construt情况下直接返回observale
7.计算断路器的健康度
Hystrix会将成功、失败、拒绝、超时等信息报告给断路器,断路器会统计这组数据。如果数据不佳则会采用短路的方式架空服务调用,维持一段时间称为恢复期。当恢复期结束后,再次判断数据,如果还是不佳,则继续短路,否则恢复。
8.fallback处理
我们通常称此操作为服务降级,总的来说超时、线程池请求队列信号量占满、断路器打开都会引起服务降级
服务降级需要实现一个通用的响应结果,切记不能是网络资源。如果一定要是网络操作,则必须是级联的操作。如果级联成功则返回observale,否则会根据执行方法的不同而返回相应的东西
4.断路器原理
断路器首先从HystrixCircuitBreaker入手
public interface HystrixCircuitBreaker {
    boolean allowRequest();

    boolean isOpen();

    void markSuccess();

    void markNonSuccess();

    boolean attemptExecution();

    public static class NoOpCircuitBreaker implements HystrixCircuitBreaker {}

    public static class Factory {}
isopen() 判断断路器是否打开
由源码可以看出来,第一个判断条件是否强制打开,第二个判断条件是否强制关闭,第三个判断条件则是判断circuitOpened的大小,如果大于等于0直接返回true代表断路器打开
public boolean isOpen() {
            if ((Boolean)this.properties.circuitBreakerForceOpen().get()) {
                return true;
            } else if ((Boolean)this.properties.circuitBreakerForceClosed().get()) {
                return false;
            } else {
                return this.circuitOpened.get() >= 0L;
            }
        }
this.circuitOpened = new AtomicLong(-1L);private Subscription subscribeToStream() {
return this.metrics.getHealthCountsStream().observe().subscribe(new Subscriber<HealthCounts>() {
public void onCompleted() {
}
public void onError(Throwable e) {
}
public void onNext(HealthCounts hc) {
if (hc.getTotalRequests() >= (long)(Integer)HystrixCircuitBreakerImpl.this.properties.circuitBreakerRequestVolumeThreshold().get() && hc.getErrorPercentage() >= (Integer)HystrixCircuitBreakerImpl.this.properties.circuitBreakerErrorThresholdPercentage().get() && HystrixCircuitBreakerImpl.this.status.compareAndSet(HystrixCircuitBreaker.HystrixCircuitBreakerImpl.Status.CLOSED, HystrixCircuitBreaker.HystrixCircuitBreakerImpl.Status.OPEN)) {
HystrixCircuitBreakerImpl.this.circuitOpened.set(System.currentTimeMillis());
}
}
});
}
allowRequest() 判断请求是否被允许
前面条件是判断属性文件,最后面则是判断断路器是否有半打开的状态,也就是说还在不在恢复期,如果有这个条件,则去判断当前时间是不是已经过了恢复期,如果是则返回true
 public boolean allowRequest() {
            if ((Boolean)this.properties.circuitBreakerForceOpen().get()) {
                return false;
            } else if ((Boolean)this.properties.circuitBreakerForceClosed().get()) {
                return true;
            } else if (this.circuitOpened.get() == -1L) {
                return true;
            } else {
                return ((HystrixCircuitBreaker.HystrixCircuitBreakerImpl.Status)this.status.get()).equals(
HystrixCircuitBreaker.HystrixCircuitBreakerImpl.Status.HALF_OPEN) ? false :
this.isAfterSleepWindow();
            }
        }
private boolean isAfterSleepWindow() {
long circuitOpenTime = this.circuitOpened.get();
long currentTime = System.currentTimeMillis();
long sleepWindowTime = (long)(Integer)this.properties.circuitBreakerSleepWindowInMilliseconds().get();
return currentTime > circuitOpenTime + sleepWindowTime;
}markSuccess() 该函数用于在半开路状态时使用,若Hystrix命令调用成功,通过调用它将打开的断路器关闭,并重置circuitOpend对象的数值
public void markNonSuccess() {
            if (this.status.compareAndSet(HystrixCircuitBreaker.HystrixCircuitBreakerImpl.Status.H
ALF_OPEN, HystrixCircuitBreaker.HystrixCircuitBreakerImpl.Status.OPEN)) {
                this.circuitOpened.set(System.currentTimeMillis());
            }

        }
大致流程:
当HystrixCommand调用isopen()的时候,通过Metrics计算出调用失败率,failure/(success+failure)= % ,如果错误率大于阈值则返回true,并记录此次数据。
当HystrixCommand调用allowRequest()的时候,判断是否open,如果否则判断是否在恢复期,如果恢复期已经过去则请求允许通过
当HystrixCommand调用markSuccess(),如果open则关闭断路器,将数据通过Metrics记录
当HystrixCommand调用markFailure(),记录失败数据
5.依赖隔离
舱壁模式:Docker使用的就是此模式,容器与容器之间的隔离
Hystrix则用此模式实现线程池的隔离,为每一个服务依赖创建一个线程池,这样子每个线程池互不影响,互不霸占所有资源,当一个服务依赖故障时候不会影响其他服务依赖。
由于使用线程池会损耗一定的性能,所以又有了信号量来控制单个依赖服务的并发量,但是它不能设置超时和实现异步访问
命令执行:execution.isloation.strategy=SEMAPHORE,Hystrix会使用信号量替代线程池来控制依赖服务的并发
降级逻辑:当Hystrix尝试逻辑时,它会在调用线程中使用信号量
信号量的默认值为10,我们可以通过动态刷新的方式控制并发数量大小,性能达到5000rps(一秒的请求数量)可以将信号量设置为1-2
6.使用详解
创建请求命令
(1) 通过继承的方式来实现HystrixCommand
通过调用execute方法是同步方法 ,返回User
通过调用queque方法是异步方法,返回的是Future<T>对象,通过get方法可以获取结果
public class UserCommand extends HystrixCommand<User> {

    private RestTemplate restTemplate;
    private Long id;

    protected UserCommand(Setter setter,RestTemplate restTemplate,Long id) {
        super(setter);
        this.restTemplate=restTemplate;
        this.id=id;
    }

    @Override
    protected User run() throws Exception {
        return restTemplate.getForObject("http://USER-SERVICE/user/{1}",User.class,id);
    }
}
(2) 通过注解实现Hystrix命令
同步方法
@HystrixCommand(fallbackMethod = "helloError")
    public User helloConsumer(){
        return restTemplate.getForEntity("http://HELLO-SERVICE/hello",User.class).getBody();
    }
异步方法
@HystrixCommand
    public Future<User> getUserAsync(){
        return new AsyncResult<User>(){

            @Override
            public User invoke() {
                return restTemplate.getForEntity("http://HELLO-SERVICE/hello",User.class).getBody();
            }
        };
    }
虽然HystrixCommand具备oberve()和toObervable()方法,但是只能发射一次数据,所以hystrix还提供了HystrixObservableCommand
observe()
public class UserObservableCommand extends HystrixObservableCommand<User> {


    private RestTemplate restTemplate;
    private Long id;

    protected UserObservableCommand(Setter setter,RestTemplate restTemplate, Long id) {
        super(setter);
        this.restTemplate=restTemplate;
        this.id=id;
    }

    @Override
    protected Observable<User> construct() {

        return Observable.create(new Observable.OnSubscribe<User>() {
            @Override
            public void call(Subscriber<? super User> subscriber) {
                if(!subscriber.isUnsubscribed()){
                    User user=restTemplate.getForObject("http://USER-SERVICE/users{1}",User.class,id);
                    subscriber.onNext(user);
                    subscriber.onCompleted();
                }
            }
        });
    }

}
用注解实现
当要实现hot observe @HystrixCommand(observableExecutionMode = ObservableExecutionMode.EAGER)
当要实现cool observe @HystrixCommand(observableExecutionMode = ObservableExecutionMode.LAZY)
@HystrixCommand(observableExecutionMode = ObservableExecutionMode.EAGER)
    protected Observable<User> getUser() {

        return Observable.create(new Observable.OnSubscribe<User>() {

            @Override
            public void call(Subscriber<? super User> subscriber) {
                try {
                    if(!subscriber.isUnsubscribed()){
                        User user=restTemplate.getForObject("http://USER-SERVICE/users{1}",User.class,id);
                        subscriber.onNext(user);
                        subscriber.onCompleted();
                    }
                }catch (Exception e){
                    subscriber.onError(e);
                }

            }
        });
    }
下面demo从别处查看得来
地址:https://blog.csdn.net/liuchuanhong1/article/details/73293318
作者:牛奋lch
大致意思是执行了多条的rest资源请求,并将结果通过onnext()方法全部返回。
有需要的话需要学习rxjava了解一下
HystrixObservableCommand和HystrixCommand进行比较:
- HystrixCommand提供了同步和异步两种执行方式,而HystrixObservableCommand只有异步方式
- HystrixCommand的run方法是用内部线程池的线程来执行的,而HystrixObservableCommand则是由调用方(例如Tomcat容器)的线程来执行的,因为是异步,所以两种方式都能很好的起到资源隔离的效果。
- HystrixCommand一次只能发送单条数据返回,而HystrixObservableCommand一次可以发送多条数据返回.
if (!observer.isUnsubscribed()) {
		for (String id : ids) {
			CloseableHttpClient client = HttpClients.createDefault();
			HttpGet get = new HttpGet("http://localhost:7901/user/" + id);
			CloseableHttpResponse response = client.execute(get);
			HttpEntity entity = response.getEntity();
			String body = EntityUtils.toString(entity);
			ObjectMapper mapper = ObjectMapperInstance.getInstance();
			User u = mapper.readValue(body, User.class);
//			TimeUnit.SECONDS.sleep(3);
			observer.onNext(u);
		}
		observer.onCompleted();
	}
@RequestMapping("/users/{ids}")
	public String getAll(@PathVariable("ids") String ids){

		List<User> list = new ArrayList<User>();
		UserHystrixObservableCommand observableCommand = new
UserHystrixObservableCommand(ids.split("-"));
		Observable<User> observe = observableCommand.observe();
		observe.subscribe(new Observer<User>() {

			@Override
			public void onCompleted() {
				System.out.println("聚合完了所有的查询请求!");
				System.out.println(list);
			}

			@Override
			public void onError(Throwable t) {
				t.printStackTrace();
			}

			@Override
			public void onNext(User user) {
				list.add(user);
			}
		});
		return "success";
	}
定义服务降级
HystrixCommand:也就是我们常说的fallback方法,通过重写getFallback() 方法来写服务降级方法
 @Override
    protected User getFallback() {
        return new User();
    }
HystrixObservableCommand:也就是我们常说的fallback方法,通过重写resumeWithFallback() 方法来写服务降级方法
@Override
    protected Observable<User> resumeWithFallback() {
        return Observable.create(new Observable.OnSubscribe<User>() {
            @Override
            public void call(Subscriber<? super User> subscriber) {
                if(!subscriber.isUnsubscribed()){
                    User user=new User();
                    subscriber.onNext(user);
                    subscriber.onCompleted();
                }
            }
        });
    }
使用注解的方式来定义服务降级逻辑
@HystrixCommand(fallbackMethod = "helloError")
    public User helloConsumer(){
        return restTemplate.getForEntity("http://HELLO-SERVICE/hello",User.class).getBody();
    }

    public String helloError(){
        return "error";
    }
当发现备用方法也是一个不稳定的方法的时候也可以加上@HystrixCommand注解以生成Hystrix命令
 @HystrixCommand(fallbackMethod = "helloError")
    public User helloConsumer(){
        return restTemplate.getForEntity("http://HELLO-SERVICE/hello",User.class).getBody();
    }

    @HystrixCommand(fallbackMethod = "helloErrorTwo")
    public User helloError(){
        return restTemplate.getForEntity("http://HELLO-SERVICE/hello",User.class).getBody();
    }

    public String helloErrorTwo(){
        return "error";
    }
需要注意的是:在使用注解开发的时候,备用方法必须在同一个类中,又因为是同一个类,不管限定符是什么都可以调用这个备用方法
特殊情况:
1.执行文件的写操作,当写失败时候只需要通知调用者即可,因为写操作一般占据不少时间。
2.执行批处理或离线计算的命令:当失败的时候告诉调用者重试即可,不用去进行备用方法的调用
异常处理
由于除了HystrixBadRequestException之外,其他异常都会被判定为方法调用失败而执行备用方法。如果我们想指定异常不被判定为方法调用故障,那么如下所示
@HystrixCommand(ignoreExceptions = {BadRequestException.class},fallbackMethod = "helloError")
    public User helloConsumer(){
        return restTemplate.getForEntity("http://HELLO-SERVICE/hello",User.class).getBody();
    }
如果是想异常获取的话,有两种情况,一种是在继承的时候直接调用getExecutionException()方法,第二种是直接绑定到形参上就可以了。
@Override
    protected User getFallback() {
        getExecutionException();
        return new User();
    }
@HystrixCommand(fallbackMethod = "helloErrorTwo")
public User helloError(String id){
return restTemplate.getForEntity("http://HELLO-SERVICE/hello",User.class).getBody();
}
public String helloErrorTwo(String id,Throwable throwable){
return "error";
}命令名称、分组以及线程划分
GroupKey是一个必选的参数,因为Hystrix会根据组来组织和统计命令的的告警、仪表盘 等信息,且会根据相同组名来实现同一个线程池
protected UserCommand(Setter setter,RestTemplate restTemplate,Long id) {
        super(Setter.withGroupKey(HystrixCommandGroupKey.Factory.asKey("myGroup"))
.andCommandKey(HystrixCommandKey.Factory.asKey("hello"))
);
        this.restTemplate=restTemplate;
        this.id=id;
    }
为了进一步的更加细粒度的划分,最好使用HystrixThreadPoolkey的方式来指定线程池的划分,而不是通过组名来划分
 protected UserCommand(Setter setter,RestTemplate restTemplate,Long id) {
        super(Setter.withGroupKey(HystrixCommandGroupKey.Factory.asKey("myGroup")).andCommandKey(HystrixCommandKey.Factory.asKey("hello"))
                .andThreadPoolKey(HystrixThreadPoolKey.Factory.asKey("thread")));
        this.restTemplate=restTemplate;
        this.id=id;
    }
使用注解方式实现
@HystrixCommand(commandKey = "helloError",groupKey = "UserGroup",threadPoolKey="getUserById")
    public User helloError(String id){
        return restTemplate.getForEntity("http://HELLO-SERVICE/hello",User.class).getBody();
    }
请求缓存
由于使用http调用依赖服务相比于进程调用,损耗是非常大的,所以我们可以仿照数据缓存来进行请求缓存
在使用继承HystrixCommand或者HystrixObservableCommand时,通过重载getCacheKey()方法来开启请求缓存
缓存有点:
减少了请求次数,降低了依赖服务的并发度
由于缓存,相同的依赖服务数据相同
缓存会在run()和construt()调用之前生效,所以会减少不必要的线程开销
    @Override
    protected String getCacheKey() {
        return String.valueOf(id);
    }
清理失效缓存功能
如果请求的是更新操作,那么应该及时清理缓存,防止读取到脏数据
在HystrixCommand中可以通过HystrixRequestCache.clear();
里面的构造函数有两个,第一个就是我们之前设置的命令名称,第二个就是获取并发策略实例
@Override
    protected User run() throws Exception {
        //return restTemplate.getForObject("http://USER-SERVICE/user/{1}",User.class,id);
        User u= restTemplate.postForObject("http://USER-SERVICE/users",user,User.class);
        //清理缓存
        HystrixRequestCache.getInstance(HystrixCommandKey.Factory.asKey("hello"),
                HystrixConcurrencyStrategyDefault.getInstance()).clear(String.valueOf(u.getId()));
        return u;
    }
缓存工作原理解析
主要位于AbstractCommand的toObervable()方法中
尝试获取请求缓存:判断是否开启了缓存,如果开启了则通过cachekey去获取HystrixCachedObservable对象
 boolean requestCacheEnabled = AbstractCommand.this.isRequestCachingEnabled();
                    String cacheKey = AbstractCommand.this.getCacheKey();
                    if (requestCacheEnabled) {
                        HystrixCommandResponseFromCache<R> fromCachex = (HystrixCommandResponseFromCache)AbstractCommand.this.requestCache.get(cacheKey);
                        if (fromCachex != null) {
                            AbstractCommand.this.isResponseFromCache = true;
                            return AbstractCommand.this.handleRequestCacheHitAndEmitValues(fromCachex, AbstractCommand.this);
                        }
                    }
将请求结果加入缓存:
先获得一个延迟执行的结果对象hystrixObservable,如果开启了缓存对象,继续包装成缓存对象HystrixCachedObervable,变量名为tocache,通过putifAbsent将数据放到线程安全的map中,并且如果当前的fromCache不为null,则取消订阅操作就是不发送请求。
并且需要知道putIfAbsent是如果有数据则使用原先数据,没有的话才会put新数据。所以实际上已经记录了缓存,最后如果!null则直接调用缓存返回结果,如果为null则执行toObervable方法返回Observable对象
Observable<R> hystrixObservable = Observable.defer(applyHystrixSemantics).map(wrapWithAllOnNextHooks);
                    Observable afterCache;
                    if (requestCacheEnabled && cacheKey != null) {
                        HystrixCachedObservable<R> toCache = HystrixCachedObservable.from(hystrixObservable, AbstractCommand.this);
                        HystrixCommandResponseFromCache<R> fromCache = (HystrixCommandResponseFromCache)AbstractCommand.this.requestCache.putIfAbsent(cacheKey, toCache);
                        if (fromCache != null) {
                            toCache.unsubscribe();
                            AbstractCommand.this.isResponseFromCache = true;
                            return AbstractCommand.this.handleRequestCacheHitAndEmitValues(fromCache, AbstractCommand.this);
                        }

                        afterCache = toCache.toObservable();
                    } else {
                        afterCache = hystrixObservable;
                    }
<T> HystrixCachedObservable<T> putIfAbsent(String cacheKey, HystrixCachedObservable<T> f) {
HystrixRequestCache.ValueCacheKey key = this.getRequestCacheKey(cacheKey);
if (key != null) {
ConcurrentHashMap<HystrixRequestCache.ValueCacheKey, HystrixCachedObservable<?>> cacheInstance = (ConcurrentHashMap)requestVariableForCache.get(this.concurrencyStrategy);
if (cacheInstance == null) {
throw new IllegalStateException("Request caching is not available. Maybe you need to initialize the HystrixRequestContext?");
}
HystrixCachedObservable<T> alreadySet = (HystrixCachedObservable)cacheInstance.putIfAbsent(key, f);
if (alreadySet != null) {
return alreadySet;
}
}
return null;
}使用注解实现请求缓存
@CacheResult
通过此注解将会缓存返回的对象,而key值则是方法上面的参数
@CacheResult
    @HystrixCommand(ignoreExceptions = {BadRequestException.class},fallbackMethod = "helloError")
    public User helloConsumer(Long id){
        return restTemplate.getForEntity("http://HELLO-SERVICE/hello",User.class).getBody();
    }
@CacheResult(cacheKeyMethod="xxx")
通过此注解自定义需要缓存的数据的key值,类似于在使用继承方法的时候覆盖的缓存方法,括号里面写的是方法名
@CacheResult(cacheKeyMethod = "getUserByIdCacheKey")
    @HystrixCommand(ignoreExceptions = {BadRequestException.class},fallbackMethod = "helloError")
    public User helloConsumer(Long id){
        return restTemplate.getForEntity("http://HELLO-SERVICE/hello",User.class).getBody();
    }

    private Long getUserByIdCacheKey(Long id){
        return id;
    }
@CacheKey
此注解的作用同上边注解类似,唯一区别就是优先级的问题,此注解优先级较低,如果两种注解同时存在,那么此注解将会被忽略.顺带说明此注解还可以拿内部属性值
 @HystrixCommand(ignoreExceptions = {BadRequestException.class},fallbackMethod = "helloError")
    public User helloConsumer(@CacheKey Long id){
        return restTemplate.getForEntity("http://HELLO-SERVICE/hello",User.class).getBody();
    }
@HystrixCommand(ignoreExceptions = {BadRequestException.class},fallbackMethod = "helloError")
public User helloConsumer(@CacheKey("id") User user){
return restTemplate.getForEntity("http://HELLO-SERVICE/hello",User.class).getBody();
}@CacheRemove
这个注解与@CacheResult注解是相对的,目的是清楚缓存,所以也同上方的继承类一样,需要指定commankey来找到正确的请求命令缓存位置,并且通过指定key删除缓存.
注意:commandkey 是你在缓存的时候的commandkey
@CacheRemove(commandKey = "helloError")
@HystrixCommand(ignoreExceptions = {BadRequestException.class},fallbackMethod = "helloError")
    public User helloConsumer(@CacheKey("id") User user){
        return restTemplate.getForEntity("http://HELLO-SERVICE/hello",User.class).getBody();
    }
@CacheResult
@HystrixCommand(commandKey = "helloError",groupKey = "UserGroup",threadPoolKey="getUserById")
public User helloError(@Cachekey String id){
return restTemplate.getForEntity("http://HELLO-SERVICE/hello",User.class).getBody();
}请求合并
目的是为了将在一定时间范围内多个相同的请求合并在一起,通过一次访问的方式来解决。可以减少并发量,但是要考虑是否需要使用请求合并,如果访问少,请求快速的,应该不使用,不然只会拖延请求时间。
合并器的三个泛型参数是分别是
- 合并请求后的返回类型
- 单个请求返回类型
- 单个请求参数类型
- 首先使用构造器初始化配置,设置时间窗,并且设置了合并器命令名称
- 通过getRequestArgument返回请求参数
- 然后创建命令,将所有的请求数据拿出来,通过流的操作获取所有的请求参数。
- 最后通过mapResponse返回所有请求的对象,也就是将合并请求的所有数据拆分后分发到每个线程
大概流程
首先服务提供者
public class UserCollapseCommand extends HystrixCollapser<List<User>,User,Long> {
    private UserService userService;
    private Long userId;

    public UserCollapseCommand(UserService userService, Long userId) {
        super(Setter.withCollapserKey(HystrixCollapserKey.Factory.asKey("userCollapseCommand")).andCollapserPropertiesDefaults(
                HystrixCollapserProperties.Setter().withTimerDelayInMilliseconds(100)
        ));
        this.userService = userService;
        this.userId = userId;
    }

    @Override
    public Long getRequestArgument() {
        return userId;
    }

    @Override
    protected HystrixCommand<List<User>> createCommand(Collection<CollapsedRequest<User, Long>> collection) {
        List<Long> userIds=new ArrayList<>(collection.size());
        userIds.addAll(collection.stream().map(CollapsedRequest::getArgument).collect(Collectors.toList()));

        return new UserBatchCommand(userService,userIds);
    }

    @Override
    protected void mapResponseToRequests(List<User> users, Collection<CollapsedRequest<User, Long>> collection) {
        int count=0;
        for(CollapsedRequest<User,Long> collapsedRequest:collection){
            User user=users.get(count++);
            collapsedRequest.setResponse(user);
        }
    }


}
@RestController
public class ConsumerController {


    @Autowired
    private  RestTemplate restTemplate;

    @RequestMapping("/consumer")
    public String helloConsumer() throws ExecutionException, InterruptedException {


        //请求合并
        HystrixRequestContext context = HystrixRequestContext.initializeContext();
        HjcBatchCommand command = new HjcBatchCommand(restTemplate,1L);
        HjcBatchCommand command1 = new HjcBatchCommand(restTemplate,2L);
        HjcBatchCommand command2 = new HjcBatchCommand(restTemplate,3L);

        //这里你必须要异步,因为同步是一个请求完成后,另外的请求才能继续执行,所以必须要异步才能请求合并
        Future<String> future = command.queue();
        Future<String> future1 = command1.queue();

        String r = future.get();
        String r1 = future1.get();

        Thread.sleep(2000);
        //可以看到前面两条命令会合并,最后一条会单独,因为睡了2000毫秒,而你请求设置要求在200毫秒内才合并的。
        Future<String> future2 = command2.queue();
        String r2 = future2.get();

        System.out.println(r);
        System.out.println(r1);
        System.out.println(r2);

        context.close();

        return null;

    }

}
复制代码
使用注解实现请求合并器
在Controller只要调用相应的方法即可,请求合并器会拦截请求并且将请求放到队列中等待一并发送
@Service("peopleService")
public class PeopleServiceImpl implements PeopleService {
    @Autowired
    private RestTemplate restTemplate;

    @HystrixCollapser(batchMethod = "findAll",
            collapserProperties = {@HystrixProperty(name = "timerDelayInMilliseconds", value = "100")})
    public Future<User> find(Long id) {
        throw new RuntimeException("This method body should not be executed");
    }

    @HystrixCommand
    public List<User> findAll(List<Long> ids) {
        System.out.println("Annotation---------" + ids + "Thread.currentThread().getName():" + Thread.currentThread().getName());
        User[] users = restTemplate.getForObject("http://localhost:8762/users?ids={1}", User[].class, StringUtils.join(ids, ","));
        return Arrays.asList(users);
    }

}
7.属性详解
首相讲解四大属性设置的优先级,从低到高
- 全局默认值:也就是默认值
- 全局默认属性:通过在配置文件中定义全局属性值,可以通过动态刷新的方式更新配置
- 实例默认值:通过代码为实例定义全局属性值
- 实例配置属性:通过配置文件为指定实例进行属性配置
Command属性
execution:控制HystrixCommand.run() 的执行
execution.isolation.strategy来设置执行的隔离策略,参数值有两种
- THREAD:线程池隔离策略。并发限制受线程数量影响
- SEMAPHORE:通过信号量分离策略。并发限制受信号量的影响。效率高到时不知道超时和异步请求
书写方式
- 全局默认值:THREAD
- 全局默认属性:hystrix.command.default.execution.isolation.strategy
- 实例默认值:
- 继承HystrixCommandProperties.Setter().withExecutionIsoIationStrategy(ExecutionisoIationStrategy.THREAD)
- 注解:@HystrixProperty(name="execution.isolation.strategy" ,value="THREAD")
- 实例配置属性:hystrix.command.HystrixCommondKey.execution.isolation.strategy
execution.isolation.thread.timeoutInMilliseconds设置HystrixCommand执行超时时间,单位为毫秒
- 全局默认值:1000
- 全局默认属性:hystrix.command.default.execution.isolation.thread.timeoutInMillseconds
- 实例默认值:
- 继承HystrixCommandProperties.Setter().withExecutionTimeoutInMillseconds(1000)
- 注解:@HystrixProperty(name="execution.thread.timeoutnMillseconds" ,value="1000")
- 实例配置属性:hystrix.command.HystrixCommondKey.execution.isolation.thread.timeoutInMillseconds
execution.timeout.enabled设置HystrixCommand是否启用超时时间
- 全局默认值:true
- 全局默认属性:hystrix.command.default.execution.timeout.enabled
- 实例默认值:
- 继承HystrixCommandProperties.Setter().withExecutionTimeoutEnabled(true)
- 注解:@HystrixProperty(name="execution.timeout.enabled" ,value="1000")
- 实例配置属性:hystrix.command.HystrixCommondKey.execution.timeout.enabled
execution.isolation.thread.interruptOnTimeOut设置HystrixCommand.run()执行超时的时候是否要中断
- 全局默认值:true
- 全局默认属性:hystrix.command.default.execution.isolation.thread.interruptOnTimeout
- 实例默认值:
- 继承HystrixCommandProperties.Setter().withExecutionInsolationThreadInterruptOnTimeout(true)
- 注解:@HystrixProperty(name="execution.isolation.thread.interruptOnTimeOut" ,value="true")
- 实例配置属性:hystrix.command.HystrixCommondKey.execution.isolation.thread.interrruptOnTimeOut
execution.isolation.thread.interruptOnTimeCancle设置HystrixCommand.run()执行取消的时候是否要中断
- 全局默认值:true
- 全局默认属性:hystrix.command.default.execution.isolation.thread.interruptOnCancle
- 实例默认值:
- 继承HystrixCommandProperties.Setter().withExecutionInsolationThreadInterruptOnCancletrue)
- 注解:@HystrixProperty(name="execution.isolation.thread.interruptOnCancle" ,value="true")
- 实例配置属性:hystrix.command.HystrixCommondKey.execution.isolation.thread.interruptOnCancle
execution.isolation.semaphore.maxConcurrentRequests当HystrixCommand的隔离策越使用信号量的时候,用来设置信号量的大小,也就是并发请求的最大值
- 全局默认值:10
- 全局默认属性:hystrix.command.default.execution.isolation.semaphore.maxConcurrentRequests
- 实例默认值:
- 继承HystrixCommandProperties.Setter().withExecutionInsolationSemaphoreMaxConcurrentRequests)
- 注解:@HystrixProperty(name="execution.isolation.semaphore.maxConcurrentRequests" ,value="10")
- 实例配置属性:hystrix.command.HystrixCommondKey.execution.isolation.semaphore.maxConcurrentRequests
fallback配置
控制HystrixCommand.getFallback()执行。这些属性适用于线程池的信号量的隔离策略
fallback.isolation.semaphore.maxConcurrentRequest设置HystrixCommand.getFallback()执行的最大并发请求数
- 全局默认值:10
- 全局默认属性:hystrix.command.default.fallback.isolation.semaphore.interruptOnCancle
- 实例默认值:
- 继承HystrixCommandProperties.Setter().withFallbackIsolationSemaphoreMaxConcurrentRequests(10)
- 注解:@HystrixProperty(name="fallback.isolation.semaphore.maxConcurrentRequests" ,value="10")
- 实例配置属性:hystrix.command.HystrixCommondKey.fallback.isolation.semaphore.maxConcurrentRequests
fallback.enabled设置HystrixCommand.getFallback()执行的时候是否开启服务降级逻辑
- 全局默认值:true
- 全局默认属性:hystrix.command.default.fallback.enabled
- 实例默认值:
- 继承HystrixCommandProperties.Setter().withFallbackEnabled(true)
- 注解:@HystrixProperty(name="fallback.isolation.semaphore.maxConcurrentRequests" ,value="10")
- 实例配置属性:hystrix.command.HystrixCommondKey.fallback.enabled
circuitBreaker配置
该属性是断路器的属性配置,用来控制HystrixCircuitBreaker的行为
circuitBreaker.enabled:该属性用来确定当服务请求命令失败时,是否使用断路器来跟踪其健康指标和熔断请求
- 全局默认值:true
- 全局默认属性:hystrix.command.default.circuitBreaker.enabled
- 实例默认值:
- 继承HystrixCommandProperties.Setter().withCircuitBreakerEnabled(true)
- 注解:@HystrixProperty(name="circuitBreaker.enabled" ,value="false")
- 实例配置属性:hystrix.command.HystrixCommondKey.circuitBreaker.enabled
circuitBreaker.requestVolumeThreshold:该属性用来设置在滚动时间窗口中,断路器熔断之前的最小请求数,例如设置为20,就算失败了19次也不会打开
- 全局默认值:20
- 全局默认属性:hystrix.command.default.circuitBreaker.requestVolumeThreshold
- 实例默认值:
- 继承HystrixCommandProperties.Setter().withCircuitBreakerRequestVolumeThreshold(true)
- 注解:@HystrixProperty(name="circuitBreaker.requestVolumeThreshold" ,value="false")
- 实例配置属性:hystrix.command.HystrixCommondKey.circuitBreaker.requestVolumeThreshold
circuitBreaker.sleepWindowInMillisceonds:该属性用来设置当断路器打开之后的休眠时间窗。休眠时间窗结束之后,会将断路器置为半开状态,如果再次访问熔断请求,如果还是失败则再次关闭
- 全局默认值:5000
- 全局默认属性:hystrix.command.default.circuitBreaker.sleepWindowInMillseconds
- 实例默认值:
- 继承HystrixCommandProperties.Setter().sleepWindowInMillseconds(5000)
- 注解:@HystrixProperty(name="circuitBreaker.sleepWindowInMillseconds" ,value="5000")
- 实例配置属性:hystrix.command.HystrixCommondKey.circuitBreaker.sleepWindowInMillseconds
circuitBreaker.errorThresholdPercentage:该属性用来设置断路器打开的错误百分比,若请求数量超过了阈值20且失败率百分之50,则把熔断器设置为打开状态
- 全局默认值:5000
- 全局默认属性:hystrix.command.default.circuitBreaker.errorThresholdPercentage
- 实例默认值:
- 继承HystrixCommandProperties.Setter().errorThresholdPercentage(5000)
- 注解:@HystrixProperty(name="circuitBreaker.errorThresholdPercentage" ,value="5000")
- 实例配置属性:hystrix.command.HystrixCommondKey.circuitBreaker.errorThresholdPercentage
circuitBreaker.forceOpen:强制打开断路器,优先级大于强制关闭断路器(从源代码可知)
- 全局默认值:false
- 全局默认属性:hystrix.command.default.circuitBreaker.forceOpen
- 实例默认值:
- 继承HystrixCommandProperties.Setter().forceOpen(false)
- 注解:@HystrixProperty(name="circuitBreaker.forceOpen" ,value="false")
- 实例配置属性:hystrix.command.HystrixCommondKey.circuitBreaker.forceOpen
circuitBreaker.forceClosed:强制关闭断路器,优先级小于强制打开断路器(从源代码可知)
- 全局默认值:false
- 全局默认属性:hystrix.command.default.circuitBreaker.forceClosed
- 实例默认值:
- 继承HystrixCommandProperties.Setter().forceClosed(false)
- 注解:@HystrixProperty(name="circuitBreaker.forceClosed" ,value="false")
- 实例配置属性:hystrix.command.HystrixCommondKey.circuitBreaker.forceClosed
metrics配置
HystrixCommand和HystrixObservableCommand在运行过程中的指标信息
metrics.rollingStats.timeInMilliseconds 该属性用来设置时间长度,用于断路器判断健康度时需要收集信息的持续时间。断路器也会根据这个时间长度拆分成多个桶,例如默认值10000,则每个桶记1000(动态刷新不更新)
- 全局默认值:10000
- 全局默认属性:hystrix.command.default.metrics.rollingStats.timeInMilliseconds
- 实例默认值:
- 继承HystrixCommandProperties.Setter().withMetricsRollingStatisticalWindowInMilliseconds(10000)
- 注解:@HystrixProperty(name="metrics.rollingStats.timeInMilliseconds" ,value="10000")
- 实例配置属性:hystrix.command.HystrixCommondKey.metrics.rollingStats.timeInMilliseconds
metrics.rollingStats.numBuckets 该属性就是用来划分上方刚刚所说的桶的数量,需要注意的是如果参数不能整除则会抛异常而且动态刷新不会生效,防止检测数据丢失
- 全局默认值:10
- 全局默认属性:hystrix.command.default.metrics.rollingStats.numBuckets
- 实例默认值:
- 继承HystrixCommandProperties.Setter().withMetricsRollingStatisticalWindowBuckets(10)
- 注解:@HystrixProperty(name="metrics.rollingStats.numBuckets" ,value="20")
- 实例配置属性:hystrix.command.HystrixCommondKey.metrics.rollingStats.numBuckets
metrics.rollingPercentile.enabled该属性用来设置对命令的延迟是否使用百分数来计算,如果设置为false返回-1。通俗的话来说就是开启计算请求命令的耗时时间
- 全局默认值:true
- 全局默认属性:hystrix.command.default.metrics.rollingPercentile.enabled
- 实例默认值:
- 继承HystrixCommandProperties.Setter().withMetricsRollingPercentileEnabled(true)
- 注解:@HystrixProperty(name="metrics.rollingPercentile.enabled" ,value="false")
- 实例配置属性:hystrix.command.HystrixCommondKey.metrics.rollingPercentile.numBuckets
metrics.rollingPercentile.timeInMilliseconds该属性用来设置百分位统计的滚动窗口的使用时间(动态刷新无效),设置执行时间在滚动窗口中保留时间,用来计算百分比。通俗来说就是把数据维持在60秒以内
- 全局默认值:60000
- 全局默认属性:hystrix.command.default.metrics.rollingPercentile.timeInMilliseconds
- 实例默认值:
- 继承HystrixCommandProperties.Setter().withMetricsRollingPercentileWindowInMillSeconds(60000)
- 注解:@HystrixProperty(name="metrics.rollingPercentile.timeInMillseconds" ,value="60000")
- 实例配置属性:hystrix.command.HystrixCommondKey.metrics.rollingPercentile.numBuckets
metrics.rollingPercentile.numBuckets该属性用来设置百分位统计中窗口使用的桶的数量
- 全局默认值:6
- 全局默认属性:hystrix.command.default.metrics.rollingPercentile.numBuckets
- 实例默认值:
- 继承HystrixCommandProperties.Setter().withMetricsRollingPercentileWindowBuckets(6)
- 注解:@HystrixProperty(name="metrics.rollingPercentile.numBuckets" ,value="5")
- 实例配置属性:hystrix.command.HystrixCommondKey.metrics.rollingPercentile.numBuckets
metrics.rollingPercentile.buckSize该属性用来设置桶中保留的最大执行次数,如果设置为100,就算一个桶中执行了500次也只保留最近100次的数据
- 全局默认值:100
- 全局默认属性:hystrix.command.default.metrics.rollingPercentile.bucketSize
- 实例默认值:
- 继承HystrixCommandProperties.Setter().withMetricsRollingPercentileBucketSize(100)
- 注解:@HystrixProperty(name="metrics.rollingPercentile.bucketSize" ,value="5")
- 实例配置属性:hystrix.command.HystrixCommondKey.metrics.rollingPercentile.bucketSize
metrics.healthSnapshot.intervalInMillseconds该属性用来设置采集影响断路器状态的健康快照(请求的成功、错误的百分比)的间隔等待时间
- 全局默认值:500
- 全局默认属性:hystrix.command.default.metrics.healthSnapshot.intervalInMillseconds
- 实例默认值:
- 继承HystrixCommandProperties.Setter().withMetricsRollingHealthSnapshotIntervalMilliseconds(500)
- 注解:@HystrixProperty(name="metrics.healthSnapshot.intervalInMillseconds" ,value="500")
- 实例配置属性:hystrix.command.HystrixCommondKey.metrics.healthSnapshot.intervalInMillseconds
requestContext配置
涉及HystrixCommand使用的HystrixRequestContext的设置
requestCache.enabled此属性设置是否开启缓存
- 全局默认值:true
- 全局默认属性:hystrix.command.default.requestCache.enabled
- 实例默认值:
- 继承HystrixCommandProperties.Setter().withRequestCacheEnabled(true)
- 注解:@HystrixProperty(name="requestCache.enabled" ,value="true")
- 实例配置属性:hystrix.command.HystrixCommondKey.requestCache.enabled
requestLog.enabled是否将HystrixCommand的执行和事件是否打印到HystrixRequestLog中
- 全局默认值:true
- 全局默认属性:hystrix.command.default.requestLoge.enabled
- 实例默认值:
- 继承HystrixCommandProperties.Setter().withRequestLogeEnabled(true)
- 注解:@HystrixProperty(name="requestLoge.enabled" ,value="true")
- 实例配置属性:hystrix.command.HystrixCommondKey.Loge.enabled
collapser配置
控制命令合并的相关行为
collapserProperties={@HystrixProperty(name="xxxx",value="20" )}
maxRequestsInBatch该参数用来设置一次请求合并批处理中允许的最大请求数
- 全局默认值:Integer.MAX_VALUE
- 全局默认属性:hystrix.collapser.default.maxRequestInBatch
- 实例默认值:
- 继承HystrixCollapserProperties.Setter().withMaxRequestInBatch(100)
- 注解:@HystrixProperty(name="maxRequestInBatch" ,value="100")
- 实例配置属性:hystrix.collapser.HystrixCommondKey.maxRequestInBatch
timerDelayInMilliseconds该参数用来设置批处理过程中每个命令的延迟时间,单位为毫秒
- 全局默认值:10
- 全局默认属性:hystrix.collapser.default.timeDeleayInMillseconds
- 实例默认值:
- 继承HystrixCollapserProperties.Setter().withTtmeDeleayInMillseconds(10)
- 注解:@HystrixProperty(name="timeDeleayInMillseconds" ,value="10")
- 实例配置属性:hystrix.collapser.HystrixCommondKey.timeDeleayInMillseconds
requestCache.enabled该参数用来设置批处理过程中请求的缓存
- 全局默认值:true
- 全局默认属性:hystrix.collapser.default.requestCache.enabled
- 实例默认值:
- 继承HystrixCollapserProperties.Setter().withRequestCacheEnabled(true)
- 注解:@HystrixProperty(name="requestCache.enabled" ,value="true")
- 实例配置属性:hystrix.command.HystrixCommondKey.requestCache.enabled
threadPool属性
控制Hystrix命令所属的线程池的配置
@HystrixCommand(fallbackMethod="helloFallback",commanKey="helloKey"
,threadPoolProperties={name="coreSize",value="20"})
coreSize:该参数用来设置执行线程池的核心线程数,命令执行的最大线程数
- 全局默认值:10
- 全局默认属性:hystrix.threadpool.default.coreSize
- 实例默认值:
- 继承HystrixThreadPoolProperties.Setter().withCoreSize(true)
- 注解:@HystrixProperty(name="coreSize" ,value="10")
- 实例配置属性:hystrix.threadPool.HystrixThreadPoolKey.coreSize
maxQueueSize:该参数用来设置执行线程的最大队列大小,当设置为-1时,线程池将使用SynchronousQueue实现的队列,否则使用将使用的LinkedBlockingQueue实现的队列
- 全局默认值:-1
- 全局默认属性:hystrix.threadpool.default.maxQueueSize
- 实例默认值:
- 继承HystrixThreadPoolProperties.Setter().withMaxQueueSize(-1)
- 注解:@HystrixProperty(name="maxQueueSize" ,value="-1")
- 实例配置属性:hystrix.threadPool.HystrixThreadPoolKey.maxQueueSize
queueSizeRejectionThreshold : 设置线程的最大阈值,就算队列没有达到最大值也能拒绝请求
- 全局默认值:5
- 全局默认属性:hystrix.threadpool.default.queueSizeRejectionThreshold
- 实例默认值:
- 继承HystrixThreadPoolProperties.Setter().withQueueSizeRejectionThreshold(5)
- 注解:@HystrixProperty(name="queueSizeRejectionThreshold" ,value="5")
- 实例配置属性:hystrix.threadPool.HystrixThreadPoolKey.queueSizeRejectionThreshold
metrics.rollingStats.timeInMilliseconds 该属性用来设置时间长度,用于线程池的指标度量
- 全局默认值:10000
- 全局默认属性:hystrix.threadpool.default.metrics.rollingStats.timeInMilliseconds
- 实例默认值:
- 继承HystrixCommandProperties.Setter().withMetricsRollingStatisticalWindowInMilliseconds(10000)
- 注解:@HystrixProperty(name="metrics.rollingStats.timeInMilliseconds" ,value="10000")
- 实例配置属性:hystrix.threadpool.HystrixThreadPoolKey.metrics.rollingStats.timeInMilliseconds
metrics.rollingStats.numBuckets 该属性就是用来划分上方刚刚所说的桶的数量,需要注意的是如果参数不能整除则会抛异常而且动态刷新不会生效,防止检测数据丢失
- 全局默认值:10
- 全局默认属性:hystrix.threadPool.default.metrics.rollingStats.numBuckets
- 实例默认值:
- 继承HystrixCommandProperties.Setter().withMetricsRollingStatisticalWindowBuckets(10)
- 注解:@HystrixProperty(name="metrics.rollingStats.numBuckets" ,value="20")
- 实例配置属性:hystrix.threadPool.HystrixCommondKey.metrics.rollingStats.numBuckets
8.Hystrix仪表盘
Hystrix是指标数据的消费者之一,主要用来实时监控Hystrix的各项指标信息,仪表盘组件则是Hystrix Dashboard
首先配置好所有依赖,打上注解
@EnableHystrixDashboard
@SpringCloudApplication
public class DemoApplication {

    @Bean
    RestTemplate restTemplate(){
        return new RestTemplate();
    }

    public static void main(String[] args) {
        SpringApplication.run(DemoApplication.class, args);
    }
}
随意访问一个服务
@RestController
public class SSController {

    @Autowired
    private SSService ssService;


    @RequestMapping("hello")
    public String getData(){
       return ssService.getData();
    }
}
查看监控数据


从首页上看有三种访问监控的方式,前两种为集群,最后一种为单体引用,我们先讨论单体应用
从首页上看有两个参数
- Delay:该参数用来控制服务器上的轮询监控信息的延迟时间,默认为2000毫秒
- Titile:该参数对应了上图头部标题Hystrix Stream之后的内容,默认会使用监控实例的URL
可以在监控信息上看到两个重要的图形信息:一个实心圆和一条曲线
实心圆:颜色从绿色、黄色、橙色、红色递减,健康度逐渐递减,圆越大代表流量越大
曲线:用来记录2分钟内流量的上升和下降
注意:当使用Hystrix Board 监控Spring Cloud Zuul时候,由于Thread Pool信息会一直处于Loading状态,这是由于Zuul默认会使用信号量来隔离,只有配置Hystrix配置隔离机制改为线程池的方式才能得以展示。
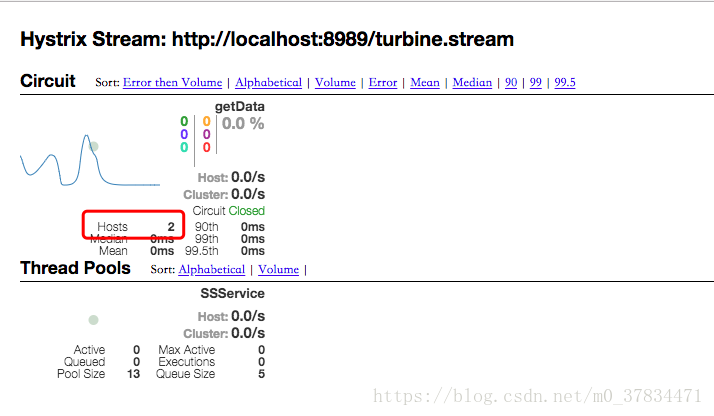
9.Turbine集群监控
上一节的/hystrix.stream是对于单体应用的监控而言,但是我们的微服务可能往往有成白个,不可能每个实例都打开页面观看,所以有了Turbine集群监控。Turbine将所有监控信息汇总后再发给Dashboard
注意:一个Dashoboard算一个服务实例,一个Turbine算一个服务实例,其他需要被监控的实例则需要配置端点监控acutor即可。
第一步配置Turbine,打开注解
@EnableTurbine
@EnableDiscoveryClient
@SpringBootApplication
public class DemoApplication {

    public static void main(String[] args) {
        SpringApplication.run(DemoApplication.class, args);
    }
}
第二部,配置属性
turbine.app-config=xxx 配置的是需要监控的服务名字
turbine.cluster-name-expression="default" 配置的是这个turbine集群的名字,当需要启用多个turbine的时候可以根据这个区分
turbine.combine-host-port 配置的是服务是否以主机名+端口号来区分,防止本地所有不同的服务聚集在一起
spring.application.name=turbine
server.port=8989
management.port=8990

eureka.client.service-url.defaultZone=http://localhost:1111/eureka/

turbine.app-config=hystrix-dashboard
turbine.cluster-name-expression="default"
turbine.combine-host-port=true
turbine会将同一个服务的多个实例汇总成一个监控图,host指的是实例数量
10.与消息代理结合
可以再加入一个RabbitMQ,RabbitMQ负责收集监控数据,然后Turbine再从RabbitMQ中异步获取这些数据,然后在输给DashBoard
第一步创建一个包含amqp的RabbitMq
- spring-cloud-starter-turbine-amqp 此依赖包含了rabbit依赖和turbine依赖
- actuator Turbine断点监控
第二步,使用注解@EnableTurbineStream (java 8 以上)
第三不,配置配置文件
- 此处不再需要配置服务名字
spring.application.name=turbine
server.port=8989
management.port=8990

eureka.client.service-url.defaultZone=http://localhost:1111/eureka/
第四步,在监控实例上加入依赖
spring-cloud-netflix-hystrix-amqp
最终可以看到一模一样的监控信息。