https://blog.csdn.net/qq_30739519/article/details/78791142
摘要:本文重点讲解一下Spring中@PropertySource注解的使用,如何通过PropertySource注解加载指定的配置文件。以及PropertySource注解与@ConfigurationProperties两个注解的配合使用。
1.1. PropertySource注解加载指定的属性文件
Spring框架提供了PropertySource注解,目的是加载指定的属性文件,接下来我们看一下如何使用该注解。首先我们定义一个配置类,并在类中添加PropertySource注解,如下所示:
@Component
@PropertySource(value= {"classpath:config/jdbc-bainuo-dev.properties"},ignoreResourceNotFound=false,encoding="UTF-8",name="jdbc-bainuo-dev.properties",)
public class CustomerDataSourceConfig1 {
private String url;
public String getUrl() {
return url;
}
public void setUrl(String url) {
this.url = url;
}
@Override
public String toString() {
return "CustomerDataSourceConfig{" +
"url='" + url + '\'' +
'}';
}
}
上述的代码目的是加载classpath路径中config文件中的jdbc-bainuo-dev.properties。其中encoding
用于指定读取属性文件所使用的编码,我们通常使用的是UTF-8;ignoreResourceNotFound含义是当指定的配置文件不存在是否报错,默认是false;比如上文中指定的加载属性文件是jdbc-bainuo-dev.properties。如果该文件不存在,则ignoreResourceNotFound为true的时候,程序不会报错,如果ignoreResourceNotFound为false的时候,程序直接报错。实际项目开发中,最好设置ignoreResourceNotFound为false。该参数默认值为false。
value值是设置需要加载的属性文件,可以一次性加载多个。name的值我们设置的是jdbc-bainuo-dev.properties。这个值在Springboot的环境中必须是唯一的,如果不设置,则值为:“class path resource [config/jdbc-bainuo-dev.properties]“。
可能很多人比较纳闷,为什么是“class path resource [config/jdbc-bainuo-dev.properties]“呢?这个就涉及到了Spring中对资源文件的封装类Resource。上文我们配置的value值为"classpath:config/jdbc-bainuo-dev.properties",因此Spring发现是classpath开头的,因此最终使用的是Resource的子类ClassPathResource。如果是file开头的,则最终使用的类是FileSystemResource。
了解了上文所述的Resource类之后。我们再次明确一点,如果@PropertySource中如果没有设置name值,则name值的生成规则是:根据value值查找到最终封装的Resource子类,然后调用具体的Resource子类实例对象中的getDescription方法,getDescription方法的返回值为最终的name值。比如ClassPathResource类中的getDescription方法实现如下:
public String getDescription() {
StringBuilder builder = new StringBuilder("class path resource [");
String pathToUse = path;
if (this.clazz != null && !pathToUse.startsWith("/")) {
builder.append(ClassUtils.classPackageAsResourcePath(this.clazz));
builder.append('/');
}
if (pathToUse.startsWith("/")) {
pathToUse = pathToUse.substring(1);
}
builder.append(pathToUse);
builder.append(']');
return builder.toString();
}
上述的name处理逻辑暂时先有个印象即可,后续会详细地跟踪源码进行讲解。
1.2. PropertySource注解加载指定的属性文件测试
上文我们设置了PropertySource注解来加载"classpath:config/jdbc-bainuo-dev.properties"文件。该文件的目录结构如下图所示:
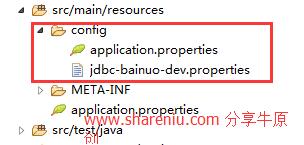
jdbc-bainuo-dev.properties文件内容如下:
spring.datasource.shareniu.url=shareniu
application.properties文件内容如下:
spring.profiles.active=dev
上面的配置文件中,spring.profiles.active属性配置了当前使用的环境是dev。spring.datasource.shareniu.url只是一个普通的属性,本身并没有什么特殊的含义。
下面开始书写Springboot的启动类,如下所示:
@SpringBootApplication
public class DemoApplication {
public static void main(String[] args) {
SpringApplication springApplication = new SpringApplication(DemoApplication.class);
ConfigurableApplicationContext configurableApplicationContext = springApplication.run(args);
CustomerDataSourceConfig1 customerDataSourceConfig = configurableApplicationContext
.getBean(CustomerDataSourceConfig1.class);
System.out.print(customerDataSourceConfig);
}
}
运行上述的代码,程序的输出如下:
CustomerDataSourceConfig{url='null'}
奇怪了,怎么url是空呢?PropertySource注解不是已经将jdbc-bainuo-dev.properties文件加载到当前的环境中了吗?我们不妨试一下看看jdbc-bainuo-dev.properties中的spring.datasource.shareniu.url属性是否可以获取到,进而从侧面验证PropertySource注解已经将jdbc-bainuo-dev.properties文件加载到当前的环境中。修改上述启动类的代码如下:
@SpringBootApplication
public class DemoApplication {
public static void main(String[] args) {
SpringApplication springApplication = new SpringApplication(DemoApplication.class);
ConfigurableApplicationContext configurableApplicationContext = springApplication.run(args);
CustomerDataSourceConfig1 customerDataSourceConfig = configurableApplicationContext.getBean(CustomerDataSourceConfig1.class);
String property = configurableApplicationContext.getEnvironment().getProperty("spring.datasource.shareniu.url");
System.out.println(property);
System.out.print(customerDataSourceConfig);
}
}
运行上述的代码,程序的输出如下:
Shareniu
通过上述的代码可以看出PropertySource确实是生效了。那么我们怎么将spring.datasource.shareniu.url属性值自动注入到CustomerDataSourceConfig1 类中的url属性中呢?
1.3. PropertySource注解读取指定文件并将属性注入到配置类
Spring中提供了@Value注解,用于将配置文件中的属性值读取出来并设置到相应的属性中。在这里我们学习一下如何使用@Value注解。同样的还是以上文的两个类为例进行详细说明,首先需要修改CustomerDataSourceConfig1类,修改部分如下所示:
@Component
@PropertySource( name="jdbc-bainuo-dev.properties",value= {"classpath:config/jdbc-bainuo-dev.properties"},ignoreResourceNotFound=false,encoding="UTF-8")
public class CustomerDataSourceConfig1 {
@Value("${spring.datasource.shareniu.url}")
private String url;
}
上述的类中,在url字段中增加了@Value注解,并指定了SPEL表达式为${spring.datasource.shareniu.url}。再次运行springboot启动类,控制台的输出为shareniu。表明确实可以通过@Value进行属性值的注入。但是使用@Value注解方式有一个不太友好的地方就是,当项目中有大量的属性进行配置的时候,我们需要一个个的在类的字段中增加@Value注解,这样确实很费劲,不过我们可以通过Springboot提供的@ConfigurationProperties注解解决这个问题。
1.4. ConfigurationProperties注解使用
1、
https://blog.csdn.net/qq_17586821/article/details/79803007
https://blog.csdn.net/qq_17586821/article/details/79803710
foo.enabled=false
foo.remote-address=192.168.1.1
foo.security.username=user
foo.security.password=pwd
foo.security.roles=USER,ADMIN- 对应的属性配置类
-
/** * 在这种绑定中,getter 和 setter 方法是强制的,因为这里的绑定是通过标准的Java Bean属性绑定,但是也有例外,这里不讲,在POJO中,getter 和 setter 方法一般都会写上的吧。具体见 spring boot 文档第 24.7小节 */ @ConfigurationProperties(prefix = "foo") //@Configuration //@EnableConfigurationProperties(FooProperties.class) public class FooProperties { private boolean enabled; private InetAddress remoteAddress; private Security security; public boolean isEnabled() { return enabled; } public void setEnabled(boolean enabled) { this.enabled = enabled; } public InetAddress getRemoteAddress() { return remoteAddress; } public void setRemoteAddress(InetAddress remoteAddress) { this.remoteAddress = remoteAddress; } public Security getSecurity() { return security; } public void setSecurity(Security security) { this.security = security; } public static class Security { private String username; private String password; private List<String> roles = new ArrayList<>(Collections.singleton("USER")); public String getUsername() { return username; } public void setUsername(String username) { this.username = username; } public String getPassword() { return password; } public void setPassword(String password) { this.password = password; } public List<String> getRoles() { return roles; } public void setRoles(List<String> roles) { this.roles = roles; } @Override public String toString() { return "{ " + "username='" + username + '\'' + ", password='" + password + '\'' + " }"; } } @Override public String toString() { return "{ " + "enabled=" + enabled + ", remoteAddress=" + remoteAddress + ", security=" + security + " }"; } } - 下一步,我们还需要把上面的属性配置类注册到@EnableConfigurationProperties里边
-
/** * 结合 {@link ConfigurationProperties} 注入了一个 FooProperties bean, 这 bean 的全名是 foo-com.info.maka.waimai.config.tutorial.environment.properties.FooProperties (属性名前缀-属性类的完全限定名) */ @Configuration @EnableConfigurationProperties(FooProperties.class) public class TestPropertiesConfiguration { } - 到这里,属性配置类以及可以实例化 bean 了,我们就可以在系统中使用这个bean了
-
@Service
public class FooServiceImpl implements FooService {

    private static final Logger logger = LoggerFactory.getLogger(FooService.class);


    private FooProperties fooProperties;

    @Autowired
    public FooServiceImpl(FooProperties fooProperties) {
        this.fooProperties = fooProperties;
    }

    /**
     * 这个注解在这里没实际用处,就是为了方便在该类构造完成后打印日志,看看配置信息是否加载到配置类中了
     */
    @PostConstruct
    public void verifyConfigurationProperties() {
        logger.info("FooProperties: {}", fooProperties);
    }
}
在上一篇博客中,我们的属性配置类FooProperties通过使用@ConfigurationProperties注解实现了配置信息的注入;然后又通过使用@EnableConfigurationProperties注解才使得配置bean被创建出来。其实,@EnableConfigurationProperties这个注解也会自动应用到项目中,同时,系统中任何被 @ConfigurationProperties 标注的“已经存在”的 bean 都会从系统环境中加载配置信息。也就是说,我们可以像下面这样简化上一篇博客中的配置。
-
/**
 * 对比 {@link FooProperties}
 *
 * 事实上,{@link EnableConfigurationProperties} 已经自动将 Environment
 *
 * 中的配置应用到了被 {@link ConfigurationProperties} 注解的"bean"上
 *
 * 所以该类的配置等同于 {@link FooProperties} 和 {@link TestPropertiesConfiguration} 的组合配置
 */
@Component
@ConfigurationProperties(prefix = "foo")
public class BarProperties {

    private boolean enabled;

    private InetAddress remoteAddress;

    private Security security;

    public boolean isEnabled() {
        return enabled;
    }

    public void setEnabled(boolean enabled) {
        this.enabled = enabled;
    }

    public InetAddress getRemoteAddress() {
        return remoteAddress;
    }

    public void setRemoteAddress(InetAddress remoteAddress) {
        this.remoteAddress = remoteAddress;
    }

    public Security getSecurity() {
        return security;
    }

    public void setSecurity(Security security) {
        this.security = security;
    }

    public static class Security {

        private String username;

        private String password;

        private List<String> roles = new ArrayList<>(Collections.singleton("USER"));

        public String getUsername() {
            return username;
        }

        public void setUsername(String username) {
            this.username = username;
        }

        public String getPassword() {
            return password;
        }

        public void setPassword(String password) {
            this.password = password;
        }

        public List<String> getRoles() {
            return roles;
        }

        public void setRoles(List<String> roles) {
            this.roles = roles;
        }

        @Override
        public String toString() {
            return "{ " + "username='" + username + '\'' + ", password='" + password + '\'' + " }";
        }
    }

    @Override
    public String toString() {
        return "{ " + "enabled=" + enabled + ", remoteAddress=" + remoteAddress + ", security="
                + security + " }";
    }
}
@Service public class BarServiceImpl implements BarService { private static final Logger logger = LoggerFactory.getLogger(FooService.class); private BarProperties barProperties; @Autowired public BarServiceImpl(BarProperties barProperties) { this.barProperties = barProperties; } /** * 这个注解在这里没实际用处,就是为了方便在该类构造完成后打印日志,看看配置信息是否加载到配置类中了 */ @PostConstruct public void verifyConfigurationProperties() { logger.info("BarProperties: {}", barProperties); } }
在这种绑定中,getter 和 setter 方法是强制的,因为这里的绑定是通过标准的Java Bean属性绑定,但是也有例外,这里不讲,在POJO中,getter 和 setter 方法一般都会写上的吧。具体见 spring boot 文档第 24.7小节
@ConfigurationProperties是类级别的注解,具体使用方式如下:
@Component
@ConfigurationProperties(prefix = "spring.datasource.shareniu")
@PropertySource( name="jdbc-bainuo-dev.properties",value= {"classpath:config/jdbc-bainuo-dev.properties"},ignoreResourceNotFound=false,encoding="UTF-8")
public class CustomerDataSourceConfig1 {
private String url;
}
上述代码中,在CustomerDataSourceConfig1类中增加了ConfigurationProperties注解,并且指明了属性的前缀为spring.datasource.shareniu。这样Springboot在处理的时候,会去扫描当前类中的所有字段并进行属性的查找以及组装。比如我们配置的prefix = "spring.datasource.shareniu",CustomerDataSourceConfig1类中有一个url字段,则url字段需要匹配的属性是prefix+字段=spring.datasource.shareniu.url。
那不仅有个疑问?如果指定的字段没有找到属性怎么办呢?这个可以进行如下的配置:
@ConfigurationProperties(prefix = "spring.datasource.shareniu",ignoreUnknownFields=true,ignoreInvalidFields=true)
ignoreUnknownFields:忽略未知的字段。
ignoreInvalidFields:是否忽略验证失败的字段。这个怎么理解呢?比如我们在配置文件中配置了一个字符串类型的变量,类中的字段是int类型,那肯定会报错的。如果出现这种情况我们可以容忍,则需要配置该属性值为true。该参数值默认为false。
本文暂且讲解到这里,后续的文章我们来讲解@PropertySource注解如何实现读取不同环境中的配置文件,这个不同环境的文件动态切换读取,PropertySource默认是不支持的,因此我们需要扩展该注解对应的源码。
========================================================================
https://blog.csdn.net/qq_30739519/article/details/78800490
摘要:Springboot中PropertySource注解的使用一文中,详细讲解了PropertySource注解的使用,通过PropertySource注解去加载指定的资源文件、然后将加载的属性注入到指定的配置类,@value以及@ConfigurationProperties的使用。但是也遗留一个问题,PropertySource注解貌似是不支持多种环境的动态切换?这个问题该如何解决呢?我们需要从源码中看看他到底是否支持。
首先,我们开始回顾一下上节课说的PropertySource注解的使用,实例代码如下:
1 @PropertySource( name="jdbc-bainuo-dev.properties",
2 value={"classpath:config/jdbc-bainuo-dev.properties"},ignoreResourceNotFound=false,encoding="UTF-8")
我们使用了PropertySource注解中的参数有:name、value、ignoreResourceNotFound、encoding。其实PropertySource注解还有一个参数,那就是factory,该参数默认的值为PropertySourceFactory.class。
PropertySource注解的定义如下:
1 public @interface PropertySource {
2 String name() default "";
3 String[] value();
4 boolean ignoreResourceNotFound() default false;
5 String encoding() default "";
6 Class<? extends PropertySourceFactory> factory() default PropertySourceFactory.class;
7 }
我们不妨先看一下PropertySourceFactory接口是做什么的?该接口的核心定义代码如下:
1 public interface PropertySourceFactory {
2 PropertySource<?> createPropertySource(@Nullable String name, EncodedResource resource) throws IOException;
3 }
上述代码中,PropertySourceFactory接口仅仅提供了一个createPropertySource方法,该方法就是创建PropertySource实例对象的,关于PropertySource的架构可以参考前面的系列文章进行学习,既然是接口,那肯定有实现类吧?该接口的默认实现类为DefaultPropertySourceFactory,代码如下:
1 public class DefaultPropertySourceFactory implements PropertySourceFactory {
2 public PropertySource<?> createPropertySource(@Nullable String name, EncodedResource resource) throws IOException {
3 return (name != null ? new ResourcePropertySource(name, resource) : new ResourcePropertySource(resource));
4 }
5 }
首先判断name参数值是否为空,如果不为空直接实例化ResourcePropertySource并将name参数值进行传递,否则直接实例化ResourcePropertySource。看到这个地方的处理,感觉也没什么神奇的地方,那么问题来了,我们思考如下三个问题:DefaultPropertySourceFactory 类什么时候被Spring框架调用呢?Name参数值是如何传递过来的呢?ResourcePropertySource实例化的时候做了什么呢?我们一个个的来看源码进行分析。
1.1. DefaultPropertySourceFactory 类什么时候被Spring框架调用呢
第一个问题:DefaultPropertySourceFactory 类什么时候被Spring框架调用呢?这个我们就需要看一下我们定义的PropertySource注解是如何被Spring框架解析的?经过我的一系列排查,我找到了。Spring框架开始解析PropertySource注解的方法位于ConfigurationClassParser类中,为了防止大量的跟踪源码跟踪丢失了,自己也糊涂了。我们直奔主题,看一下processPropertySource方法,如下所示:
1 private static final PropertySourceFactory DEFAULT_PROPERTY_SOURCE_FACTORY = new DefaultPropertySourceFactory();
2 private void processPropertySource(AnnotationAttributes propertySource) throws IOException {
3 String name = propertySource.getString("name");
4 if (!StringUtils.hasLength(name)) {
5 name = null;
6 }
7 String encoding = propertySource.getString("encoding");
8 if (!StringUtils.hasLength(encoding)) {
9 encoding = null;
10 }
11 String[] locations = propertySource.getStringArray("value");
12 boolean ignoreResourceNotFound = propertySource.getBoolean("ignoreResourceNotFound");
13 Class factoryClass = propertySource.getClass("factory");
14 PropertySourceFactory factory = (factoryClass == PropertySourceFactory.class ?
15 DEFAULT_PROPERTY_SOURCE_FACTORY : BeanUtils.instantiateClass(factoryClass));
16 for (String location : locations) {
17 try {
18 String resolvedLocation = this.environment.resolveRequiredPlaceholders(location);
19 Resource resource = this.resourceLoader.getResource(resolvedLocation);
20 addPropertySource(factory.createPropertySource(name, new EncodedResource(resource, encoding)));
21 }
22 catch (IllegalArgumentException ex) {
23 if (ignoreResourceNotFound) {
24 if (logger.isInfoEnabled()) {
25 logger.info("Properties location [" + location + "] not resolvable: " + ex.getMessage());
26 }
27 }
28 else {
29 throw ex;
30 }
31 }
32 catch (IOException ex) {
33 }
34 }
上述代码的逻辑分为如下几个核心的步骤:
1. 开始解析name、encoding值。
2. 解析value(数组)以及ignoreResourceNotFound值。
3. 解析factory,如果该值没有配置,默认为PropertySourceFactory则直接实例化DefaultPropertySourceFactory类,否则开始实例化自定义的类。换言之factory的处理类我们是可以进行自定义的。BeanUtils.instantiateClass是Spring中比较常用的一个工具类,其内部就是通过反射手段实例化类,在这里我们就不一一讲解了。
4. 循环遍历所有的location值,进行如下的处理。
4.1.对location进行SPEL表达式的解析。比如当前的配置环境中有一个属性为app=shareniu,我们配置的location为${app}最终值为shareniu。通过这里的处理逻辑可以知道location支持多环境的切换以及表达式的配置。
4.2.使用资源加载器resourceLoader将resolvedLocation抽象为Resource。
4.3.调用addPropertySource属性进行处理。将指定的资源处理之后,添加到当前springboot运行的环境中,这个前面的章节也详细讲解过类似的,在这里就不详细说明了。注意:这里调用了DefaultPropertySourceFactory类中的createPropertySource方法了。
5.如果上述的任意步骤报错,则开始查找ignoreResourceNotFound的值,如果该值为treu,则忽略异常,否则直接报错。在这里我们可以看出ignoreResourceNotFound参数值的配置非常的重要。
1.2. ResourcePropertySource
我们看一下ResourcePropertySource类的构造函数,主要看一下没有name参数的构造函数,如下所示:
1 public ResourcePropertySource(EncodedResource resource) throws IOException {
2 super(getNameForResource(resource.getResource()),PropertiesLoaderUtils.loadProperties(resource));
3 this.resourceName = null;
4 }
上述代码,我们重点关注一下name值的生成逻辑。也就是getNameForResource中的处理逻辑,如下所示:
1 private static String getNameForResource(Resource resource) {
2 String name = resource.getDescription();
3 if (!StringUtils.hasText(name)) {
4 name = resource.getClass().getSimpleName() + "@" + System.identityHashCode(resource);
5 }
6 return name;
7 }
通过resource中的getDescription方法获取name值。如果name值为空,则重新生成,否则直接返回。大家又兴起可以看看resource中各个子类的定义以及使用。
PropertiesLoaderUtils.loadProperties(resource)毋庸置疑就是加载指定的属性文件了。
1.3. PropertySource多环境配置以及表达式使用
在springboot中,可以通过设置spring.profiles.active属性,达到不同环境配置文件的动态切换。我们看一下这种方式如何使用,首先在application.properties增加如下的信息:
spring.profiles.active=dev
application.properties文件位置如下图所示:
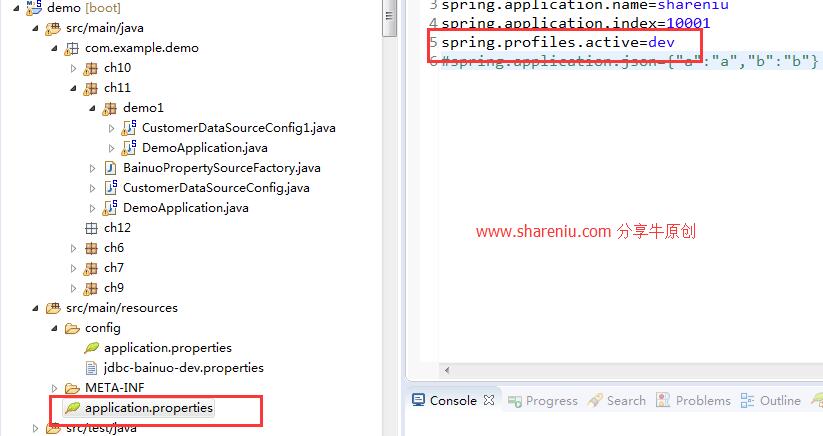
然后,我们修改CustomerDataSourceConfig1类,这个类的配置以及启动类进行测试可以参考上一篇文章进行学习。
1 @PropertySource( name="jdbc-bainuo-dev.properties",value= {"classpath:config/jdbc-bainuo-$ {spring.profiles.active}.properties"},ignoreResourceNotFound=false,encoding="UTF-8")
2 public class CustomerDataSourceConfig1 {
3 }
这里注意value的值已经修改为了:"classpath:config/jdbc-bainuo-${spring.profiles.active}.properties"。
${spring.profiles.active}表达式可以动态的进行配置,从而达到动态切换不同的配置文件了。
如果发现@ConfigurationPropertie不生效,有可能是项目的目录结构问题,你可以通过@EnableConfigurationProperties(ConnectionSettings.class)来明确指定需要用哪个实体类来装载配置信息。