一、搭建开发环境
1.1 拉取代码:git clone https://github.com/EOSIO/eos –recursive
1.2 自动build:cd eos && ./eosio_build.sh ubuntu
1.3 安装可执行文件:cd build && sudo make install
1.4 验证:~/opt/mongodb/bin/mongod -f ~/opt/mongodb/mongod.conf & ; cd build && make test
二、运行nodes
2.1 配制文件:
Linux: ~/.local/share/eosio/nodeos/config/config.ini ,同样也可以通过CLI 的nodeos –参数加载配制
2.2 启动块生产:
(1)本地单节点:nodeos -e -p eosio –plugin eosio::chain_api_plugin –plugin eosio::history_api_plugin
(2)本地多节点:

打开4个终端:
1)终端1:keosd –http-server-address 127.0.0.1:8899
2)终端2:
cleos –wallet-url http://localhost:8899 wallet create
生成公私钥对 :cleos create key
将上一步密钥对中的私钥导入钱包:cleos wallet import ${private-key}
3)终端2启动第一个生产者节点eosio:nodeos –enable-stale-production –producer-name eosio –plugin eosio::chain_api_plugin –plugin eosio::net_api_plugin
4)加载eosio.bios合同:通过此合同,可以直接控制其他帐户的资源分配并访问其他特权API调用。
cleos –wallet-url http://localhost:8899 set contract eosio build/contracts/eosio.bios
5)以eosio为创建者创建新账户inita:cleos –wallet-url http://localhost:8899 create account eosio inita
{pubkey}
6) 启动第二个生产节点inita:
nodeos –producer-name inita –plugin eosio::chain_api_plugin –plugin eosio::net_api_plugin –http-server-address 127.0.0.1:8889 –p2p-listen-endpoint 127.0.0.1:9877 –p2p-peer-address 127.0.0.1:9876 –config-dir node2 –data-dir node2 –private-key [\”
{privatekey}\”]
7) 将空闲生产者inita激活:通过将inita注册为具有bios节点的生产者来激活
cleos –wallet-url http://localhost:8899 push action eosio setprods “{ \”schedule\”: [{\”producer_name\”: \”inita\”,\”block_signing_key\”: \”${pubkey}\”}]}” -p eosio@active
8)验证:eosio不再产生节点,生产者只有inita
第一个 节点信息:cleos –url http://localhost:8888 get info
第二个节点信息:cleos –url http://localhost:8889 get info
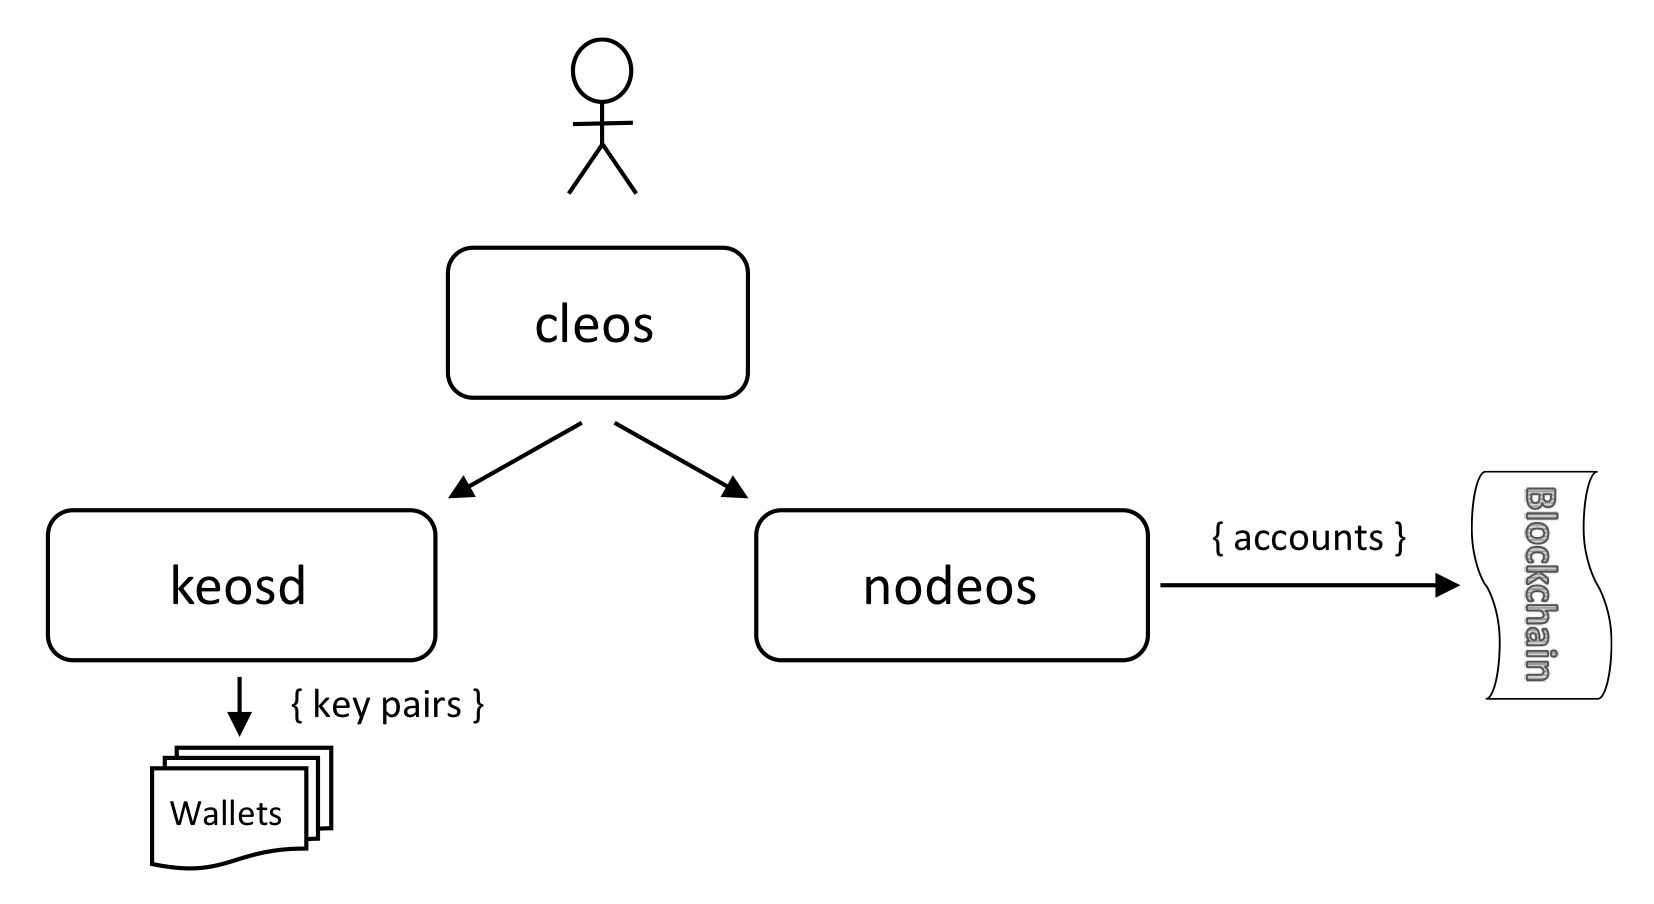
三、cleos
3.1 帐户和钱包关系图
3.2 创建和管理钱包
(1) 默认钱包
/**
创建默认钱包:默认钱包文件名:default.wallet
位置:~/eosio-wallet
指定:--wallet-dir ${钱包数据所在目录}
$ cleos wallet create
(2) 多个钱包
$ cleos wallet create -n ${wallet-name}(3)验证
$ cleos wallet list(4)解锁某个钱包
$ cleos wallet unlock -n ${wallet-name}(5)关闭与打开钱包
1)keosd终止,wallet关闭;
unlock-timeout = 900 默认15min后自动关闭,可以在配制文件自己设定。
2)再次打开:
$ cleos wallet open(6)钱包中引入密钥对
//产生密钥对
$ cleos create key
//引入私钥
$ cleos wallet import PRIVATE_KEY_1
//查看钱包引入的公钥
$ cleos wallet keys
//
$ cleos wallet private_keys --password YOUR WALLET PASSWORD
(7)钱包文件所在位置:
默认:$ cd ~/eosio-wallet && ls
指定:data-dir的值
3.3 创建账户
(1)使用cleos请求nodeos创建帐户并在区块链上发布。
keosd 和nodeos 默认端口都是8888,修改keosd 端口为8899:
1)修改keosd的配制文件:~/eosio-wallet/config.ini:http-server-address = 127.0.0.1:8899
2)启动keosd:
$pkill keosd
$keosd   --http-server-address=localhost:8899
(2)解锁钱包:
$cleos --wallet-url=http://localhost:8899 wallet unlock(3)启动nodes:
/**
eosio帐户是用于引导EOSIO节点的特殊帐户。 这个帐户的密钥可以在nodeos配置文件:〜/ .local / share / eosio / nodeos / config / config.ini :signature-provider =
**/
$nodeos -e -p eosio --plugin eosio::chain_api_plugin --plugin eosio::history_api_plugin
(4)创建账户:
//keosd端口8899
$ cleos --wallet-url=http://localhost:8899 create account eosio myaccount PUBLIC_KEY_1 PUBLIC_KEY_2
//一般用以下即可
$ cleos create account eosio NEW_ACCOUNT OWNER_KEY ACTIVE_KEY
3.4 连接到非默认主机端口
(1)cleos 使用 –url or –wallet-url 连接到不同nodes,如果不指定参数值,默认连接到本地正在运行的eos node。
//连接到node
cleos --url http://localhost:8888 ${subcommand}
//连接到keosd
cleos --wallet-url http://test1.eos.io:8888 ${subcommand}
(2)cleos 会自动启动keosd ,但是当多个keosd在一台机器上启动时,cleos可能连接不到特定的keosd,原因是可能找不到正确的密钥集。查看是否有多个keosd在运行:
$ pgrep keosd | xargs printf " -p %d" | xargs lsof -Pani