Vert.x是运行在JDK8上的,这也就意味着,Vert.x依赖大量的JDK8的新特性,比如lambda表达式,所以你最好能够熟悉JDK8的新特性,并熟练运用。否则你的Vert.x的代码看起来会非常丑陋。
需求:我们下面要写一个小的Demo,实现一个简单的HttpServer,通过浏览器访问这个HttpServer能够在浏览器上显示HelloWorld。
Vert.x是基于Netty的,Netty本身就是一个NIO框架,因此Vert.x不需要依赖中间件,可以直接在main方法中运行。下面简单列出实现的步骤
- 创建一个Maven项目,并配置依赖的包。(这里仅仅引入vertx-core的包即可)
- 创建一个核心类
- 启动服务,并通过浏览器访问
下面是具体的代码
1.pom文件
<project xmlns="http://maven.apache.org/POM/4.0.0"
	xmlns:xsi="http://www.w3.org/2001/XMLSchema-instance"
	xsi:schemaLocation="http://maven.apache.org/POM/4.0.0 http://maven.apache.org/xsd/maven-4.0.0.xsd">
	<modelVersion>4.0.0</modelVersion>
	<groupId>com.stu.vertx</groupId>
	<artifactId>stu-vertx</artifactId>
	<version>1.0.0</version>

	<dependencies>
		<dependency>
			<groupId>io.vertx</groupId>
			<artifactId>vertx-core</artifactId>
			<version>3.5.2</version>
		</dependency>
	</dependencies>

	<build>
		<plugins>

			<plugin>
				<groupId>org.apache.maven.plugins</groupId>
				<artifactId>maven-compiler-plugin</artifactId>
				<version>2.0.2</version>
				<configuration>
					<source>1.8</source>
					<target>1.8</target>
					<encoding>UTF-8</encoding>
				</configuration>
			</plugin>
		</plugins>
	</build>
</project>
2. 创建核心类MyHttpServer
package com.stu.vertx.hello;

import io.vertx.core.Vertx;
import io.vertx.core.http.HttpServer;
import io.vertx.core.http.HttpServerResponse;

/**
 * Vertx 创建一个最简单的HttpServer,当用户请求时返回Hello World
 *
 * @author lenovo
 *
 */
public class MyHttpServer {

	public static void main(String[] args) {

		Vertx vertx = Vertx.vertx();

		// 创建一个HttpServer
		HttpServer server = vertx.createHttpServer();

		server.requestHandler(request -> {
			// 获取到response对象
			HttpServerResponse response = request.response();

			// 设置响应头
			response.putHeader("Content-type", "text/html;charset=utf-8");

			// 响应数据
			response.end("Hello World");

		});

		server.listen(8888); // 监听8888端口
	}

}
代码非常简单,首先获取到Vertx对象,然后通过vertx对象创建Http服务,监听Http请求并进行处理。
这里用到了JDK8的新特性,第一个是Vertx.vertx()方法,我们知道Vertx是一个接口,按照我们以前的逻辑,方法实现是不能写在接口中的,在JDK8中增加了静态方法和默认方法。第二个是->这个符合,这也是一个新特性,可能看起来比较难懂,可以类比JavaScript来理解,JavaScript中有很多这样的写法。我们可以看到,这个方法实际上是接收一个Handle接口,Handle接口中有一个抽象方法 public void handle(HttpServerRequest request) ,这个方法有一个参数 HttpServerRequest .按照我们之前的写法应该写成如下代码:
server.requestHandler(new Handler<HttpServerRequest>() {
@Override
public void handle(HttpServerRequest request) {
// 获取到response对象
HttpServerResponse response = request.response();
// 设置响应头
response.putHeader("Content-type", "text/html;charset=utf-8");
// 响应数据
response.end("Hello World");
}
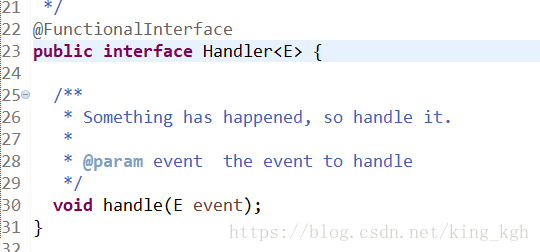
});对比两者可以发现,实际上就是简化了new 子类,简化了重写方法,直接把方法的参数后跟->{方法体}来解决。这样写起来是非常方便的。但是这种写法一个接口中只能定义一个抽象方法。这种接口一般会打上@FunctionalInterface注解。
上面那段代码是直接写到main方法中的,可以直接运行即可。监听的是8888端口,在启动的过程中,要保证8888端口不被占用。启动成功之后可以直接通过浏览器访问。
3.浏览器访问 localhost:8888
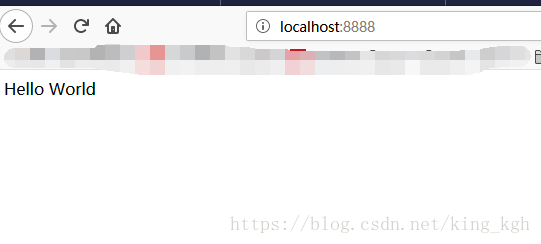
到这里,一个简单的Vertx程序就写完了。