Vert.x的开发非常类似于Nodejs,在HelloWorld中我们已经创建了一个简单的HttpServer,但这个HttpServer并不能满足我么业务的要求,对于Web开发的很多常用功能都需要开发者自己来实现,所以Vert.x提供了Web开发组件,提供了一堆Web开发中常用的功能。比如路由功能,国际化,异常处理,session和cookie以及模板等。
本篇主要介绍Web开发中的路由功能,并会介绍如何接收用户传上来的参数。路由是Web开发中最基础也是最常用的功能,Vertx提供了强大的路由功能,包括正则匹配,二级路由等。下面是一个简单的实例代码。
基本路由实现
1.在pom文件中,加入vertx-web的依赖包
<dependency>
	<groupId>io.vertx</groupId>
	<artifactId>vertx-web</artifactId>
	<version>3.5.2</version>
</dependency>
2.创建一个HttpServer
package com.stu.vertx.route;

import io.vertx.core.Vertx;
import io.vertx.core.http.HttpServer;
import io.vertx.ext.web.Router;

public class MyHttpServerWithRoute {

	public static void main(String[] args) {

		Vertx vertx = Vertx.vertx();
		HttpServer server = vertx.createHttpServer();

		Router router = Router.router(vertx); // 创建路由对象

		// 创建路由规则,当在浏览器中输入  localhost:8888/index时匹配
		router.route("/index").handler(request -> {
			request.response().end("Index");
		});

		// 创建路由规则,当在浏览器中输入  localhost:8888/hello时匹配
		router.route("/hello").handler(request -> {
			request.response().end("Hello");
		});

		// 把请求交给路由处理    ----------------(1)
		server.requestHandler(router::accept);
		server.listen(8888);
	}
}
上面这段代码还是比较好理解的,主要就是在HelloWorld的基础上增加了Router,并且最后把请求的处理交给Router来处理。这样当我们访问服务器时,就会根据匹配规则,找到对应的处理器来进行处理。
这里有一个地方,就是在代码中标(1)的部分,router:accept这个可能很多朋友不理解,这个也是JDK8的一个新特性,实际上就是一个语法糖,下面是一段不使用JDK8的代码,想必大家看了下面这段代码就都名白了
server.requestHandler(new Handler<HttpServerRequest>() {

	@Override
	public void handle(HttpServerRequest event) {
	    router.accept(event);
	}
});
通过比较,我们会发现,使用JDK8 的新特性,代码上还是相对会简洁很多的。
我们都知道,有一个2.8原则,就是说学习80%的知识可能只用20%的时间,路由也是一样,通过上面这些你实际上已经可以去进行路由了,所以也算是路由的80%的东西了,剩下的20%你可能需要花费更多的时间。
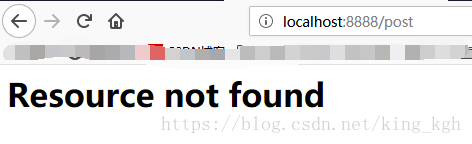
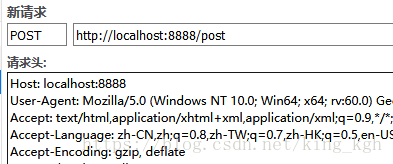
可能对于请求地址的映射,我们第一个想到的就是请求方法的限制,我们知道,请求方法有GET POST PUT DELETE等,我们之前通过在浏览器地址栏输入的都是get请求,如果我们要限制,只能使用POST请求该如何处理呢?也非常简单!
router.post("/post").handler(request -> {
	request.response().end("post");
});
当我们在浏览器直接请求时,你会看到如下结果
当你使用POST发送时,结果如下;
除了post方法以外,还可以使用put,get等方法。除了直接使用这些方法以外,还有另外一种形式,也可以指定请求的方法,代码如下
router.route(HttpMethod.GET, "/method").handler(request -> {
	request.response().end("method");
});
HttpMethod是一个枚举类,可以通过route的参数来指定请求所限制的方法。

二级路由
我们经常会遇到一些情形,比如要对产品做增删改查,我们可能会有如下路由规则的定义
Router restAPI = Router.router(vertx);

restAPI.get("/products/:productID").handler(rc -> {

  // TODO Handle the lookup of the product....
  rc.response().write(productJSON);

});

restAPI.put("/products/:productID").handler(rc -> {

  // TODO Add a new product...
  rc.response().end();

});

restAPI.delete("/products/:productID").handler(rc -> {

  // TODO delete the product...
  rc.response().end();

});
这样虽然能够满足我么的要求,但是,如果比较多的话明显的看起来比较乱,Vertx给我们提供了二级路由来解决这个问题。我们可以直接把上面的restAPI这个作为子路由,挂载到一个主路由中。也就是说,我们创建一个主路由,然后把上面的restAPI这个路由规则通过mount方法挂载就可以了。
mainRouter.mountSubRouter("/productsAPI", restAPI);指定路由顺序
我们可能会配置很多的路由规则,而Vertx进行路由匹配的规则非常简单,默认就是当匹配成功之后就不再继续匹配了。比如我们有如下代码
router.route("/index/*").handler(request -> {
	request.response().end("Index");
});

router.route("/index/main").handler(request -> {
	request.response().end("IndexMain");
});
当我们访问:http://localhost:8080/index/main 的时候,我们希望匹配显然是下面的,我们希望返回的是 IndexMain,而实际情况是返回是Index。为了解决这个问题,我们有两种办法,第一个是把下面的代码放到上面,但这样可能也并不符合我们的习惯,还有另外一种方式就是制定order。
router.route("/index/*").order(2).handler(request -> {
	request.response().end("Index");
});

router.route("/index/main").order(-1).handler(request -> {
	request.response().end("IndexMain");
});
还有一种情况,如果想要所有匹配的规则都执行,可以通过requestContext 的next方法
router.route("/index/*").order(2).handler(request -> {
//	request.response().end("Index");
	System.out.println(1);
	request.next(); // 调下一个匹配规则
});

router.route("/index/main").order(-1).handler(request -> {
//	request.response().end("IndexMain");
	System.out.println("2");
	request.next(); // 调下一个匹配规则
});
参数获取
用户经常会上传一些参数,那么我们在Vertx中如何接收用户上传的参数呢?
第一种就是get请求直接拼接在URL后的参数,比如:http://localhost:8080/method?param=hello
router.route(HttpMethod.GET, "/method").handler(request -> {
	String param = request.request().getParam("param");
	System.out.println("接收到用户传递的参数为:" + param);
	request.response().end("method");
});
第二种是获取路径的参数,比如:http://localhost:8080/method/xiaoming/xm123
// 获取参数
router.route(HttpMethod.GET, "/method/:user/:pass").handler(request -> {
	String user = request.request().getParam("user");
	String pass = request.request().getParam("pass");

	request.response()
		.putHeader("Content-type", "text/html;charset=utf-8")
		.end("接收到的用户名为:" + user + " 接收到的密码为:" + pass);
});
第三种是获取到请求体中的数据,也就是post提交的数据。这个稍微有一些繁琐,首先要指定一个BodyHandle,然后才能通过requestContext对象来获取body体中的数据。
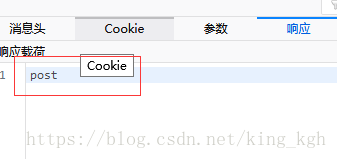
router.route().handler(BodyHandler.create()); // 在路由的最前面,指定body的处理器获取body体的数据的方法有很多,可以获取到字符串,可以直接转成Json对象等等,下面是直接读取到字符串
router.post("/post").handler(request -> {
	String res = request.getBodyAsString(); // 获取到body体的数据
	System.out.println(res);
	request.response().end("post");
});