安装TensorRT 4.0时,按照官方给出的教程(https://docs.nvidia.com/deeplearning/sdk/tensorrt-install-guide/index.html)安装,遇到了几个坑,可能是环境不同的原因,现记录一下,也许对你有帮助。
——环境——
Ubuntu 18.04
Python 3.6.5
CUDA 9.0
cuDNN 7.1
本文是基于tar文件的安装,非deb文件,对应的,CUDA以及cuDNN的安装也必须为tar方式。CUDN以及cuDNN的安装过程此处省略,可搜索相关教程自行安装。官方建议使用CUDA 9.0+cuDNN 7.1,而非最新的CUDA 9.1。
首先从官网(https://developer.nvidia.com/nvidia-tensorrt-download)下载TensorRT 4.0安装文件:
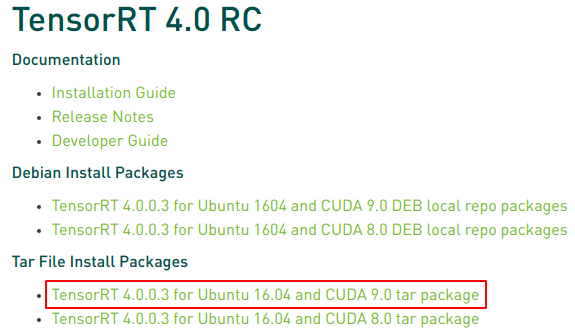
解压缩文件:
$ tar -xzvf TensorRT-4.0.0.3.Ubuntu-16.04.4.x86_64-gnu.cuda-9.0.cudnn7.0.tar.gz添加环境变量:
$ vim ~/.bashrcexport LD_LIBRARY_PATH=$LD_LIBRARY_PATH:~/TensorRT-4.0.0.3/lib #不要像官方教程中那样有<eg:>,否则source时会报错$ source ~/.bashrc——安装Python TensorRT——
$ cd ~/TensorRT-4.0.0.3/python# if Python 2.7
$ sudo pip2 install tensorrt-4.0.0.3-cp27-cp27mu-linux_x86_64.whl
# if Python 3.5
$ sudo pip3 install tensorrt-4.0.0.3-cp35-cp35mu-linux_x86_64.whltensorrt-4.0.0.3-cp36-cp36mu-linux_x86_64.whl注意:一定要使用sudo安装,否则安装成功后bin文件不在/usr/local/bin目录下。而如果使用sudo安装则可能会在安装过程中出现如下错误:
    x86_64-linux-gnu-gcc -pthread -fwrapv -Wall -O3 -DNDEBUG -fno-strict-aliasing -Wdate-time -D_FORTIFY_SOURCE=2 -g -fdebug-prefix-map=/build/python3.6-nbjU53/python3.6-3.6.5=. -fstack-protector-strong -Wformat -Werror=format-security -fPIC -DBOOST_PYTHON_SOURCE=1 -DHAVE_CURAND=1 -DPYGPU_PACKAGE=pycuda -DBOOST_THREAD_DONT_USE_CHRONO=1 -DPYGPU_PYCUDA=1 -DBOOST_MULTI_INDEX_DISABLE_SERIALIZATION=1 -DBOOST_THREAD_BUILD_DLL=1 -Dboost=pycudaboost -DBOOST_ALL_NO_LIB=1 -Isrc/cpp -Ibpl-subset/bpl_subset -I/usr/lib/python3.6/dist-packages/numpy/core/include -I/usr/include/python3.6 -c src/cpp/cuda.cpp -o build/temp.linux-x86_64-3.6/src/cpp/cuda.o
    In file included from src/cpp/cuda.cpp:1:0:
    src/cpp/cuda.hpp:14:10: fatal error: cuda.h: No such file or directory
     #include <cuda.h>
              ^~~~~~~~
    compilation terminated.
    error: command 'x86_64-linux-gnu-gcc' failed with exit status 1

    ----------------------------------------
Command "/usr/bin/python -u -c "import setuptools, tokenize;__file__='/tmp/pip-build-xpowxF/pycuda/setup.py';f=getattr(tokenize, 'open', open)(__file__);code=f.read().replace('\r\n', '\n');f.close();exec(compile(code, __file__, 'exec'))" install --record /tmp/pip-jUVvJV-record/install-record.txt --single-version-externally-managed --compile" failed with error code 1 in /tmp/pip-build-xpowxF/pycuda/如果可以which到tensorrt,证明安装成功。
$ which tensorrt
/usr/local/bin/tensorrt
——安装UFF——
$ cd ~/TensorRT-4.0.0.3/uff# if Python 2.7
$ sudo pip2 install uff-0.3.0rc0-py2.py3-none-any.whl# if Python 3
$ sudo pip3 install uff-0.3.0rc0-py2.py3-none-any.whl如果可以which到convert-to-uff,证明安装成功。
$ which convert-to-uff
/usr/local/bin/convert-to-uff
——测试——
使用samples测试TensorRT是否安装成功
$ cd ~/TensorRT-4.0.0.3/samples
$ make
如果出现如下错误:
dpkg-query: no packages found matching cuda-toolkit-*
../Makefile.config:6: CUDA_INSTALL_DIR variable is not specified, using /usr/local/cuda- by default, use CUDA_INSTALL_DIR=<cuda_directory> to change.
../Makefile.config:9: CUDNN_INSTALL_DIR variable is not specified, using  by default, use CUDNN_INSTALL_DIR=<cudnn_directory> to change.
dpkg-query: no packages found matching cuda-toolkit-*
dpkg-query: no packages found matching cuda-toolkit-*
dpkg-query: no packages found matching cuda-toolkit-*
dpkg-query: no packages found matching cuda-toolkit-*
Compiling: sampleMNIST.cpp
sampleMNIST.cpp:9:10: fatal error: cuda_runtime_api.h: No such file or directory
 #include <cuda_runtime_api.h>
          ^~~~~~~~~~~~~~~~~~~~
compilation terminated.
../Makefile.config:177: recipe for target '../../bin/dchobj/sampleMNIST.o' failed
make: *** [../../bin/dchobj/sampleMNIST.o] Error 1
是由于CUDA路径没有找到,需要在make后添加,以指定路径
$ sudo make clean #清理make后产生的文件
$ meke CUDA_INSTALL_DIR=/usr/local/cuda
生成的bin文件在~/TensorRT-4.0.0.3/bin目录下,直接执行即可:
$ cd ~/TensorRT-4.0.0.3/bin
$ ./sample_mnist
---------------------------


@@@@@@@@@@@@@@@@@@@@@@@@@@@@
@@@@@@@@@@@@@@@@@@@@@@@@@@@@
@@@@@@@@@@@@@@@@@@@@@@@@@@@@
@@@@@@@@@@@@@@@@@@@@@@@@@@@@
@@@@@@@@@@@*.  .*@@@@@@@@@@@
@@@@@@@@@@*.     +@@@@@@@@@@
@@@@@@@@@@. :#+   %@@@@@@@@@
@@@@@@@@@@.:@@@+  +@@@@@@@@@
@@@@@@@@@@.:@@@@: +@@@@@@@@@
@@@@@@@@@@=%@@@@: +@@@@@@@@@
@@@@@@@@@@@@@@@@# +@@@@@@@@@
@@@@@@@@@@@@@@@@* +@@@@@@@@@
@@@@@@@@@@@@@@@@: +@@@@@@@@@
@@@@@@@@@@@@@@@@: +@@@@@@@@@
@@@@@@@@@@@@@@@* .@@@@@@@@@@
@@@@@@@@@@%**%@. *@@@@@@@@@@
@@@@@@@@%+.  .: .@@@@@@@@@@@
@@@@@@@@=  ..   :@@@@@@@@@@@
@@@@@@@@: *@@:  :@@@@@@@@@@@
@@@@@@@%  %@*    *@@@@@@@@@@
@@@@@@@%  ++  ++ .%@@@@@@@@@
@@@@@@@@-    +@@- +@@@@@@@@@
@@@@@@@@=  :*@@@# .%@@@@@@@@
@@@@@@@@@+*@@@@@%.  %@@@@@@@
@@@@@@@@@@@@@@@@@@@@@@@@@@@@
@@@@@@@@@@@@@@@@@@@@@@@@@@@@
@@@@@@@@@@@@@@@@@@@@@@@@@@@@
@@@@@@@@@@@@@@@@@@@@@@@@@@@@


0:
1:
2: **********
3:
4:
5:
6:
7:
8:
9: