表述性状态传输(REST)作为对基于 SOAP 和 Web 服务描述语言(WSDL)的 Web 服务的简单替代,在 Web 开发上得到了广泛的接受。
能够充分证明这点的是主流 Web 2.0 服务提供商在接口设计中对 REST 的普遍采用 - 包括雅虎、谷歌以及脸谱 - 出于简单易用、以面向资源的模型发布自己的服务的偏好他们都已经抛弃了 SOAP 和基于 WSDL 的接口。在你必须要对你的 RESTFul web service 进行测试的时候,你可能会有这两个选择:
如果你碰到了以下问题之一,那么恭喜你,你来对地方了:
2. 创建简单 Java 类:CrunchifyJMeterTest.java(我们将使用 JMeter 访问的服务)。
3. 在 Tomcat 上对该应用进行重新部署。
4. 运行 JMeter 并打开下文提供的 .jmx 文件。
5. 执行并对你的测试结果进行分析。
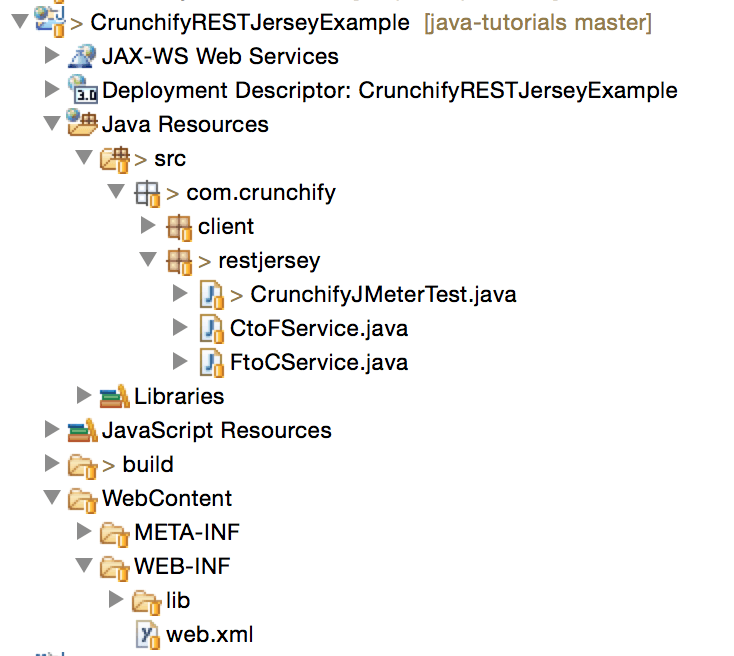
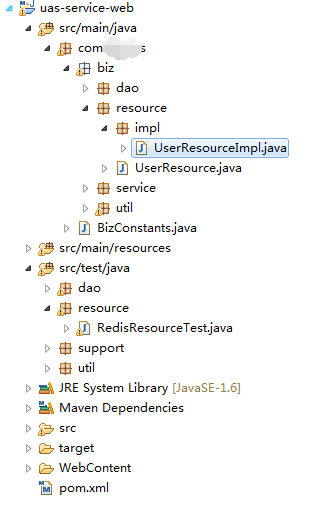
之后应该看到下面这种 Eclipse 目录结构:
URL: http://localhost:8080/CrunchifyRESTJerseyExample/crunchify/index/
原文链接: How to Call Your Restful Web Service Using JMeter? Perform a Simple Load Testing and Automation。
该方法单元测试相关代码:
RESTfulJsonClientFactory 是一个 WebService 的远程客户端创建类。执行该单元测试,输出:
请求报文:{}{"msgType":null,"tranCode":null,"sysCode":"1001","brcCode":"1000","srcCode":"01","frontNo":"dfs-02040668","frontTime":"2017-01-20 15:27:19","repCode":null,"repMsg":null,"remark":null,"version":"1.0","signature":null,"cerVersion":null,"channelNo":"01","token":"mytest004","value":"{\"csrfToken\":null,\"userInfo\":{\"loginName\":null,\"merCode\":\"102239\",\"merName\":null,\"accountList\":[{\"acccountCode\":\"1022380016\",\"accountName\":\"redis测试账户名称\"}],\"operator\":null,\"role\":null},\"menuTree\":null}","timeOut":"10000","reqDate":null}
响应报文:{}{"msgType":null,"tranCode":null,"sysCode":"1001","brcCode":"1000","srcCode":"01","frontNo":"channel.web.dfs.local","frontTime":"2017-01-20 15:26:24","repCode":"000000","repMsg":"成功","remark":null,"version":"1.0","signature":null,"cerVersion":null,"channelNo":"01","token":"mytest004","result":"1","reqDate":null}
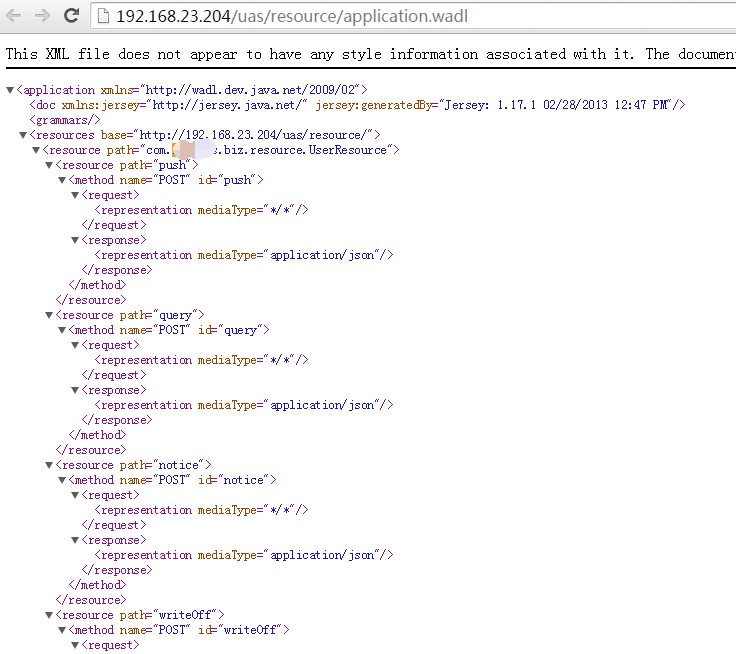
根据 SmartSniff 的结果我们拿到了这次 Web Service 调用的完整 URL: http:192.168.23.204/uas/resource/com.dfs.uas.biz.resource.UserResource/push,以及完整报文:
POST /uas/resource/com.dfs.uas.biz.resource.UserResource/push HTTP/1.1
Content-Type: application/json
User-Agent: Java/1.6.0_29
Host: 192.168.23.204
Accept: text/html, image/gif, image/jpeg, *; q=.2, */*; q=.2
Connection: keep-alive
Content-Length: 429
{"sysCode":"1001","brcCode":"1000","srcCode":"01","frontNo":"dfs-02040668","frontTime":"2017-01-20 17:12:29","version":"1.0","channelNo":"01","token":"mytest004","value":"{\"csrfToken\":null,\"userInfo\":{\"loginName\":null,\"merCode\":\"102239\",\"merName\":null,\"accountList\":[{\"acccountCode\":\"1022380016\",\"accountName\":\"redis..................\"}],\"operator\":null,\"role\":null},\"menuTree\":null}","timeOut":10000}
HTTP/1.1 200 OK
Server: nginx/1.10.2
Date: Fri, 20 Jan 2017 09:11:28 GMT
Content-Type: application/json
Transfer-Encoding: chunked
Connection: keep-alive
db
{"sysCode":"1001","brcCode":"1000","srcCode":"01","frontNo":"channel.web.dfs.local","frontTime":"2017-01-20 17:11:28","repCode":"000000","repMsg":"......","version":"1.0","channelNo":"01","token":"mytest004","result":1}
0
这些都是很有用的信息,URL 在我们写 HTTP 采样器配置路径的时候用,请求报文在我们组织请求报文体时用,返回报文可以用来参考写断言。

能够充分证明这点的是主流 Web 2.0 服务提供商在接口设计中对 REST 的普遍采用 - 包括雅虎、谷歌以及脸谱 - 出于简单易用、以面向资源的模型发布自己的服务的偏好他们都已经抛弃了 SOAP 和基于 WSDL 的接口。在你必须要对你的 RESTFul web service 进行测试的时候,你可能会有这两个选择:
- 使用 URL 对你的 WebService 进行简单访问测试
- 使用 JMeter 来对 WebService 进行循环访问测试。这种测试也能起到简单性能测试的效果。
如果你碰到了以下问题之一,那么恭喜你,你来对地方了:
- 使用 JMeter 对 SOAP/REST WebService 进行功能测试
- 使用 JMeter 对一个 RESTFul API 执行性能测试
- 使用 JMeter 对 Rest API 进行自动化测试 - 也就是性能测试
- 如何使用 JMeter 测试 REST API
- 使用 JMeter 来测试一个 RESTful web service(Jersey)
步骤概述:
1. 先决条件:RESTFul web service 的完整实现。2. 创建简单 Java 类:CrunchifyJMeterTest.java(我们将使用 JMeter 访问的服务)。
3. 在 Tomcat 上对该应用进行重新部署。
4. 运行 JMeter 并打开下文提供的 .jmx 文件。
5. 执行并对你的测试结果进行分析。
步骤 1
先决条件:RESTFul web service 的完整实现。部署并运行应用程序。步骤 2
创建 CrunchifyJMeterTest.java 文件package com.crunchify.restjersey;
import java.io.FileNotFoundException;
import java.io.IOException;
import javax.ws.rs.GET;
import javax.ws.rs.Path;
import javax.ws.rs.Produces;
/**
* @author Crunchify
*
*/
@Path("/index")
public class CrunchifyJMeterTest {
@GET
@Produces("text/html")
public String checkECV() throws InterruptedException, FileNotFoundException, IOException {
String result = "<br><div align='center'><h2>Hey This is Crunchify's JMeter Test...</h2></div>";
System.out.println(result);
Thread.sleep(1000);
return result;
}
}之后应该看到下面这种 Eclipse 目录结构:
步骤 3
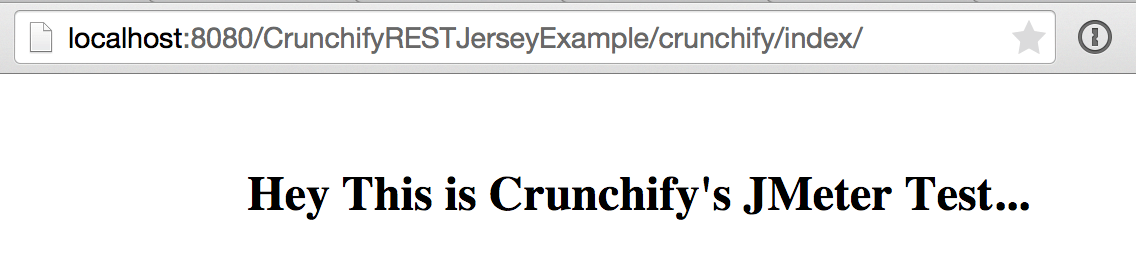
将 CrunchifyRESTJerseyExample 在 Tomcat 上重新部署,使用这个 URL 测试你的 REST 服务:URL: http://localhost:8080/CrunchifyRESTJerseyExample/crunchify/index/
步骤 4
将以下脚本拷贝到文本文件并另存为 Crunchify-JMeter-Test.jmx:<?xml version="1.0" encoding="UTF-8"?>
<jmeterTestPlan version="1.2" properties="2.4" jmeter="2.9 r1437961">
<hashTree>
<TestPlan guiclass="TestPlanGui" testclass="TestPlan" testname="App Shah Desktop Test" enabled="true">
<stringProp name="TestPlan.comments"></stringProp>
<boolProp name="TestPlan.functional_mode">false</boolProp>
<boolProp name="TestPlan.serialize_threadgroups">false</boolProp>
<elementProp name="TestPlan.user_defined_variables" elementType="Arguments" guiclass="ArgumentsPanel" testclass="Arguments" testname="User Defined Variables" enabled="true">
<collectionProp name="Arguments.arguments"/>
</elementProp>
<stringProp name="TestPlan.user_define_classpath"></stringProp>
</TestPlan>
<hashTree>
<ThreadGroup guiclass="ThreadGroupGui" testclass="ThreadGroup" testname="Crunchify's REST Service JMeter Test" enabled="true">
<stringProp name="ThreadGroup.on_sample_error">continue</stringProp>
<elementProp name="ThreadGroup.main_controller" elementType="LoopController" guiclass="LoopControlPanel" testclass="LoopController" testname="Loop Controller" enabled="true">
<boolProp name="LoopController.continue_forever">false</boolProp>
<intProp name="LoopController.loops">-1</intProp>
</elementProp>
<stringProp name="ThreadGroup.num_threads">5</stringProp>
<stringProp name="ThreadGroup.ramp_time">2</stringProp>
<longProp name="ThreadGroup.start_time">1367432020000</longProp>
<longProp name="ThreadGroup.end_time">1367432020000</longProp>
<boolProp name="ThreadGroup.scheduler">false</boolProp>
<stringProp name="ThreadGroup.duration"></stringProp>
<stringProp name="ThreadGroup.delay"></stringProp>
</ThreadGroup>
<hashTree>
<HTTPSamplerProxy guiclass="HttpTestSampleGui" testclass="HTTPSamplerProxy" testname="HTTP Request" enabled="true">
<boolProp name="HTTPSampler.postBodyRaw">true</boolProp>
<elementProp name="HTTPsampler.Arguments" elementType="Arguments">
<collectionProp name="Arguments.arguments">
<elementProp name="" elementType="HTTPArgument">
<boolProp name="HTTPArgument.always_encode">false</boolProp>
<stringProp name="Argument.value"></stringProp>
<stringProp name="Argument.metadata">=</stringProp>
</elementProp>
</collectionProp>
</elementProp>
<stringProp name="HTTPSampler.domain">localhost</stringProp>
<stringProp name="HTTPSampler.port">8080</stringProp>
<stringProp name="HTTPSampler.connect_timeout">10000</stringProp>
<stringProp name="HTTPSampler.response_timeout">10000</stringProp>
<stringProp name="HTTPSampler.protocol"></stringProp>
<stringProp name="HTTPSampler.contentEncoding"></stringProp>
<stringProp name="HTTPSampler.path">/CrunchifyRESTJerseyExample/crunchify/index</stringProp>
<stringProp name="HTTPSampler.method">GET</stringProp>
<boolProp name="HTTPSampler.follow_redirects">true</boolProp>
<boolProp name="HTTPSampler.auto_redirects">false</boolProp>
<boolProp name="HTTPSampler.use_keepalive">true</boolProp>
<boolProp name="HTTPSampler.DO_MULTIPART_POST">false</boolProp>
<boolProp name="HTTPSampler.monitor">false</boolProp>
<stringProp name="HTTPSampler.embedded_url_re"></stringProp>
</HTTPSamplerProxy>
<hashTree/>
<ResultCollector guiclass="StatGraphVisualizer" testclass="ResultCollector" testname="Aggregate Graph" enabled="true">
<boolProp name="ResultCollector.error_logging">false</boolProp>
<objProp>
<name>saveConfig</name>
<value class="SampleSaveConfiguration">
<time>true</time>
<latency>true</latency>
<timestamp>true</timestamp>
<success>true</success>
<label>true</label>
<code>true</code>
<message>true</message>
<threadName>true</threadName>
<dataType>true</dataType>
<encoding>false</encoding>
<assertions>true</assertions>
<subresults>true</subresults>
<responseData>false</responseData>
<samplerData>false</samplerData>
<xml>true</xml>
<fieldNames>false</fieldNames>
<responseHeaders>false</responseHeaders>
<requestHeaders>false</requestHeaders>
<responseDataOnError>false</responseDataOnError>
<saveAssertionResultsFailureMessage>false</saveAssertionResultsFailureMessage>
<assertionsResultsToSave>0</assertionsResultsToSave>
<bytes>true</bytes>
</value>
</objProp>
<stringProp name="filename"></stringProp>
</ResultCollector>
<hashTree/>
<ResultCollector guiclass="StatVisualizer" testclass="ResultCollector" testname="Aggregate Report" enabled="true">
<boolProp name="ResultCollector.error_logging">false</boolProp>
<objProp>
<name>saveConfig</name>
<value class="SampleSaveConfiguration">
<time>true</time>
<latency>true</latency>
<timestamp>true</timestamp>
<success>true</success>
<label>true</label>
<code>true</code>
<message>true</message>
<threadName>true</threadName>
<dataType>true</dataType>
<encoding>false</encoding>
<assertions>true</assertions>
<subresults>true</subresults>
<responseData>false</responseData>
<samplerData>false</samplerData>
<xml>false</xml>
<fieldNames>false</fieldNames>
<responseHeaders>false</responseHeaders>
<requestHeaders>false</requestHeaders>
<responseDataOnError>false</responseDataOnError>
<saveAssertionResultsFailureMessage>false</saveAssertionResultsFailureMessage>
<assertionsResultsToSave>0</assertionsResultsToSave>
<bytes>true</bytes>
</value>
</objProp>
<stringProp name="filename"></stringProp>
</ResultCollector>
<hashTree/>
</hashTree>
</hashTree>
</hashTree>
</jmeterTestPlan>步骤 5
- 下载 Apache JMeter
- 使用 jmeter.bat 或 jmeter.sh 文件启动 JMeter
- 点击 File -> Open
- 切换到你保存 Crunchify-JMeter-Test.jmx 文件的目录并选择该文件
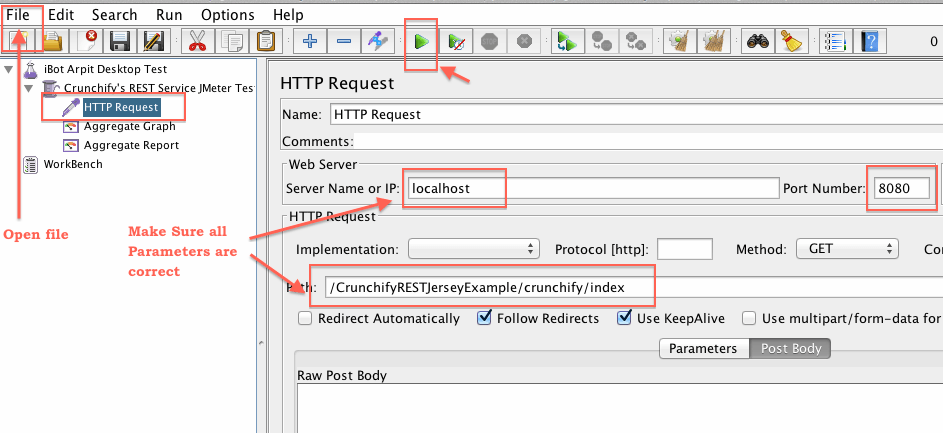
步骤 6
- 将 Crunchify 测试案例扩展开你会看到下图所示界面
- 点击 HTTP Request
- 确认各项参数是否正确
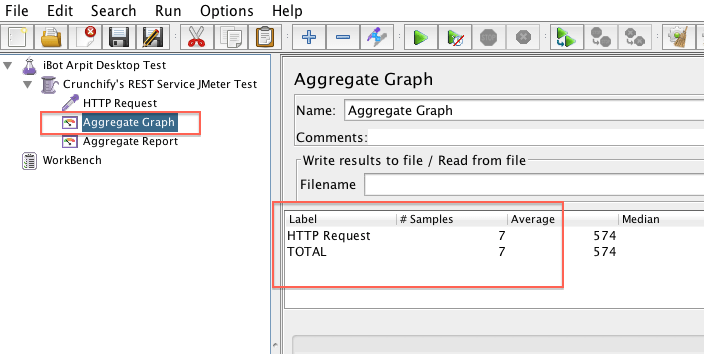
步骤 7
分析你的测试结果:
原文链接: How to Call Your Restful Web Service Using JMeter? Perform a Simple Load Testing and Automation。
译者续:《对一个基于 Jersey 框架实现的 RESTful web service 进行压力测试》
Jersey 项目
一个基于 Jersey 框架实现的 RESTful web service 项目如下:
将其部署后,访问 wadl 地址 http://192.168.23.204/uas/resource/application.wadl:
Web Service 方法
我们要对其这个方法进行压测: /**
* 数据初始化
* @param request
* @return
*/
@Override
@POST
@Produces(MediaType.APPLICATION_JSON)
@Path("push")
public UserPushResponse push( UserPushRequest request) {
logger.info(">>>>用户" + request.getToken() + "信息初始化!");
logger.info(">>>>数据初始化请求报文:{}",
new Object[]{JsonUtils.object2jsonString(request)});
//返回报文
UserPushResponse response;
try {
//请求报文校验
userPushService.validateRequest(request);
//数据库操作
redisDao.set(request.getToken(), request.getValue(),
new Long(request.getTimeOut()));
//组织成功报文
response = userPushService.buildSucessResponse(request);
} catch (Exception e) {
logger.info(e.getMessage(), e);
response = userPushService.buildFailResposne(e);
}
logger.info("用户信息初始化响应报文:{}"
, new Object[]{JsonUtils.object2jsonString(response)});
return response;
}该方法单元测试相关代码:
    UserResource userResource = RESTfulJsonClientFactory.createClient(UserResource.class, VIP);

    Logger logger = LoggerFactory.getLogger(this.getClass());

    @Test
    public void testResource() {
        UserPushRequest pushRequest = new UserPushRequest();
        pushRequest.setToken("mytest004");
        UserInfoAndMenu userInfoAndMenu = new UserInfoAndMenu();
        UserInfo userInfo = new UserInfo();
        userInfo.setMerCode("102239");
        userInfo.setAccountList(getAccountList());
        userInfoAndMenu.setUserInfo(userInfo);
        pushRequest.setValue(JsonUtils.object2jsonString(userInfoAndMenu));
        pushRequest.setTimeOut(10000);
        System.out.println("请求报文:{}"+JsonUtils.object2jsonString(pushRequest));
        UserPushResponse response = userResource.push(pushRequest);
        System.out.println("响应报文:{}"+JsonUtils.object2jsonString(response));
    }
RESTfulJsonClientFactory 是一个 WebService 的远程客户端创建类。执行该单元测试,输出:
请求报文:{}{"msgType":null,"tranCode":null,"sysCode":"1001","brcCode":"1000","srcCode":"01","frontNo":"dfs-02040668","frontTime":"2017-01-20 15:27:19","repCode":null,"repMsg":null,"remark":null,"version":"1.0","signature":null,"cerVersion":null,"channelNo":"01","token":"mytest004","value":"{\"csrfToken\":null,\"userInfo\":{\"loginName\":null,\"merCode\":\"102239\",\"merName\":null,\"accountList\":[{\"acccountCode\":\"1022380016\",\"accountName\":\"redis测试账户名称\"}],\"operator\":null,\"role\":null},\"menuTree\":null}","timeOut":"10000","reqDate":null}
响应报文:{}{"msgType":null,"tranCode":null,"sysCode":"1001","brcCode":"1000","srcCode":"01","frontNo":"channel.web.dfs.local","frontTime":"2017-01-20 15:26:24","repCode":"000000","repMsg":"成功","remark":null,"version":"1.0","signature":null,"cerVersion":null,"channelNo":"01","token":"mytest004","result":"1","reqDate":null}
http 报文截取
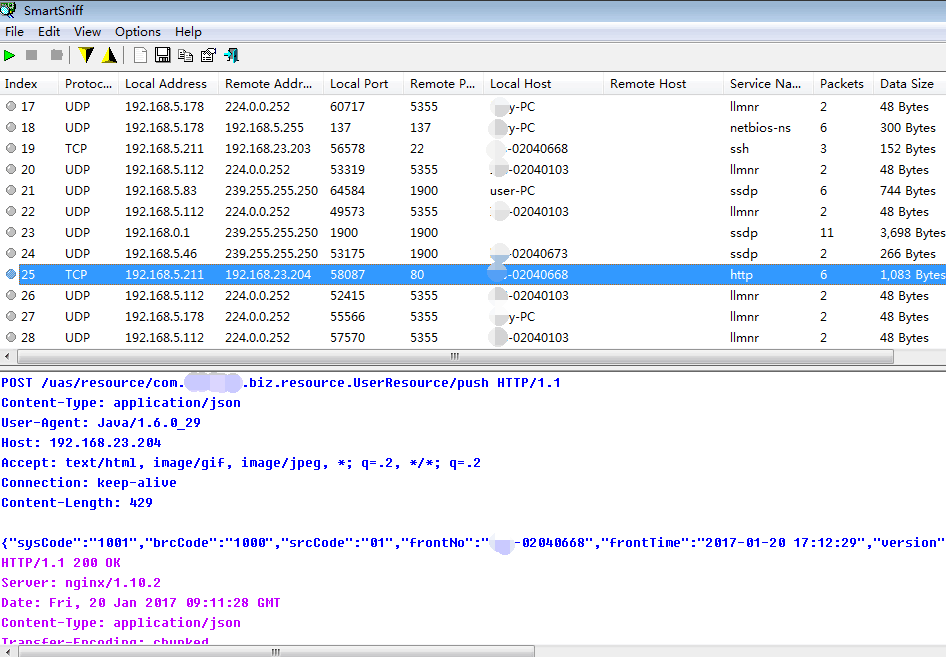
SmartSniff 为我们截取到了这次 Web Service 调用,包括一个完整的 http 请求报文(蓝字部分)和返回报文(红字部分):
根据 SmartSniff 的结果我们拿到了这次 Web Service 调用的完整 URL: http:192.168.23.204/uas/resource/com.dfs.uas.biz.resource.UserResource/push,以及完整报文:
POST /uas/resource/com.dfs.uas.biz.resource.UserResource/push HTTP/1.1
Content-Type: application/json
User-Agent: Java/1.6.0_29
Host: 192.168.23.204
Accept: text/html, image/gif, image/jpeg, *; q=.2, */*; q=.2
Connection: keep-alive
Content-Length: 429
{"sysCode":"1001","brcCode":"1000","srcCode":"01","frontNo":"dfs-02040668","frontTime":"2017-01-20 17:12:29","version":"1.0","channelNo":"01","token":"mytest004","value":"{\"csrfToken\":null,\"userInfo\":{\"loginName\":null,\"merCode\":\"102239\",\"merName\":null,\"accountList\":[{\"acccountCode\":\"1022380016\",\"accountName\":\"redis..................\"}],\"operator\":null,\"role\":null},\"menuTree\":null}","timeOut":10000}
HTTP/1.1 200 OK
Server: nginx/1.10.2
Date: Fri, 20 Jan 2017 09:11:28 GMT
Content-Type: application/json
Transfer-Encoding: chunked
Connection: keep-alive
db
{"sysCode":"1001","brcCode":"1000","srcCode":"01","frontNo":"channel.web.dfs.local","frontTime":"2017-01-20 17:11:28","repCode":"000000","repMsg":"......","version":"1.0","channelNo":"01","token":"mytest004","result":1}
0
这些都是很有用的信息,URL 在我们写 HTTP 采样器配置路径的时候用,请求报文在我们组织请求报文体时用,返回报文可以用来参考写断言。
HTTP 信息头管理器
JMeter 新建测试线程组、新建 HTTP 信息头,信息头加入名称为 Content-Type 值为 application/json 项:
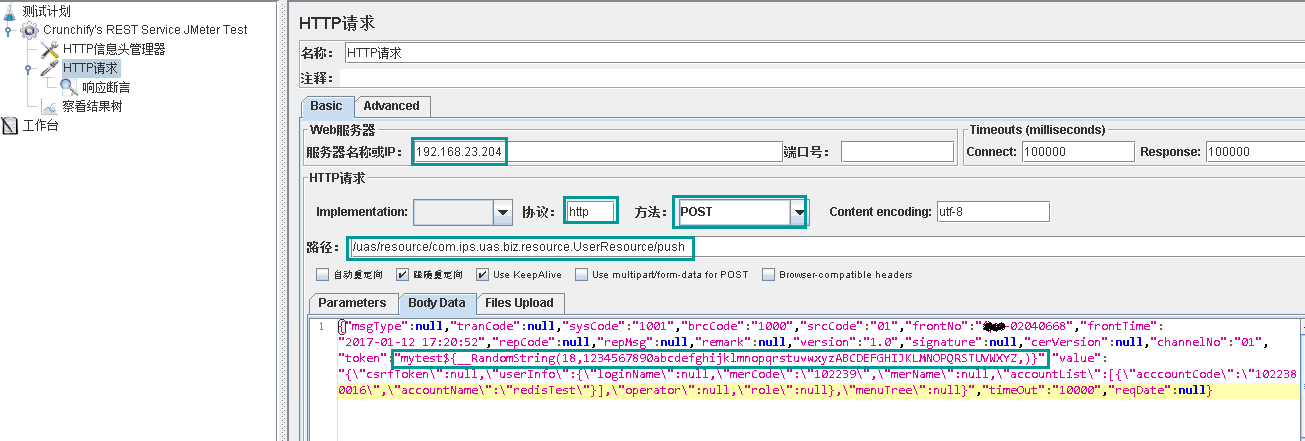
HTTP 请求采样器
根据截取信息编辑 HTTP 请求采样器,注意标框部分:
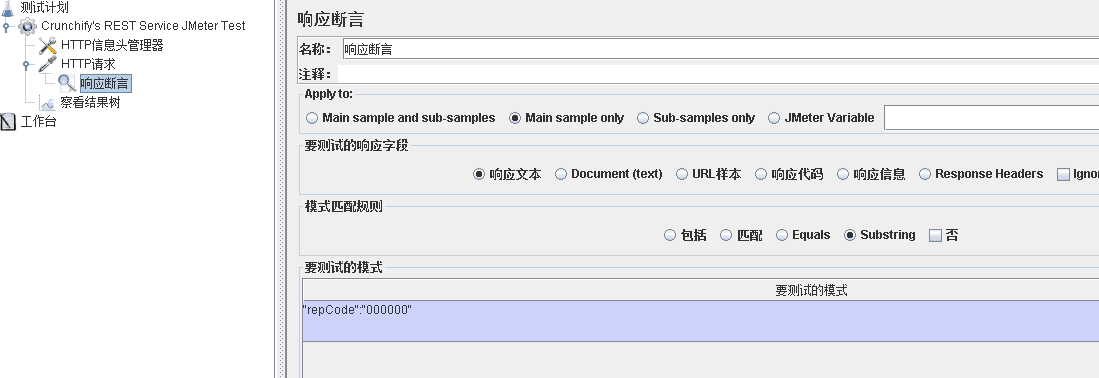
HTTP 响应断言
根据截取信息编辑 HTTP 响应断言:
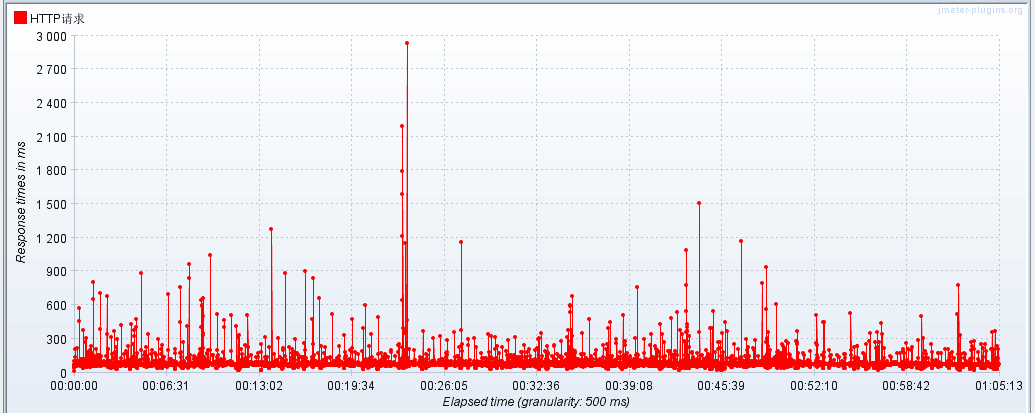
执行压力测试
使用察看结果树对脚本调试成功之后,再配置线程组并发数、循环次数等,开始压测,一个小时后的 TRT 结果:
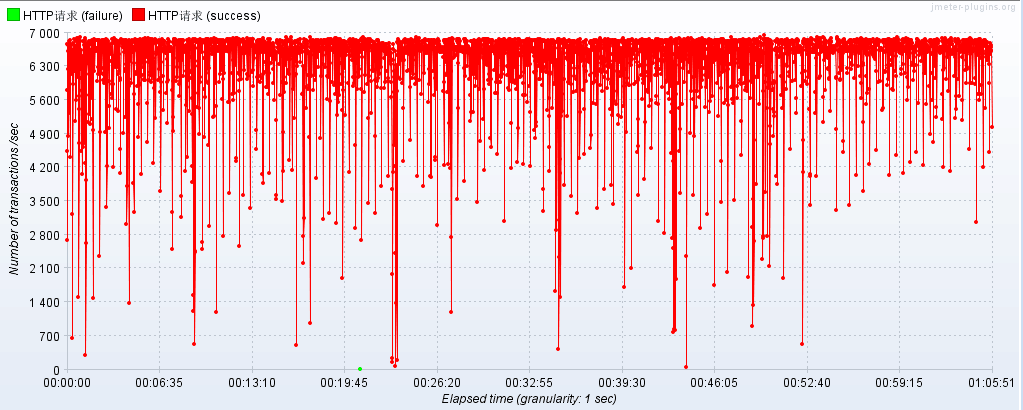
TPS 数据:
译者后记
Web Service 的压力测试脚本其实很好写,但是如果从建立 Web Service 的客户端比如写 BeanShell 实现本地执行远程服务调用的角度出发往往会落入复杂繁琐而且遥遥无期的脚本开发调试之中(用《神探狄仁杰》里狄仁杰经常说的一句经典台词说:落入彀中)。换个思路,比如从协议的角度出发,Web Service 再复杂也脱离不了 HTTP 吧?然后在借助合理的协议工具的帮助下,看似复杂的脚本编写就会变得非常简单了。