来源:https://blog.csdn.net/saytime/article/details/74781696
尊重原创,这里转载的原因,是自己在做的过程中,出了很多错误,所以把产生错误的情况也加上来,让在学的人有个直观的做法。
现如今,互联网的热点已经成为微服务了,如果你到现在还没有听说过微服务,或者还不了解,那表示你已经out了,需要开始作准备了。现在主流的微服务框架包括早期阿里的Dubbo,以及现在热门的SpringCloud,所以我们开始要准备开始学习SpringCloud了,扯远了,因为SpringCloud是基于SpringBoot结构上去进行开发,所以我们也要学习SpringBoot,平时我们使用SSM,SSH等,是不是配置文件一大堆,而且经常不知道哪里配置错了,导致问题很多。SpringBoot就是为了解决这个问题的。使用起来非常简单。
一、本教程环境
- IDE : IntelliJ IDEA 2017.1.4 x64
- JDK : 1.8
- SpringBoot :1.5.4.RELEASE
二、搭建SpringBoot工程
2.1 先用Idea新建一个Empty Project (这里为什么一定要建一个空工程?我不建空工程,直接建SpringBoot工程,过程全部是对的,但是不会有正确的网页结果。还是老老实实按这个教程做,才是正确的)。
建新工程的步骤:打开idea --> Create New Project --> Empty Project -->Next -->
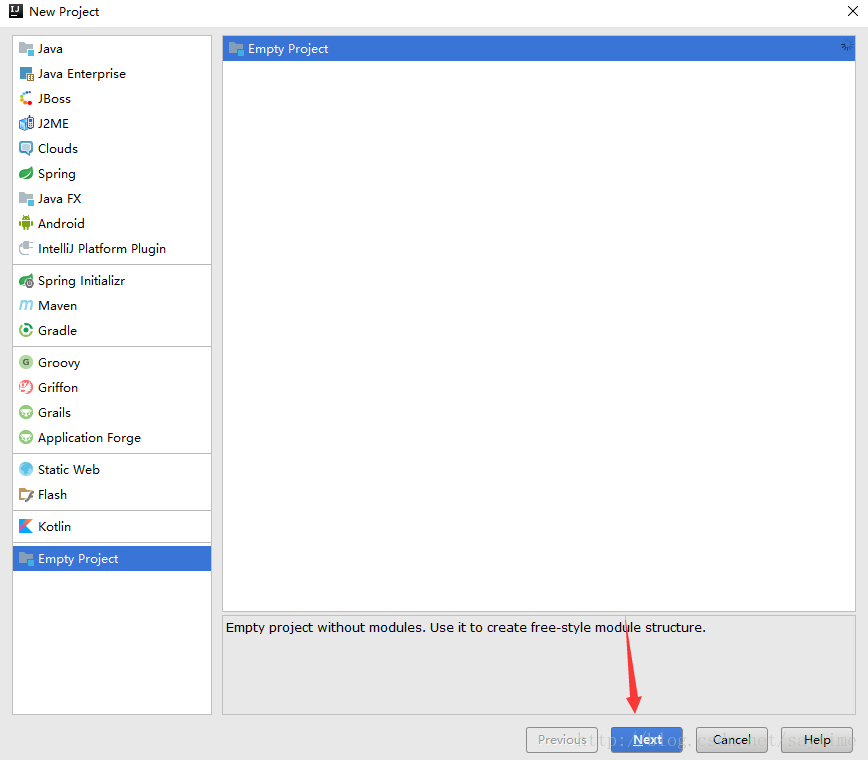
名字随意,这里叫springboot-demo

键空工程的意思,我的理解是,先建一个工程的目录, 就象是工作空间一样的。
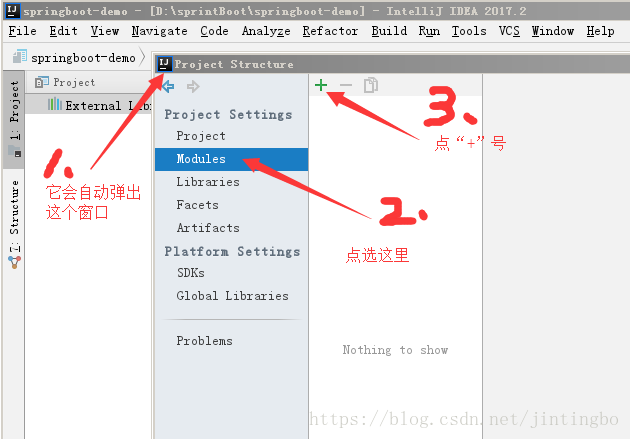
2.2 使用IDEA Spring Initializr 构建SpringBoot工程
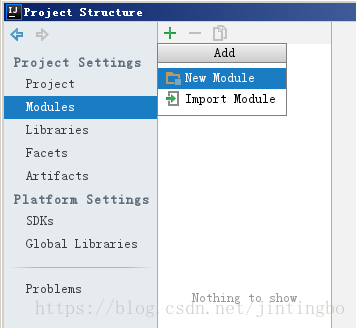
New Module
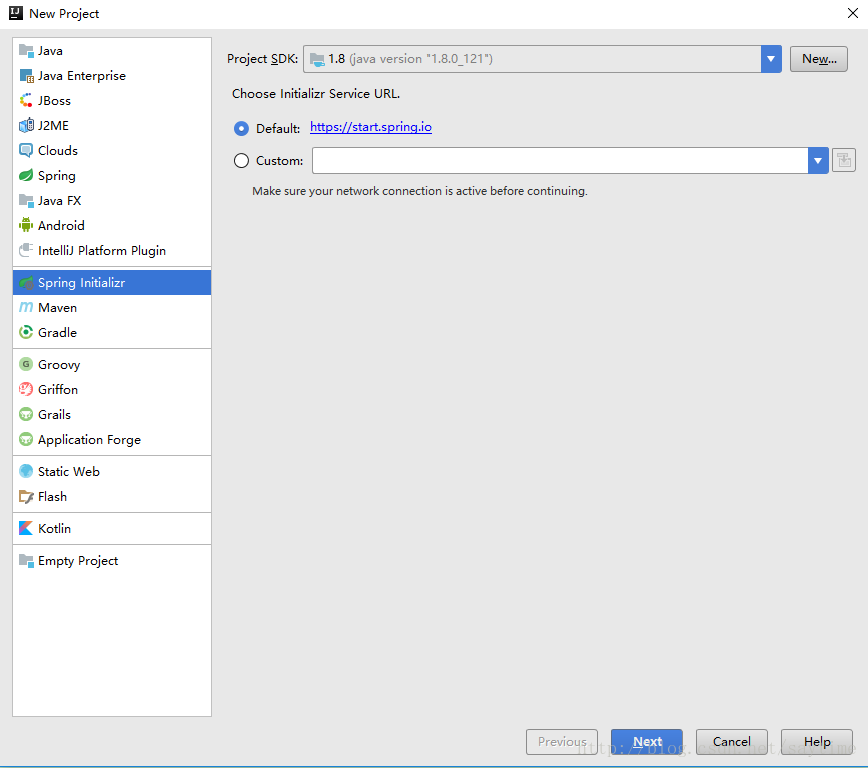

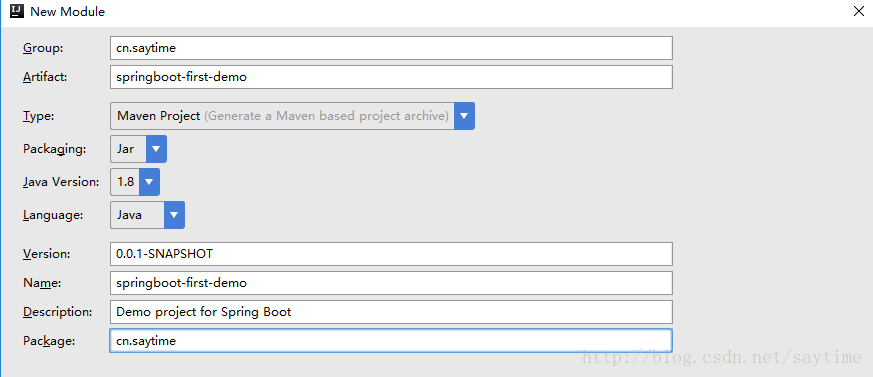
勾选web依赖,继续下一步就好了。

pom.xml
<?xml version="1.0" encoding="UTF-8"?>
<project xmlns="http://maven.apache.org/POM/4.0.0" xmlns:xsi="http://www.w3.org/2001/XMLSchema-instance"
    xsi:schemaLocation="http://maven.apache.org/POM/4.0.0 http://maven.apache.org/xsd/maven-4.0.0.xsd">
    <modelVersion>4.0.0</modelVersion>

    <groupId>cn.saytime</groupId>
    <artifactId>springboot-first-demo</artifactId>
    <version>0.0.1-SNAPSHOT</version>
    <packaging>jar</packaging>

    <name>springboot-first-demo</name>
    <description>Demo project for Spring Boot</description>

    <parent>
        <groupId>org.springframework.boot</groupId>
        <artifactId>spring-boot-starter-parent</artifactId>
        <version>1.5.4.RELEASE</version>
        <relativePath/> <!-- lookup parent from repository -->
    </parent>

    <properties>
        <project.build.sourceEncoding>UTF-8</project.build.sourceEncoding>
        <project.reporting.outputEncoding>UTF-8</project.reporting.outputEncoding>
        <java.version>1.8</java.version>
    </properties>

    <dependencies>
        <!-- Add typical dependencies for a web application -->
        <dependency>
            <groupId>org.springframework.boot</groupId>
            <artifactId>spring-boot-starter-web</artifactId>
        </dependency>

        <!-- SpringBoot test -->
        <dependency>
            <groupId>org.springframework.boot</groupId>
            <artifactId>spring-boot-starter-test</artifactId>
            <scope>test</scope>
        </dependency>
    </dependencies>

    <!-- Package as an executable jar -->
    <build>
        <plugins>
            <plugin>
                <groupId>org.springframework.boot</groupId>
                <artifactId>spring-boot-maven-plugin</artifactId>
            </plugin>
        </plugins>
    </build>

</project>
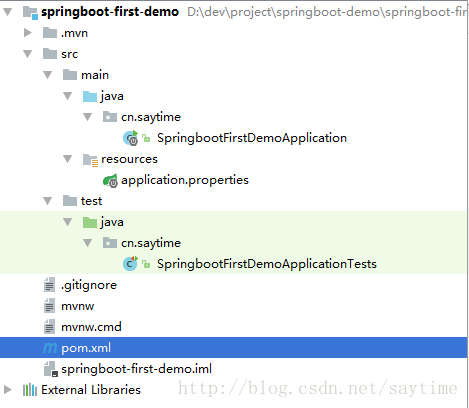
搭建完成,下面是SpringBoot项目结构
三、Hello SpringBoot
先来看看 SpringBoot 工程结构,注意新建的其它包,比如bean,service,web都是和Application.java这个文件是相同层的。
cn
 +- saytime
    +- Application.java   //main方法所在类在最底层
     |
     +- bean            //bean类
     |   +- Hello.java
     |
     +- service         //service层
     |   +- HelloService.java
     |
     +- web             //controller层
         +- HelloController.java
通过上面的图你可以看到:你新建的目录(或包)要与Application.java在一个层次。
国际惯例,Hello world
再cn.saytime目录下,也就是SpringbootFirstDemoApplication类同级目录新建web包以及HelloController类。
package cn.saytime.web;

import org.springframework.web.bind.annotation.RequestMapping;
import org.springframework.web.bind.annotation.RequestMethod;
import org.springframework.web.bind.annotation.RestController;

/**
 * @author zh
 * @ClassName cn.saytime.web.HelloController
 * @Description
 * @date 2017-06-25 21:20:41
 */
@RestController
public class HelloController {

    @RequestMapping(value = "sayhello", method = RequestMethod.GET)
    public String sayhello(){
        return "Hello SpringBoot !";
    }

}
@RestController == @Controller + @ResponseBody
意思是:@RestController就相当于以前springMVC的@Controller与@ResponseBody合并在一起。
运行SpringBoot工程入口类SpringbootFirstDemoApplication的main方法:
先启动这个Application.java文件,然后再打开网页,输入http://localhost:8080这个网址就可以看到结果了,如果你不先运行main函数的,Application.java这个文件,你的WEB也不能运行。
.   ____          _            __ _ _
 /\\ / ___'_ __ _ _(_)_ __  __ _ \ \ \ \
( ( )\___ | '_ | '_| | '_ \/ _` | \ \ \ \
 \\/  ___)| |_)| | | | | || (_| |  ) ) ) )
  '  |____| .__|_| |_|_| |_\__, | / / / /
 =========|_|==============|___/=/_/_/_/
 :: Spring Boot ::        (v1.5.4.RELEASE)
s.b.c.e.t.TomcatEmbeddedServletContainer : Tomcat started on port(s): 8080 (http)
2017-06-25 21:26:02.338  INFO 8620 --- [           main] c.s.SpringbootFirstDemoApplication       : Started SpringbootFirstDemoApplication in 1.624 seconds (JVM running for 2.186)
main启动后,再打开浏览器,点击进入 http://127.0.0.1:8080/sayhello
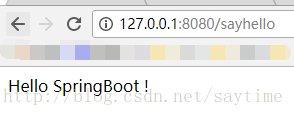
SpringBoot Hello World 执行成功
四、使用感受:
没有做任何的web.xml配置。 没有做任何的sping mvc的配置 没有配置tomcat (springboot内嵌tomcat)
五、SpringBoot 工程启动方式
- Application类main方法启动
- mvn clean install/package cd 到target目录,java -jar 项目.jar,注意这里需要加入依赖spring-boot-maven-plugin生成可执行的jar
- mvn spring-boot: run 启动
六、Application 分析
package cn.saytime;

import org.springframework.boot.SpringApplication;
import org.springframework.boot.autoconfigure.SpringBootApplication;

@SpringBootApplication
public class SpringbootFirstDemoApplication {

    public static void main(String[] args) {
        SpringApplication.run(SpringbootFirstDemoApplication.class, args);
    }
}
通过查看源代码可以发现:
@SpringBootApplication = @SpringBootConfiguration + @EnableAutoConfiguration + @ComponentScan
@SpringBootConfiguration = @Configuration = @Component 在Spring中@Component泛指组件,当组件不好归类的时候,我们可以使用这个注解进行标注。 当**@ComponentScan**扫描到该注解时,加入到Spring容器中,类似的注解除了@Component,还有@Service,@Controller,@Repository等。
理解,@SpringBootConfiguration就相当于@Component。
@ComponentScan 指定注解扫描地址,默认为该类同级路径。即能扫描到本项目中web包下面的HelloController的@RestController注解
@EnableAutoConfiguration 注解用来自动配置,我们pom中配置了 spring-boot-starter-web,所以spring会来创建一 个web应用来配置程序,也就是根据依赖jar,自动进行装配操作,同样,如果Pom中或者加入了mysql jdbc 包,那么会自动去构建一个数据库配置,如果你在application.properties/.yml中没有配置mysql jdbc,那么启动会报错,如果引入了相关jar包,但是需要springboot不自动配置,那么需要配置exclude 比如:@EnableAutoConfiguration(exclude={DataSourceAutoConfiguration.class}),
这里的意思是说,你用了jar包,那么你就要去配置,如果你不想配置,你就要用exclude说明一下。