实现Windows的一个模拟器
接上一节的实现的接口,在WINDOWS里面写一个简单的模拟器,在上面能操作上一节里面的接口动作。
打开VS,创建一个解决方案,把UI的代码作了一个单独的lib库,再创建一个带窗体的工程,UI的画图就画在一个窗体的客户区DC中.
首先定义一个对DC的画图操作,对应上一节的UI_DriveDrawApi 接口. 如果直接操作窗体的DC画图是很慢的,会看到绘图的过程,所以需要用到双缓存,在一个缓存画好以后,再把画好的贴到DC中,基本完整的定义如下:
如定义在 UIWINDrawApi.cpp 和实文件 UIWINDrawApi.h中
HWND g_hwnd; /*窗体的句柄*/
HDC g_hdc;
HDC hMemDC; /*内存DC*/
HDC hOldDC;
HBITMAP hMembitmap;
extern TUIScreen Screen;
static UI_DriveDrawApi _DriverDrawApiWin = {
WIN_SetPointPixel,
WIN_GetPointPixel,
WIN_DrawHLine,
WIN_DrawVLine,
WIN_DrawFillRect,
WIN_GetScreenX,
WIN_GetScreenY
};
void WIN_InitDrawApi()
{
UI_DrawApiInit(&_DriverDrawApiWin);
Screen.ScreenX = WIN_GetScreenX();
Screen.ScreenY = WIN_GetScreenY();
g_hdc = GetDC(g_hwnd);
hMemDC = CreateCompatibleDC(g_hdc);
hMembitmap = CreateCompatibleBitmap(g_hdc,Screen.ScreenX ,Screen.ScreenY);
}
void WIN_UnInitDrawApi()
{
SelectObject(hOldDC, g_hdc);
DeleteObject(hMembitmap);
DeleteDC(hMemDC);
}
void WIN_StartDraw()
{
hOldDC = (HDC)SelectObject(hMemDC, hMembitmap);
}
void WIN_EndDraw()
{
BitBlt(g_hdc, 0, 0, Screen.ScreenX , Screen.ScreenY, hMemDC, 0, 0, SRCCOPY);
}
void WIN_SetPointPixel(int x, int y, PIXELINDEX pixelValue)
{
SetPixel(hMemDC, x, y, pixelValue);
}
unsigned int WIN_GetPointPixel(int x, int y)
{
return GetPixel(hMemDC, x, y);
}
void WIN_DrawHLine(int x0, int y0, int x1)
{
PIXELINDEX PixelColor = Screen.PixelColor;
for(; x0 <= x1; x0++)
{
WIN_SetPointPixel(x0, y0, PixelColor);
}
}
void WIN_DrawVLine(int x0, int y0, int y1)
{
PIXELINDEX PixelColor = Screen.PixelColor;
for(; y0 <= y1; y0++)
{
WIN_SetPointPixel(x0, y0, PixelColor);
}
}
void WIN_DrawFillRect(int x0, int y0, int x1, int y1)
{
RECT rect = {x0,y0,x1 + 1,y1 + 1};
HBRUSH hbrush = CreateSolidBrush(Screen.PixelColor);
FillRect(hMemDC,&rect, hbrush);
}
int WIN_GetScreenX()
{
RECT rect;
GetWindowRect(g_hwnd, &rect);
return rect.right - rect.left + 1;
}
int WIN_GetScreenY()
{
RECT rect;
GetWindowRect(g_hwnd, &rect);
return rect.bottom - rect.top + 1;
}
Screen 是UI里用来记录一些基本的变量值的,如上面用到的分辨率的大小.
int APIENTRY _tWinMain(HINSTANCE hInstance,
HINSTANCE hPrevInstance,
LPTSTR lpCmdLine,
int nCmdShow)
{
UNREFERENCED_PARAMETER(hPrevInstance);
UNREFERENCED_PARAMETER(lpCmdLine);
MSG msg;
HACCEL hAccelTable;
LoadString(hInstance, IDS_APP_TITLE, szTitle, MAX_LOADSTRING);
LoadString(hInstance, IDC_T1, szWindowClass, MAX_LOADSTRING);
MyRegisterClass(hInstance);
if (!InitInstance (hInstance, nCmdShow))
{
return FALSE;
}
hAccelTable = LoadAccelerators(hInstance, MAKEINTRESOURCE(IDC_T1));
WIN_Init();
UIMain();
while (GetMessage(&msg, NULL, 0, 0))
{
if (!TranslateAccelerator(msg.hwnd, hAccelTable, &msg))
{
TranslateMessage(&msg);
DispatchMessage(&msg);
}
WIN_Refresh();
}
return (int) msg.wParam;
}
上面VS工程里的主过程看起来是这样的:
WIN_Init(), UIMain(), WIN_Refresh() 方法是加进去的。
WIN_Init()方法是对环境的初始化,如上面的画图API的初始化,
UIMain是UI画图的操作。
WIN_Refresh UI界面的刷新操作,这个会在后面实现。
还需要在窗体中的InitInstance里的加一些代码:
BOOL InitInstance(HINSTANCE hInstance, int nCmdShow)
{
HWND hWnd;
hInst = hInstance; // 将?实害?例句?柄括?存?储洹?在ú全?局?变?量?中D
hWnd = CreateWindow(szWindowClass, szTitle, WS_OVERLAPPEDWINDOW,
CW_USEDEFAULT, 0, CW_USEDEFAULT, 0, NULL, NULL, hInstance, NULL);
if (!hWnd)
{
return FALSE;
}
#if 1
ShowWindow(hWnd, nCmdShow);
#else
ShowWindow(hWnd, SW_SHOWMAXIMIZED);
SetMenu(hWnd, NULL);
SetWindowLong(hWnd, GWL_STYLE,
GetWindowLong(hWnd, GWL_STYLE) &
WS_MAXIMIZEBOX); // 去ǎ?掉?WS_MAXIMIZEBOX风?格?
ShowWindow(hWnd, SW_MAXIMIZE); // 最?大洙?化ˉ显?式?窗洹?口ú
#endif
UpdateWindow(hWnd);
g_hwnd = hWnd;
return TRUE;
}
如上面的运行时把窗体最大化,隐藏菜单,工具栏等.
g_hwnd 是在前面在 UIWINDrawApi.cpp中定义的,这里需要初始化它.
再看 WIN_Init,这个如我们放在一个 UIWINAdapter.cpp的里面实现:
void WIN_Init()
{
WIN_InitDrawApi();
UI_Init();
}
WIN_InitDrawApi就是前面定义的,UI_Init是初始化UI库里的一些东西,后面再说到实现。
前面的UIMain()可以看成是UI执行画图的一个起点,如放在一个UITest.cpp里面完成:
void UIMain()
{
}
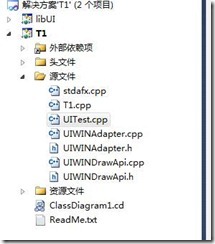
这样一个简单的模拟器就OK了,工程现在看起来是这样的:
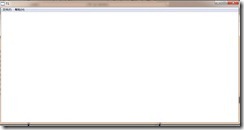
现在运行起来像是这样的:
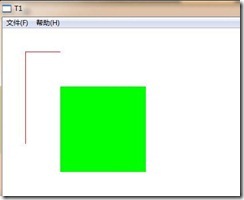
还只是一块白板,什么也没有,我们可认用前一节定义的基本的UI操作来画一些简单的东西,如在 UIMain 里的代码如下:
UI_SetColor(0xff0000);
UI_HLine(40,40,100);
UI_VLine(40,40,200);
UI_SetColor(0x00ff00);
UI_FillRect(250,250,100,100);
UI_SetColor 就是设置像素的填充值
效果如下:
所以借助前面的API的定义,现在可以画一些点线,面的东西,但UI的所有的基本的东西都是在这些基本的API上操作上来完成的,当然UI也决不是这一点点东西。
后面我们会说到UI的核心 画布的管理。


