这些天在研究MySQL监控方面的开源资料,经过评估,准备搭建一套grafana+zabbix+mysql监控环境,经过各种查资料摸索,整理整个过程,给还在这方面摸索的同学做个参考。
第一部分 zabbix安装配置
环境:lsb_release –a
Distributor ID: CentOS
Description: CentOS release 6.4 (Final)
Release: 6.4
Codename: Final
提前准备:
安装一个MySQL数据库,用于提供Zabbix存放数据
安装方式:源码编译安装
下载源码包:zabbix-3.4.3.tar.gz
下载地址:https://www.zabbix.com/download
上传到服务器任意位置后解压,/opt/zabbix
导入zabbix数据库脚本
cd /opt/zabbix/zabbix-3.4.3/database/mysql
-rw-r--r-- 1 1000 1000 2861223 Oct 17 20:15 data.sql -rw-r--r-- 1 1000 1000 1978341 Oct 17 20:11 images.sql -rw-r--r-- 1 1000 1000 134738 Oct 17 20:15 schema.sql- 1
- 2
- 3
- 4
tar -zxvf zabbix-3.4.3.tar.gz
编译:
./configure --enable-server --enable-agent --with-mysql=/export/servers/app/mysql-5.6.23/mysql_config -enable-ipv6 --with-net-snmp --with-libcurl --with-libxml2- 1
注意:/export/servers/app/mysql-5.6.23/mysql_config 是mysql数据库配置文件地址
可能会出现以下问题:
报错:
checking for the linux kernel version… 2.6 family (2.6.32-358.el6.x86_64)
checking size of void *… 8
checking for mysql_config… /export/servers/app/mysql-5.6.23/mysql_config
configure: error: MySQL library not found
解决方法:
yum install mysql-devel- 1
报错:
checking for xmlReadMemory in -lxml2… yes
checking for net-snmp-config… no
configure: error: Invalid Net-SNMP directory - unable to find net-snmp-config
解决方法:
yum install net-snmp-devel- 1
报错:
Unable to use libevent (libevent check failed)
解决:
yum install libevent-devel- 1
报错:
Unable to use libpcre (libpcre check failed)
安装 pcre库,
下载:pcre-8.36.tar.gz
解压:tar –zxvf pcre-8.36.tar.gz
编译:cd pcre-8.36
./configure –enable-utf8
make make install
报错:
curl library not found
解决:
yum install libcurl-devel
configure 完成!
开始安装:
Make
make install
安装完成后配置 zabbix_server.conf
路径:vi /usr/local/zabbix/etc/zabbix_server.conf
cat /usr/local/zabbix/etc/zabbix_server.conf | grep -v ^# | grep -v ^$
LogFile=/tmp/zabbix_server.log
DBName=zabbix
DBUser=zabbix
DBPassword=zabbix DBSocket=/export/servers/data/my3306/run/mysqld.sock DBPort=3306 Timeout=4 LogSlowQueries=3000- 1
- 2
- 3
- 4
- 5
- 6
- 7
- 8
- 9
如果有启动错误:
zabbix_server: error while loading shared libraries: libmysqlclient.so.
error while loading shared libraries: libpcre.so.1: cannot open shared object file:
解决方法:
echo "/export/servers/app/mysql-5.6.23/lib" >> /etc/ld.so.conf
echo "/usr/local/lib" >> /etc/ld.so.conf ldconfig- 1
- 2
- 3
做几个软连接
[root@localhost ~]# ln -s /usr/local/zabbix/bin/* /usr/bin/
[root@localhost ~]# ln -s /usr/local/zabbix/sbin/* /usr/sbin/
[root@localhost ~]# cp /opt/zabbix/zabbix-3.4.3/misc/init.d/fedora/core/* /etc/init.d/ [root@localhost ~]# vi /etc/init.d/zabbix_server- 1
- 2
- 3
- 4
修改这行:
BASEDIR=/usr/local/zabbix
修改完成后启动zabbix:
/etc/init.d/zabbix_server start- 1
查看zabbix日志:
tail -200f /tmp/zabbix_server.log- 1
第二部分 php安装配置
安装包准备:
放到: /usr/local/apache-php-packages
apr-1.6.3.tar.gz
apr-util-1.6.1.tar.gz
httpd-2.4.29.tar.gz
libxml2-2.7.4.tar.gz
pcre-8.20.tar.gz
php-5.6.32.tar.gz
安装apr-1.6.3.tar.gz
cd /usr/local
mkdir apr
cd /usr/local/apache-php-packages
tar -zxvf apr-1.6.3.tar.gz cd apr-1.6.3 ./configure --prefix=/usr/local/apr Make Make install- 1
- 2
- 3
- 4
- 5
- 6
- 7
- 8
同样的方法安装apr-util-1.6.1.tar.gz,pcre-8.20.tar.gz
可能出现的问题:
xml/apr_xml.c:35:19: error: expat.h: No such file or directory
解决:
yum install expat-devel- 1
安装apache:
makdir /usr/local/apache
cd /usr/local/apache-php-packages
tar -zxvf httpd-2.4.29.tar.gz cd httpd-2.4.29 ./configure --prefix=/usr/local/apache --with-pcre=/usr/local/pcre --with-apr=/usr/local/apr --with-apr-util=/usr/local/apr-util make make install- 1
- 2
- 3
- 4
- 5
- 6
- 7
启动apache
/usr/local/apache2/bin/apachectl start- 1
测试是否启动成功:
curl http://127.0.0.1
<html><body><h1>It works!</h1></body></html>- 1
- 2
拷贝zabbix web到apache:
cp -r /opt/zabbix/zabbix-3.4.3/frontends /usr/local/apache2/htdocs/- 1
将 frontends/php 下面的文件拷贝到 /usr/local/apache2/htdocs/ 下
安装php:
cd /usr/local/apache-php-packages
tar –zxvf php-5.6.32.tar.gz cd php-5.6.32- 1
- 2
- 3
./configure --prefix=/usr/local/php --with-apxs2=/usr/local/apache2/bin/apxs --with-config-file-path=/usr/local/php/lib --disable-cli --enable-shared --with-libxml-dir --with-gd --with-openssl --enable-mbstring --with-mcrypt --with-mysqli --with-mysql --enable-opcache --enable-mysqlnd --enable-zip --with-zlib-dir --with-pdo-mysql --with-jpeg-dir --with-freetype-dir --with-curl --without-pdo-sqlite --without-sqlite3 --enable-bcmath --enable-sockets --with-gettext --with-mysqli=/export/servers/app/mysql-5.6.23/bin/mysql_config- 1
make
make install- 1
- 2
问题:
configure: error: jpeglib.h not found.
解决:
yum install libjpeg-devel- 1
问题:
configure: error: mcrypt.h not found. Please reinstall libmcrypt
解决:
install -y libmcrypt-devel- 1
配置php:
cp php.ini-production /usr/local/php/lib/php.ini
vim /usr/local/apache2/conf/httpd.conf- 1
- 2
找到 AddType application/x-gzip .gz .tgz 在其下添加如下内容
AddType application/x-httpd-php .php (.前面有空格)
AddType application/x-httpd-php-source .phps (.前面有空格)
增加起始页:
<IfModule dir_module>
    DirectoryIndex index.html index.php
</IfModule> - 1
- 2
- 3
重启apache
/usr/local/apache2/bin/apachectl stop
/usr/local/apache2/bin/apachectl start- 1
- 2
访问zabbix首页
http://zabbix.server.ip/index.php
zabbix.server.ip 为安装服务器的IP地址
出现配置界面如下:
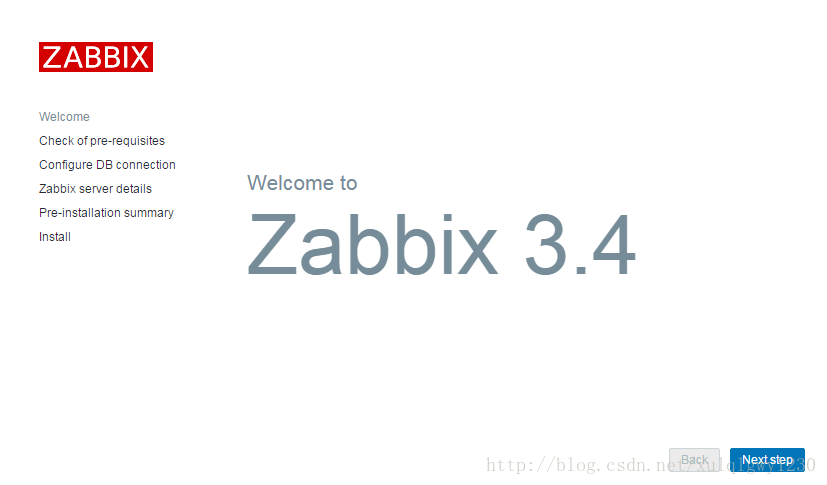
开始配置,点击 next step
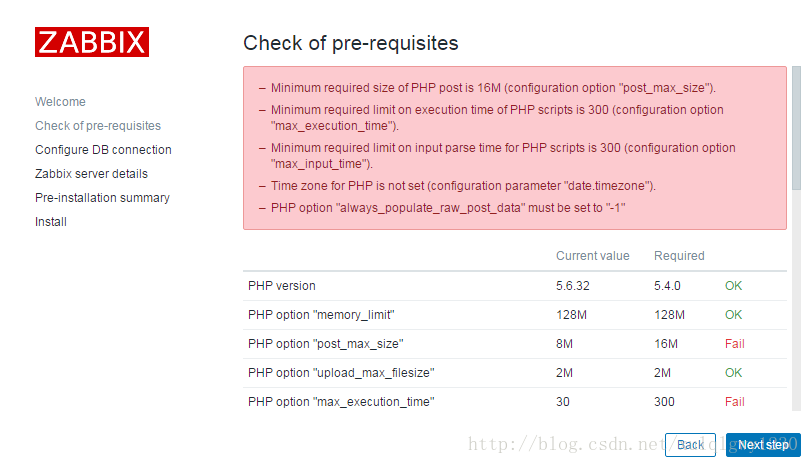
显示缺少的组件或者要改的配置,按提示依次修改 /usr/local/php/lib/php.ini
配置完成,显示登录页面:

初始用户名密码: Admin/zabbix
第三部分 Zabbix监控MySQL
一、 在客户端(MySQL服务器)上安装zabbix agent
添加zabbix账号:
groupadd zabbix
useradd zabbix -g zabbix -s /sbin/nologin- 1
- 2
1、上传zabbix源码包(与zabbix server同一个包)zabbix-3.4.3.tar.gz
tar –zxvf zabbix-3.4.3.tar.gz cd zabbix-3.4.3 ./configure --prefix=/usr/local/zabbix --with-net-snmp --enable-agent make make install- 1
- 2
- 3
- 4
- 5
4、copy agent端运行所需要的脚本
cp misc/init.d/tru64/zabbix_agentd /etc/init.d/
chmod +x /etc/init.d/zabbix_agentd- 1
- 2
注意,要修改一下这个启动脚本, vi /etc/init.d/zabbix_agentd 将目录修改为如下
DAEMON=/usr/local/zabbix/sbin/zabbix_agentd- 1
5、配置agent端配置文件
vim /usr/local/zabbix/etc/zabbix_agentd.conf
Server=172.25.44.100                       #填写zabbix-Server的IP地址
ServerActive=172.25.44.100 #修改为zabbix-Server的IP地址 Hostname=zabbix_agent_110 #填写本机的HostName,注意Server端配hosts,要能解析 UnsafeUserParameters=1 #是否允许自定义的key,1为允许,0为不允许- 1
- 2
- 3
- 4
6、从zabbix 服务端验证一下,可以解析客户端服务器的hostname(注意:此步骤在服务端操作)
7、启动zabbix agent端
/etc/init.d/zabbix_agentd start- 1
二、 配置MySQL监控脚本
cd /usr/local/zabbix/
mkdir scripts
cd scripts- 1
- 2
- 3
上传mysql监控脚本 ck_mysql.sh
#!/bin/sh
# -------------------------------------------------------------------------------

MYSQL_SOCK="/export/servers/data/my3306/run/mysqld.sock"
# 用户名
MYSQL_USER='zabbix' # 密码 MYSQL_PWD='zabbix' # 主机地址/IP MYSQL_HOST='127.0.0.1' # 端口 MYSQL_PORT='3306' # 数据连接 MYSQL_CONN="/export/servers/app/mysql-5.7.16/bin/mysqladmin -u${MYSQL_USER} -h${MYSQL_HOST} -P${MYSQL_PORT} " # 获取数据 case $1 in Uptime) result=`${MYSQL_CONN} status|cut -f2 -d":"|cut -f1 -d"T"` echo $result ;; Com_update) result=`${MYSQL_CONN} extended-status |grep -w "Com_update"|cut -d"|" -f3` echo $result ;; Slow_queries) result=`${MYSQL_CONN} status |cut -f5 -d":"|cut -f1 -d"O"` echo $result ;; Com_select) result=`${MYSQL_CONN} extended-status |grep -w "Com_select"|cut -d"|" -f3` echo $result ;; Com_rollback) result=`${MYSQL_CONN} extended-status |grep -w "Com_rollback"|cut -d"|" -f3` echo $result ;; Questions) result=`${MYSQL_CONN} status|cut -f4 -d":"|cut -f1 -d"S"` echo $result ;; Com_insert) result=`${MYSQL_CONN} extended-status |grep -w "Com_insert"|cut -d"|" -f3` echo $result ;; Com_delete) result=`${MYSQL_CONN} extended-status |grep -w "Com_delete"|cut -d"|" -f3` echo $result ;; Com_commit) result=`${MYSQL_CONN} extended-status |grep -w "Com_commit"|cut -d"|" -f3` echo $result ;; Bytes_sent) result=`${MYSQL_CONN} extended-status |grep -w "Bytes_sent" |cut -d"|" -f3` echo $result ;; Bytes_received) result=`${MYSQL_CONN} extended-status |grep -w "Bytes_received" |cut -d"|" -f3` echo $result ;; Com_begin) result=`${MYSQL_CONN} extended-status |grep -w "Com_begin"|cut -d"|" -f3` echo $result ;; *) echo "Usage:$0(Uptime|Com_update|Slow_queries|Com_select|Com_rollback|Questions|Com_insert|Com_delete|Com_commit|Bytes_sent|Bytes_received|Com_begin)" ;; esac- 1
- 2
- 3
- 4
- 5
- 6
- 7
- 8
- 9
- 10
- 11
- 12
- 13
- 14
- 15
- 16
- 17
- 18
- 19
- 20
- 21
- 22
- 23
- 24
- 25
- 26
- 27
- 28
- 29
- 30
- 31
- 32
- 33
- 34
- 35
- 36
- 37
- 38
- 39
- 40
- 41
- 42
- 43
- 44
- 45
- 46
- 47
- 48
- 49
- 50
- 51
- 52
- 53
- 54
- 55
- 56
- 57
- 58
- 59
- 60
- 61
- 62
- 63
- 64
- 65
- 66
- 67
- 68
- 69
- 70
- 71
- 72
- 73
- 74
- 75
赋权:
chmod u+x /usr/local/zabbix/scripts/chk_mysql.sh
chown -R zabbix.zabbix /usr/local/zabbix/scripts/chk_mysql.sh- 1
- 2
修改zabbix_agentd.conf
vim /usr/local/zabbix/etc/zabbix_agentd.conf- 1
增加下面三行脚本
UserParameter=mysql.version,mysql -V
UserParameter=mysql.status[*],/usr/local/zabbix/scripts/chk_mysql.sh $1
UserParameter=mysql.ping,mysqladmin -uzabbix -pzabbix -P3306 -h127.0.0.1 ping | grep -c alive- 1
- 2
- 3
注意修改端口用户名密码
在MySQL数据库添加zabbix用户
mysql>GRANT PROCESS,SUPER,REPLICATION CLIENT ON *.* TO zabbix@'127.0.0.1' IDENTIFIED BY 'zabbix'; mysql> flush privileges;- 1
- 2
启动Zabbix agent
/etc/init.d/zabbix_agentd start- 1
在Zabbix Server端测试:
zabbix_get -s 172.25.50.211 -p10050 -k mysql.status[Com_update]
mysqladmin: connect to server at '127.0.0.1' failed
error: 'Access denied for user 'zabbix'@'127.0.0.1' (using password: NO)'- 1
- 2
- 3
解决方法:
先用mysqladmin定位查找的my.cnf路径:
/export/servers/app/mysql-5.7.16/bin/mysqladmin –help- 1
找到:
Default options are read from the following files in the given order:
/etc/my.cnf /etc/mysql/my.cnf /export/servers/app/mysql-5.7.16/etc/my.cnf ~/.my.cnf
找一个对应的my.cnf 添mysqladmin的用户密码
vi /export/servers/app/mysql-5.7.16/etc/my.cnf- 1
[mysqladmin]
user=zabbix
password=zabbix- 1
- 2
- 3
重启MySQL
再测试:
[root@HC-25-44-100 ~]# zabbix_get -s 172.25.50.211 -p10050 -k mysql.status[Com_update] 0- 1
- 2
三、 配置监控
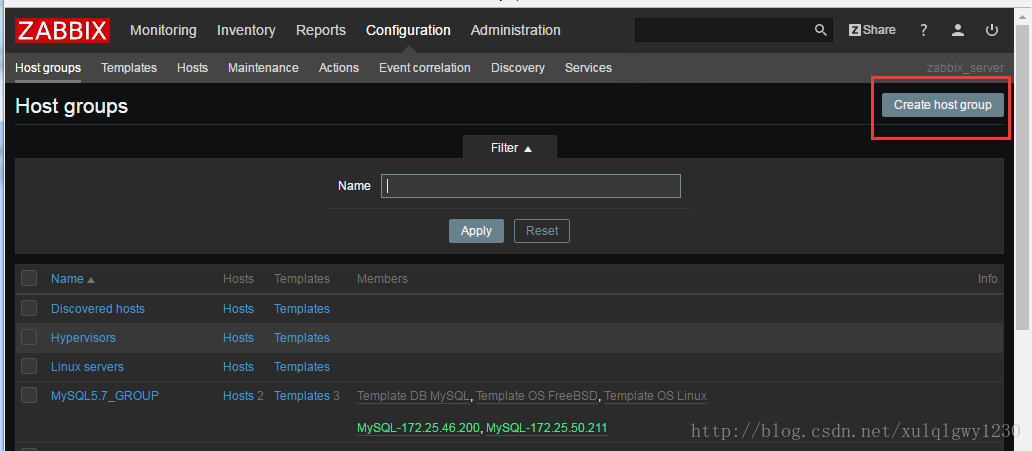
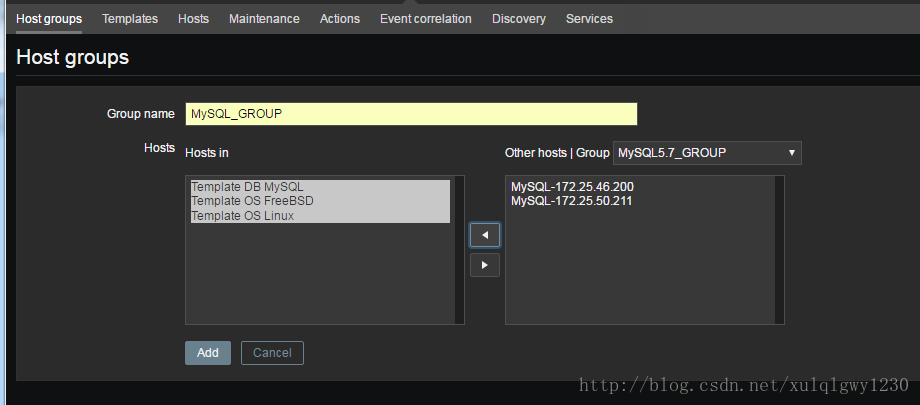
1、 配置主机组:
2、 配置主机 host
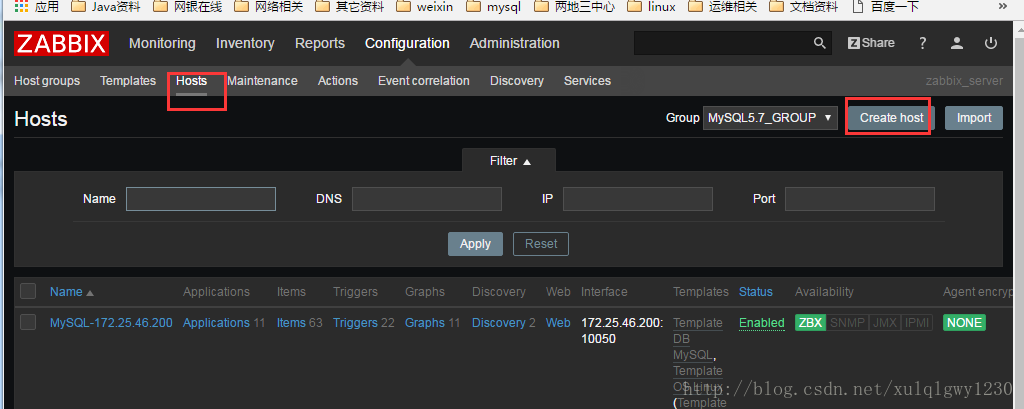

选择模板:
Template DB MySQL
Template OS Linux
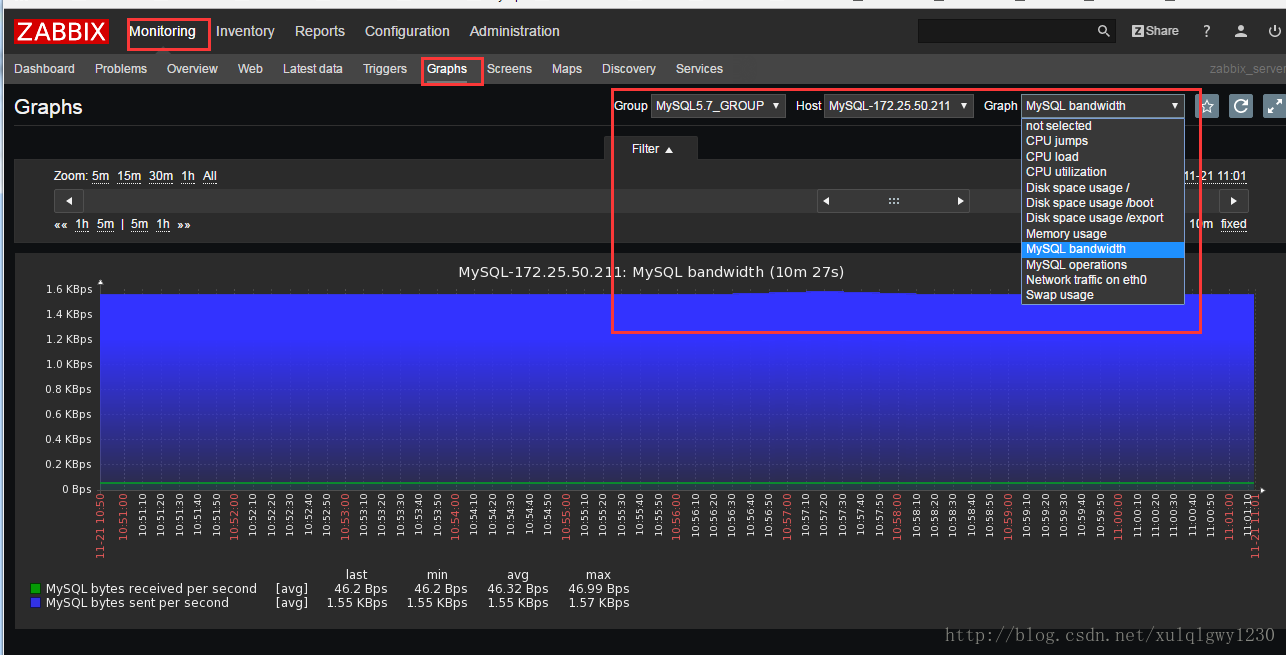
3、 查看图表

第四部分 grafana安装配置
安装grafana包
rpm -ivh grafana-4.1.1-1484211277.x86_64.rpm- 1
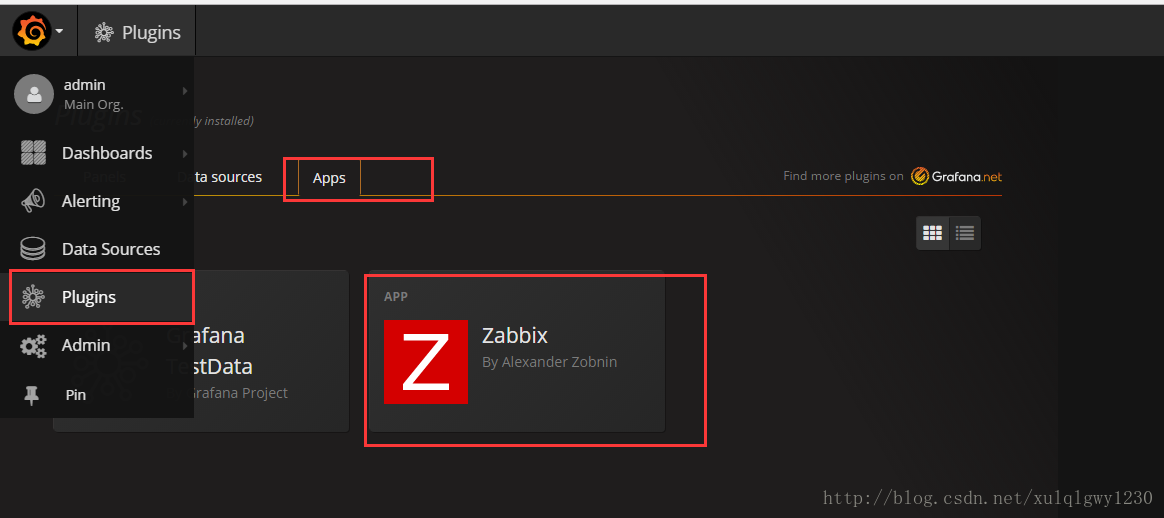
安装grafana-zabbix插件
https://grafana.com/plugins/alexanderzobnin-zabbix-app/installation
可以手动下载
alexanderzobnin-grafana-zabbix-v3.7.0-0-g1a85503.zip
将包放到grafana的插件目录,默认路径:/var/lib/grafana/plugins
解压后重命名:alexanderzobnin-grafana-zabbix
重启grafana
service grafana-server restart- 1
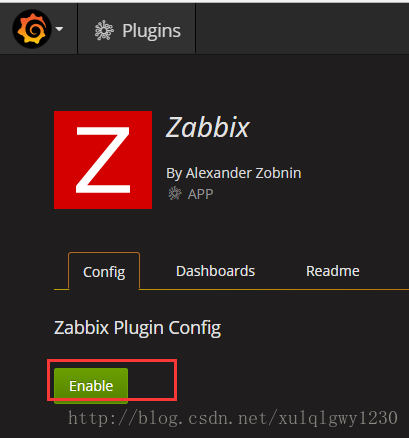
进入grafana,找到zabbix插件,点击启用:
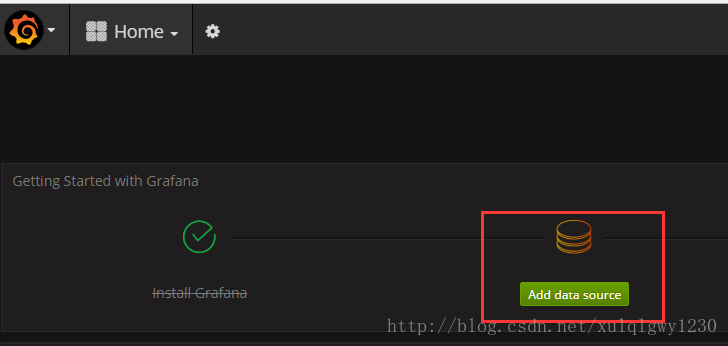
回到主页,点击添加数据源:
配置zabbix数据源:
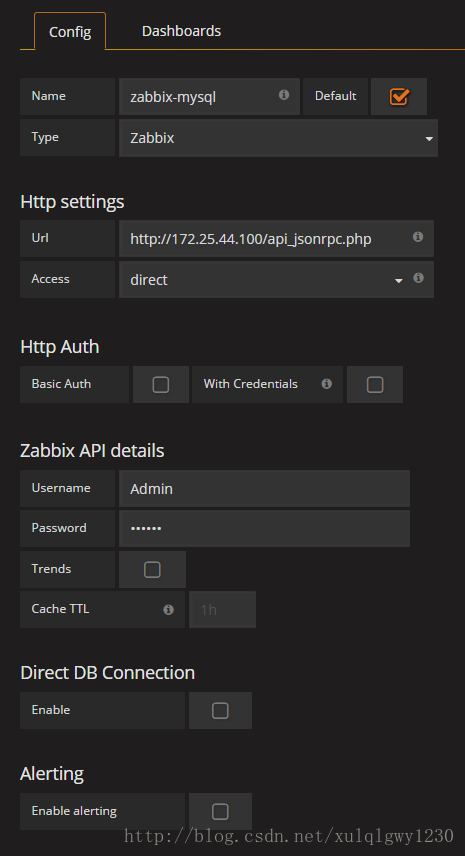
type选择zabbix
url为zabbix-server php路径下的api_jsonrpc.php
按照上述配置,配完后保存
添加panel
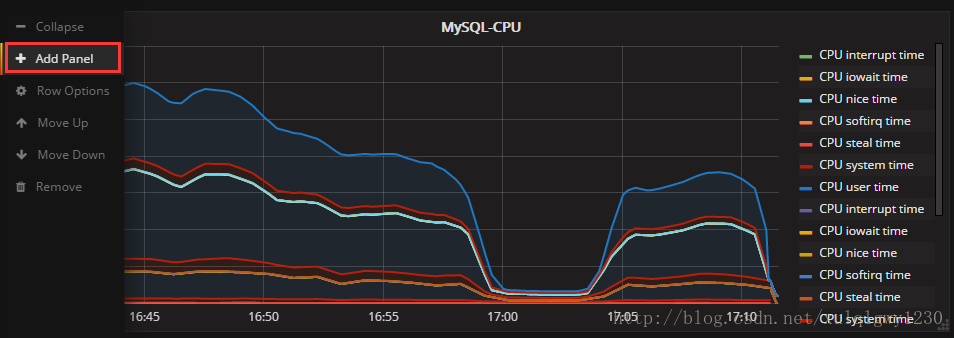
编辑 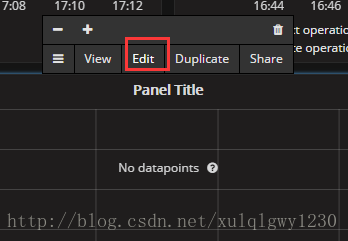
选择监控项: 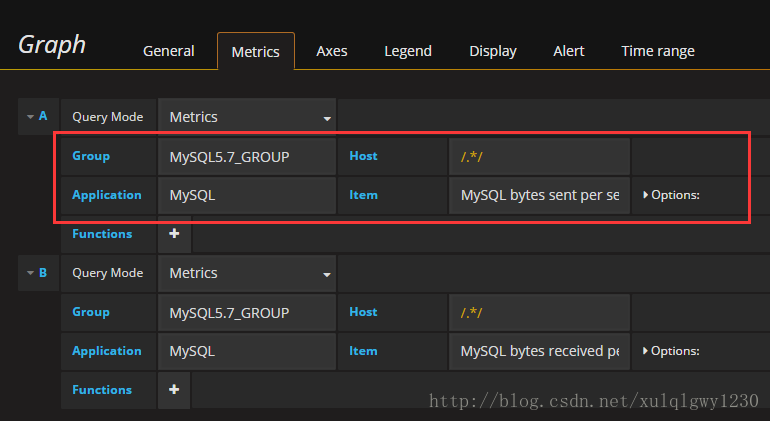
修改标题: 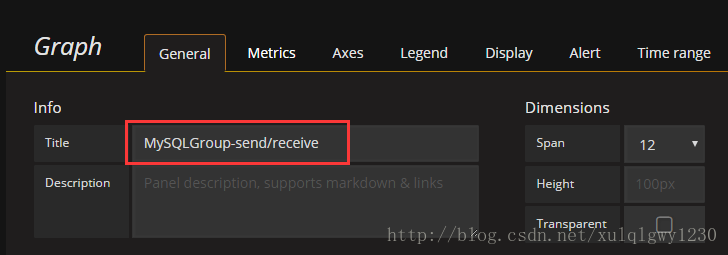
保存,回到Dashboard查看效果:
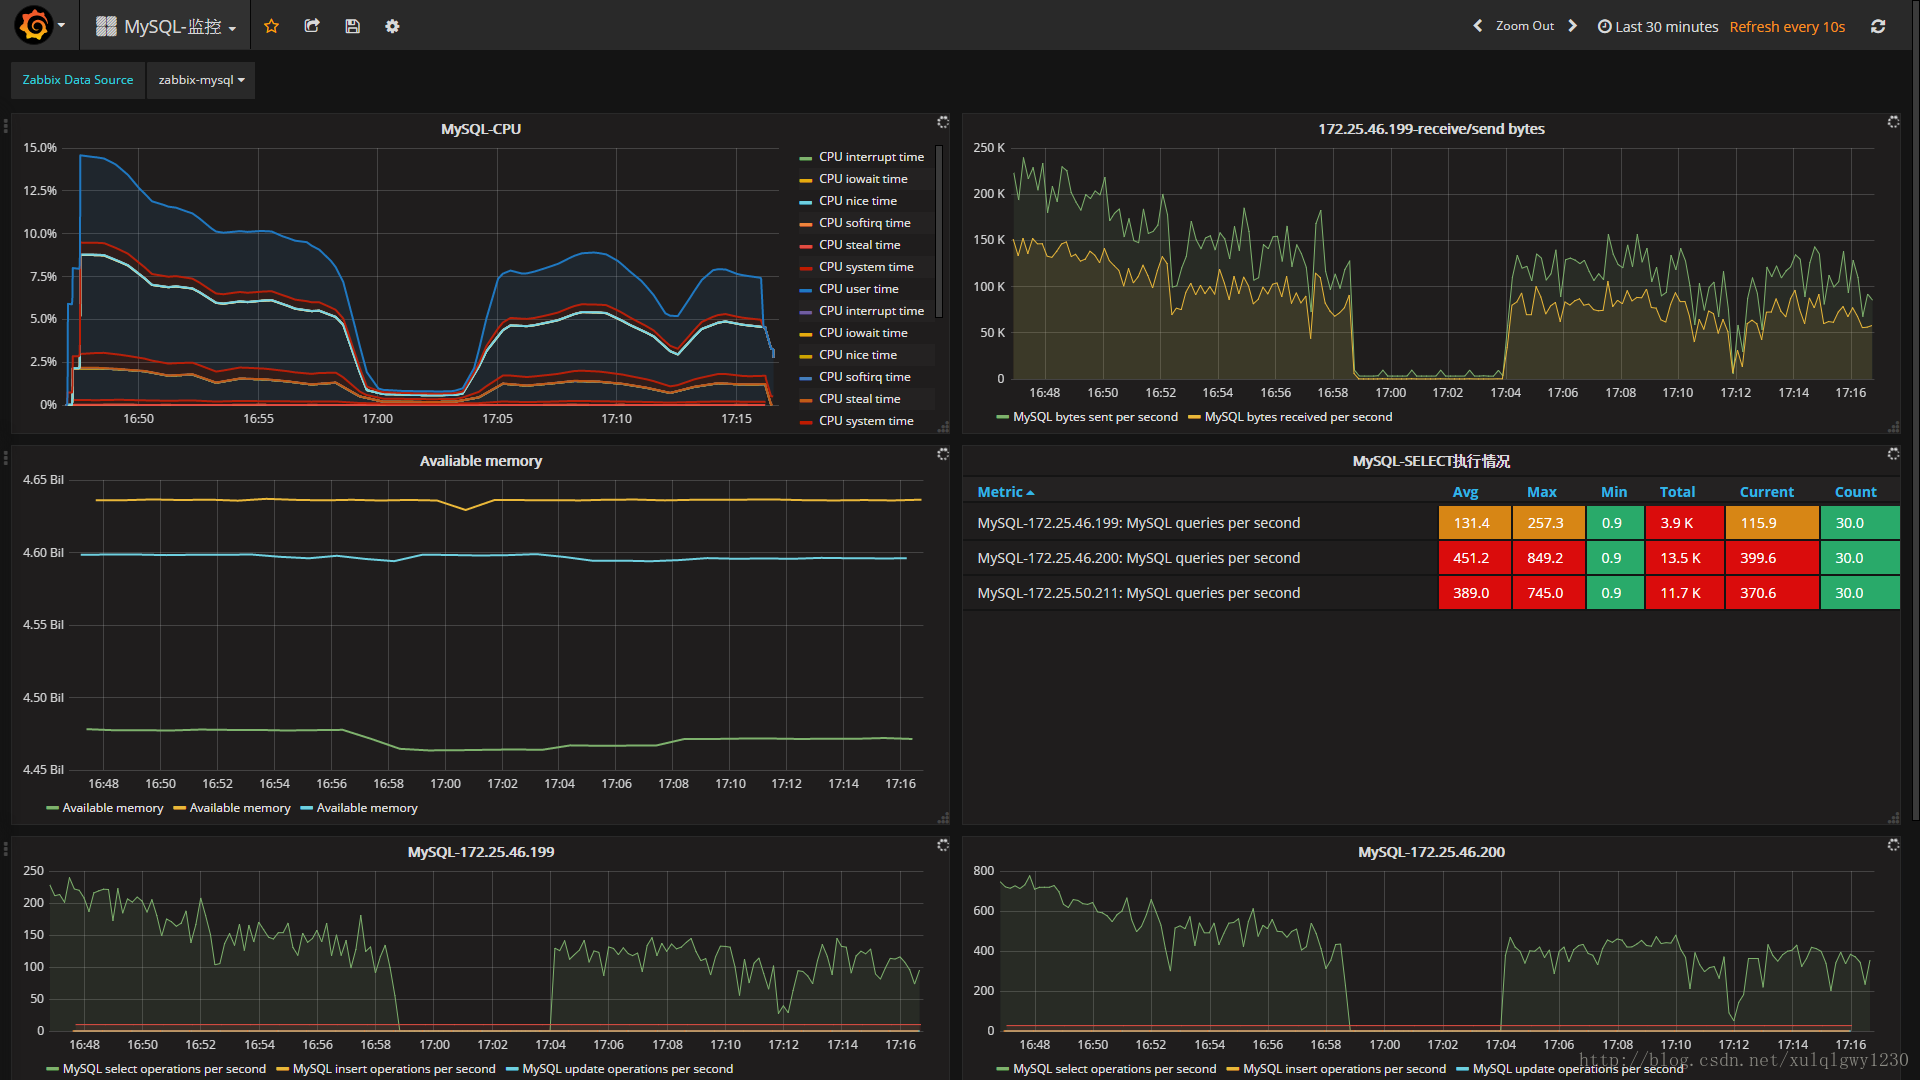
完成,这里展示的是zabbix自带的几个监控项,MySQL应该可以自定义一些监控,等研究后再分享。