写在前面的话:
1、从现在,这一刻,开始努力,动起来!
2、《Effective Objective-C 2.0》这是一本非常实在的书,各个章节用具体的例子告知读者如此这般的缘由!
3、书已经买了很久,也隔三差五的看一下,本次是按照本书章节,总结本书内容以及自己的体会!
4、愿共勉之!
第1条:了解Objective-C语言的起源
OC是C的超集,OC使用动态绑定的消息结构,接收到一条信息之后,具体执行什么代码是在运行期决定的而不是编译期决定的!
第2条:在类的头文件中尽量少引用其他头文件
关于#import和@class的使用:
1、只有确定当前文件会使用到引用的类的具体的东西的时候才使用#import引入该文件,一般表现为A中引用B,那么在A的声明中使用@class B,A的实现文件中#import B,这么做的原因是:减少类的使用者所需引入的头文件数量和减少编译时间,使用#import引入B就会一并引入B中的所有内容。
备注:书上说的#import而非#include不会导致死循环,但是会有一个不能正确编译,在目前的Xcode版本已经不存在这个问题,不过基于良好的代码习惯尽量还是避免相互引用!
2、关于协议:一般的协议建议单独放到一个头文件中(一个称为“class-continuation”分类,这个在本书之后的章节会再说明),减少与其他类的依赖;
第3条:多用字面量语法,少用与之等价的方法
多使用字面量好处是:语法会更简洁,更安全(若出现nil会直接抛出异常并使程序终止)。
使用字面量创建的对象肯定是不可变的,如果创建mutable,则需要执行mutableCopy复制一份
第4条:多用类型常量,少用#define预处理指令
1、#define定义的常量没有类型信息,如果被随意修改,在编译阶段没有异常,会导致一些不匹配的问题且不好定位问题;
2、关于const、extern、static关键字的使用以及含义


/**
 局部变量
 isStatic YES 是static 修饰 NO无static修饰
 @return
 */

- (void)staticForPartParmsStatic:(BOOL)isStatic
{
    if (isStatic) {
        static int tempNum = 20;
        tempNum ++;
        NSLog(@"static 修饰的 tempNum地址 = %p,tempNum = %d",&tempNum,tempNum);

    }else{
        int tempNum = 20;
        tempNum ++;
        NSLog(@"tempNum地址 = %p,tempNum = %d",&tempNum,tempNum);
    }


}

- (void)staticForParmsAction
{
    /*
     static:修饰局部变量和全局变量
     修饰局部变量:
     1、让局部变量只初始化一次
     2、局部变量在程序中只有一份内存
     3、不会改变局部变量的作用域(需要验证,验证之后再议),只是改变了局部变量的声明周期(只有程序结束,这个局部变量才销毁,这样下次使用的时候还会保持上次的值)
     */
    [self staticForPartParmsStatic:NO];
    [self staticForPartParmsStatic:NO];
    [self staticForPartParmsStatic:NO];
    [self staticForPartParmsStatic:YES];
    [self staticForPartParmsStatic:YES];
    [self staticForPartParmsStatic:YES];
    /*
      tempNum地址 = 0x7fff573fc198,tempNum = 21
      tempNum地址 = 0x7fff573fc198,tempNum = 21
      tempNum地址 = 0x7fff573fc198,tempNum = 21
      static 修饰的 tempNum地址 = 0x10880d250,tempNum = 21
      static 修饰的 tempNum地址 = 0x10880d250,tempNum = 22
      static 修饰的 tempNum地址 = 0x10880d250,tempNum = 23
     结果可以看出 有static关键字修饰的变量,地址始终不变!
     */

}

int tempWholeNUm = 0;
//static int tempStaticWholeNum;
- (void)staticForWholection
{
    /*
     static:修饰局部变量和全局变量
     修饰全局变量:
     1、作用域仅限于当前文件
     2、项目的其他文件不能使用extern引用变量
     具体可搜索打开 “tempStaticWholeNum”部分代码,并尝试在其他文件使用!
 本demo会在之后提交之github
     */
    NSLog(@"具体可搜索打开 “tempStaticWholeNum”部分代码,并尝试在其他文件使用!");

}
- (void)constDetailActin
{
    //const的作用:
    /*
     1、修饰右边的基本变量和指针变量
     2、被const修饰的变量是只读的,不可修改
     使用场景:
     修饰全局变量-->次变量为只读变量-->可代替宏
     修饰方法中的参数
     */
    //没有const修饰的指针以及改指针指向的值都可以被多次修改
    //被const修饰的*p只能被赋值一次,之后不能赋值,否则编译器会报错;被const修饰的p只能存一次地址,否编译器报错
   //注释掉的三行可以分别打开验证!
//    const  int *tempP = NULL; --- 会导致*tempP = 99;这样的操作报错 不能修改*p的值
//    int const *tempP = NULL; --- 会导致*tempP = 99;这样的操作报错 不能修改*p的值
//    int *const tempP = NULL; --会导致 tempP = &tempNumA; 这样的操作报错 ,不能修改p的值
   //示例:
/*

    //定义一个指针变量
    int *tempP = NULL;
    //定义两个int 类型的变量
    int tempNumA = 10;

    NSLog(@"tempNumA = %d ,地址&tempNumA = %p",tempNumA,&tempNumA);
    int tempNumB = 20;

    NSLog(@"tempNumB = %d ,地址&tempNumB = %p",tempNumB,&tempNumB);


    //指针p指向A,然后设置指针p的内容---结果就是A的指针的内容(也就是变量)发生了修改
    tempP = &tempNumA;
    *tempP = 99;
    NSLog(@"--指向A后--地址tempP = %p ,*tempP = %d",tempP,*tempP);


    //指针p指向B
    tempP = &tempNumB;
    *tempP = 55;
    NSLog(@"--指向B后--地址tempP = %p ,*tempP = %d",tempP,*tempP);
    NSLog(@" - 2- tempNumA = %d ,地址&tempNumA = %p",tempNumA,&tempNumA);
    NSLog(@"- 2- tempNumB = %d ,地址&tempNumB = %p",tempNumB,&tempNumB);
*/
   //关于const的修饰的位置(就近修饰原则)
    /*
     int const *p1,表示*p1不能修改
     int *const p2,表示p2不能修改
     Eg:
     NSString *tempStr = @"temp";
     如果不想其他人修改tempStr的值的话:
     NSString *const tempStr = @"temp";
     tempStr = @"123";
     强制就修改“Cannot assign to variable 'tempStr' with const-qualified type 'NSString *const __strong'”
     */

//const 和 宏的区别:
    /*
     1、编译时刻:宏是预编译;const是编译
     2、编译检查:宏没有编译检查,不会报编译错误,只是替换;const有编译检查,会报编译错误
     3、宏的好处:宏可以定义一些函数、方法,const不能
     4、宏的坏处:大量的使用宏,会导致预编译时间过长,每次都需要重新替换!
     注意:很多Blog都说使用宏,会消耗很多内存,我这验证并不会生成很多内存,宏定义的是常量,常量都放在常量区,只会生成一份内存。
《参考链接:https://blog.csdn.net/chen_gp_x/article/details/53149524》
     关于涉及到的地址这个方面在之后地址的整理中会详细说明

     */

}
- (void)externDetailAction
{
    //extern
    /*
     作用:声明外部全局变量,或者说只是用来获取全局变量(包括全局静态变量)的值,不能用于定义变量
     工作原理:现在当前文件查找有没有全局变量,没有找到才会在其他文件查找

     */
    NSLog(@"extern 一般是和 const 一起使用");
}
 1 - (void)externDetailAction
 2 {
 3     //extern
 4     /*
 5      作用:声明外部全局变量,或者说只是用来获取全局变量(包括全局静态变量)的值,不能用于定义变量
 6      工作原理:现在当前文件查找有没有全局变量,没有找到才会在其他文件查找
 7
 8      */
 9     NSLog(@"extern 一般是和 const 一起使用");
10 }
 1 //HFGlobleHandleObject.h文件
 2 #import <Foundation/Foundation.h>
 3
 4 @interface HFGlobleHandleObject : NSObject
 5
 6 extern NSString *const hfConstTempName;
 7 extern NSString *const hfStaticTempName;
 8
 9
10 @end
11
12
13 //HFGlobleHandleObject.m文件
14
15 #import "HFGlobleHandleObject.h"
16
17 @implementation HFGlobleHandleObject
18
19 NSString *const hfConstTempName = @"hfConstTempName";
20 NSString *const hfStaticTempName = @"hfStaticName";
21 @end
22
23
24 - (void)constWithExternAction
25 {
26     //extern和const的结合使用
27     /*
28      使用场景:在多个文件中经常使用的同一个字符串常量,
29      注意:开发使一般规定,为了避免重复报错,全局变量不能定义在自己的类中,我们需要创建一个专门用来管理全局变量的文件,例如一个全局类()
30      */
31     NSLog(@"hfConstTempName = %@",hfConstTempName);
32
33 }
static NSString *const kConstatCellID = @"constCellID";


//#define kConstatCellID @"kConstatCellID"


- (void)constWithStaticAction
{
    //static和const的结合使用
    /*
     作用:声明一个只读的全局静态变量
     场景:在一个文件中经常使用的字符串常量,可以使用static与const组合

     */
}
3、使用类型常量可以明确知道定义的常量类型以及const、extern、static关键字的使用可以在常量被修改的时候发出警告!
第5条:用枚举表示状态、选项、状态码
枚举表示状态、选项、状态码:枚举中涉及到的枚举类型,只有选项可以同时使用的时候或涉及到位或操作才定义为NS_OPTION类型,否则是NS_ENUM类型;如果使用枚举值配合switch语句,switch不添加defaut语句,这样可以增加各个枚举的校验操作。
第6条:理解“属性”这一概念
1、关于属性:本质上就是 property = ivar + setter+getter,现在是编译期帮助我们处理这件事,
属性涉及到两个关键字
@synthesized
@dynamic
2、什么情况下编译器不会自动给我们合成属性:
2.1、同时实现了setter、getter方法的时候,系统就不再合成ivar 和setter、getter方法
2.2、使用@dynamic proertyName的时候
2.3、protocol中定义的属性,不会自动合成setter、getter方法实现,只会生成声明(需要进一步学习)
2.4、category中的属性会生成setter、getter方法,但是不会生成ivar,所以需要我们利用运行时 objc_setAssociatedObject和objc_getAssociatedObject绑定实力变量和获取实力变量(在之后研究运行时的时候在具体描述)
2.5、重载的属性不会生成
@synthesized propertyname = ivarname 不会影响编译期合成setter方法,只会影响合成实力变量的名字
@dynamic 会影响编译期是否合成ivar 和 setter和getter方法,使用该关键字,该属性将不会合成ivar 和 setter getter
3、属性的特性:
3.1、原子性:atomic和nonatomic
3.2、读、写权限
3.3、内存管理的关键字(assign、strong、weak、unsafe_unretained,copy)
3.4、方法名getter=<name>,setter=<name>
4、直接访问实力变量的特点:不调用setter、getter方法,速度快
5、通过属性访问属性的特点:
5.1、会调用setter、getter方法
5.2、有助于设置断点排查错误3、可以触发KVO
第7条:在对象内部尽量直接访问实例变量
1、对象内部读取数据时应该直接使用实力变量来读取,写入数据时应通过属性
2、初始化方法和delloc中,一般是使用实力变量读写数据,但是:如果某属性使用了延迟加载技术的时候,必须使用读取方法访问该属性!
第8条:理解“对象等同性”这一概念
1、== 对比的是两个指针
2、isEqual 对比的是两个对象的等同性,一般来说,两个类型不同的对象总是不相等的
3、isEqualToString是NSString实现的一个自己独有的等同性判断的方法,这个方法比isEqual快,原因是它不知道受测对象的类型
4、isEqulaToArray:NSArray特殊的判断等同性的判断方法
5、isEqualToDictionary:NSDictionary特殊的判断等同性的判断方法
等同性判定的执行深度
NSArray的检测方式为先看两个数组所包含的对象是否相同,若相同,则再在每个对应的位置的两个对象上调用气“isEqual”方法,如果对应位置上的对象均相等,那么这两个数组就相等,
这叫做“深度等同性判定”,不过有的时候不需要将所有数据注意比较,只根据其中部分数据即可判断是否相同!例如:自定义的类中的ID之类的属性
注意:把某个对象加入set之后又修改其内容,之后的行为将会难以预料,如果要这么做,需要注意其隐患,可查看关于mutSetOne的实验打印
自定义类中 重写isEqual,一般也会涉及到重写hash函数
将对象加入到set或者是字典的key的时候也会执行(set和字典的key是需要校验唯一性)
如下返回hash是一种相对可以保持高效,又能使生成的哈希码在一定范围内不会过于频繁地重复
NSUInteger hash = [self.firstParms hash] ^ [self.secondParms hash];
编写hash方法时,应该用当前的对象做实验,以便在减少碰撞频度与降低运算复杂程序之间的取舍
 1 - (NSUInteger)hash{
 2     //这个方法在校验对象唯一的时候 才会执行,
 3     //1、一般而言就是执行isEqual的时候才会触发这个方法
 4     //2、将对象加入到set或者是字典的key的时候也会执行(set和字典的key是需要校验唯一性)
 5     //如下返回hash是一种相对可以保持高效,又能使生成的哈希码在一定范围内不会过于频繁地重复
 6     //编写hash方法时,应该用当前的对象做实验,以便在减少碰撞频度与降低运算复杂程序之间的取舍
 7     NSUInteger hash = [self.firstParms hash] ^ [self.secondParms hash];
 8     NSLog(@"hsah = %ld",hash);
 9     return hash;
10 }
11
12 - (BOOL)isEqual:(id)object
13 {
14
15     if (self == object) {
16         return YES;
17     }
18
19     if (![object isKindOfClass:[HFFatherModel class]]) {
20         return NO;
21     }
22
23     return [self isEqualToFatherModel:(HFFatherModel *)object];
24
25 }
26
27 - (BOOL)isEqualToFatherModel:(HFFatherModel *)father
28 {
29     if (!father) {
30         return NO;
31     }
32
33     BOOL haveEqualNames = (!self.firstParms && !father.firstParms) || [self.firstParms isEqualToString:father.firstParms];
34     BOOL haveEqualBirthdays = (!self.secondParms && !father.secondParms) || [self.secondParms isEqualToString:father.secondParms];
35
36     return haveEqualNames && haveEqualBirthdays;
37
38
39 }
第9条:以“类族模式”隐藏实现细节
关于“类族模式”,该模式可以灵活应对多个类,将它们的实现细节隐藏在抽象的基类后面,以保持接口的简洁!用户无需自己创建子类,只需调用基类的方法创建即可!
就目前我个人在项目中最经常使用到的是类似微博列表展示的tableView中多个UITabbleViewCell的创建,
大体思路:创建ParentCell,然后根据页面创建继承自ParentCell的各个SonCell,然后ParentCell创建相关的调用方法,SonCell实现之等。
第10条:在既有类中使用关联对象存放自定义数据
这个主要是关联对象 ,动态添加属性的暂时没有详细介绍
这个涉及到三个方法:
1、void objc_setAssociatedObject(id object, void *key,id value, objc_AssocaitionPolicy) policy)
给定的键和策略为某对象设置关系对象值
id object : 表示关联者,是一个对象
void *key:获取被关联者的索引key (是设置和引用的关键字)
id value :被关联的对象
policy:关联策略,类似于assign、retain、copy等协议
2、id objc_getAssocoatedObject(id object, void *key)
根据给定的键从对象中获取相应的关联对象值 ,key和set方法中的key对应!
3、void objc_removeAssociatedObject(id object)
移除指定对象的全部关联对象,通常是不建议使用这个方法,它移除的是全部,移除某一个可以使用
objc_setAssocitedObject(self,&keyName,nil,OBJC_ASSOCIATION_COPY_NONATOMIC);
使用场景:
1、category 添加事件
2、之前的弹出视图UIAlertView 代理事件中的具体处理,可以将视图和事件的代码放在一起,逻辑更清晰明了,类似于现在的弹出视图(UIAlertController)的实现
3、tableview 中 cell或index和 弹出视图绑定 (这个是我目前觉得比较实用的)
  1 #import "UIButton+HFBlock.h"
  2 #import <objc/runtime.h>
  3
  4
  5
  6 static const char buttonActionKeyname;
  7
  8 static void *HFAlterViewKey;
  9
 10
 11
 12 @implementation UIButton (HFBlock)
 13
 14
 15 /*
 16  使用关联,我们可以不用修改类的定义而为其对象增加存储空间,这主要是在我们无法访问到类的源码的时候或者是考虑到二进制兼容性的时候非常有用
 17  涉及到的使用场景:
 18  1、category的使用,objc_setAssociatedObject/pbjc_getAssociatedObiect实现添加属性
 19  2、objc_setAssociatedObject与Block的简单使用
 20  注意:
 21  1、使用“关联对象”机制把两个对象连起来
 22  2、模仿添加属性
 23  3、只有在其他做法不可执行时才会使用关联对象,因为这种做法通常会引入难于查找的bug
 24  ——————————  ——————  ———————— —————————— ———————— —————————— ———————— —————————— ———————— ———————— ——————
 25
 26  1、void objc_setAssociatedObject(id object, const void *key, id value, objc_AssociationPolicy policy);
 27  《此方法以给定的键和策略为对象设置关联对象值》
 28  id object       :表示关联者,是一个对象,变量名理所当然也是object
 29  const void *key :获取被关联者的索引key
 30  id value        :被关联的对象
 31  objc_AssociationPolicy policy : 关联时采用的协议,亦称为关联策略,有assign,retain,copy等协议,一般使用OBJC_ASSOCIATION_RETAIN_NONATOMIC
 32  OBJC_ASSOCIATION_ASSIGN 等价于 @property(assign)。
 33  OBJC_ASSOCIATION_RETAIN_NONATOMIC等价于 @property(strong, nonatomic)。
 34  OBJC_ASSOCIATION_COPY_NONATOMIC等价于@property(copy, nonatomic)。
 35  OBJC_ASSOCIATION_RETAIN等价于@property(strong,atomic)。
 36  OBJC_ASSOCIATION_COPY等价于@property(copy, atomic)。
 37
 38 2、id objc_getAssociatedObject(id object, const void *key);
 39  《此方法是根据给定的键从某对象中获取相应的关联对象值》
 40 3、void objc_removeAssociatedObjects(id object);
 41  《此方法移除指定对象的全部关联对象》
 42  使用函数objc_removeAssociatedObjects可以断开所有关联。通常情况下不建议使用这个函数,因为他会断开所有关联。只有在需要把对象恢复到“原始状态”的时候才会使用这个函数。
 43  断开关联是使用objc_setAssociatedObject函数,传入nil值即可。
 44  objc_setAssociatedObject(self, &associatedButtonkey, nil, OBJC_ASSOCIATION_COPY_NONATOMIC);
 45
 46  */
 47
 48
 49 /*
 50  这个是为button 添加一个block 事件,和系统的addTarget 相比是代码更简洁,其他的 暂时还没有发现
 51
 52  */
 53 - (void)handleBlock:(hfButtonAction)hfBlock
 54 {
 55     [self addTarget:self action:@selector(buttonAction:) forControlEvents:UIControlEventTouchUpInside];
 56
 57     objc_setAssociatedObject(self, &buttonActionKeyname, hfBlock, OBJC_ASSOCIATION_COPY_NONATOMIC);
 58 }
 59 - (void)buttonAction:(UIButton *)button
 60 {
 61     hfButtonAction hfBlcok = (hfButtonAction)objc_getAssociatedObject(self, &buttonActionKeyname);
 62     if (hfBlcok) {
 63         hfBlcok(button);
 64         NSLog(@"block 回调 斯密达");
 65     }
 66 }
 67
 68 #pragma mark - AlterViewDelegate
 69 - (void)alertView:(UIAlertView *)alertView clickedButtonAtIndex:(NSInteger)buttonIndex
 70 {
 71
 72     void (^blcok)(NSInteger) = objc_getAssociatedObject(alertView, &HFAlterViewKey);
 73     blcok(buttonIndex);
 74 }
 75
 76 - (void)addAlterView
 77 {
 78     //UIAlertView 从iOS9开始被废弃了,这个是用这个做了例子,说明objc_setAssociatedObject的作用
 79     //这样做 可以将alterView 与处理操作之间的代码放在一起,看起来更易理解,实际上目前使用弹框的UIAlertController 实现就类似如此实现
 80     UIAlertView *alterView = [[UIAlertView alloc]initWithTitle:@"title" message:@"Message" delegate:self cancelButtonTitle:@"cancle" otherButtonTitles:@"OK", nil];
 81
 82     void (^block)(NSInteger) = ^(NSInteger buttonIndex){
 83
 84         if (buttonIndex == 0) {
 85             [self buttonZeroAction];
 86         }else if (buttonIndex == 1)
 87             [self buttonOneAction];
 88     };
 89
 90     objc_setAssociatedObject(alterView, &HFAlterViewKey, block, OBJC_ASSOCIATION_COPY);
 91     [alterView show];
 92
 93
 94     //或者是 在tableView中 如果每个cell上都有一个点击事件 弹出一个view,可以用
 95     /*
 96      然后这里设定关联,此处把indexPath关联到alert上
 97     objc_setAssociatedObject(alert, &kUITableViewIndexKey, indexPath, OBJC_ASSOCIATION_RETAIN_NONATOMIC);
 98     然后在需要使用地方取出,而不需要频繁设置全局变量或属性实现indexpath的传递
 99      */
100
101
102
103
104
105
106 }
107
108 - (void)buttonZeroAction
109 {
110     NSLog(@"button index = 0");
111 }
112
113 - (void)buttonOneAction
114 {
115     NSLog(@"button Index = 1");
116 }
117
118
119
120
121
122
123
124
125
126 @end
 1 #import <UIKit/UIKit.h>
 2
 3 typedef void(^hfButtonAction)(UIButton *button);
 4
 5
 6 //为了验证objc_setAssociatedObject 相关的关联对象的部分东西
 7 @interface UIButton (HFBlock)<UIAlertViewDelegate>
 8
 9 - (void)handleBlock:(hfButtonAction)hfBlock;
10
11 - (void)addAlterView;
12 @end
1     [blockButton handleBlock:^(UIButton *button) {
2         NSLog(@" =----!!");
3 //想要执行的事件
4     }];
5 //
6     [self.view addSubview:blockButton];
第11条:理解objc_msgSend的作用
objc_msgSend 消息传递
消息是由接受者、选择子(亦称为方法名)以及参数构成。给对象“发送消息 (invoke a message)”也就相当于在该对象上“调用方法”(call a method)
发给某对象的全部消息都是由“动态消息派发系统”(dynamic message dispatch system)来处理,该系统会查出对应的方法,并执行其代码。
实际上objc_msgSend是系统帮助我们处理的整个过程
第12条:理解消息转发机制
若对象无法响应某个选择子,则进入消息转发流程。
通过运行期的动态方法解析功能,我们可以在需要用到某个方法时再将其加入类中。
对象可以把无法解读的某些选择子转交给其他对象来处理。
进过上述两步之后,如果还是没办法处理选择子,那就启动完整的消息转发机制。
下图是在网上找到的关于oc消息传递的流程图

完整的消息转发全流程: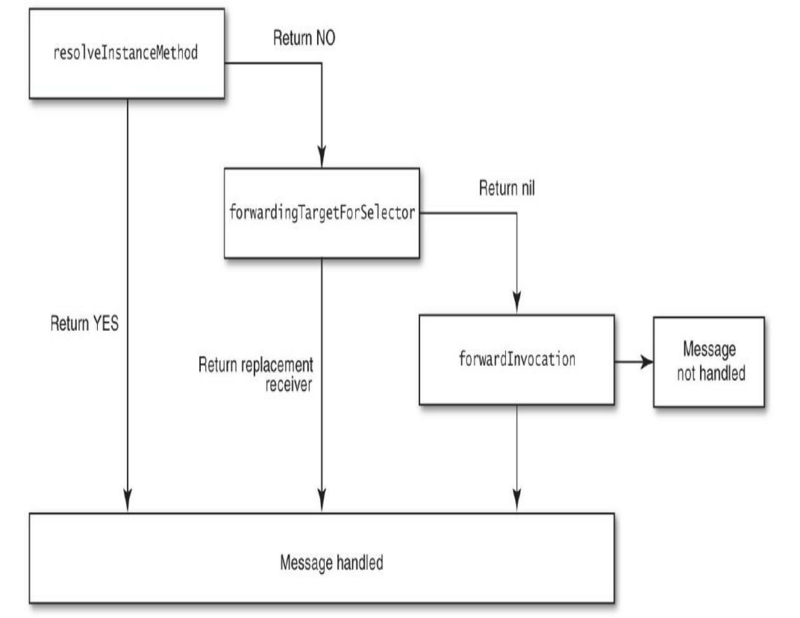
第13条:用“方法调配技术”调试“黑盒方法”
法调配技术 还是在runtime的技术上实现的。
runtime的常见作用:
1、动态交换两个方法的实现
2、动态添加属性
3、实现字典转模型的自动转换
4、发送消息
5、动态添加方法
6、实现NSCoding的自动归档和解档。
什么是 method swizzling(俗称黑魔法)简单说就是进行方法交换
交换方法的几种实现方式
利用 method_exchangeImplementations 交换两个方法的实现
利用 class_replaceMethod 替换方法的实现
利用 method_setImplementation 来直接设置某个方法的IMP。
 1 #import <Foundation/Foundation.h>
 2
 3 @interface HFFatherModel : NSObject
 4
 5 @property (nonatomic, copy) NSString *firstParms;
 6 @property (nonatomic, copy) NSString *secondParms;
 7
 8 + (void)testObjc_msgSend;
 9
10 - (id)initWithFirstParms:(NSString *)firstStr secondParms:(NSString *)secondStr;
11
12 - (void)runtimeTest;
13
14 -(void)classMethodName;
15
16 - (void)exchangeMethodA;
17 - (void)exchangeMethodB;
18 - (void)replaceMethodsAction;
19
20
21 @end
  1 #import "HFFatherModel.h"
  2 #import <objc/runtime.h>
  3 #import <objc/message.h>
  4
  5 @interface HFFatherModel()
  6 //@property (nonatomic, copy) NSString *tempStr;
  7 {
  8     NSString *_fatherAge;
  9     NSString *_fatherRole;
 10     NSInteger _fatherNum;
 11 }
 12 @end
 13
 14 @implementation HFFatherModel
 15
 16
 17 - (id)initWithFirstParms:(NSString *)firstStr secondParms:(NSString *)secondStr
 18 {
 19     if (self = [super init]) {
 20         _firstParms = firstStr;
 21         _secondParms = secondStr;
 22     }
 23     return self;
 24 }
 25 - (NSUInteger)hash{
 26     //这个方法在校验对象唯一的时候 才会执行,
 27     //1、一般而言就是执行isEqual的时候才会触发这个方法
 28     //2、将对象加入到set或者是字典的key的时候也会执行(set和字典的key是需要校验唯一性)
 29     //如下返回hash是一种相对可以保持高效,又能使生成的哈希码在一定范围内不会过于频繁地重复
 30     //编写hash方法时,应该用当前的对象做实验,以便在减少碰撞频度与降低运算复杂程序之间的取舍
 31     NSUInteger hash = [self.firstParms hash] ^ [self.secondParms hash];
 32     NSLog(@"hsah = %ld",hash);
 33     return hash;
 34 }
 35
 36 - (BOOL)isEqual:(id)object
 37 {
 38
 39     if (self == object) {
 40         return YES;
 41     }
 42
 43     if (![object isKindOfClass:[HFFatherModel class]]) {
 44         return NO;
 45     }
 46
 47     return [self isEqualToFatherModel:(HFFatherModel *)object];
 48
 49 }
 50
 51 - (BOOL)isEqualToFatherModel:(HFFatherModel *)father
 52 {
 53     if (!father) {
 54         return NO;
 55     }
 56
 57     BOOL haveEqualNames = (!self.firstParms && !father.firstParms) || [self.firstParms isEqualToString:father.firstParms];
 58     BOOL haveEqualBirthdays = (!self.secondParms && !father.secondParms) || [self.secondParms isEqualToString:father.secondParms];
 59
 60     return haveEqualNames && haveEqualBirthdays;
 61
 62
 63 }
 64 - (void)runtimeTest
 65 {
 66     /*
 67      常见方法
 68
 69      */
 70     //1、获取属性列表
 71     unsigned int count;
 72     objc_property_t *propertyList = class_copyPropertyList([self class], &count);
 73     NSLog(@"属性数目propertyCount = %d",count);
 74
 75     for (unsigned int i = 0; i < count; i++) {
 76         //获得属性名
 77         const char *properName = property_getName(propertyList[i]);
 78         NSLog(@"property -- > name = %@",[NSString stringWithUTF8String:properName]);
 79     }
 80
 81    //2、获取方法列表
 82     Method  *methodList = class_copyMethodList([self class], &count);
 83     NSLog(@"方法数目 methodListCount  = %d",count);
 84
 85     for (unsigned int i = 0; i < count; i++) {
 86         Method method = methodList[i];
 87         NSLog(@"method name = %@",NSStringFromSelector(method_getName(method)));
 88
 89     }
 90     //3、获得成员变量列表
 91     Ivar *ivarList = class_copyIvarList([self class], &count);
 92     NSLog(@"实力变量数目 methodListCount  = %d",count);
 93
 94     for (unsigned int i = 0; i<count; i++) {
 95         Ivar myIvar = ivarList[i];
 96         //获得实力变量名称
 97         const char *ivarName = ivar_getName(myIvar);
 98         NSLog(@"实力变量 Ivar name = %@",[NSString stringWithUTF8String:ivarName]);
 99     }
100     //4、获取协议列表
101     __unsafe_unretained Protocol **protocoList = class_copyProtocolList([self class], &count);
102     for (unsigned int i = 0; i< count; i++) {
103         Protocol *tempProtocol = protocoList[i];
104         //获得协议名称
105         const char *tempProtocolName = protocol_getName(tempProtocol);
106         NSLog(@"协议名称 -- protocoName = %@",[NSString stringWithUTF8String:tempProtocolName]);
107     }
108     //5、获得实例方法
109     Method  myInstanceMethod = class_getInstanceMethod([self class], @selector(classMethodName));
110     NSLog(@"myInstanceMethod name = %@",NSStringFromSelector(method_getName(myInstanceMethod)));
111
112     //6、获得类方法
113
114     Method  myClassMethod = class_getClassMethod([self class], @selector(testObjc_msgSend));
115     NSLog(@"myClassMethod name = %@",NSStringFromSelector(method_getName(myClassMethod)));
116
117
118     //7、添加方法
119     /*
120
121      */
122 //    新增addNewMethod方法 其实现是addNewtempMethods方法的实现
123     Method  addNewtempMethods = class_getInstanceMethod([self class], @selector(addNewtempMethods));
124
125     class_addMethod([self class], @selector(addNewMethod), method_getImplementation(addNewtempMethods), method_getTypeEncoding(addNewtempMethods));
126     //8、替换方法
127
128     Method replaceMethod = class_getInstanceMethod([self class], @selector(replaceMethodsAction));
129     //myInstanceMethod
130     //这样子设置的意思是classMethodName的实现替换了replaceMethodsAction 的实现
131 //    class_replaceMethod([self class], @selector(replaceMethodsAction), method_getImplementation(myInstanceMethod), method_getTypeEncoding(myInstanceMethod));
132
133     //如下是是用方法replaceMethodsAction的实现 替换方法classMethodName的
134     /*
135      class: 给哪个类添加方法
136      SEL:被替换的方法,即该方法的方法编号
137      IMP:(将来要使用替换成的方法实现)方法实现=>函数=>函数入口=>函数名(添加方法的函数实现或者称为函数地址)
138
139      imp可以用method_getImplementation方法获得
140
141      type:(要替换成的方法的方法类型)方法类型,(返回值+参数类型 v:void @:对象->self :表示SEL->_cmd)
142      type的相关可以用method_getTypeEncoding方法获取
143
144
145      class_replaceMethod(Class _Nullable cls, SEL _Nonnull name, IMP _Nonnull imp,
146      const char * _Nullable types)
147
148
149      */
150     class_replaceMethod([self class], @selector(classMethodName), method_getImplementation(replaceMethod), method_getTypeEncoding(replaceMethod));
151
152     //9、交换方法
153     //A和B的方法交换
154     Method exchangeMethodA = class_getInstanceMethod([self class], @selector(exchangeMethodA));
155     Method exchangeMethodB = class_getInstanceMethod([self class], @selector(exchangeMethodB));
156     method_exchangeImplementations(exchangeMethodA, exchangeMethodB);
157
158     //以上是比较常见的几个关于runtime的方法,其他的方法还可以查看runtime的开发文档!
159
160
161
162
163
164 }
165 -(void)classMethodName
166 {
167     NSLog(@"classMethodName 具体实现");
168 //    NSLog(@" ----原始的---- = %@",NSStringFromSelector(_cmd));
169
170 }
171
172 - (void)addNewtempMethods
173 {
174     NSLog(@"新增的方法 ---- = %@",NSStringFromSelector(_cmd));
175
176 }
177 //
178 - (void)replaceMethodsAction
179 {
180     NSLog(@"replaceMethodsAction 具体实现");
181 //    NSLog(@"----交换的 ---- = %@",NSStringFromSelector(_cmd));
182
183 }
184
185 - (void)exchangeMethodA
186 {
187     NSLog(@" -A--- = %@",NSStringFromSelector(_cmd));
188
189 }
190 - (void)exchangeMethodB
191 {
192     NSLog(@" -B--- = %@",NSStringFromSelector(_cmd));
193
194 }
195 + (void)testObjc_msgSend
196 {
197     SEL testFunc = NSSelectorFromString(@"testFunc");
198
199     ((void (*) (id, SEL)) (void *)objc_msgSend)([HFFatherModel new], testFunc);
200 }
201 - (void)testFunc
202 {
203
204     NSLog(@"123123");
205 }
 1  HFFatherModel *fatherModel = [HFFatherModel new];
 2     fatherModel.firstParms = @"First";
 3     fatherModel.secondParms = @"Second";
 4
 5     [fatherModel replaceMethodsAction];
 6
 7     [fatherModel classMethodName];
 8     [fatherModel exchangeMethodA];
 9     [fatherModel exchangeMethodB];
10     NSLog(@"开始rntime相关的操作----");
11     [fatherModel runtimeTest];
12
13     NSLog(@"rntime之后 相关的操作----");
14
15     [fatherModel performSelector:@selector(addNewMethod)];
16
17     [fatherModel classMethodName];
18     NSLog(@"--classMethodName-- 被替换为replaceMethodsAction");
19
20
21     [fatherModel replaceMethodsAction];
22
23
24     [fatherModel exchangeMethodA];
25     NSLog(@"--exchangeMethodA-- 执行 为方法B");
26
27     [fatherModel exchangeMethodB];
28     NSLog(@"--exchangeMethodB-- 执行 为方法A");
 1 2018-08-06 16:11:41.404156+0800 HaiFeiArrangeProject[94906:21371173] replaceMethodsAction 具体实现
 2 2018-08-06 16:11:41.404352+0800 HaiFeiArrangeProject[94906:21371173] classMethodName 具体实现
 3 2018-08-06 16:11:41.404477+0800 HaiFeiArrangeProject[94906:21371173]  -A--- = exchangeMethodA
 4 2018-08-06 16:11:41.404578+0800 HaiFeiArrangeProject[94906:21371173]  -B--- = exchangeMethodB
 5 2018-08-06 16:11:41.404663+0800 HaiFeiArrangeProject[94906:21371173] 开始rntime相关的操作----
 6 2018-08-06 16:11:41.404811+0800 HaiFeiArrangeProject[94906:21371173] 属性数目propertyCount = 2
 7 2018-08-06 16:11:41.405104+0800 HaiFeiArrangeProject[94906:21371173] property -- > name = firstParms
 8 2018-08-06 16:11:41.405182+0800 HaiFeiArrangeProject[94906:21371173] property -- > name = secondParms
 9 2018-08-06 16:11:41.405290+0800 HaiFeiArrangeProject[94906:21371173] 方法数目 methodListCount  = 16
10 2018-08-06 16:11:41.405387+0800 HaiFeiArrangeProject[94906:21371173] method name = firstParms
11 2018-08-06 16:11:41.405484+0800 HaiFeiArrangeProject[94906:21371173] method name = secondParms
12 2018-08-06 16:11:41.407349+0800 HaiFeiArrangeProject[94906:21371173] method name = isEqualToFatherModel:
13 2018-08-06 16:11:41.409457+0800 HaiFeiArrangeProject[94906:21371173] method name = classMethodName
14 2018-08-06 16:11:41.410112+0800 HaiFeiArrangeProject[94906:21371173] method name = addNewtempMethods
15 2018-08-06 16:11:41.410313+0800 HaiFeiArrangeProject[94906:21371173] method name = replaceMethodsAction
16 2018-08-06 16:11:41.410592+0800 HaiFeiArrangeProject[94906:21371173] method name = exchangeMethodA
17 2018-08-06 16:11:41.410692+0800 HaiFeiArrangeProject[94906:21371173] method name = exchangeMethodB
18 2018-08-06 16:11:41.410843+0800 HaiFeiArrangeProject[94906:21371173] method name = initWithFirstParms:secondParms:
19 2018-08-06 16:11:41.411002+0800 HaiFeiArrangeProject[94906:21371173] method name = runtimeTest
20 2018-08-06 16:11:41.411085+0800 HaiFeiArrangeProject[94906:21371173] method name = testFunc
21 2018-08-06 16:11:41.411682+0800 HaiFeiArrangeProject[94906:21371173] method name = setFirstParms:
22 2018-08-06 16:11:41.411779+0800 HaiFeiArrangeProject[94906:21371173] method name = setSecondParms:
23 2018-08-06 16:11:41.411897+0800 HaiFeiArrangeProject[94906:21371173] method name = .cxx_destruct
24 2018-08-06 16:11:41.411977+0800 HaiFeiArrangeProject[94906:21371173] method name = hash
25 2018-08-06 16:11:41.412104+0800 HaiFeiArrangeProject[94906:21371173] method name = isEqual:
26 2018-08-06 16:11:41.412213+0800 HaiFeiArrangeProject[94906:21371173] 实力变量数目 methodListCount  = 5
27 2018-08-06 16:11:41.412297+0800 HaiFeiArrangeProject[94906:21371173] 实力变量 Ivar name = _fatherAge
28 2018-08-06 16:11:41.412394+0800 HaiFeiArrangeProject[94906:21371173] 实力变量 Ivar name = _fatherRole
29 2018-08-06 16:11:41.412497+0800 HaiFeiArrangeProject[94906:21371173] 实力变量 Ivar name = _fatherNum
30 2018-08-06 16:11:41.413290+0800 HaiFeiArrangeProject[94906:21371173] 实力变量 Ivar name = _firstParms
31 2018-08-06 16:11:41.413504+0800 HaiFeiArrangeProject[94906:21371173] 实力变量 Ivar name = _secondParms
32 2018-08-06 16:11:41.415427+0800 HaiFeiArrangeProject[94906:21371173] myInstanceMethod name = classMethodName
33 2018-08-06 16:11:41.415554+0800 HaiFeiArrangeProject[94906:21371173] myClassMethod name = testObjc_msgSend
34 2018-08-06 16:11:41.416592+0800 HaiFeiArrangeProject[94906:21371173] rntime之后 相关的操作----
35 2018-08-06 16:11:41.416781+0800 HaiFeiArrangeProject[94906:21371173] 新增的方法 ---- = addNewMethod
36 2018-08-06 16:11:41.417614+0800 HaiFeiArrangeProject[94906:21371173] replaceMethodsAction 具体实现
37 2018-08-06 16:11:41.418273+0800 HaiFeiArrangeProject[94906:21371173] --classMethodName-- 被替换为replaceMethodsAction
38 2018-08-06 16:11:41.418476+0800 HaiFeiArrangeProject[94906:21371173] replaceMethodsAction 具体实现
39 2018-08-06 16:11:41.419673+0800 HaiFeiArrangeProject[94906:21371173]  -B--- = exchangeMethodA
40 2018-08-06 16:11:41.419945+0800 HaiFeiArrangeProject[94906:21371173] --exchangeMethodA-- 执行 为方法B
41 2018-08-06 16:11:41.420848+0800 HaiFeiArrangeProject[94906:21371173]  -A--- = exchangeMethodB
42 2018-08-06 16:11:41.421346+0800 HaiFeiArrangeProject[94906:21371173] --exchangeMethodB-- 执行 为方法A
第14条:理解“类对象”的用意
个人理解就是,理解Class的底层实现,在什么时候调用isMemberOfClass、isKindOfClass 类型信息查询的时候 知道如此调用的原因,以及不使用==的原因
可以参考https://www.jianshu.com/p/2d49e0413bef,关于这点的描述!
写在结尾处的话:每天努力一点点,也许不明显,但终究会有所帮助!