一、测试代码
1.activity_main.xml:
<?xml version="1.0" encoding="utf-8"?>
<RelativeLayout xmlns:android="http://schemas.android.com/apk/res/android"
    xmlns:tools="http://schemas.android.com/tools"
    android:layout_width="match_parent"
    android:layout_height="match_parent"
    tools:context="com.babycy.getviewwh.MainActivity">

    <Button
        android:id="@+id/btn"
        android:layout_width="100dp"
        android:layout_height="40dp" />

</RelativeLayout>
2.MainActivity.java
public class MainActivity extends AppCompatActivity {

    private Button mBtn;

    @Override
    protected void onCreate(Bundle savedInstanceState) {
        super.onCreate(savedInstanceState);
        setContentView(R.layout.activity_main);

        mBtn = (Button) findViewById(R.id.btn);

        Log.d("TAG", "onCreate() button width=" + mBtn.getWidth());
    }

    @Override
    protected void onResume() {
        super.onResume();

        mBtn.post(new Runnable() {
            @Override
            public void run() {
                Log.d("TAG", "onResume() mBtn post button width=" + mBtn.getWidth());
            }
        });

        new Handler().post(new Runnable() {
            @Override
            public void run() {
                Log.d("TAG", "onResume() Handler button width=" + mBtn.getWidth());
            }
        });
    }
}
打印结果:

二、分析步骤
我们先大致了解下 Activity 的启动流程(生命周期):
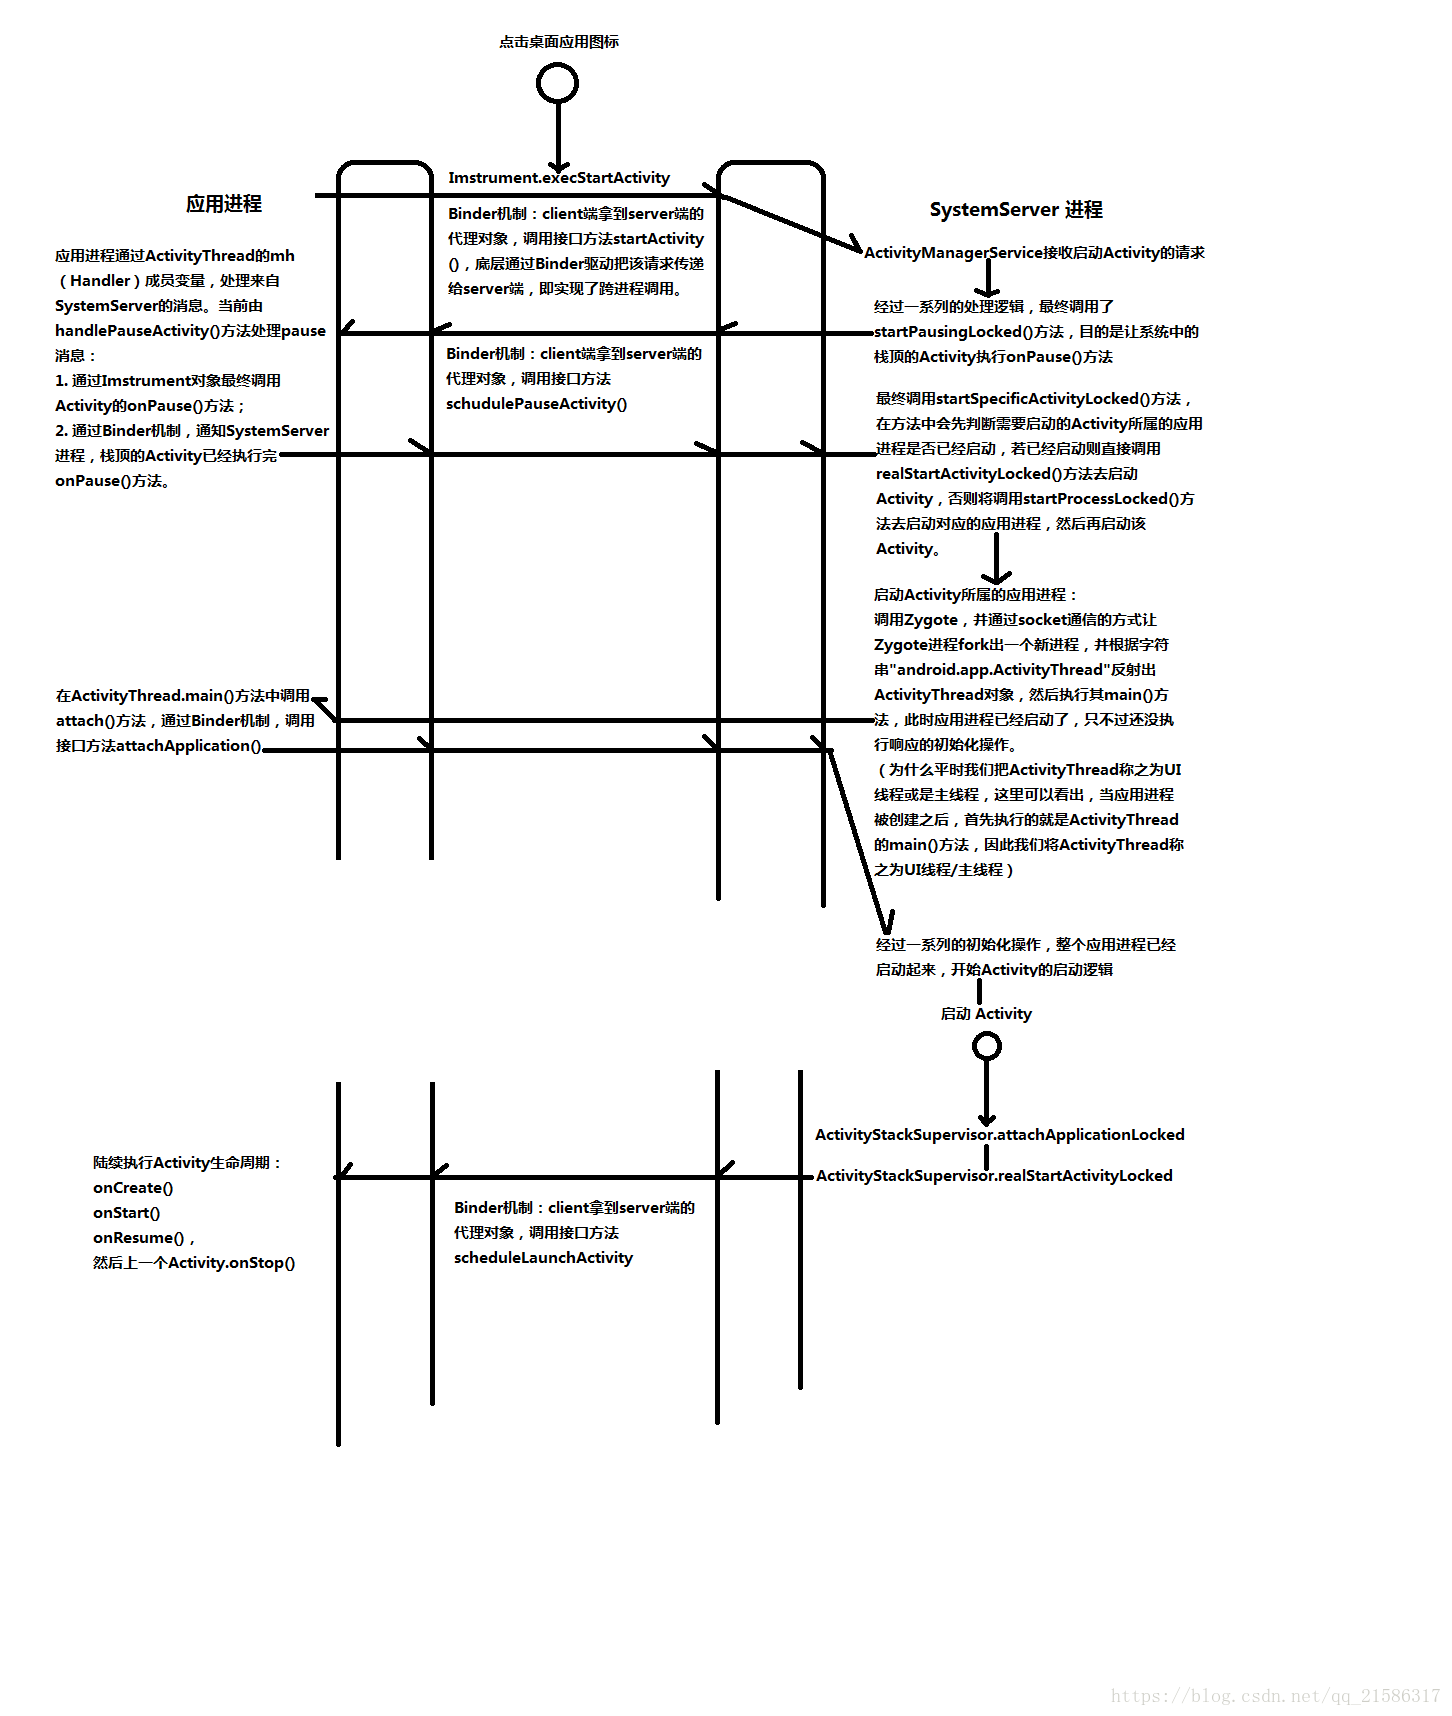
在上图的最下方的 scheduleLaunchActivity() 接口方法之后的流程:handleLaunchActivity() -> handleResumeActivity() -> performResumeActivity() -> Activity#performResume() -> Instrumentation#callActivityOnResume() -> Activity#onResume()
我们知道在 Activity 可见之后,界面绘制就要被触发了,最终调用的是 Activity 的 onResume() 方法
handleResumeActivity() {
    //...
    r = performResumeActivity(token, clearHide, reason);//调用 onResume() 方法
    //...
    wm.addView(decor, l);//对 mAttachInfo 进行赋值
    //...
}
可以看出 onResume() 方法在 addView() 方法前调用
重点关注:onResume() 方法所处的位置,前后都发生了什么?
从上面总结的流程看出,onResume() 方法是由 handleResumeActivity 触发的,而界面绘制被触发是因为 handleResumeActivity() 中调用了wm.addView(decor, l);
public void addView(View view, ViewGroup.LayoutParams params,
            Display display, Window parentWindow) {
    //...

    ViewRootImpl root;
    View panelParentView = null;

    synchronized (mLock) {
        //...

        root = new ViewRootImpl(view.getContext(), display);

        view.setLayoutParams(wparams);

        mViews.add(view);
        mRoots.add(root);
        mParams.add(wparams);
    }

    // do this last because it fires off messages to start doing things
    try {
        //触发开发绘制,参考 1
        root.setView(view, wparams, panelParentView);
    } catch (RuntimeException e) {
        //...
        throw e;
    }
}
参考 1:setView()
/**
 *We have one child
 */
public void setView(View view, WindowManager.LayoutParams attrs, View panelParentView) {
    synchronized (this) {
        if (mView == null) {
            mView = view;

            //...

            // Schedule the first layout -before- adding to the window
            // manager, to make sure we do the relayout before receiving
            // any other events from the system.
            //触发界面刷新,参考 2
            requestLayout();
            if ((mWindowAttributes.inputFeatures
                    & WindowManager.LayoutParams.INPUT_FEATURE_NO_INPUT_CHANNEL) == 0) {
                mInputChannel = new InputChannel();
            }
            //...
            try {
                mOrigWindowType = mWindowAttributes.type;
                mAttachInfo.mRecomputeGlobalAttributes = true;
                collectViewAttributes();
                res = mWindowSession.addToDisplay(mWindow, mSeq, mWindowAttributes,
                        getHostVisibility(), mDisplay.getDisplayId(),
                        mAttachInfo.mContentInsets, mAttachInfo.mStableInsets,
                        mAttachInfo.mOutsets, mInputChannel);
            } catch (RemoteException e) {
                //...
                throw new RuntimeException("Adding window failed", e);
            } finally {
                if (restore) {
                    attrs.restore();
                }
            }

            //...

            //这里的 view 是 DecorView
            view.assignParent(this);
            //...
        }
    }
}
参考 2:requestLayout()
@Override
public void requestLayout() {
    if (!mHandlingLayoutInLayoutRequest) {
        checkThread();
        mLayoutRequested = true;
        //准备刷新,参考 3
        scheduleTraversals();
    }
}
参考 3:scheduleTraversals()
void scheduleTraversals() {
    if (!mTraversalScheduled) {
        mTraversalScheduled = true;
        //设置同步障碍 Message
        mTraversalBarrier = mHandler.getLooper().getQueue().postSyncBarrier();
        //屏幕刷新信号 VSYNC 监听回调把 mTraversalRunnable(执行doTraversal())push 到主线程了,且是个异步 Message 会优先得到执行 ,具体看下 Choreographer 的实现
        //mTraversalRunnable,参考 4
        mChoreographer.postCallback(Choreographer.CALLBACK_TRAVERSAL, mTraversalRunnable, null);
        if (!mUnbufferedInputDispatch) {
            scheduleConsumeBatchedInput();
        }
        notifyRendererOfFramePending();
        pokeDrawLockIfNeeded();
    }
}
参考 4:mTraversalRunnable
final class TraversalRunnable implements Runnable {
    @Override
    public void run() {
        //参考 5
        doTraversal();
    }
}
final TraversalRunnable mTraversalRunnable = new TraversalRunnable();
参考 5:doTraversal()
void doTraversal() {
    if (mTraversalScheduled) {
        mTraversalScheduled = false;
        //移除同步障碍 Message
        mHandler.getLooper().getQueue().removeSyncBarrier(mTraversalBarrier);

        if (mProfile) {
            Debug.startMethodTracing("ViewAncestor");
        }

        //参考 6,在上面移除同步障碍后,才开始执行刷新
        performTraversals();

        if (mProfile) {
            Debug.stopMethodTracing();
            mProfile = false;
        }
    }
}
参考 6:performTraversals()
private void performTraversals() {
    // cache mView since it is used so much below...
    final View host = mView;

    //...

    Rect frame = mWinFrame;
    if (mFirst) {
        mFullRedrawNeeded = true;
        mLayoutRequested = true;

        //...

        // We used to use the following condition to choose 32 bits drawing caches:
        // PixelFormat.hasAlpha(lp.format) || lp.format == PixelFormat.RGBX_8888
        // However, windows are now always 32 bits by default, so choose 32 bits
        mAttachInfo.mUse32BitDrawingCache = true;
        mAttachInfo.mHasWindowFocus = false;
        mAttachInfo.mWindowVisibility = viewVisibility;
        mAttachInfo.mRecomputeGlobalAttributes = false;
        mLastConfiguration.setTo(host.getResources().getConfiguration());
        mLastSystemUiVisibility = mAttachInfo.mSystemUiVisibility;
        // Set the layout direction if it has not been set before (inherit is the default)
        if (mViewLayoutDirectionInitial == View.LAYOUT_DIRECTION_INHERIT) {
            host.setLayoutDirection(mLastConfiguration.getLayoutDirection());
        }
        host.dispatchAttachedToWindow(mAttachInfo, 0);
        mAttachInfo.mTreeObserver.dispatchOnWindowAttachedChange(true);
        dispatchApplyInsets(host);
        //Log.i(mTag, "Screen on initialized: " + attachInfo.mKeepScreenOn);

    } else {
        desiredWindowWidth = frame.width();
        desiredWindowHeight = frame.height();
        if (desiredWindowWidth != mWidth || desiredWindowHeight != mHeight) {
            if (DEBUG_ORIENTATION) Log.v(mTag, "View " + host + " resized to: " + frame);
            mFullRedrawNeeded = true;
            mLayoutRequested = true;
            windowSizeMayChange = true;
        }
    }

    //...

    // Execute enqueued actions on every traversal in case a detached view enqueued an action
    getRunQueue().executeActions(mAttachInfo.mHandler);

    //...

    performMeasure(childWidthMeasureSpec, childHeightMeasureSpec);
    performLayout(lp, mWidth, mHeight);
    performDraw();

    //...
}
1. 在 onResume() 中 handler.post(Runnable) 获取不到 View 的真实宽高
原因:查看上面”参考 6:performTraversals()”执行的时机,因为在 scheduleTraversals() 中设置同步障碍消息,相当于在 MessageQueue 中插入了一个 Message,并且是插入到了 onResume() 之后,所以在 onResume() 中 handler.post(Runnable) 的消息会在同步障碍 Message 前被执行,而此时界面还没有开始刷新绘制,待查询到同步障碍 Message 时候,会等待下个异步 Message(刷新Message)出现,所以在 onResume() 中 handler.post(Runnable) 中操作 UI 是失效的。
2. View.post(Runnable) 为什么可以获取到 View 的宽高?
public boolean post(Runnable action) {
    //mAttachInfo 是在 ViewRootImpl 的构造函数中初始化的
    //而 ViewRootmpl 的初始化是在 addView() 中调用
    //所以此处的 mAttachInfo 为空,所以不会执行该 if 语句
    final AttachInfo attachInfo = mAttachInfo;
    if (attachInfo != null) {
        return attachInfo.mHandler.post(action);
    }

    // Postpone the runnable until we know on which thread it needs to run.
    // Assume that the runnable will be successfully placed after attach.
    //保存消息到 RunQueue 中,等到在 performTraversals() 方法中被执行
    getRunQueue().post(action);
    return true;
}
由参考 6 可知,我们通过 View.post(Runnable) 的 Message 会在 performMeaure() 之前被调用,那为什么还可以正确的获取到 View 的宽高呢?其实我们的 Message 并没有立即被执行,因为此时主线程的 Handler 正在执行的 Message 是 TraversalRunnable,而 performMeaure() 方法也是在该 Message 中执行的,所以等到主线程的 Handler 执行到我们 post 的 Message 时,View 的宽高已经测量完毕,因此我们也就很自然的能够获取到 View 的宽高。