前言:EtherCAT(以太网控制自动化技术)是一个开放架构,以以太网为基础的现场总线系统,其名称的CAT为控制自动化技术(Control Automation Technology)字首的缩写。EtherCAT是确定性的工业以太网,最早是由德国的Beckhoff公司研发。
优势:免费、开源、稳定性能良好、支持实时扩展。
说明:该文档主要是建立在上节中已经对Ubuntu14.04添加完xenomai实时补丁之后的扩展,按照此文档的操作步骤即可让EtherCAT正常工作。
环境:Ubuntu14.04
实时补丁内核:3.14.44-xenomai-2.6.5
一、获取
(1) 从EtherCAT官方网站获取
网址:http://etherlab.org/download/ethercat/ethercat-1.5.2.tar.bz2
(2) 从开源代码托管平台github上获取
进入github搜索”igh ethercat”即可下载所需要的源码包
二、编译
(1) 安装编译该程序的依赖文件
# apt-get install autoconf autogen libtool(2) 解压EtherCAT源码安装包并进入该源码包根文件下
$ tar -vxf ethercat-1.5.2.tar.bz2
$ cd ethercat-1.5.2
(3) 配置编译参数
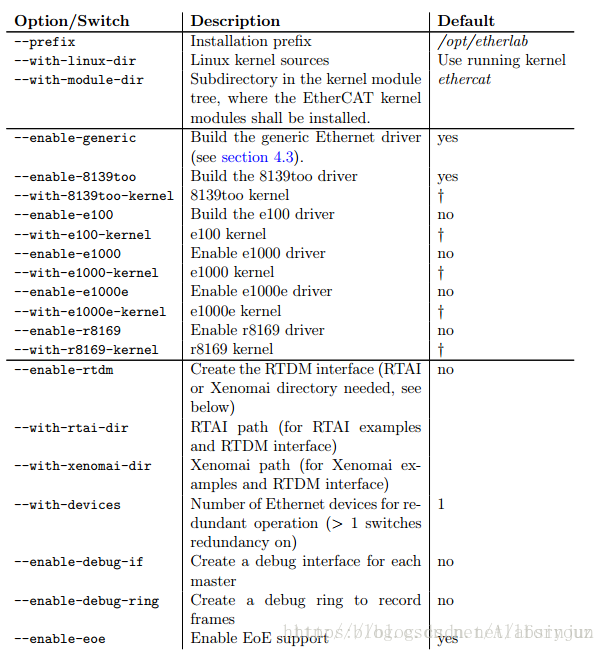
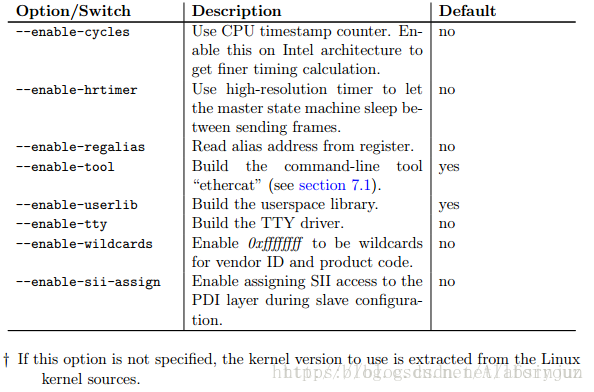
$ ./configure --with-linux-dir=/usr/src/linux-headers-3.14.44-xenomai-2.6.5 --with-module-dir=/lib/modules/3.14.44-xenomai-2.6.5 --enable-generic --enable-rtdm --with-xenomai-dir=/usr/xenomai --enable-cycles --enable-hrtimer --enable-8139too=no官方文档中所有的配置如下:
(3) 编译所有文件及模块
$ make
$ make modules
三、安装
(1) 安装源码包及模块
# make install
# make modules_install
(2) 将模块插入内核
# depmod (3) 创建软链接和相关脚本
# ln -s ${PREFIX}/etc/init.d/ethercat /etc/init.d/ethercat
# cp ${PREFIX}/etc/sysconfig/ethercat /etc/sysconfig/ethercat
# vi /etc/sysconfig/ethercat
(4) 编辑EtherCAT网卡硬件地址
DEVICE_MODULES="":双引号中是网卡设备
MASTER0_DEVICE="" :双引号中是网卡设备对应的硬件地址
运行命令sudo /etc/init.d/ethercat start即可开启EtherCAT主站!!
配置用户库和依赖
(1) 修改Ethercat权限
# echo KERNEL==\"EtherCAT[0-9]*\", MODE=\"0664\" > /etc/udev/rules.d/99-EtherCAT.rules
# udevadm control --reload-rules
(2) 配置库
① 将/opt/etherlab/include下的2个头文件放入/usr/local/include
# cp /opt/etherlab/include/* /usr/local/include② 将/opt/etherlab/lib下的libethercat.so.1.0.0放入/usr/local/lib
# cp /opt/etherlab/lib/libethercat.so.1.0.0 /usr/local/lib③ 将/usr/local/etherlab/bin下的ethercat放入/usr/local/bin
# cp /usr/local/etherlab/bin/ethercat /usr/local/bin④ 执行ldconfig 确保/usr/local/lib在系统的动态链接库路径里面
# ldconfig(3) 配置cmake
# apt-get install cmake配置实时权限
# vim /etc/security/limits.conf 然后在该文件中添加
<username> hard rtprio 99 username 为所使用的用户名
 例如:我添加的内容为absin hard rtprio 99
其中99为实时调度的优先级最大为139(139为调度程序本身的优先级)。保存后退出,然后重启电脑。 在terminal查看ulimit -Hr是不是为99。
提示为99,设置成功。
参考文章:https://github.com/ART-robot/ethercat_install
参考文章:https://blog.csdn.net/allforyouz/article/details/78721760