网关服务很多,比如:Zuul、Kong、spring cloud gateway ……, 这里不纠结哪种性能好,本次体验是用的 spring cloud gateway
更多网关比较可以了解这篇文章: 微服务网关哪家强?一文看懂Zuul, Nginx, Spring Cloud, Linkerd性能差异
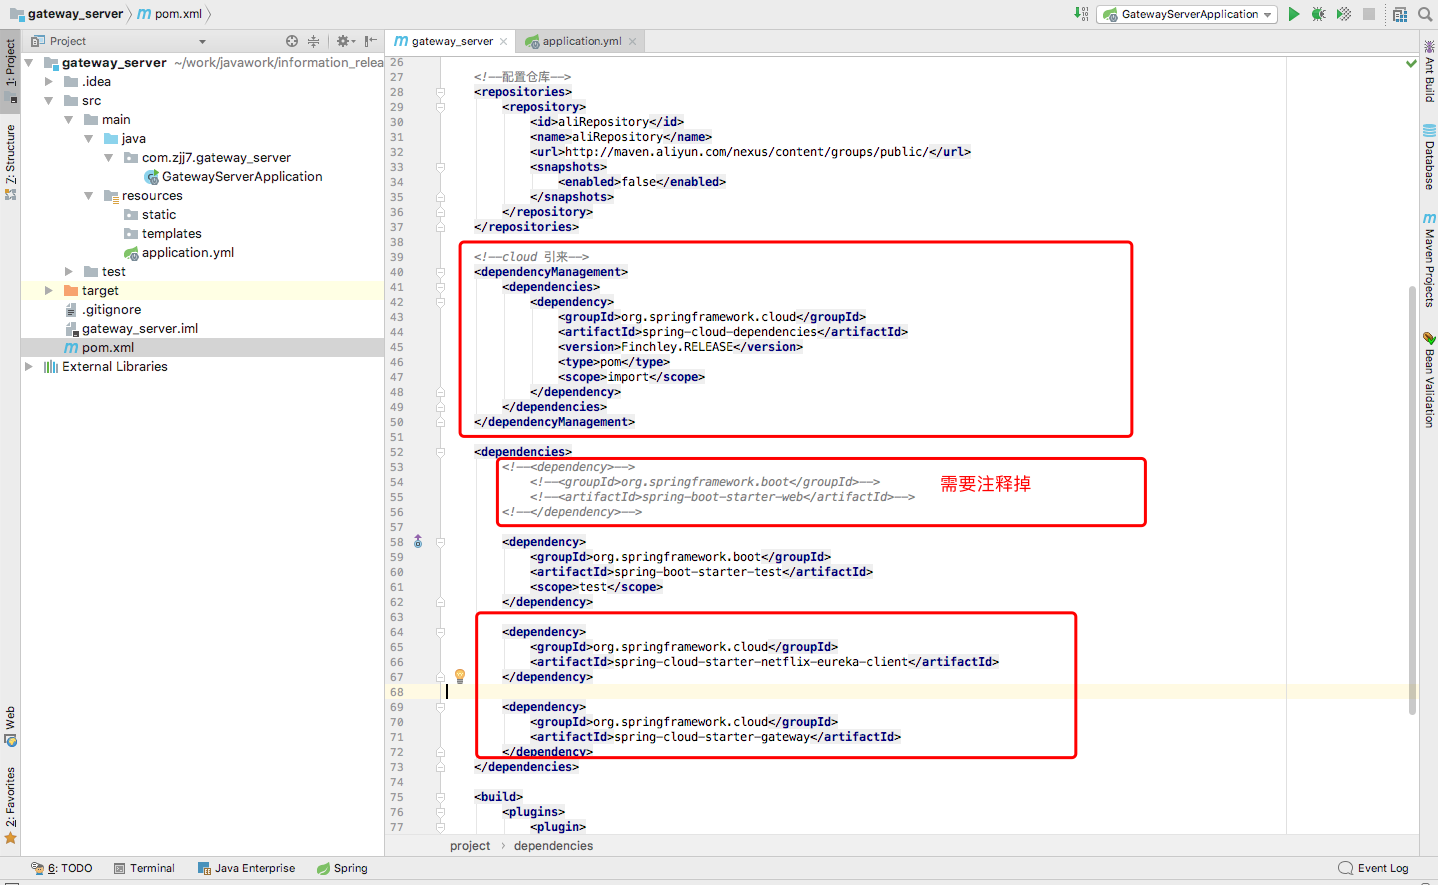
配置网关服务步骤:
1、初始化一个 SpringBoot 应用
2、引入相关依赖


<?xml version="1.0" encoding="UTF-8"?>
<project xmlns="http://maven.apache.org/POM/4.0.0" xmlns:xsi="http://www.w3.org/2001/XMLSchema-instance"
    xsi:schemaLocation="http://maven.apache.org/POM/4.0.0 http://maven.apache.org/xsd/maven-4.0.0.xsd">
    <modelVersion>4.0.0</modelVersion>

    <groupId>com.zjj7</groupId>
    <artifactId>gateway_server</artifactId>
    <version>0.0.1-SNAPSHOT</version>
    <packaging>jar</packaging>

    <name>gateway_server</name>
    <description>Demo project for Spring Boot</description>

    <parent>
        <groupId>org.springframework.boot</groupId>
        <artifactId>spring-boot-starter-parent</artifactId>
        <version>2.0.4.RELEASE</version>
        <relativePath/> <!-- lookup parent from repository -->
    </parent>

    <properties>
        <project.build.sourceEncoding>UTF-8</project.build.sourceEncoding>
        <project.reporting.outputEncoding>UTF-8</project.reporting.outputEncoding>
        <java.version>1.8</java.version>
    </properties>

    <!--配置仓库-->
    <repositories>
        <repository>
            <id>aliRepository</id>
            <name>aliRepository</name>
            <url>http://maven.aliyun.com/nexus/content/groups/public/</url>
            <snapshots>
                <enabled>false</enabled>
            </snapshots>
        </repository>
    </repositories>

    <!--cloud 引来-->
    <dependencyManagement>
        <dependencies>
            <dependency>
                <groupId>org.springframework.cloud</groupId>
                <artifactId>spring-cloud-dependencies</artifactId>
                <version>Finchley.RELEASE</version>
                <type>pom</type>
                <scope>import</scope>
            </dependency>
        </dependencies>
    </dependencyManagement>

    <dependencies>
        <!--<dependency>-->
            <!--<groupId>org.springframework.boot</groupId>-->
            <!--<artifactId>spring-boot-starter-web</artifactId>-->
        <!--</dependency>-->

        <dependency>
            <groupId>org.springframework.boot</groupId>
            <artifactId>spring-boot-starter-test</artifactId>
            <scope>test</scope>
        </dependency>

        <dependency>
            <groupId>org.springframework.cloud</groupId>
            <artifactId>spring-cloud-starter-netflix-eureka-client</artifactId>
        </dependency>

        <dependency>
            <groupId>org.springframework.cloud</groupId>
            <artifactId>spring-cloud-starter-gateway</artifactId>
        </dependency>
    </dependencies>

    <build>
        <plugins>
            <plugin>
                <groupId>org.springframework.boot</groupId>
                <artifactId>spring-boot-maven-plugin</artifactId>
            </plugin>
        </plugins>
    </build>


</project>
3、修改配置文件
spring:
  application:
    name: gateway_server
  cloud:
    gateway:
      default-filters:
      routes:
      - id:  user-server
        # lb代表从注册中心获取服务
        uri: lb://user
        predicates:
        # 转发该路径
        - Path=/user/**
        # 带前缀
        filters:
        - StripPrefix=1
      - id:  publish-server
        uri: lb://publish
        predicates:
        - Path=/publish/**
        filters:
        - StripPrefix=1

#服务注册中心端口号
server:
  port: 6400

#服务注册中心实例的主机名、端口
#是否向服务注册中心注册自己
#是否检索服务
#服务注册中心的配置内容,指定服务注册中心的位置
eureka:
  port:
    6110
  instance:
    hostname: localhost
  client:
    register-with-eureka: true
    fetch-registry: true
    serviceUrl:
      defaultZone: http://${eureka.instance.hostname}:${eureka.port}/eureka/

这里和其它服务不同的是: 启动类上面除了默认注解,无需添加更多
这时,一个简单的网关服务就搭建完了, 启动后所有的 API 就能以网关服务的地址为入口开始访问了