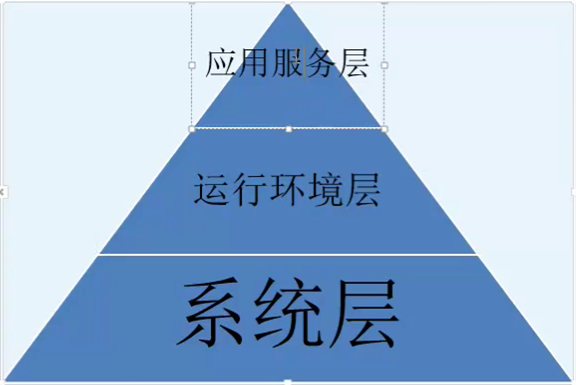
镜像构建思路
思路:分层设计
最底层:系统层,构建自己适用的不同操作系统镜像;
中间层:根据运行环境,如php、java、python等,构建业务基础运行环境层镜像;
最上层:根据具体的业务模块,构建应用服务层镜像。
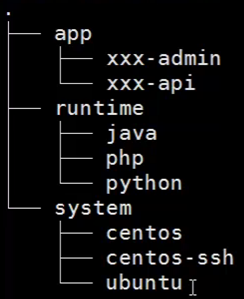
目录构建树结构
案例1:centos 7系统镜像构建
|
1
2
3
4
5
|
cd
/root
mkdir
-p
/root/docker/system/centos
cd
/root/docker/system/centos
wget -O
/etc/yum
.repos.d
/epel
.repo http:
//mirrors
.aliyun.com
/repo/epel-7
.repo
# 下载阿里RHEL 7 epel源
cp
/etc/yum
.repos.d
/epel
.repo epel.repo
|
创建镜像文件
|
1
2
3
4
5
6
7
8
9
10
11
12
13
14
|
vim Dockerfile
# This Dockerfile
# Base image
FROM centos
# Who
MAINTAINER shhnwangjian [email protected]
# EPEL
ADD epel.repo
/etc/yum
.repos.d/
# Base pkg
RUN yum
install
-y wget supervisor git tree net-tools
sudo
psmisc mysql-devel && yum clean all
|
构建镜像
|
1
|
docker build -t shhnwangjian
/centos
:base .
|

案例2:基于案例1的centos系统镜像,构建python运行环境镜像
|
1
2
|
mkdir
-p
/root/docker/runtime/python
cd
/root/docker/runtime/python
|
创建镜像文件
|
1
2
3
4
5
6
7
8
9
10
11
12
|
vim Dockerfile
# Base image
FROM shhnwangjian
/centos
:base
# Who
MAINTAINER shhnwangjian [email protected]
# Python env
RUN yum
install
-y python-devel python-pip supervisor
# Upgrade pip
RUN pip
install
--upgrade pip
|
构建镜像
|
1
|
docker build -t shhnwangjian
/python
.
|

案例3:构建带SSH功能的centos 7系统镜像
|
1
2
3
4
|
mkdir
-p
/root/docker/system/centos-ssh
cd
/root/docker/system/centos-ssh
wget -O
/etc/yum
.repos.d
/epel
.repo http:
//mirrors
.aliyun.com
/repo/epel-7
.repo
# 下载阿里RHEL 7 epel源
cp
/etc/yum
.repos.d
/epel
.repo epel.repo
|
创建镜像文件
|
1
2
3
4
5
6
7
8
9
10
11
12
13
14
15
16
17
18
|
# Docker for CentOS
# Base image
FROM centos
# Who
MAINTAINER shhnwangjian [email protected]
# EPEL
ADD epel.repo
/etc/yum
.repos.d/
# Base pkg
RUN yum
install
-y openssh-clients openssl-devel openssh-server wget supervisor git tree net-tools
sudo
psmisc mysql-devel && yum clean all
# For SSHD
RUN
ssh
-keygen -t rsa -f
/etc/ssh/ssh_host_rsa_key
RUN
ssh
-keygen -t ecdsa -f
/etc/ssh/ssh_host_ecdsa_key
RUN
echo
"root:123456"
| chpasswd
|
构建镜像
|
1
|
docker build -t shhnwangjian
/centos-ssh
.
|

案例4:基于案例3的centos-ssh系统镜像,构建python-ssh运行环境镜像
|
1
2
|
mkdir
-p
/root/docker/runtime/python-ssh
cd
/root/docker/runtime/python-ssh
|
创建镜像文件
|
1
2
3
4
5
6
7
8
9
10
11
|
# Base image
FROM shhnwangjian
/centos-ssh
# Who
MAINTAINER shhnwangjian [email protected]
# Python env
RUN yum
install
-y python-devel python-pip supervisor
# Upgrade pip
RUN pip
install
--upgrade pip
|
构建镜像
|
1
|
docker build -t shhnwangjian
/python-ssh
.
|

案例5:基于案例4的python-ssh镜像,构建app应用服务镜像
|
1
2
|
mkdir
-p
/root/docker/app/web-app
cd
/root/docker/app/web-app
|
应用程序文件app.py
|
1
2
3
4
5
6
7
8
9
10
|
from flask
import
Flask
app = Flask(__name__)
@app.route(
'/'
)
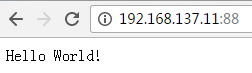
def hello():
return
"Hello World!"
if
__name__ ==
"__main__"
:
app.run(host=
"0.0.0.0"
, debug=True)
|
python依赖包文件requirements.txt
|
1
|
Flask
|
supervisor配置文件app-supervisor.ini
|
1
2
3
4
5
6
7
8
9
10
11
12
|
[program:web-api]
command
=
/usr/bin/python2
.7
/opt/app
.py
process_name=%(program_name)s
autostart=
true
user=www
stdout_logfile=
/tmp/app
.log
stderr_logfile=
/tmp/app
.error
[program:sshd]
command
=
/usr/sbin/sshd
-D
process_name=%(program_name)s
autostart=
true
|
在宿主机上安装supervisor,将默认生成的supervisord.conf放入docker构建环境目录下
 conf
conf
备注:nodaemon=true ,前台启动
创建镜像文件
|
1
2
3
4
5
6
7
8
9
10
11
12
13
14
15
16
17
18
19
20
21
22
23
|
# Base image
FROM shhnwangjian
/python-ssh
# Who
MAINTAINER shhnwangjian [email protected]
# ADD user www
RUN
useradd
-s
/sbin/nologin
-M www
# ADD file
ADD app.py
/opt/app
.py
ADD requirements.txt
/opt/
ADD supervisord.conf
/etc/supervisord
.conf
ADD app-supervisor.ini
/etc/supervisord
.d/
# Pip install
RUN
/usr/bin/pip2
.7
install
-r
/opt/requirements
.txt
# Port
EXPOSE 22 5000
# CMD
CMD [
"/usr/bin/supervisord"
,
"-c"
,
"/etc/supervisord.conf"
]
|

构建镜像
|
1
|
docker build -t shhnwangjian
/web-api
.
|

启动容器
|
1
|
docker run --name web-api -d -p 88:5000 -p 8022:22 shhnwangjian
/web-api
|