本文主要为Tensorflow使用者提供一个速查指南,并不是一个针对初学者的入门教程。
TensorFlow 快速查阅指南
1. 变量的初始化
initio= tf.global_variables_initializer()
sess.run(init)
计算图(占位符tf.placeholder()的使用……)
tf.train API
优化器可以执行优化算法,慢慢逼近最好的结果。
optimizer = tf.train.GradientDescentOptimizer(params)
train = optimizer.minimize(loss)- 构建一个神经网络的一般步骤
- 导入Tensorflow
- 定义基础函数,数据操作等内容(灵活使用占位符placeholder)
- 定义网络结构
- 开启会话,初始化参数
- 迭代训练(停止规则)
更进一步
数据与处理(数据输入等内容)
构建图
tf.name_scope( name, default_name=None, values=None)
每个图层都创建在唯一一个图层下,作为该作用域内的前缀。
with tf.name_scope('hidden1'):
    weights = tf.Variable(
        tf.truncated_normal([IMAGE_PIXELS, hidden1_units],
                        stddev=1.0 / math.sqrt(float(IMAGE_PIXELS))),
name='weights') 这里, 权重的名称是“hidden1/weights”。
- 指定图
with tf.Graph().as_default():- 会话
with tf.Session(config = config) as sess:Feeding
字典被传递到sess.run()函数的feed_dict参数中,为该次训练提供输入示例。
状态可视化
为了[发布TensorBoard](https://www.tensorflow.org/get_started/summaries_and_tensorboard)使用的events files,在图形构建阶段,所有的summaries(在这种情况下只有一个)被收集到一个Tensor中。
summary = tf.summary.merge_all() 然后在创建会话之后,可以将tf.summary.FileWriter实例化,用于写入包含图形本身和summaries值的events files。
summary_writer = tf.summary.FileWriter(FLAGS.train_dir, sess.graph) 最后,每次summary评估events files将被更新 ,并将输出传递给读写器的add_summary()函数。
summary_str = sess.run(summary, feed_dict=feed_dict)
summary_writer.add_summary(summary_str, step) 当写入events files时,可以针对训练文件夹运行TensorBoard,以显示summary中的值。
保存Checkpoint
为了生成一个可以用于稍后恢复模型进行进一步训练或评估的检查点文件,我们实例化了一个 [`tf.train.Saver`](https://www.tensorflow.org/api_docs/python/tf/train/Saver)。
saver = tf.train.Saver() 在训练循环中,tf.train.Saver.save 将定期调用该方法,在训练目录的一个检查点文件中写入所有可训练变量的当前值。
saver.save(sess, FLAGS.train_dir, global_step=step) 这样在以后我们可以通过使用该tf.train.Saver.restore 方法来重新模型参数来恢复训练 。
saver.restore(sess, FLAGS.train_dir)- 评估模型,构建评估图。。。
2. tf.contrib.learn学习
一般情况下,不建议使用,封装有些混乱。
3. TensorBoard可视化
3.1 简单入门
TensorBoard通过读取TensorFlow事件文件来运行操作,该文件包含在运行TensorFlow时生成的主要数据。
首先,创建要sumary的TensorFlow图,并确定在哪些节点使用汇总操作(summary operations)。在TensorFlow中,所有的操作只有当你主动运行,或者依赖于它的输出操作时才会运行。而主体的学习过程嗯不依赖summary节点的信息,因此,为了生成summaries,需要run这些summary节点。手工管理是乏味的,所以使用 tf.summary.merge_all 将它们组合成一个单一的操作,生成所有的summary数据。然后,运行合并的summary操作,将Summary生成一个序列化的protobuf对象,其中 包含所有summary数据。要将此summary数据写入磁盘,将summary protobuf传递给 tf.summary.FileWriter。
tf.summary.scalar(name, var)
tf.summary.histgram(name, var)
一般步骤
需要加入的数据用 tf.summaru.scalar(name, temnsor, collection=None,family)加入;(如果有必要可以用tf.summary.histgram(name, tensor,collections=None, family)加入)
得到所有的summary: merge = tf.summary.merge_all()
定义train_writer和test_writer:
train_writer = tf.summary.FileWriter(path, graph = sess.graph)
test_writer = tf.summary.FileWriter(path, graph = sess.graph)
需要的时候为FileWriter添加summary: writer.add_sumary(summary_to_add)
for i in range(FLAGS.max_steps):
if i % 10 == 0:  # Record summaries and test-set accuracy
  summary, acc = sess.run([merged, accuracy], feed_dict=feed_dict(False))
  test_writer.add_summary(summary, i)
  print('Accuracy at step %s: %s' % (i, acc))
else:  # Record train set summaries, and train
  summary, _ = sess.run([merged, train_step], feed_dict=feed_dict(True))
  train_writer.add_summary(summary, i)
启动TensorBoard
tensorboard --logdir=path/to/log-directory
#或者
python -m tensorflow.tensorboard --logdir=path/to/log-directory
3.2 嵌入可视化
默认情况下,嵌入投影机使用主成分分析将高维数据投影到 三维。
- 1)设置一个保存嵌入的2D张量。
embedding_var = tf.Variable(....)- 2)定期将模型变量保存在检查点中 LOG_DIR。
saver = tf.train.Saver()
saver.save(session, os.path.join(LOG_DIR, "model.ckpt"), step)
3)(可选)将元数据与嵌入相关联。
如果你有你的嵌入相关的任何元数据(标签,图像),你可以告诉TensorBoard它通过直接存储projector_config.pbtxt 在LOG_DIR,或使用我们的API的Python。例如,以下projector_config.ptxt将 word_embedding张量与存储在$LOG_DIR/metadata.tsv以下内容中的元数据相关联:
embeddings {
  tensor_name: 'word_embedding'
  metadata_path: '$LOG_DIR/metadata.tsv'
} 可以使用以下代码段以编程方式生成相同的配置:
from tensorflow.contrib.tensorboard.plugins import projector

# Create randomly initialized embedding weights which will be trained.
N = 10000 # Number of items (vocab size).
D = 200 # Dimensionality of the embedding.
embedding_var = tf.Variable(tf.random_normal([N,D]), name='word_embedding')

# Format: tensorflow/contrib/tensorboard/plugins/projector/projector_config.proto
config = projector.ProjectorConfig()

# You can add multiple embeddings. Here we add only one.
embedding = config.embeddings.add()
embedding.tensor_name = embedding_var.name
# Link this tensor to its metadata file (e.g. labels).
embedding.metadata_path = os.path.join(LOG_DIR, 'metadata.tsv')

# Use the same LOG_DIR where you stored your checkpoint.
summary_writer = tf.summary.FileWriter(LOG_DIR)

# The next line writes a projector_config.pbtxt in the LOG_DIR. TensorBoard will
# read this file during startup.
projector.visualize_embeddings(summary_writer, config) 运行模型并训练您的嵌入后,运行TensorBoard并将其指向LOG_DIR作业。
tensorboard --logdir=LOG_DIR 然后单击顶部窗格上的“ 嵌入 ”选项卡,并选择适当的运行(如果有多个运行)。
如果需要嵌入图像,需要生成缩略图,并告诉在那里找到缩略图:
embedding.sprite.image_path = PATH_TO_SPRITE_IMAGE
# Specify the width and height of a single thumbnail.
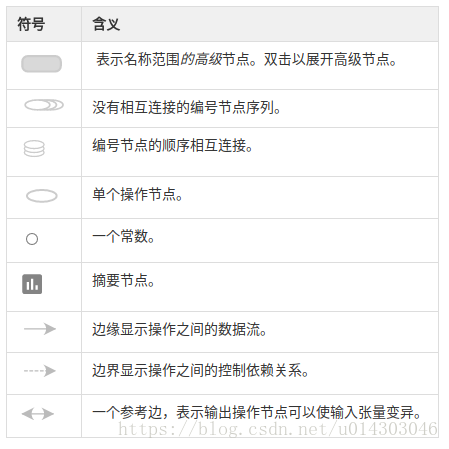
embedding.sprite.single_image_dim.extend([w, h])3.3 图形可视化(Graph)
默认显示name_scope顶层名字,可以双击展开。TensorFlow图有两种连接:数据依赖和控制依赖。数据相关性显示两个操作之间的张量流,并显示为实线箭头,而控制依赖使用虚线。
为减少混乱,高密度的节点会分离到右侧的辅助区域。并且,仅仅是最后一格数字不同的张量名会被堆在一起,双击可展开。
4. 变量(包含张量的内存缓冲区)
- 创建
tf.Varibale(initial_value=None, collections=None, name=None) #返回一个tf.Variable类的一个实例。 其中,tensor可以用tf.random_norma(shape)等初始化,需要指定形状。
- 设备选取
with tf.device("/cpu:0"):
    v = tf.Variable(...)

with tf.device("/gpu:0"):
    v = tf.Varialbe(...)
改变变量的操作,例如 tf.Variable.assign和tf.train.Optimizer中参数更新操作 必须与变量在同一设备上运行。创建这些操作时,不兼容的设备布局指令将被忽略。 在设置的副本中运行时,设备选取特别重要。
初始化
可以创建 一个会话,之后初始化:
init = tf.global_variables_initializer()#初始化为并行初始化,要特别小心
with tf.Session(config = ...) as sess:
sess.run(init) 也可以从另一个变量初始化:
由于 tf.global_variables_initializer()是并行初始化,所以使用的时候需要特别小心。使用另一个变量weight初始化w2的需要使用变量的initialized_value()属性,例子:
W2 = tf.Variable(weights.initialized_value() 8 2.0, name = name) 还可以自定义初始化(比如使用下面的tf.variables_initializer()初始化一个变量列表):
tf.variables_initializer(var_list, name='init')保存和恢复
tf.train.Saver()管理模型中所有变量,保存时以变量创建时的名称保存。
saver = tf.train.Saver()
saver_path = saver.save(sess, "path to he .ckpt file") 使用另一个saver对象恢复变量,此时,需要预先创建变量,但是不必实现初始化变量,因为恢复的时候就初始化了:
# First create variables
saver = tf.train.Saver()
saver.restore(sess, 'path to the .ckpt file') 可以保存或者恢复部分变量,给tf.train.Saver()传入一个字典{要保存为的名称:变量}
变量收集
collections: list of tensors
默认,tf.Variable在tf.GraphKeys.GLOBAL_VARIABLES和tf.GraphKeys.TRAINABLE_VARIABLES两个集合。你可以自定义集合:
tf.add_to_collection("my_collection_name", my_local) # my_local 是一个tf.Variable对象
tf.get_collection("my_collection_name")
5. 张量
可以将TensorFlow张量视为n维数组或列表。张量具有静态类型和动态尺寸。计算图中节点之间只能传递张量。张量的维数是张量的阶,可以类比多为数组去理解,张量数据类型支持多种,比如tf.int8,tf.float32等。
- 得到rank tf.rand()
- 切片
- tf.reshape(, )
6. 共享变量
复杂模型需要共享大量变量,此时使用tf.Variable()创建变量就会变得很繁琐,函数tf.get_variable()和tf.variable_scope()可以帮助你管理。TensorFlow中的可变范围机制包括两个主要功能:
tf.get_variable(<name>, <shape>, <initializer>):创建或返回具有给定名称的变量。初始化器使用里指定的形状。tf.variable_scope(<scope_name>):管理传递给的名称的名称空间tf.get_variable()。
def conv_relu(input, kernel_shape, bias_shape):
    weights = tf.get_variable("weights", kernel_shape, initializer=tf.random_normal_initializer())
    biases = tf.get_variable("biases", bias_shape, initializer=tf.constant_initializer(0.0))
    conv = tf.nn.conv2d(input, weights, strides=[1, 1, 1, 1], padding='SAME')
    return tf.nn.relu(conv + biases)

def my_image_filter(input_images):
    with tf.variable_scope("conv1"):
        relu1 = conv_relu(input_images, [5, 5, 32, 32], [32])
    with tf.variable_scope("conv2"):
        return conv_relu(relu1, [5, 5, 32, 32], [32])
#调用两次时,会提示变量已存在:
result1 = my_image_filter(image1)
result2 = my_image_filter(image2)
# Raises ValueError(... conv1/weights already exists ...)

#为解决这个问题,设置变量可重用:
with tf.variable_scope("image_filters") as scope:
    result1 = my_image_filter(image1)
    scope.reuse_variables()
    result2 = my_image_filter(image2)
tf.get_variable(, , )主要2个用处:
- 创建新变量 `tf.get_variable_scope().reuse == False
with tf.variable_scope("foo"): v = tf.get_variable("v", [1])- 重用变量 tf.get_variable_scope().reuse == True
with tf.variable_scope("foo", reuse=True):
  v1 = tf.get_variable("v", [1])
tf.variable_scope()以类似子目录的方式追加名称
reuse是继承的,下一层scope的reuse继承自上一层的scope.
- 可以获得可变范围:
with tf.variable_scope("foo") as foo_scope: v = tf.get_variable("v", [1]) with tf.variable_scope(foo_scope): w = tf.get_variable("w", [1]) with tf.variable_scope(foo_scope, reuse=True): v1 = tf.get_variable("v", [1]) w1 = tf.get_variable("w", [1]) assert v1 is v assert w1 is w with tf.variable_scope("foo") as foo_scope: assert foo_scope.name == "foo" with tf.variable_scope("bar"): with tf.variable_scope("baz") as other_scope: assert other_scope.name == "bar/baz" with tf.variable_scope(foo_scope) as foo_scope2: assert foo_scope2.name == "foo" # Not changed.- 可变范围的初始化器
with tf.variable_scope("foo", initializer=tf.constant_initializer(0.4)):
  v = tf.get_variable("v", [1])
  assert v.eval() == 0.4  # Default initializer as set above.
  w = tf.get_variable("w", [1], initializer=tf.constant_initializer(0.3)):
  assert w.eval() == 0.3  # Specific initializer overrides the default.
  with tf.variable_scope("bar"):
      v = tf.get_variable("v", [1])
      assert v.eval() == 0.4  # Inherited default initializer.
  with tf.variable_scope("baz", initializer=tf.constant_initializer(0.2)):
      v = tf.get_variable("v", [1])
      assert v.eval() == 0.2  # Changed default initializer.
7. 线程和队列
队列也是Tensorflow的一个节点。队列,例如tf.FIFOQueue 和tf.RandomShuffleQueue,是重要的TensorFlow对象,用于在图中异步计算张量。典型的输入架构是使用 RandomShuffleQueue用于训练模型的输入:多线程准备训练样本,一个训练线程执行训练。
TensorFlow Session对象是多线程的,所以多个线程可以方便地使用相同的会话并行运行操作。但是,实现一个如上所述的驱动线程的Python程序并不容易。所有线程必须能够同步停止,异常必须被捕获和报告,队列必须在停止时被正确关闭。
TensorFlow提供了两个类来帮助实现:tf.train.Coordinator 和 tf.train.QueueRunner。这两个类被设计为一起使用。Coordinator类能同时停止多个线程,并报告异常给等待他们停止的程序。QueueRunner类被用来协调多个线程并把张量推进同一队列中。
Coordinator
tf.train.Coordinator.should_stop:如果线程停止,则返回True。tf.train.Coordinator.request_stop:请求线程停止。tf.train.Coordinator.join:等待直到指定的线程停止。首先创建一个Coordinator对象,然后创建一些使用coordinator的线程。线程通常一直循环运行,直到should_stop()返回True时停止。任何线程都可以决定计算应该何时停止。它只需要调用 request_stop(),由于此时should_stop()返回True,其他线程将停止。
# Thread body: loop until the coordinator indicates a stop was requested.
# If some condition becomes true, ask the coordinator to stop.
def MyLoop(coord):
  while not coord.should_stop():
    ...do something...
    if ...some condition...:
      coord.request_stop()

# Main thread: create a coordinator.
coord = tf.train.Coordinator()

# Create 10 threads that run 'MyLoop()'
threads = [threading.Thread(target=MyLoop, args=(coord,)) for i in xrange(10)]

# Start the threads and wait for all of them to stop.
for t in threads:
  t.start()
coord.join(threads)
QueueRunner
QueueRunner类创建一些反复运行enqueue操作的线程。这些线程可以使用coordinator来停止。另外,如果向coordinator报告异常,则queue runner会运行一个closer thread ,该线程会自动关闭队列。首先构建一个使用TensorFlow队列(例如tf.RandomShuffleQueue)作为输入示例的图。增加处理样本并将样本推入队列中的操作。添加训练操作开始从队列移除样本。
example = ...ops to create one example...
# Create a queue, and an op that enqueues examples one at a time in the queue.
queue = tf.RandomShuffleQueue(...)
enqueue_op = queue.enqueue(example)
# Create a training graph that starts by dequeuing a batch of examples.
inputs = queue.dequeue_many(batch_size)
train_op = ...use 'inputs' to build the training part of the graph... 在Python训练程序中,创建一个QueueRunner运行几个线程来处理和排队样本。创建一个Coordinator请求队列开始运行coordinator线程。编写一个循环训练,使用coordinator控制终端。
# Create a queue runner that will run 4 threads in parallel to enqueue
# examples.
qr = tf.train.QueueRunner(queue, [enqueue_op] * 4)

# Launch the graph.
sess = tf.Session()
# Create a coordinator, launch the queue runner threads.
coord = tf.train.Coordinator()
enqueue_threads = qr.create_threads(sess, coord=coord, start=True)
# Run the training loop, controlling termination with the coordinator.
for step in xrange(1000000):
    if coord.should_stop():
        break
    sess.run(train_op)
# When done, ask the threads to stop.
coord.request_stop()
# And wait for them to actually do it.
coord.join(enqueue_threads)
异常处理
queue runners开始的线程不仅仅是运行入队操作。它们还捕获并处理由队列生成的异常,包括tf.errors.OutOfRangeError异常,用于报告队列已经关闭。使用coordinator的训练过程必须在其主循环中同样捕获并报告异常。
try:
    for step in xrange(1000000):
        if coord.should_stop():
            break
        sess.run(train_op)
except Exception, e:
    # Report exceptions to the coordinator.
    coord.request_stop(e)
finally:
    # Terminate as usual. It is safe to call `coord.request_stop()` twice.
    coord.request_stop()
    coord.join(threads)
8. 读取数据
- tf.placeholder()的应用
- csv文件——tf.TextLineReader与tf.decode_csv
- 固定长度记录 tf.FixedLengthRecordReder与tf.decode_raw
- 标准tensorFlow格式:TFRecords。
- 使用通用Python编程
- 使用线程和队列
9. 监视器 tf.train.Supervisor
为了能够在停机或崩溃后恢复训练,训练过程必须周期保存检查点。在重新启动时,它必须查找最新的检查点,并在恢复训练之前加载它。
10. tfdbg
由于 tensorflow 在训练的时候是在后台运行的,所以使用 python 的 debug 工具来 debug tensorflow 的执行过程是不可行的,为此,官方提供了一款debug 工具,名为 tfdbg
有很多人觉得,为了 debug tensorflow 的计算过程又要学习一个新的工具,很烦。但其实不然,tfdbg 用起来是十分简单的。以至于简单到我们只需要增加两行代码,就可以将之前的模型改成可 debug 的。
# 第一行: 引包
from tensorflow.python import debug as tf_debug

sess = tf.Session()
# 初始化的 sess 没必要加上 debug wrapper
sess.run(tf.global_variables_initializer())

# 第二行,给 session 加个 wrapper
debug_sess = tf_debug.LocalCLIDebugWrapperSession(sess=sess)
debug_sess.run(train_op) # 用 加了 wrapper 的 session,来代替之前的 session 做训练操作
然后执行:
python demo_debug.py| 命令示例 | 说明 |
|---|---|
pt hidden/Relu:0 |
打印张量的值hidden/Relu:0。 |
pt hidden/Relu:0[0:50,:] |
hidden/Relu:0使用numpy -style阵列切片打印张量的子阵列。 |
pt hidden/Relu:0[0:50,:] -a |
对于像这样的大张量,打印其整体的价值 - 即不使用任何省略号。可能需要很长时间的大张力。 |
pt hidden/Relu:0[0:10,:] -a -r [1,inf] |
使用-r标志突出显示落入指定数值范围的元素。多个范围可以结合使用,例如。-r [[-inf,-1],[1,inf]] |
@[10,0] 要么 @10,0 |
导航到正在显示的张量中的[10,0]。 |
/inf |
使用正则表达式搜索屏幕输出inf并突出显示任何匹配项。 |
/ |
滚动到与搜索到的正则表达式匹配的下一行(如果有)。 |
ni -a hidden/Relu |
显示有关节点的信息hidden/Relu,包括节点属性。 |
ni -t hidden/Relu |
显示节点结构的堆栈跟踪hidden/Relu。 |
li -r hidden/Relu:0 |
列出节点的输入hidden/Relu,递归 - 即输入树。 |
lo -r hidden/Relu:0 |
列出节点hidden/Relu输出的收件人,递归(即输出收件人树)。 |
lt -n softmax.* |
列出名称与正则表达式模式匹配的所有转储张量。softmax.* |
lt -t MatMul |
列出节点类型为的所有倾倒张量MatMul。 |
ps /path/to/source.py |
打印Python源文件source.py,并分别在每个文件中创建的ops注释行。 |
ps -t /path/to/source.py |
与上述命令相同,但使用转储式传感器代替操作执行注释。 |
ps -b 30 /path/to/source.py |
从第30行开始注释source.py。 |
run_info 要么 ri |
显示有关当前运行的信息,包括提取和Feed。 |
help |
打印一般帮助信息,列出所有可用的tfdbg命令及其标志。 |
help lt |
打印lt命令的帮助信息。 |
11. metagraph的导入和导出
meta图保存了模型结构。主要类:tf.train.Saver类负责保存和还原神经网络。自动保存为三个文件:模型文件列表checkpoint,计算图结构model.ckpt.meta,每个变量的取值model.ckpt。其中前两个自动生成。
如果不希望重复定义图上的运算,也可以直接加载已经持久化的图:
import tensorflow as tf
# 在下面的代码中,默认加载了TensorFlow计算图上定义的全部变量
# 直接加载持久化的图
saver = tf.train.import_meta_graph("save/model.ckpt.meta")
with tf.Session() as sess:
    saver.restore(sess, "save/model.ckpt")
    # 通过张量的名称来获取张量
print(sess.run(tf.get_default_graph().get_tensor_by_name("v1:0"))) 为了保存或者加载部分变量,在声明tf.train.Saver类时可以提供一个列表来指定需要保存或者加载的变量。比如在加载模型的代码中使用saver = tf.train.Saver([v1])命令来构建tf.train.Saver类,那么只有变量v1会被加载进来。
在下面的代码中,默认加载了TensorFlow计算图上定义的全部变量
直接加载持久化的图
saver = tf.train.import_meta_graph(“save/model.ckpt.meta”)
with tf.Session() as sess:
saver.restore(sess, “save/model.ckpt”)
# 通过张量的名称来获取张量
print(sess.run(tf.get_default_graph().get_tensor_by_name(“v1:0”)))
12. 更多内容
TensorFlow很庞大,下一步可以继续了解:
- 具体的卷积神经网络,序列模型的构建
- 如何写出高性能代码
- 量化神经网络
- 部署TensorFlow模型作为服务
- 分布式操作
- TensorFlow架构
- ……