Mybatis介绍
Mybatis本事apache的一个开源项目iBatis,2010年这个项目由apache software foundation 迁移到了google code,并且改名为MyBatis 。2013年11月迁移到Github。
Mybatis是一个优秀的持久层框架,它对JDBC操作数据库的技术进行了封装,使开发者只需要关注SQL本身,而不需要去处理如何注册驱动,创建Connection、Statement、手动设置参数,结果集的封装等繁琐的代码。Mybatis通过xml或注解的方式将要执行的各种Statement或PreparedStatemnt配置起来,并通过java对象和Statement中的sql进行映射生成最终执行的sql语句,最后由框架执行sql语句并将结果映射到对象中并返回。
JDBC编程步骤
1、加载数据库驱动(Class.forName())
2、创建并获取数据库链接(DriverManager.getConnection())
3、书写sql语句
4、创建jdbc statement对象
5、设置sql语句中的参数(使用preparedStatement)
6、通过statement执行sql并获取结果
7、对sql执行结果进行解析处理
8、释放资源(resultSet、preparedstatement、connection)
存在问题
- 频繁数据库连接创建与释放,会造成资源的浪费,可以通过数据库连接池解决
- 在代码中编写sql语句,不易维护
- 使用preparedStatement向占位符传递参数,存在一定局限性。
- 对结果集的封装是开发人员自己维护,比较繁琐。
Mybatis的架构
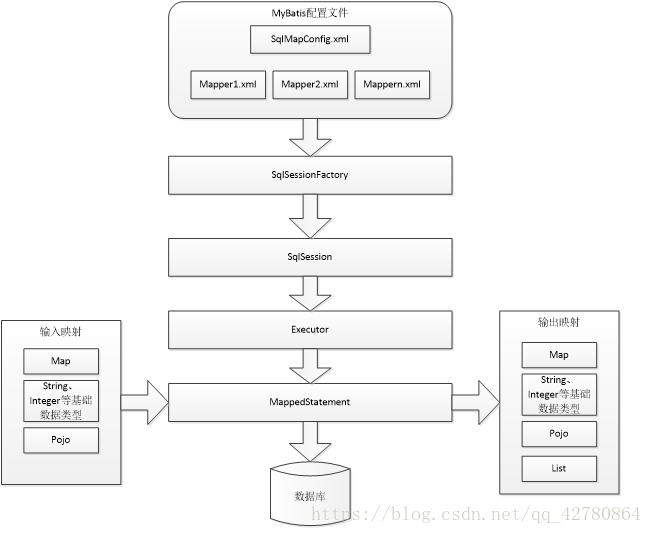
- SqlMapConfig.xml此文件是Mybatis的全局配置,配置了Mybatis运M行的环境,数据库连接等。
- Mapper.xml文件是sql的映射文件,文件中配置了数据库操作语言,此文件通过SqlMapConfig.xml来加载。
- 通过Mybatis环境等配置信息构造SqlSessionFactory会话工厂,用于创建sqlSession对象,操作数据库需要通过sqlSession对象。
- Mybatis底层自定义了Executor执行器接口操作数据库,Executor接口有两个实现,一个是基本执行器、一个是缓存执行器。通过它来执行Mapped Statement对象。
- Mapped Statement它包装了Mybatis配置信息及sql映射信息,Mapper.xml中的每一个sql语句对应一个Mapped Statement,sql配置信息的id即是Mapped Statement的id。
- Mapped Statement对sql语句的输入参数和输出结果进行定义,包括HashMap,基本数据类型,Pojo,Executor通过Mapped Statement在执行sql之前,将参数映射到sql中。及执行之后,将输出结果封装到java的对象中。
Mybatis入门程序
导包
mybatis核心包:mybatis-3.2.7.jar
数据库驱动包
依赖包
配置文件SqlMapConfig.xml
主配置文件,用于连接数据库和加载Mapper.xml文件,与spring整合后,连接则交给spring管理

<?xml version="1.0" encoding="UTF-8" ?>
<!DOCTYPE configuration
PUBLIC "-//mybatis.org//DTD Config 3.0//EN"
"http://mybatis.org/dtd/mybatis-3-config.dtd">
<configuration>
    <!-- 和spring整合后 environments配置将废除 -->
    <environments default="development">
        <environment id="development">
            <!-- 使用jdbc事务管理 -->
            <transactionManager type="JDBC" />
            <!-- 数据库连接池 -->
            <dataSource type="POOLED">
                <property name="driver" value="com.mysql.jdbc.Driver" />
                <property name="url"
                    value="jdbc:mysql://localhost:3306/mybatis?characterEncoding=utf-8" />
                <property name="username" value="root" />
                <property name="password" value="root" />
            </dataSource>
        </environment>
    </environments>
</configuration>- 准备log4j.properties文件
# Global logging configuration
log4j.rootLogger=DEBUG, stdout
# Console output...
log4j.appender.stdout=org.apache.log4j.ConsoleAppender
log4j.appender.stdout.layout=org.apache.log4j.PatternLayout
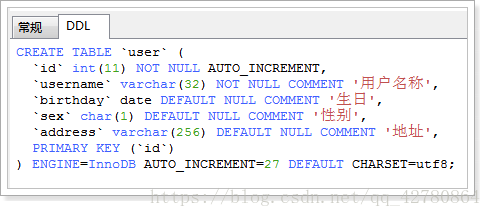
log4j.appender.stdout.layout.ConversionPattern=%5p [%t] - %m%n准备数据库表
准备实体类
Public class User {
    private int id;
    private String username;// 用户姓名
    private String sex;// 性别
    private Date birthday;// 生日
    private String address;// 地址
    ...
    get和set方法
...- 编写Mapper.xml文件
<?xml version="1.0" encoding="UTF-8" ?>
<!DOCTYPE mapper
PUBLIC "-//mybatis.org//DTD Mapper 3.0//EN"
"http://mybatis.org/dtd/mybatis-3-mapper.dtd">
<mapper>

    <!-- id:statement的id 或者叫做sql的id-->
    <!-- parameterType:声明输入参数的类型 -->
    <!-- resultType:声明输出结果的类型,应该填写pojo的全路径 -->
    <!-- #{}:输入参数的占位符,相当于jdbc的? -->
    <select id="queryUserById" parameterType="int"
        resultType="cn.itcast.mybatis.pojo.User">
        SELECT * FROM user WHERE id  = #{id}
    </select>
</mapper>
在SqlMapConfig.xml中加载Mapper.xml文件
在configuration中添加以下代码
测试

public class MybatisTest {
    private SqlSessionFactory sqlSessionFactory = null;
    //@Before用于加载一个类时,优先加载该方法
    @Before
    public void init() throws Exception {
        // 1. 创建SqlSessionFactoryBuilder对象
        SqlSessionFactoryBuilder sqlSessionFactoryBuilder = new SqlSessionFactoryBuilder();
        // 2. 加载SqlMapConfig.xml配置文件
        InputStream inputStream = Resources.getResourceAsStream("SqlMapConfig.xml");
        // 3. 创建SqlSessionFactory对象
        this.sqlSessionFactory = sqlSessionFactoryBuilder.build(inputStream);
    }
    @Test
    public void testQueryUserById() throws Exception {
        // 4. 创建SqlSession对象
        SqlSession sqlSession = sqlSessionFactory.openSession();
        // 5. 执行SqlSession对象执行查询,获取结果User
        // 第一个参数是User.xml的statement的id,第二个参数是执行sql需要的参数;
        Object user = sqlSession.selectOne("queryUserById", 1);
        // 6. 打印结果
        System.out.println(user);
        // 7. 释放资源
        sqlSession.close();
    }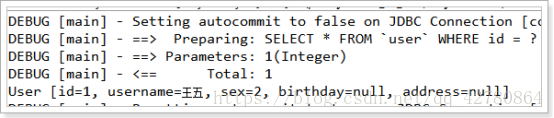
}- 测试结果