by Pradeep Kumar · Published November 19, 2017 · Updated November 19, 2017
DNS or Domain Name System, as we know is an internet service that is used to translate the user friendly domain into computer friendly IP addresses. Not only can we translate domain names to IP addresses, we can also perform reverse translation i.e. from IP addresses to domain name translations. In this tutorial, we are going to learn to setup a private DNS server by implementing BIND9 on Ubuntu/Debian system.
BIND or BIND 9 is an open source implementation of DNS, available for almost all Linux distributions. BIND stands Berkeley Internet Name Domain & it allows us to publish DNS information on internet as well as allows us to resolve DNS queries for the users. BIND is by far the most used DNS software on Internet. In this tutorial i will be using followings:
- Bind Server IP (Ubuntu / Debian) = 192.168.0.40
- Domain Name = linuxtechi.local
- Private Network = 192.168.0.0/24
So let’s start the tutorial with the installation on packages for BIND 9….
Installation of Bind 9 on Debian / Ubuntu System:
We need to install ‘bind9 bind9utils bind9-doc dnsutils’ to install BIND 9 & related tools. Open your terminal & execute the following command,
linuxtechi@bind-server:~$ sudo apt-get install bind9 bind9utils bind9-doc dnsutils
Configuration of bind 9 on Debian / Ubuntu System:
Once all the packages have been installed, we will move into the configuration part. All configuration files for BIND are located in folder ‘/etc/bind’.
One of the important configuration file for bind is “/etc/bind/named.conf.options“, from this file we can set the followings parameters:
- Allow Query to your dns from your private network (As the name suggests only the systems from your private network can query dns sever for name to ip translation and vice-versa)
- Allow recursive query
- Specify the DNS port ( 53)
- Forwarders (DNS query will be forwarded to the forwarders when your local DNS server is unable to resolve query)
As per my private network settings, I have specified the following parameters:
linuxtechi@bind-server:~$ sudo vi /etc/bind/named.conf.options
options {         directory "/var/cache/bind";         auth-nxdomain no;    # conform to RFC1035      // listen-on-v6 { any; };         listen-on port 53 { localhost; 192.168.0.0/24; };         allow-query { localhost; 192.168.0.0/24; };         forwarders { 8.8.8.8; };         recursion yes;         };
Next Important Configuration file is “/etc/bind/named.conf.local“, in this file we will define the zone files for our domain, edit the file add the following entries:
linuxtechi@bind-server:~$ cd /etc/bind
linuxtechi@bind-server:~$ sudo vi named.conf.local
zone    "linuxtechi.local"   {         type master;         file    "/etc/bind/forward.linuxtechi.local";  };

zone   "0.168.192.in-addr.arpa"        {        type master;        file    "/etc/bind/reverse.linuxtechi.local";  };
Save the file & exit. Here we have mentioned locations for our forward lookup zone file & reverse lookup zone files. Next we will create the mentioned forward & reverse zone files.
Firstly create the forward lookup zone file, Sample zone files (db.local) are already there in ‘/etc/bind folder‘, we can use and copy sample zone file,
linuxtechi@bind-server:/etc/bind$ sudo cp db.local forward.linuxtechi.local
linuxtechi@bind-server:/etc/bind$ sudo vi forward.linuxtechi.local
$TTL    604800

@       IN      SOA     primary.linuxtechi.local. root.primary.linuxtechi.local. (                               6         ; Serial                          604820         ; Refresh                           86600         ; Retry                         2419600         ; Expire                          604600 )       ; Negative Cache TTL

;Name Server Information
@       IN      NS      primary.linuxtechi.local.

;IP address of Your Domain Name Server(DNS)
primary IN       A      192.168.0.40

;Mail Server MX (Mail exchanger) Record
linuxtechi.local. IN  MX  10  mail.linuxtechi.local.

;A Record for Host names
www     IN       A       192.168.0.50
mail    IN       A       192.168.0.60

;CNAME Record
ftp     IN      CNAME    www.linuxtechi.local.
Your forward lookup file should look like something below:
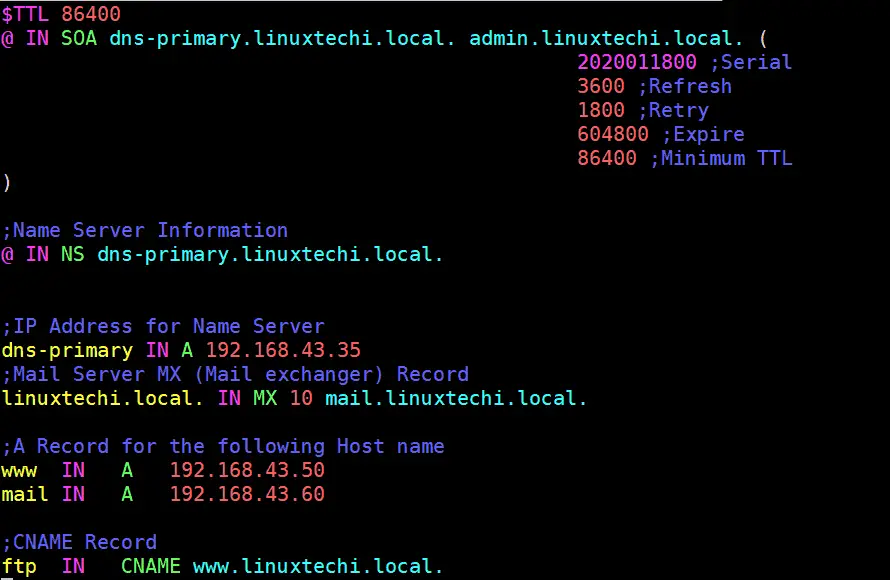
Here, we have added information regarding our DNS server & have also added A records for couple of servers, also added record for a mail server & CNAME record for ftp server. Make sure you edit this file to suit your network.
Next we will create a reverse lookup zone file at the same location,sample reverse lookup zone file is present at ‘/etc/bind‘ folder.
linuxtechi@bind-server:/etc/bind$ sudo cp db.127 reverse.linuxtechi.local
linuxtechi@bind-server:~$ sudo vi /etc/bind/reverse.linuxtechi.local
$TTL    604800
@       IN      SOA     linuxtechi.local. root.linuxtechi.local. (                              21         ; Serial                          604820         ; Refresh                           864500        ; Retry                         2419270         ; Expire                          604880 )       ; Negative Cache TTL

;Your Name Server Info
@       IN      NS      primary.linuxtechi.local.
primary IN      A       192.168.0.40

;Reverse Lookup for Your DNS Server
40      IN      PTR     primary.linuxtechi.local.

;PTR Record IP address to HostName
50      IN      PTR     www.linuxtechi.local.
60      IN      PTR     mail.linuxtechi.local.
Your Reverse Zone Lookup file should look like below:

Save file & exit. Now all we have to do is to restart the BIND service to implement the changes made,
linuxtechi@bind-server:~$ sudo systemctl restart bind9
linuxtechi@bind-server:~$ sudo systemctl enable bind9
Note:- In case OS firewall is running on your bind server then execute the below command to allow 53 port
linuxtechi@bind-server:~$ sudo ufw allow 53
Rule added
Rule added (v6)
linuxtechi@bind-server:~$
Validating Syntax of bind9 configuration and Zone files
If you want to cross verify the syntax of your bind 9 configuration file (named.conf.local). Use the command “named-checkconf“, example is shown below:
linuxtechi@bind-server:~$ sudo named-checkconf /etc/bind/named.conf.local
linuxtechi@bind-server:~$
If there is no syntax error in your bind configuration file, then it should return to shell without showing any errors.
To cross verify the syntax your forward and reverse lookup zone files , use the command “named-checkzone“, example is shown below:
linuxtechi@bind-server:~$ sudo named-checkzone linuxtechi.local /etc/bind/forward.linuxtechi.local
zone linuxtechi.local/IN: loaded serial 6
OK
linuxtechi@bind-server:~$
linuxtechi@bind-server:~$ sudo named-checkzone linuxtechi.local /etc/bind/reverse.linuxtechi.local
zone linuxtechi.local/IN: loaded serial 21
OK
linuxtechi@bind-server:~$
Testing the DNS server with dig & nslookup
To test out our BIND 9 DNS server, we will use another Ubuntu machine & will change its DNS to point out our DNS server. To change the DNS server, open ‘/etc/resol.conf‘ & make the following DNS entry,
linuxtechi@nixworld:~$ sudo vi /etc/resolv.conf
search linuxtechi.local
nameserver 192.168.0.40
save the file & exit. We now have our client ready with DNS pointing to our server. We will now use a CLI tool called ‘dig‘ command , which is used to get find out DNS & its related information. Execute the following command from terminal,
linuxtechi@nixworld:~$ dig primary.linuxtechi.local
& we should get the following output from the command,
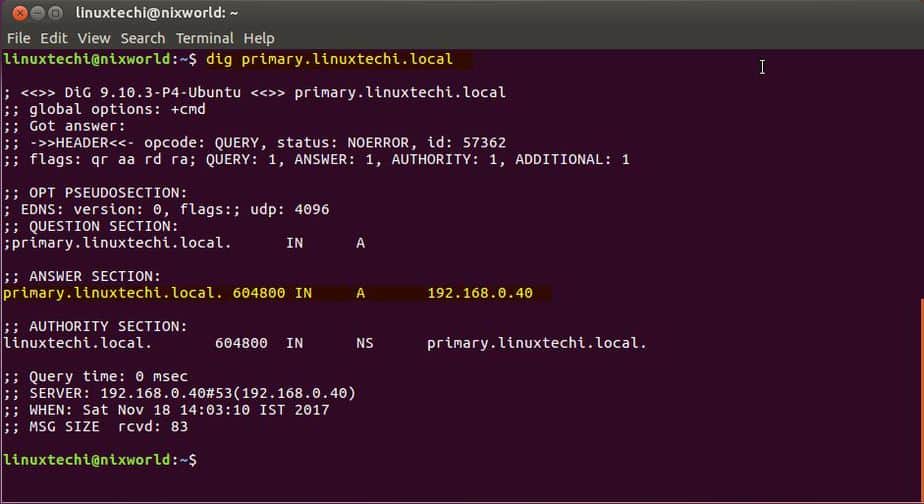
This output shows that our DNS is working fine.
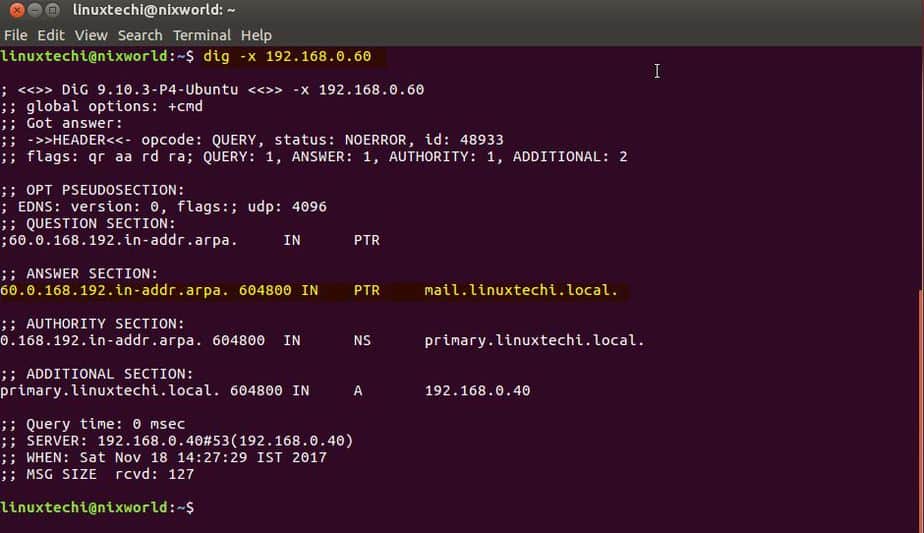
Let’s do reverse lookup query(PTR):
linuxtechi@nixworld:~$ dig -x 192.168.0.40
Output of command should be something like below:
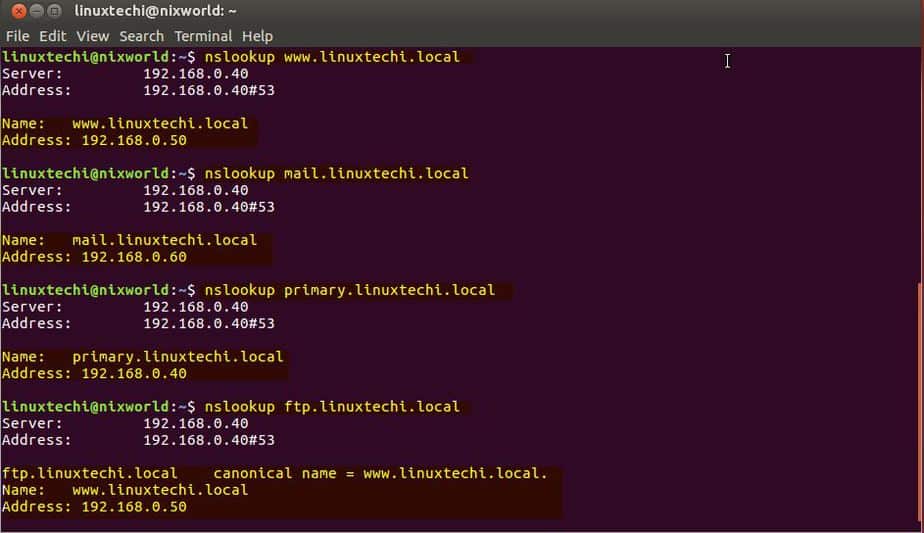
Also we can run ‘nslookup‘ command against our DNS server to confirm the output of dig command,
linuxtechi@nixworld:~$ nslookup primary.linuxtechi.local
& it should produce the following output,
Note:- While running dig command, if you get ‘command not found’ error than we need to install ‘dnsutils’ package as dig command is part of ‘dnsutils’ package,
linuxtechi@nixworld:~$ sudo apt-get install dnsutils -y
Now that our server is working fine, we can add other servers like mail server, ftp server or web servers to DNS server configuration files by creating the appropriate records as per requirement. Also we have only setup a local DNS server in this tutorial, if you need to setup a public DNS than you will require a Public IP address for the same.
With this we end our tutorial on how to install & configure DNS server on Ubuntu/Debian using BIND 9. Please do send your valuable feedback/queries to us, we will be happy to address them all.