仅以此文记录个人学习Okio的过程。
先看先Okio的官方文档,这是Okio的github地址:https://github.com/square/okio
官方的解释是这样的:Okio是一个库,是对java.io和java.nio的补充,通过这个库,我们可以更简单的使用和存储我们的数据。
Okio提供了两种新的类型,这两种类型有很多新的功能,并且使用比较简单。这两中类型分别是:ByteString和Buffer。
ByteString是不可变的字节序列(请参考String,String是不可变的字符串)。String是基本的字符数据,ByteString相当于是String的兄弟,ByteString让处理二进制数据变得简单了。这个类是符合人们的编程习惯的,它知道怎么使用比如hax,base64,UTF-8等编码格式将它自己编码或解码。
Buffer是一个可变的字符序列。你不需要提前设置它的大小,它在写入数据的时候会将数据放在最后,而在读取的时候会在最前面开始读取(这很类似与队列),你也不需要关心它的位置,限制,容量等等。
Java.io一个非常棒的设计是流的变换(比如加密和压缩)是可以分层的。Okio也有自己的流类型,叫做Source和Sink,它们的工作就相当于InputStream和OutPutStream。但是Source,Sink与InputStream,OutputStream也有几点不同:
首先是“超时机制”:Okio流提供了获取底层I/O的超时,读和写都会有超时;
其次是非常容易实现:Source接口只声明了三个方法:read(),cloase()和timeout(),我们只需重写这三个方法即可。
使用非常简单:尽管实现Source和Sink接口只需要重写三个方法,但是调用者通过BufferedSouce和BufferedSink接口可以得到更多API,这里有你想要的一切。
在字节流和字符流之间没有人为的区别,都可以作为字节读写。
测试简单:Buffer类实现了BufferedSource接口和BufferedSink接口,所以你的测试代码可以很简单很清晰。
Okio开始作为OkHttp的组件。
在混淆的时候需要加上下面一句:
-dontwarn okio.**
以上是Okio的官方文档,说实话,没看很明白,尤其是对Okio的优点不是很了解,下面通过使用Okio写入和读取文件来了解Okio的使用和特点。首先是使用Okio写入文件,代码如下:
File path = Environment.getExternalStorageDirectory();
if (path != null && path.exists()) {
    File fileA = new File(path, "a.txt");//创建文件A
    try (BufferedSink sink = Okio.buffer(Okio.sink(fileA))) {
        sink.writeUtf8("klp test write a file!");
        sink.writeUtf8("\n");
        sink.writeUtf8("klp test okio write to file!");
        if (mActivityRefs.get() != null) {
            mActivityRefs.get().runOnUiThread(new Runnable() {
                @Override
                public void run() {
                    Toast.makeText(mActivityRefs.get(), "文件A创建成功!", Toast.LENGTH_SHORT).show();
                }
            });
        }
    } catch (IOException e) {
        e.printStackTrace();
    }
}
要向文件写入数据,首先要调用Okio.sink()获取Sink实例,然后调用Okio.buffer()获取BufferedSink实例,注意这两个实例对象最后都要关闭。获取到BufferedSink对象之后就可以像文件写入数据了。
再看下从文件中读取数据的代码:
File root = Environment.getExternalStorageDirectory();
if (root != null && root.exists()) {
    File fileA = new File(root, "a.txt");
    if (fileA.exists()) {
        try (BufferedSource source = Okio.buffer(Okio.source(fileA))) {
            String s = source.readUtf8Line();
            while (s != null) {
                System.out.println(s);
                s = source.readUtf8Line();
            }
        } catch (IOException e) {
            e.printStackTrace();
        }
    }
}
跟写入数据一样,读取数据时首先要获取BufferedSource对象,等读取完数据之后要关闭BufferedSource对象。
官方文档说,Okio写入数据和读取数据的效率比较高,因为Okio内部的读写操作是在内存中进行的,真正的I/O操作比较少。下面通过源码追踪一下Okio的读取的源码,真正的读取操作是由RealBufferedSource对象实现的,代码如下:
@Override public @Nullable String readUtf8Line() throws IOException {
    long newline = indexOf((byte) '\n');

    if (newline == -1) {
      return buffer.size != 0 ? readUtf8(buffer.size) : null;
    }

    return buffer.readUtf8Line(newline);
  }
readUtf8Line()代码比较简单,先调用indexOf()获取要读取的行号,然后调用buffer.readUtf8Line()来读取数据。可见,最后读取操作是缓存buffer中的操作,也就是内存中的操作,所以速度比较快。
那么是什么时候把数据从文件中读到缓存中的呢?我们追踪下indexOf()方法,一直追踪到如下代码:
@Override public long indexOf(byte b, long fromIndex, long toIndex) throws IOException {
    if (closed) throw new IllegalStateException("closed");
    if (fromIndex < 0 || toIndex < fromIndex) {
      throw new IllegalArgumentException(
          String.format("fromIndex=%s toIndex=%s", fromIndex, toIndex));
    }

    while (fromIndex < toIndex) {
      long result = buffer.indexOf(b, fromIndex, toIndex);
      if (result != -1L) return result;

      // The byte wasn't in the buffer. Give up if we've already reached our target size or if the
      // underlying stream is exhausted.
      long lastBufferSize = buffer.size;
      if (lastBufferSize >= toIndex || source.read(buffer, Segment.SIZE) == -1) return -1L;

      // Continue the search from where we left off.
      fromIndex = Math.max(fromIndex, lastBufferSize);
    }
    return -1L;
  }
从代码中可以知道,如果没有从buffer缓存中获取到b(byte类型)的位置,而且buffer中的字节数小于toIndex,就会调用source.read(buffer, Segment.SIZE)将文件中的数据读取到buffer缓存中。
我们来看下source.read()方法:
@Override public long read(Buffer sink, long byteCount) throws IOException {
        if (byteCount < 0) throw new IllegalArgumentException("byteCount < 0: " + byteCount);
        if (byteCount == 0) return 0;
        try {
          timeout.throwIfReached();
          Segment tail = sink.writableSegment(1);
          int maxToCopy = (int) Math.min(byteCount, Segment.SIZE - tail.limit);
          int bytesRead = in.read(tail.data, tail.limit, maxToCopy);
          if (bytesRead == -1) return -1;
          tail.limit += bytesRead;
          sink.size += bytesRead;
          return bytesRead;
        } catch (AssertionError e) {
          if (isAndroidGetsocknameError(e)) throw new IOException(e);
          throw e;
        }
      }
从上面的代码中可以知道,在读取数据时,先从Buffer对象中获取了一个Segment,然后向Segment中读取数据,每个Segment最多可以存入8K数据。这里需要提一下Buffer中数据的数据结构,Buffer中的数据是存在于一个双向链表中,链表中的每个节点都是一个Segment,数据结构图如下:
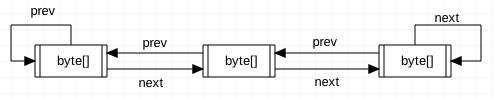
好了,到这了我们了解了Okio读写操作高效的原因。当然Okio还做了一些其他的优化,比如,只有在没有完全将数据读取到缓存中时,才会从文件中读取数据,再之后所有的操作都是在内存中操作的。从Buffer中读取数据时,都是从Buffer的头部开始读,而向Buffer中写入数据时,新写入的数据都会追加在Buffer的尾部。其他的其他的优化可以参照API。
上面是向文件中写入数据和从文件中读数据的代码。当我们需要向网络写入数据,或者从网络读取数据时唯一需要改变的是获取Source对象和Sink对象的代码:Okio.source(inputStream); 或者Okio.sink(outputStream);其他代码是一样的。这就比InputStream和OutputStream的用法简单,因为我们不需要根据不同读取数据和写入数据的不同介质实现不同的子类。
现在我们对Okio的读写有了比较深入的了解,Okio对于Source接口和Sink接口还开发了一些子类和子接口用于不同的操作,下面是OkioAPI的结构:
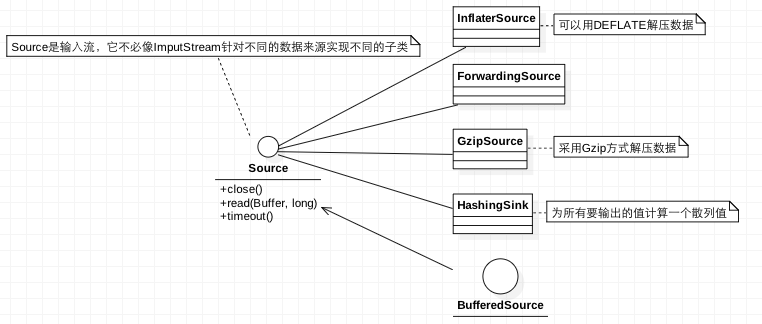
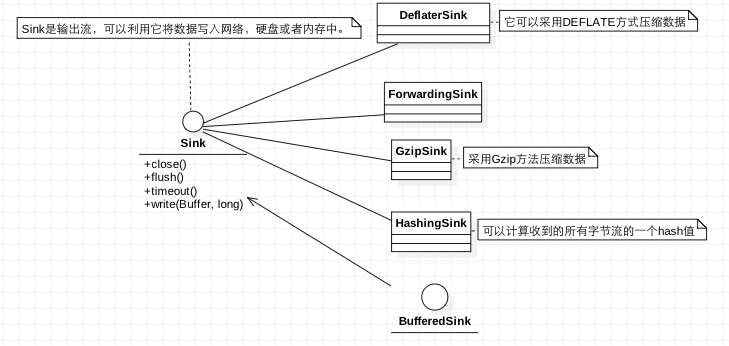
可以看到,Source和Sink不同的子类或子接口实现了不同的功能,具体见API。
下面是我利用GzipSource和GzipSink实现了文件压缩,将a.txt文件压缩到b.zip,再将b.zip文件解压到c.txt,这是一个内部类,a文件已经创建:
/**
     * 将文件a压缩成b.zip,然后再将b.zip解压缩到c.txt
     */
    private class CompressThread extends Thread {
        private Context mContext;
        private int mOption;

        public CompressThread(Context context, int option) {
            mContext = context;
            mOption = option;
        }

        @Override
        public void run() {
            if (Environment.MEDIA_MOUNTED.equals(Environment.getExternalStorageState())) {
                //获取根目录
                File root = Environment.getExternalStorageDirectory();
                if (mOption == 1) {
                    //首先读取A文件
                    File fileA = Environment.getExternalStoragePublicDirectory("a.txt");
                    if (root != null && root.exists() && fileA != null && fileA.exists()) {
                        //创建B文件
                        File fileB = new File(root, "b.zip");
                        try (GzipSink sink = new GzipSink(Okio.sink(fileB)); BufferedSource source = Okio.buffer(Okio.source(fileA))) {
                            source.readAll(sink);
                        } catch (IOException e) {
                            e.printStackTrace();
                        }
                    }
                } else if (mOption == 2) {
                    //首先读取B文件
                    File fileB = Environment.getExternalStoragePublicDirectory("b.zip");
                    if (root != null && root.exists() && fileB != null && fileB.exists()) {
                        //创建C文件
                        File fileC = new File(root, "c.txt");
                        try (BufferedSink sink = Okio.buffer(Okio.sink(fileC)); GzipSource source = new GzipSource(Okio.source(fileB))) {
                            Buffer buffer = new Buffer();
                            source.read(buffer, 1024);
                            sink.write(buffer, buffer.size());
                        } catch (IOException e) {
                            e.printStackTrace();
                        }
                    }
                }


            } else {
                MainActivity.this.runOnUiThread(new Runnable() {
                    @Override
                    public void run() {
                        Toast.makeText(mContext, "SD卡不可用", Toast.LENGTH_SHORT).show();
                    }
                });
            }
        }
}Okio先学习到这,最后再总结一下:
1、Okio简化了I/O操作,不需要像InputStream或OutputStream一样,根据不同的存储方式使用不同的子类。
2、Okio可以提高I/O操作效率,因为在刚开始读取数据就将数据读到内存缓存中,后续的操作都是在内存中进行的。
3、Okio的缓存并没有开辟一整块内存空间,而是采用双向链表进行存储的,这就有效减少了内存溢出的概率。