开发环境
我们使用的是ActiveMQ 5.11.1 Release的Windows版,官网最新版是ActiveMQ 5.12.0 Release,大家可以自行下载,下载地址。
需要注意的是,开发时候,要将apache-activemq-5.11.1-bin.zip解压缩后里面的activemq-all-5.11.1.jar包加入到classpath下面,这个包包含了所有jms接口api的实现。
搭建开发环境
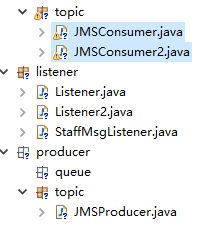
建立项目,我们只需要建立一个java项目就可以了,导入jar包,项目截图:
1、编写生产者
package com.activemq.producer.topic;

import javax.jms.Connection;
import javax.jms.Destination;
import javax.jms.JMSException;
import javax.jms.MessageProducer;
import javax.jms.Session;
import javax.jms.TextMessage;

import org.apache.activemq.ActiveMQConnection;
import org.apache.activemq.ActiveMQConnectionFactory;

public class JMSProducer {

    private static final String USERNAME=ActiveMQConnection.DEFAULT_USER; // 默认的连接用户名
    private static final String PASSWORD=ActiveMQConnection.DEFAULT_PASSWORD; // 默认的连接密码
    private static final String BROKEURL=ActiveMQConnection.DEFAULT_BROKER_URL; // 默认的连接地址
    private static final int SENDNUM=10; // 发送的消息数量

    public static void main(String[] args) {
        ActiveMQConnectionFactory connectionFactory; // 连接工厂
        Connection connection = null; // 连接
        Session session; // 会话 接受或者发送消息的线程
        Destination destination; // 消息的目的地
        MessageProducer messageProducer; // 消息生产者

        // 实例化连接工厂
        connectionFactory=new ActiveMQConnectionFactory(JMSProducer.USERNAME, JMSProducer.PASSWORD, JMSProducer.BROKEURL);

        try {
            connection=connectionFactory.createConnection(); // 通过连接工厂获取连接
            connection.start(); // 启动连接
            session=connection.createSession(Boolean.TRUE, Session.AUTO_ACKNOWLEDGE); // 创建Session
            destination=session.createTopic("FirstTopic1"); // 创建消息队列
            messageProducer=session.createProducer(destination); // 创建消息生产者
            sendMessage(session, messageProducer); // 发送消息
            session.commit();
        } catch (Exception e) {
            // TODO Auto-generated catch block
            e.printStackTrace();
        } finally{
            if(connection!=null){
                try {
                    connection.close();
                } catch (JMSException e) {
                    // TODO Auto-generated catch block
                    e.printStackTrace();
                }
            }
        }

    }

    /**
     * 发送消息
     * @param session
     * @param messageProducer
     * @throws Exception
     */
    public static void sendMessage(Session session,MessageProducer messageProducer)throws Exception{
        for(int i=0;i<JMSProducer.SENDNUM;i++){
            TextMessage message=session.createTextMessage("ActiveMQ 发送的消息"+i);
            System.out.println("发送消息:"+"ActiveMQ 发送的消息"+i);
            messageProducer.send(message);
        }
    }
}
2、编写监听器
为了模拟两个客户端接收消息,我们写两个监听器
public class Listener implements MessageListener {

    @Override
    public void onMessage(Message message) {
        // TODO Auto-generated method stub
        try {
            System.out.println("订阅者一收到的消息:"+((TextMessage)message).getText());
        } catch (JMSException e) {
            // TODO Auto-generated catch block
            e.printStackTrace();
        }
    }

}
public class Listener2 implements MessageListener {

    @Override
    public void onMessage(Message message) {
        // TODO Auto-generated method stub
        try {
            System.out.println("订阅者二收到的消息:"+((TextMessage)message).getText());
        } catch (JMSException e) {
            // TODO Auto-generated catch block
            e.printStackTrace();
        }
    }

}
3、编写消费者
connectionFactory = new ActiveMQConnectionFactory(JMSConsumer.USERNAME, JMSConsumer.PASSWORD, JMSConsumer.BROKEURL);
用户名和密码这两个参数可以不写
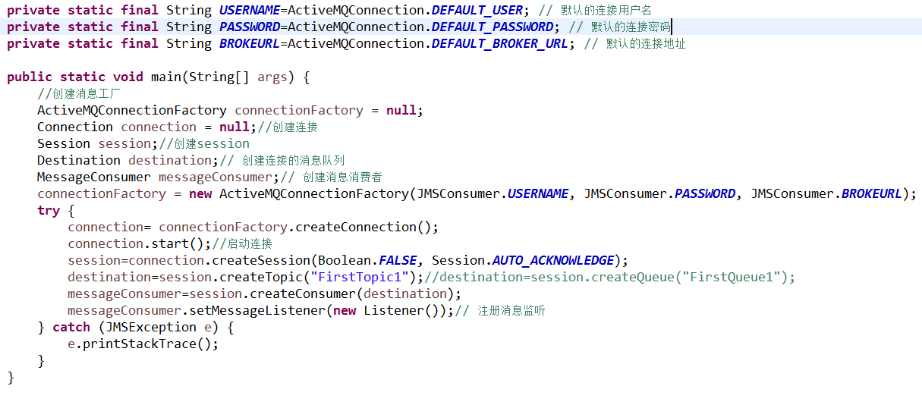
package com.activemq.consumer.topic;

import javax.jms.Connection;
import javax.jms.Destination;
import javax.jms.JMSException;
import javax.jms.MessageConsumer;
import javax.jms.Session;

import org.apache.activemq.ActiveMQConnection;
import org.apache.activemq.ActiveMQConnectionFactory;

import com.activemq.listener.Listener;

public class JMSConsumer {

    private static final String USERNAME=ActiveMQConnection.DEFAULT_USER; // 默认的连接用户名
    private static final String PASSWORD=ActiveMQConnection.DEFAULT_PASSWORD; // 默认的连接密码
    private static final String BROKEURL=ActiveMQConnection.DEFAULT_BROKER_URL; // 默认的连接地址

    public static void main(String[] args) {
        //创建消息工厂
        ActiveMQConnectionFactory factory = new ActiveMQConnectionFactory(JMSConsumer.BROKEURL);
        Connection connection = null;
        Session session;
        Destination destination;
        MessageConsumer messageConsumer;
        try {
            //创建连接
            connection= factory.createConnection();
            //启动连接
            connection.start();
            //创建session
            session=connection.createSession(Boolean.FALSE, Session.AUTO_ACKNOWLEDGE);
            // 创建连接的消息队列
            destination=session.createTopic("FirstTopic1");
            // 创建消息消费者
            messageConsumer=session.createConsumer(destination);
            // 注册消息监听
            messageConsumer.setMessageListener(new Listener());
        } catch (JMSException e) {
            // TODO Auto-generated catch block
            e.printStackTrace();
        }
    }

}
package com.activemq.consumer.topic;

import javax.jms.Connection;
import javax.jms.Destination;
import javax.jms.JMSException;
import javax.jms.MessageConsumer;
import javax.jms.Session;

import org.apache.activemq.ActiveMQConnection;
import org.apache.activemq.ActiveMQConnectionFactory;

import com.activemq.listener.Listener2;

public class JMSConsumer2 {

    private static final String USERNAME=ActiveMQConnection.DEFAULT_USER; // 默认的连接用户名
    private static final String PASSWORD=ActiveMQConnection.DEFAULT_PASSWORD; // 默认的连接密码
    private static final String BROKEURL=ActiveMQConnection.DEFAULT_BROKER_URL; // 默认的连接地址

    public static void main(String[] args) {
        //创建消息工厂
        ActiveMQConnectionFactory factory = new ActiveMQConnectionFactory(JMSConsumer2.BROKEURL);
        Connection connection = null;
        Session session;
        Destination destination;
        MessageConsumer messageConsumer;
        try {
            //创建连接
            connection= factory.createConnection();
            //启动连接
            connection.start();
            //创建session
            session=connection.createSession(Boolean.FALSE, Session.AUTO_ACKNOWLEDGE);
            // 创建连接的消息队列
            destination=session.createTopic("FirstTopic1");
            // 创建消息消费者
            messageConsumer=session.createConsumer(destination);
            // 注册消息监听
            messageConsumer.setMessageListener(new Listener2());
        } catch (JMSException e) {
            // TODO Auto-generated catch block
            e.printStackTrace();
        }
    }

}
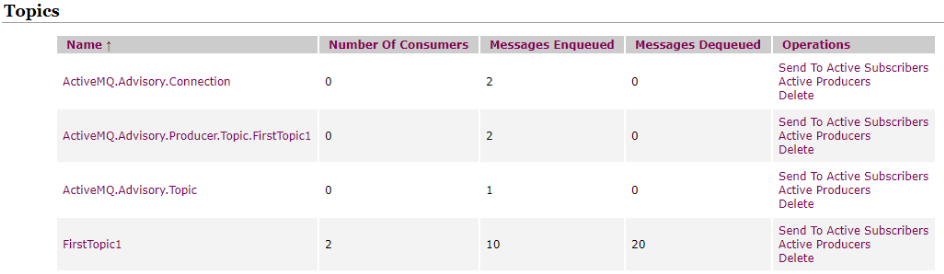
4、启动消费者和生产者
先启动消费者,再启动生产者,顺序不可颠倒。