本次主要是结合之前两篇的内容加以优化静态电话本,使之实现长度可变
SimpleAdapter的使用方法:http://blog.csdn.net/feiqinbushizheng/article/details/78823184
AlertDialog的使用方法:http://blog.csdn.net/feiqinbushizheng/article/details/78837711
话不多说,直接开始:
首先我们要定义一下弹出对话框的样式:
新建一个Layout文件:
edit_alert:
<?xml version="1.0" encoding="utf-8"?>
<LinearLayout xmlns:android="http://schemas.android.com/apk/res/android"
    android:layout_width="match_parent"
    android:layout_height="match_parent"
    android:orientation="vertical">
    <LinearLayout
        android:layout_width="match_parent"
        android:layout_height="wrap_content">
        <TextView
            android:layout_width="wrap_content"
            android:layout_height="wrap_content"
            android:text="姓名:"
            android:textColor="@color/colorPrimary"
            android:textSize="18sp"/>
        <EditText
            android:id="@+id/editname"
            android:layout_width="match_parent"
            android:layout_height="wrap_content" >
            <requestFocus></requestFocus>
        </EditText>
    </LinearLayout>
    <LinearLayout
        android:layout_width="match_parent"
        android:layout_height="wrap_content">
        <TextView
            android:layout_width="wrap_content"
            android:layout_height="wrap_content"
            android:text="电话:"
            android:textColor="@color/colorPrimary"
            android:textSize="18sp"/>
        <EditText
            android:id="@+id/editphone"
            android:layout_width="match_parent"
            android:layout_height="wrap_content" />
    </LinearLayout>


</LinearLayout>
其次就是listview的布局文件了,是直接显示在主界面上的
listview:
<?xml version="1.0" encoding="utf-8"?>
<LinearLayout xmlns:android="http://schemas.android.com/apk/res/android"
    android:layout_width="match_parent"
    android:layout_height="match_parent"
    android:id="@+id/listviewlayout">
    <QuickContactBadge
        android:id="@+id/badge"
        android:layout_width="wrap_content"
        android:layout_height="wrap_content"
        android:adjustViewBounds="false"
        android:scaleType="center"
        android:background="@drawable/img1"/>
    <LinearLayout
        android:layout_width="wrap_content"
        android:layout_height="wrap_content"
        android:orientation="vertical">
        <TextView
            android:id="@+id/name"
            android:layout_width="wrap_content"
            android:layout_height="wrap_content"
            android:textColor="@color/colorAccent"
            android:textSize="20sp"/>
        <TextView
            android:id="@+id/phonenum"
            android:textColor="@color/colorPrimary"
            android:textSize="20sp"
            android:layout_width="wrap_content"
            android:layout_height="wrap_content" />
    </LinearLayout>
</LinearLayout>
写完listview的布局文件,我们就在主界面的布局文件中引用这个布局文件,并添加一个Button,作为添加联系人的按钮
activity_main:
<?xml version="1.0" encoding="utf-8"?>
<android.support.constraint.ConstraintLayout xmlns:android="http://schemas.android.com/apk/res/android"
    xmlns:app="http://schemas.android.com/apk/res-auto"
    xmlns:tools="http://schemas.android.com/tools"
    android:layout_width="match_parent"
    android:layout_height="match_parent"
    tools:context="com.example.mico.call.MainActivity">

    <ListView
        android:id="@+id/listview1"
        android:layout_width="wrap_content"
        android:layout_height="wrap_content"
        app:layout_constraintTop_toTopOf="parent"
        android:layout_marginTop="8dp"
        android:layout_marginBottom="8dp">

    </ListView>
    <Button
        android:id="@+id/button"
        android:layout_width="wrap_content"
        android:layout_height="wrap_content"
        android:text="添加联系人"
        android:onClick="alert_edit"
        app:layout_constraintTop_toBottomOf="@id/listview1"/>

</android.support.constraint.ConstraintLayout>
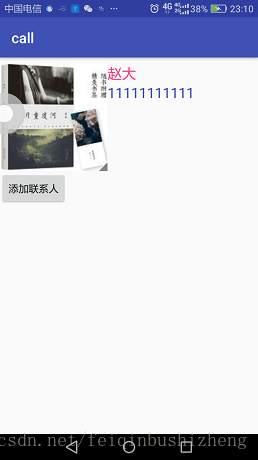
界面写完了,那么就下来先利用SimpleAdapter将电话簿生成:
MainActivity:
public class MainActivity extends AppCompatActivity {
    QuickContactBadge quickContactBadge;
    SimpleAdapter adapter;
    List<Map<String,Object>> listItems;
    ListView list;
    @Override
    protected void onCreate(Bundle savedInstanceState) {
        super.onCreate(savedInstanceState);
        setContentView(R.layout.activity_main);
        list = (ListView)findViewById(R.id.listview1);
        final String[] name = {"赵大"};
        final String[] strings = {"11111111111"};
        listItems = new ArrayList<Map<String, Object>>();
        for (int i = 0 ; i < name.length ; i++){
            Map<String,Object> map = new HashMap<String, Object>();
            map.put("nameimage",null);
            map.put("name",name[i]);
            map.put("phonenum",strings[i]);
            listItems.add(map);
        }
        adapter = new SimpleAdapter(this,listItems,R.layout.listview,
                new String[]{"nameimage","name","phonenum"},new int[]{R.id.badge,R.id.name, R.id.phonenum});
        list.setAdapter(adapter);

        list.setOnItemClickListener(new AdapterView.OnItemClickListener() {
            @Override
            public void onItemClick(AdapterView<?> adapterView, View view, int i, long l) {
                    quickContactBadge = (QuickContactBadge)view.findViewById(R.id.badge);
                    quickContactBadge.assignContactFromPhone(strings[i],false);
            }
        });
    }
}
接下来唯一欠缺的就是增加联系人功能了:
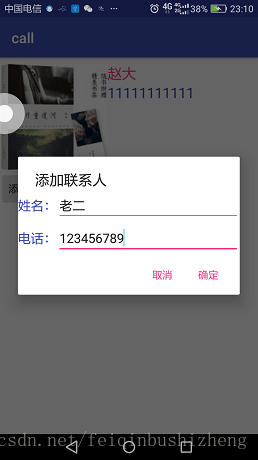
在MainActivity中添加方法实现该功能:
public void alert_edit(View view){
LayoutInflater factory = LayoutInflater.from(this);
//三个实例化必须用final,不可更改
final View listview = factory.inflate(R.layout.edit_alert,null);
final EditText editname = (EditText)listview.findViewById(R.id.editname);
final EditText editphone = (EditText)listview.findViewById(R.id.editphone);
new AlertDialog.Builder(this).setTitle("添加联系人")
.setView(listview)
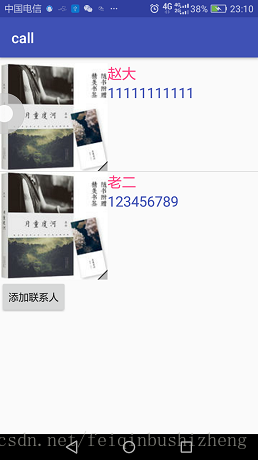
.setPositiveButton("确定", new DialogInterface.OnClickListener() {
@Override
public void onClick(DialogInterface dialogInterface, int i) {
//按下确定键后的事件,添加一条Item到list中
Toast.makeText(getApplicationContext(),editname.getText().toString(),Toast.LENGTH_LONG).show();
Map<String,Object> map = new HashMap<String, Object>();
map.put("nameimage",null);
map.put("name",editname.getText().toString());
map.put("phonenum",editphone.getText().toString());
listItems.add(map);
adapter = new SimpleAdapter(getApplicationContext(),listItems,R.layout.listview,
new String[]{"nameimage","name","phonenum"},new int[]{R.id.badge,R.id.name, R.id.phonenum});
list.setAdapter(adapter);
}
}).setNegativeButton("取消",null).show();
}效果: