原文地址:https://blog.csdn.net/u010827484/article/details/81223889
ODL-SFC 环境搭建
作者信息:绿盟科技SPG团队 张力茂
ODL Service Function Chaining
在网络通信过程中,包含各式各样的网络服务功能。既可以包含传统的像防火墙,NAT等功能,也有包含特定的网络应用功能(Service Function)。将特定的网络应用功能有序地组合起来,接着让流量通过这些服务功能就构成了网络服务链(Network Service Chain)。一般在数据中心环境下,往往会有网络服务链(Network Service Chaining)的部署需求,使得报文在数据中心传递的时候,能够经过各种各样的服务节点,保证安全、快速、稳定的网络服务。
SDN服务链基本概述
由于Overlay网络的发展,是的虚拟网络和物理网络分离,让数据中心的网络控制变得更加灵活,更具有扩展性。然而,在数据中心中,还存在很多介于虚拟网络和物理网络之间的中间件,如防火墙,QoS,负载均衡器等。这些中间件提供了必要的业务处理功能,即Service Function。灵活、便捷、高效、安全地调配流量到Service Function上处理,形成服务链(Service Function Chaining),这就是SFC项目要解决的问题。服务链可以理解为一种业务形式。
过去也有服务链的概念,但传统的网络服务链往往和网络拓扑紧密耦合、部署复杂,在服务链变更、扩容时,都需要改动网络拓扑,重新进行网络设备的配置。而云计算环境广泛使用虚拟化技术,具有动态性、高流动性、规模易变化、多租户等特点,传统网络的服务链无法满足这些需求,SDN的出现让服务链又焕发了生机。因此,当前再谈及服务链时,默认指的是SDN服务链。
与传统DC中配置的网络服务链相比,基于SDN的SFC具有如下的优势:
传统的网络服务链往往基于手工配置,很大程度上依赖于具体的网络拓扑,以至于网络设备之间的耦合性很大。而基于SDN的配置,可以动态的添加或者删除链表上的服务节点,不仅方便使用,而且解耦了网络设备之间的关联。
在数据流量经过链表的过程中,SFC还支持分类器与服务,服务与服务之间的上下文信息共享。
在传统的数据服务链中,数据包往往要经过过次分类,即多次解包、封包的过程。而在SFC中,这个过程大大缩减,一般只需在分类一次即可,使得整个过程更便捷、更高效。
基于OpenDaylight的服务链项目
OpenDaylight的SFC项目是整个控制器平台内部的一个功能模块。用户可以通过控制器提供的北向API来使用的SFC的功能,例如创建、更新或者删除Service Chain,还可以通过配置非透明的metadata数据段用来在Service Function的节点间实现数据共享。同时,项目可以向Controller的DataStore中注册、配置服务节点,并获取拓扑。南向也支持Netconf,Openflow12等协议。

SFC核心组件如下:
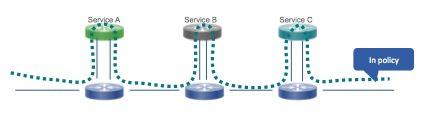
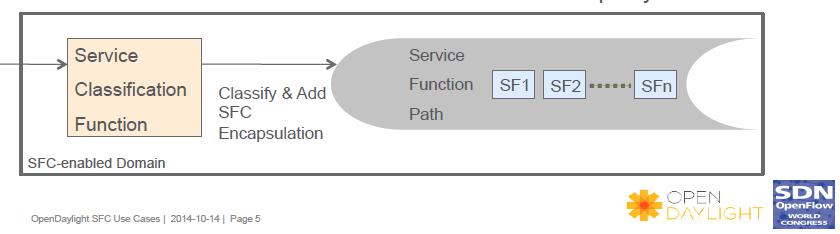
Classification:根据初始化的(配置好的)policy匹配数据流进行封装,然后转入到Service Function Chain中。
Service Function(SF): 负责对收到的数据包进行特定功能的处理。作为一个逻辑上的组件,SF在具体实现的上可以是一个虚拟的元素,或者是嵌入在具体网络设备上的某种功能。常见的SF有:防火墙(firewall),WAN设备加速器,深层报文检测(Deep Packet Inspection,DPI),NAT等等。
- Service Function Forwarder(SFF):主要负责Service Function Chaining上的流量转发控制。
- Service Function Chain(SFC): SFC定义了一个抽象的Service Function有序集合。经过分类后的包要依次去遍历集合中的Service Function。比如:用户可以配置firewall->qos->dpi三种服务来构建一条SFC。
- Rendered Service Path(RSP) : 数据包实际行走的路径。
- Service Function Path(Service Function Path): SFP是一个逻辑概念 它是介于SFC和RSP之间的一层抽象,有时候会将SFP与SFC等同。
那么,SFC项目是怎么综合起上述的组件进行工作的呢?
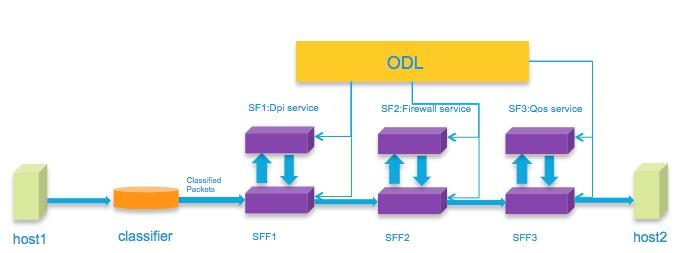
一种基于NSH封装头的机制是,使用ODL配置并下发一条Service Function Chain,每条Chain都有自己的标识。当host1发送数据包给host2,数据包首先会到分类器中进行筛选。分类出需要经过Service Function Chaining的数据包会进行封装,并打上NSH头。头中包含了很多信息,包括走哪一条服务链,服务链有几跳等。接着数据包会依次经过SFF,由SFF将数据包传递给SF或者下一跳的SFF,直到链的最后。
实验
基础环境搭建
实验环境:
root@ubuntu:/home/sfc# uname -a
Linux ubuntu 4.13.0-45-generic #50~16.04.1-Ubuntu SMP Wed May 30 11:18:27 UTC 2018 x86_64 x86_64 x86_64 GNU/Linux
root@ubuntu:/home/sfc# cat /proc/meminfo | grep MemTotal
MemTotal:        4016440 kB
root@ubuntu:/home/sfc# cat /proc/cpuinfo | grep siblings
siblings : 21、部署基础环境
1.1 安装 git
sudo apt-get install git1.2 安装 Maven
sudo apt-get install maven

安装完成后:
0 added, 0 removed; done.
Running hooks in /etc/ca-certificates/update.d...

done.
done.
root@ubuntu:/home/odl#

测试java环境:
root@ubuntu:/home/odl# java -version
2、创建sfc-oxygen目录并下载ODL代码到sfc-oxygen目录,然后切换到oxygen的稳定分支:
git clone https://git.opendaylight.org/gerrit/p/sfc.git  --branch stable/oxygen --single-branch sfc-oxygen

下载完成后:
root@ubuntu:/home/odl# git clone https://git.opendaylight.org/gerrit/p/sfc.git  --branch stable/oxygen --single-branch sfc-oxygen
Cloning into 'sfc-oxygen'...
remote: Finding sources: 100% (26479/26479)
remote: Total 26479 (delta 9512), reused 26193 (delta 9512)
Receiving objects: 100% (26479/26479), 17.90 MiB | 275.00 KiB/s, done.
Resolving deltas: 100% (9512/9512), done.
Checking connectivity... done.
root@ubuntu:/home/odl# cd sfc-oxygen/
root@ubuntu:/home/odl/sfc-oxygen# git branch
* stable/oxygen
root@ubuntu:/home/odl/sfc-oxygen#
3、编译 opendaylight 过程中可能会因为网络的原因下载失败,只需要重新编译就行
设置maven堆空间,有助于编译过程,节约编译时间:
export MAVEN_OPTS=’-Xmx1048m -XX:MaxPermSize=512m’
you can increase the heap space, the -Xmx setting, to greater than 1G if memory is available. When building in maven, the max memory reached will be displayed at the end of the build. You can use this as a guide to determine if more memory would help decrease build times. Approx 1.5G of RAM is needed by the JVM to run the Helium Controller repeatedly and avoid OOM errors.
开始编译:–DskipTests:跳过测试过程,可以节约很多时间
mvn clean install -DskipTests

提示如下错误:
root@ubuntu:/home/odl/sfc-oxygen# mvn clean install -DskipTests
Warning: JAVA_HOME environment variable is not set.
[INFO] Scanning for projects...
[ERROR] [ERROR] Some problems were encountered while processing the POMs:
[FATAL] Non-resolvable parent POM for org.opendaylight.sfc:sfc-parent:0.7.3-SNAPSHOT: Could not find artifact org.opendaylight.mdsal:binding-parent:pom:0.12.3-SNAPSHOT and 'parent.relativePath' points at no local POM @ line 6, column 11
 @
[ERROR] The build could not read 1 project -> [Help 1]
[ERROR]
[ERROR]   The project org.opendaylight.sfc:sfc-parent:0.7.3-SNAPSHOT (/home/odl/sfc-oxygen/pom.xml) has 1 error
[ERROR]     Non-resolvable parent POM for org.opendaylight.sfc:sfc-parent:0.7.3-SNAPSHOT: Could not find artifact org.opendaylight.mdsal:binding-parent:pom:0.12.3-SNAPSHOT and 'parent.relativePath' points at no local POM @ line 6, column 11 -> [Help 2]
[ERROR]
[ERROR] To see the full stack trace of the errors, re-run Maven with the -e switch.
[ERROR] Re-run Maven using the -X switch to enable full debug logging.
[ERROR]
[ERROR] For more information about the errors and possible solutions, please read the following articles:
[ERROR] [Help 1] http://cwiki.apache.org/confluence/display/MAVEN/ProjectBuildingException
[ERROR] [Help 2] http://cwiki.apache.org/confluence/display/MAVEN/UnresolvableModelException
root@ubuntu:/home/odl/sfc-oxygen#
以上错误原因是ODL编译过程中Maven会下载很多包,但是找不到下载的源需要在当前用户目录加上settings.xml
下载Opendaylight官网提供的settings.xml并保存在当前用户目录:

root@ubuntu:/home/odl/sfc-oxygen# wget -q -O - https://raw.githubusercontent.com/opendaylight/odlparent/master/settings.xml > ~/.m2/settings.xml
重新编译 ODL:
root@ubuntu:/home/odl/sfc-oxygen# mvn clean install –DskipTestsWarning: JAVA_HOME environment variable is not set.
[INFO] Scanning for projects...
Downloading: https://nexus.opendaylight.org/content/repositories/opendaylight.snapshot/org/opendaylight/mdsal/binding-parent/0.12.3-SNAPSHOT/maven-metadata.xml
Downloaded: https://nexus.opendaylight.org/content/repositories/opendaylight.snapshot/org/opendaylight/mdsal/binding-parent/0.12.3-SNAPSHOT/maven-metadata.xml (617 B at 0.1 KB/sec)
Downloading: https://nexus.opendaylight.org/content/repositories/opendaylight.snapshot/org/opendaylight/mdsal/binding-parent/0.12.3-SNAPSHOT/binding-parent-0.12.3-20180722.142257-14.pom
出错了…分析错误原因是因为在java环境中没有tools.jar包,查看java安装目录找不到这个包,还是重新装java:
[INFO] ------------------------------------------------------------------------
[INFO] BUILD FAILURE
[INFO] ------------------------------------------------------------------------
[INFO] Total time: 07:43 min
[INFO] Finished at: 2018-07-25T04:10:06-07:00
[INFO] Final Memory: 118M/233M
[INFO] ------------------------------------------------------------------------
[ERROR] Failed to execute goal org.apache.maven.plugins:maven-checkstyle-plugin:2.17:check (check-license) on project sfc-parent: Execution check-license of goal org.apache.maven.plugins:maven-checkstyle-plugin:2.17:check failed: Plugin org.apache.maven.plugins:maven-checkstyle-plugin:2.17 or one of its dependencies could not be resolved: Could not find artifact com.sun:tools:jar:1.8.0 at specified path /usr/lib/jvm/java-8-openjdk-amd64/jre/../lib/tools.jar -> [Help 1]
[ERROR]
[ERROR] To see the full stack trace of the errors, re-run Maven with the -e switch.
[ERROR] Re-run Maven using the -X switch to enable full debug logging.
[ERROR]
[ERROR] For more information about the errors and possible solutions, please read the following articles:
[ERROR] [Help 1] http://cwiki.apache.org/confluence/display/MAVEN/PluginResolutionException
root@ubuntu:/home/odl/sfc-oxygen#
安装java:
1、卸载现有java
apt-get --purge remove java-common

2、安装java

添加ppa
sudo add-apt-repository ppa:webupd8team/java
sudo apt-get update

安装oracle-java-installer
sudo apt-get install oracle-java8-installer

设置系统默认jdk
sudo update-java-alternatives -s java-8-oracle

java安装测试
java -version
javac -version

导出JAVA安装目录到环境变量:
export JAVA_HOME=/usr/lib/jvm/java-8-oracle/

3、重新安装Maven,卸载java-common时会卸载掉mvn命令,重新安装就可以了
sudo apt-get install maven
又出错了…
[INFO] ------------------------------------------------------------------------
[INFO] BUILD FAILURE
[INFO] ------------------------------------------------------------------------
[INFO] Total time: 33:17 min
[INFO] Finished at: 2018-07-25T05:17:44-07:00
[INFO] Final Memory: 162M/233M
[INFO] ------------------------------------------------------------------------
[ERROR] Failed to execute goal com.github.eirslett:frontend-maven-plugin:0.0.24:bower (bower) on project sfc-ui-module: Failed to run task: 'bower install' failed. (error code 1) -> [Help 1]
[ERROR]
[ERROR] To see the full stack trace of the errors, re-run Maven with the -e switch.
[ERROR] Re-run Maven using the -X switch to enable full debug logging.
[ERROR]
[ERROR] For more information about the errors and possible solutions, please read the following articles:
[ERROR] [Help 1] http://cwiki.apache.org/confluence/display/MAVEN/MojoFailureException
[ERROR]
[ERROR] After correcting the problems, you can resume the build with the command
[ERROR]   mvn <goals> -rf :sfc-ui-module
root@ubuntu:/home/odl/sfc-oxygen#
分析出错原因,是因为系统没有bower,安装bower后重新编译ODL
root@ubuntu:/home/odl/sfc-oxygen# apt-get install npm
root@ubuntu:/home/odl/sfc-oxygen# npm install bower -g
npm WARN deprecated bower@1.8.4: We don't recommend using Bower for new projects. Please consider Yarn and Webpack or Parcel. You can read how to migrate legacy project here: https://bower.io/blog/2017/how-to-migrate-away-from-bower/
/usr/local/bin/bower -> /usr/local/lib/node_modules/bower/bin/bower
/usr/local/lib
└── [email protected]
继续出错……
[INFO] BUILD FAILURE
[INFO] ------------------------------------------------------------------------
[INFO] Total time: 07:37 min
[INFO] Finished at: 2018-07-25T05:55:52-07:00
[INFO] Final Memory: 164M/233M
[INFO] ------------------------------------------------------------------------
[ERROR] Failed to execute goal com.github.eirslett:frontend-maven-plugin:0.0.24:bower (bower) on project sfc-ui-module: Failed to run task: 'bower install' failed. (error code 1) -> [Help 1]
[ERROR]
[ERROR] To see the full stack trace of the errors, re-run Maven with the -e switch.
[ERROR] Re-run Maven using the -X switch to enable full debug logging.
[ERROR]
[ERROR] For more information about the errors and possible solutions, please read the following articles:
[ERROR] [Help 1] http://cwiki.apache.org/confluence/display/MAVEN/MojoFailureException
[ERROR]
[ERROR] After correcting the problems, you can resume the build with the command
[ERROR]   mvn <goals> -rf :sfc-ui-module
google后知道mvn使用root编译需要加上如下参数,继续编译
echo '{ "allow_root": true }' > /root/.bowerrc大概需要2个小时,编译完成
SFC部署
1、进入karaf目录:
/home/odl/sfc-oxygen/karaf/target/assembly2、删除karaf历史数据:
rm instances/ journal/ data/cache/ -rf3、启动odl
root@ubuntu:/home/odl/sfc-oxygen/karaf/target/assembly# ./bin/karaf clean
Apache Karaf starting up. Press Enter to open the shell now...
100% [========================================================================]

Karaf started in 1s. Bundle stats: 13 active, 13 total

    ________                       ________                .__  .__       .__     __
    \_____  \ ______   ____   ____ \______ \ _____  ___.__.|  | |__| ____ |  |___/  |_
     /   |   \\____ \_/ __ \ /    \ |    |  \\__  \<   |  ||  | |  |/ ___\|  |  \   __\
    /    |    \  |_> >  ___/|   |  \|    `   \/ __ \\___  ||  |_|  / /_/  >   Y  \  |
    \_______  /   __/ \___  >___|  /_______  (____  / ____||____/__\___  /|___|  /__|
            \/|__|        \/     \/        \/     \/\/            /_____/      \/


Hit '<tab>' for a list of available commands
and '[cmd] --help' for help on a specific command.
Hit '<ctrl-d>' or type 'system:shutdown' or 'logout' to shutdown OpenDaylight.

opendaylight-user@root>
当前ODL只有基础组件,需要安装SFC环境需要的组件
opendaylight-user@root>feature:list -i
Name                                 │ Version │ Required │ State   │ Repository                           │ Description
─────────────────────────────────────┼─────────┼──────────┼─────────┼──────────────────────────────────────┼──────────────────────────────────────────────────
31c3ba29-4dc2-4fff-a491-3a8393c9ab46 │ 0.0.0   │ x        │ Started │ 3a6a1663-0dfe-4efd-8ae1-127045152b07 │
aries-proxy                          │ 4.1.5   │          │ Started │ standard-4.1.5                       │ Aries Proxy
aries-blueprint                      │ 4.1.5   │          │ Started │ standard-4.1.5                       │ Aries Blueprint
feature                              │ 4.1.5   │          │ Started │ standard-4.1.5                       │ Features Support
shell                                │ 4.1.5   │          │ Started │ standard-4.1.5                       │ Karaf Shell
shell-compat                         │ 4.1.5   │          │ Started │ standard-4.1.5                       │ Karaf Shell Compatibility
deployer                             │ 4.1.5   │          │ Started │ standard-4.1.5                       │ Karaf Deployer
bundle                               │ 4.1.5   │          │ Started │ standard-4.1.5                       │ Provide Bundle support
config                               │ 4.1.5   │          │ Started │ standard-4.1.5                       │ Provide OSGi ConfigAdmin support
diagnostic                           │ 4.1.5   │          │ Started │ standard-4.1.5                       │ Provide Diagnostic support
instance                             │ 4.1.5   │          │ Started │ standard-4.1.5                       │ Provide Instance support
jaas                                 │ 4.1.5   │          │ Started │ standard-4.1.5                       │ Provide JAAS support
log                                  │ 4.1.5   │          │ Started │ standard-4.1.5                       │ Provide Log support
package                              │ 4.1.5   │          │ Started │ standard-4.1.5                       │ Package commands and mbeans
service                              │ 4.1.5   │          │ Started │ standard-4.1.5                       │ Provide Service support
system                               │ 4.1.5   │          │ Started │ standard-4.1.5                       │ Provide System support
kar                                  │ 4.1.5   │          │ Started │ standard-4.1.5                       │ Provide KAR (KARaf archive) support
ssh                                  │ 4.1.5   │          │ Started │ standard-4.1.5                       │ Provide a SSHd server on Karaf
management                           │ 4.1.5   │          │ Started │ standard-4.1.5                       │ Provide a JMX MBeanServer and a set of MBeans in
wrap                                 │ 0.0.0   │          │ Started │ standard-4.1.5                       │ Wrap URL handler
standard                             │ 4.1.5   │          │ Started │ standard-4.1.5                       │ Wrap feature describing all features part of a st
opendaylight-user@root>
根据SFC架构,北向接口需要安装restconf相关组件,南向接口需要安装netconf相关组件以及南北向抽象层mdsal的相关组件和提供SFC功能的核心组件:
opendaylight-user@root>feature:install odl-netconf-api odl-netconf-mapping-api odl-netconf-util odl-netconf-netty-util odl-netconf-client odl-sfc-netconf odl-netconf-connector-all odl-netconf-notifications-api odl-mdsal-apidocs odl-mdsal-models odl-mdsal-binding odl-mdsal-binding-runtime odl-mdsal-common odl-mdsal-broker odl-mdsal-clustering-commons odl-mdsal-distributed-datastore odl-mdsal-remoterpc-connector odl-mdsal-broker-local odl-restconf odl-restconf-noauth odl-sfc-model odl-sfc-provider odl-sfc-provider-rest  odl-sfc-ovs odl-sfc-ui odl-sfc-sb-rest odl-sfc-openflow-renderer
opendaylight-user@root>
4、使用本地IP地址(192.168.29.137)登录ODL,ODL默认UI端口为8181,登录时需要需要指定访问index.html页面,如果使用系统自带浏览器可以使用localhost代替IP地址。登录用户名:admin,密码:admin
http://192.168.29.137:8181/index.html登录进去后如下图所示:
5、启动ODL提供的测试用例,进入/home/odl/sfc-oxygen/sfc-py目录,执行如下命令,start_agent会在后台模拟ODL的南向设备
root@ubuntu:/home/odl/sfc-oxygen/sfc-py# ./start_agent.sh 192.168.29.137:8181
INFO:sfc/sfc_agent.py:ODL locator: 192.168.29.137:8181
INFO:sfc/sfc_agent.py:

====== STARTING SFC AGENT ======
INFO:sfc/sfc_agent.py:

SFC Agent will listen to Opendaylight REST Messages and take any
appropriate action such as creating, deleting, updating  SFs, SFFs,
 or classifier.

INFO:/home/odl/sfc-oxygen/sfc-py/sfc/common/odl_api.py:Getting SFFs configured in ODL ...
WARNING:/home/odl/sfc-oxygen/sfc-py/sfc/common/odl_api.py:=>Failed to GET SFFs from ODL

WARNING:/home/odl/sfc-oxygen/sfc-py/sfc/common/odl_api.py:

Could not determine SFF name. This means ODL is not running
or there is no SFF with a data plane locator IP that matches
one where the SFC agent is running. SFC Agent will retry later...

 * Serving Flask app "sfc_agent" (lazy loading)
 * Environment: production
   WARNING: Do not use the development server in a production environment.
   Use a production WSGI server instead.
 * Debug mode: off
INFO:werkzeug: * Running on http://0.0.0.0:5000/ (Press CTRL+C to quit)
6、使用ODL WEB创建SF
Service Functions —> Add Service Function
点击SAVE,SF创建成功,同时start_agent收到北向请求:
7、创建SN,这个过程start_agent不会响应
Service Nodes —> Add Service node
8、创建SFF
Service Funcition Forwarders —>Add Service Function Forwarder
创建SFF成功后WEB和start_agent状态:
查看Service Nodes状态:
9、创建SFC
点击:Add Service Function Chain,填入SFC名字,点击Save
拖动Service Function type下面的firewall到Service Function Chain里面,SFC创建成功如下图所示:
点击“Chain-1” 后面的保存图标,保存图标变成三角形,继续点击完成SFC部署:
WEB页面提示创建成功,但后台start_agent提示出错
根据错误提示,分析是由于部署SFC过程中获取本地接口IPV6地址出错导致“sff_name”变量为空,然后异常退出,目前暂时不用IPV6,屏蔽掉这段代码:
file:/home/sfc/sfc-py/sfc/common/odl_api.py +321重新启动start_agent进程,让修改后的代码生效,然后再从第一步开始部署,成功后如下图所示:
10、测试SFC功能
start_agent是运行在后台的进程,它模拟整个SFC环境的南向环境,包括SF和SFF。现在使用另外一个程序(/home/odl/sfc-oxygen/sfc-py/sfc/sff_client.py)模拟发包,然后观察start_agent的后台数据变化
10.1、在ODL WEB页面点击Service Function Paths —> Rendered Service Paths查看RSP(SFC实际的数据包转发路径)状态,知道Path-ID:51,starting index:255
10.2、后台打开一个新的终端,运行sff_clinet.py程序,设置SFC IP和port,sfp-id和sfp-index设置为10.1步奏得到的数据,启动sff_client.py,start_agent得到如下所示数据
分析start_agent进程显示的数据SFF收到sff_client发送的数据后成功转给firewall,但firewall处理完数据后直接把数据包发到6633端口了,然后就没然后了。正常的SFC过程应该是SFF —> firewall —> SFF……
SF的数据由SFF提供,SF处理完数据后再交回SFF,由SFF决定需要把数据包交给下一个SF或下一个SFF。当前的环境firewall(SF)处理完数据后应该把数据返回到SF接收数据的端口4789,但却返回到了6633,所以不正确。修改(/home/odl/sfc-oxygen/sfc-py/sfc/common/services.py +288),把6633端口修改为4789,就可以了。这里不应该把端口号写死为6633,应该根据不同的SFF查找对应的端口号,现在这里是写死的就先写死吧。
重启start_agent进程,使修改后的代码生效,然后从第一部开始部署,SFC正常工作后如下图所示:
根据以上实验步奏重新部署两个SF的SFC环境,截图如下:
参考:
Cisco Network Service Chaining Solutions
OpenDaylight Documentation Release Boron