本文转自https://blog.csdn.net/wuzhengfei1112/article/details/77142147,若有侵权,请与我联系删除,谢谢
本文代码摘录的时候,将一些与本流程无关的内容去掉了,如有需要请看源码。
一、 闲言碎语
使用rpc框架已经多年了,虽然之前有研究过rpc的过程,但是却不曾详细阅读过dubbo的源码,探究过其中的设计思路与亮点。所以抽时间阅读了一下dubbo的源码,分享出来和大家一起学习。
二、 目标与示例
1. 目标
l 探究dubbo rpc实现原理。
l 探究rpc从发出请求到收到返回结果这整个过程的详细过程。
l 学习rpc的负载均衡原理。
l 学习服务暴露、服务发现的原理以及实现细节。
l 多线程中dubbo是如何做到将返回结果和每个线程一一对应的。
本文重点为源码分析和模型实现分析,如果对dubbo的概念和使用不熟悉,情移步官网。
本文的所有分析均基于dubbo 2.5.3版本。
本文假定使用zookeeper管理服务。
2. 示例代码
以下的分析基于以下配置方式。不同的配置方式并不会影响本文所需要解决的几个问题,只是一下方式配置会比较便于理解,所以这里依次做为示例。
1) consumer
<bean id="rpcServiceRef" class="com.alibaba.dubbo.config.spring.ReferenceBean">
        <property name="interface" value="com.wzf.service.RpcService"/>
        <property name="application" ref="dubboApplicationConfig"/>
        <property name="registry" ref="dubboRegistryConfig"/>
        <property name="version" value="dev"/>
        <property name="timeout" value="3000"/>
        <property name="retries" value="0"/>
        <property name="check" value="false"/>
    </bean>
2) provider
    <bean id="rpcServiceExport" class="com.alibaba.dubbo.config.spring.ServiceBean">
        <property name="interface" value="com.wzf.funny.service.RpcService"/>
        <property name="ref" ref="rpcServiceImpl"/>
        <property name="application" ref="dubboApplicationConfig"/>
        <property name="registry" ref="dubboRegistryConfig"/>
        <property name="protocol" ref="dubboProtocolConfig"/>
        <property name="version" value="dev"/>
        <property name="timeout" value="0"/>
        <property name="retries" value="0"/>
    </bean>
三、 服务调用模型
1. dubbo的模块模型

dubbo的模块模型有些复杂,不太容易看懂,如果你也有同感的话,可以看一下本文后面的几部分,他们详细讲述了dubbo中rpc的调用链,其中包括了核心的几个类,比较便于理解。
2. 服务调用关系模型
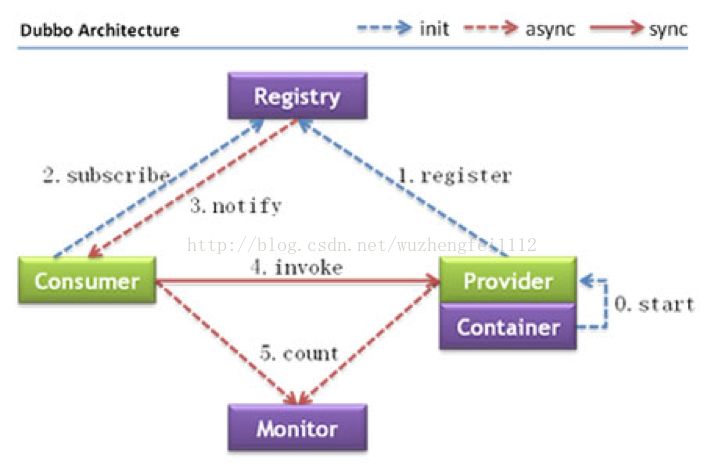
如图所示,dubbo的RPC调用模型分为registry、provider、consumer、monitor这几个部分。此图展示了从服务注册、发现、调用的全过程,但dubbo是如何做到的呢?其实这个问题包括了以下几个问题:provider如何注册服务到zookeeper;consumer如何从zookeeper拉取provider信息;provider变化以后,zookeeper如何告知consumer;consumer如何调用provider。另外,监控逻辑很简单本文暂时不做分析。
3. Provider
从源码上看ServiceBean主要完成以下几件工作:服务暴露,取消暴露服务。
1) 暴露服务
服务暴露开始于ServiceBean的afterPropertiesSet方法,此方法在ServiceBean的所有属性都被赋值以后被BeanFactory调用。服务暴露的调用链是: ServiceConfig#export-> ServiceConfig#doExport -> ServiceConfig#doExportUrls -> ServiceConfig#doExportUrlsFor1Protocol-> ServiceConfig#exportLocal(URL url)。 暴露服务其实包括两个类容:
l 将Invoker存入AbstractProtocol#exporterMap,调用服务时从次map中取出Invoker直接使用。
protected finalSet<Invoker<?>> invokers = new ConcurrentHashSet<Invoker<?>>();
其中key为:com.wzf.funny.service.ArticleService:dev,value为invoker对象
l 将url注册到zookeeper。
此过程的入口在RegistryProtocol#export方法中,调用链为:
RegistryProtocol#export -> FailbackRegistry#register ->AbstractRegistry#register -> ZookeeperRegistry#doRegister -> ZookeeperClient#create-> AbstractZookeeperClient#create
2) 服务发现
ZookeeperRegistry是服务发现的核心类之一,实现了《服务调用关系模型》中的register、subscribe、notify。以下分析一下几个主要的方法。
l 构造函数
从以下代码中可以看到,zkClient创建成功以后,会监听RECONNECTED事件,recover方法主要做一件事:将需要暴露的url放在failedRegistered(Set<URL>)中,将需要订阅的服务放在failedSubscribed(Set<URL>)中。说明RECONNECTED时,因为所有需要暴露的服务都需要重新注册,所以其实是将需要暴露、订阅的url都放到failedRegistered、failedSubscribed中。
public ZookeeperRegistry(URL url,ZookeeperTransporter zookeeperTransporter) {
       super(url);
       //其他代码省略
       this.root = group;
        zkClient = zookeeperTransporter.connect(url);
       zkClient.addStateListener(new StateListener() {
           public void stateChanged(intstate) {
                if (state == RECONNECTED) {
                      try {
                                recover();
                          } catch (Exception e){
                                logger.error(e.getMessage(),e);
                          }
                }
           }
       });
}
创建zkclient的url示例如下:
zookeeper://localhost:2181/com.alibaba.dubbo.registry.RegistryService?application=funny&dubbo=2.5.3&interface=com.alibaba.dubbo.registry.RegistryService&pid=38796×tamp=1502594657663
l register(URL url)
注册url代表的服务到zookeeper
l unregister(URLurl)
从zookeeper中删除之前注册的服务
l subscribe(URL url,NotifyListener listener)
订阅url的服务
l unsubscribe(URL url,NotifyListener listener)
取消订阅url对应的服务
l notify(URL url,NotifyListener listener, List<URL> urls)
通知
l retry()
上面提到过,在recover()中将需要暴露的服务放到failedRegistered(Set<URL>)中,将需要订阅的服务放在failedSubscribed(Set<URL>)中,并没有真正的重新暴露服务或者订阅服务,这个工作是放在retry()中的,另外notify、doUnsubscribe,failedUnregistered也都放在此方法中处理。retry()方法的主要逻辑如下(为了方便阅读,我删掉了部分代码),retry被一个定时线程调用:
   protected voidretry() {
       if (! failedRegistered.isEmpty()) {
           for (URL url : failed) {
              doRegister(url);
              failedRegistered.remove(url);
           }
       }
       if(! failedUnregistered.isEmpty()) {
           for (URL url : failed) {
              doUnregister(url);
              failedUnregistered.remove(url);
           }
       }
       if (! failedSubscribed.isEmpty()) {
          for(Map.Entry<URL, Set<NotifyListener>> entry: failed.entrySet()) {
              URL url= entry.getKey();
              Set<NotifyListener> listeners = entry.getValue();
              for(NotifyListener listener : listeners) {
                  doSubscribe(url, listener);
                  listeners.remove(listener);
              }
           }
       }
       if (! failedUnsubscribed.isEmpty()) {
          for(Map.Entry<URL, Set<NotifyListener>> entry: failed.entrySet()) {
              URL url= entry.getKey();
              Set<NotifyListener> listeners = entry.getValue();
              for(NotifyListener listener : listeners) {
                  doUnsubscribe(url, listener);
                  listeners.remove(listener);
              }
           }
       }
       if (! failedNotified.isEmpty()) {
          for(Map<NotifyListener, List<URL>> values: failed.values()) {
             for(Map.Entry<NotifyListener, List<URL>> entry:values.entrySet()) {
                NotifyListener listener = entry.getKey();
                List<URL> urls = entry.getValue();
                listener.notify(urls);
                values.remove(listener);
             }
           }
       }
   }

     this.retryFuture= retryExecutor.scheduleWithFixedDelay(new Runnable() {
           public void run() {
               //检测并连接注册中心
               try{
                   retry();
               } catch(Throwable t) { //防御性容错
                   logger.error("Unexpected error occur at failed retry,cause: " + t.getMessage(), t);
               }
           }
       }, retryPeriod, retryPeriod, TimeUnit.MILLISECONDS);
3) 取消暴露服务
取消服务暴露是将服务从zk中移除的过程,保证此后consumer无法再使用此服务。ZkclientZookeeperClient中订阅了所有状态改变的事件,状态的改变最终会触发调用recover方法,从而导致调用unRegister方法,将zk节点删除。
另外,因为在zk那边建立的是临时的节点,所以服务器和zk断开联系后,node将自动删除。Consumer将收到notify消息。
     publicZkclientZookeeperClient(URL url) {
           super(url);
           client= new ZkClient(url.getBackupAddress());
           client.subscribeStateChanges(new IZkStateListener() {
                publicvoid handleStateChanged(KeeperState state) throwsException {
                     ZkclientZookeeperClient.this.state = state;
                     if(state == KeeperState.Disconnected) {
                          stateChanged(StateListener.DISCONNECTED);
                     } elseif (state== KeeperState.SyncConnected) {
                          stateChanged(StateListener.CONNECTED);
                     }
                }
                publicvoid handleNewSession() throws Exception {
                     stateChanged(StateListener.RECONNECTED);
                }
           });
     }
4) RPC调用
l Wrapper类
调用Wrapper#getWrapper方法时,会尝试从WRAPPER_MAP中获取,如果获取到直接返回,如果获取不到,则进入makeWrapper方法创建一个,创建好了以后放入WRAPPER_MAP中。makeWrapper是一个核心的方法,这个方法中做对原有RpcService的封装,具体逻辑如下。
首先创建三个方法:setPropertyValue、getPropertyValue、invokeMethod,代码如下
     StringBuilder c1 = newStringBuilder("public void setPropertyValue(Object o, String n, Objectv){ ");
     StringBuilder c2 = newStringBuilder("public Object getPropertyValue(Object o, String n){ ");
     StringBuilder c3 = newStringBuilder("public Object invokeMethod(Object o, String n, Class[] p,Object[] v) throws " + InvocationTargetException.class.getName() + "{"};
然后遍历RpcService的所有属性、方法,在原有属性的get、set、invoke的时候添加一些逻辑,因为invokeMethod方法与rpc关系最为密切的方法,所以重点讨论此方法。生成invokemethod的逻辑就是一个字符串拼接的过程,就不讨论了,这里将结果贴出来讨论一下,如下。其中: 2表示methodName; 4表示arguments;$w表示returnType
publicObject invokeMethod(Object o, String n, Class[] p,Object[] v)
throwsjava.lang.reflect.InvocationTargetException {
com.wzf.funny.service.ArticleService w;
try{
w= ((com.wzf.funny.service.ArticleService) $1);
} catch(Throwable e) {
thrownew IllegalArgumentException(e);
}
try{
if("pageQuery".equals($<span class="hljs-number">2</span>)&& $3.length == 2) {
return($w) w.pageQuery((com.wzf.funny.query.ArticleQuery)$4[0], ((Boolean) $4[1]).booleanValue());
}
} catch(Throwable e) {
thrownewjava.lang.reflect.InvocationTargetException(e);
}
thrownewcom.alibaba.dubbo.common.bytecode.NoSuchMethodException(
"Notfound method \"" + $2 + "\" in classcom.wzf.funny.service.ArticleService.");
}
最后构建Wrapper对象,构建的时候加上一些属性、方法,其中c1表示setPropertyValue,c2表示getPropertyValue ,c3表示invokeMethod。代码如下:
    ClassGenerator cc= ClassGenerator.newInstance(cl);
     cc.setClassName(( Modifier.isPublic(c.getModifiers()) ? Wrapper.class.getName() : c.getName()+ "$sw" ) + id );
     cc.setSuperClass(Wrapper.class);
     cc.addDefaultConstructor();
     cc.addField("publicstatic String[] pns;"); // property name array.
     cc.addField("public static " + Map.class.getName() + "pts;"); // property type map.
     cc.addField("publicstatic String[] mns;"); // all method name array.
     cc.addField("publicstatic String[] dmns;"); // declared method name array.
     for(int i=0,len=ms.size();i<len;i++)
          cc.addField("public static Class[] mts" + i + ";");
     cc.addMethod("publicString[] getPropertyNames(){ return pns; }");
     cc.addMethod("publicboolean hasProperty(String n){ return pts.containsKey($1); }");
     cc.addMethod("publicClass getPropertyType(String n){ return (Class)pts.get($1); }");
     cc.addMethod("publicString[] getMethodNames(){ return mns; }");
     cc.addMethod("publicString[] getDeclaredMethodNames(){ return dmns; }");
     cc.addMethod(c1.toString());
     cc.addMethod(c2.toString());
     cc.addMethod(c3.toString());
     Class<?> wc= cc.toClass();
     // setup static field.
     wc.getField("pts").set(null,pts);
     wc.getField("pns").set(null,pts.keySet().toArray(new String[0]));
     wc.getField("mns").set(null,mns.toArray(newString[0]));
     wc.getField("dmns").set(null,dmns.toArray(newString[0]));
     int ix = 0;
     for( Methodm : ms.values())
          wc.getField("mts"+ ix++).set(null,m.getParameterTypes());
     return(Wrapper)wc.newInstance();
l JavassistProxyFactory#getInvoker
如下代码所示,在JavassistProxyFactory中创建Invoker时,其实创建的是AbstractProxyInvoker的子类,其中proxy为xml中配置的rpcServiceImpl对象,即我们的目标对象。当consumer发起Rpc请求时,会将classname、methodname、 parameterTypes、arguments这些数据传输过来,在wrapper.invokeMethod中通过动态代理技术,直接调用rpcServiceImpl中的 methodname方法。
   public <T> Invoker<T>getInvoker(T proxy, Class<T> type, URL url){
        // TODO Wrapper类不能正确处理带$的类名
       final Wrapper wrapper = Wrapper.getWrapper(proxy.getClass().getName().indexOf('$') < 0 ? proxy.getClass(): type);
       return new AbstractProxyInvoker<T>(proxy, type, url) {
           @Override
           protectedObject doInvoke(T proxy, String methodName,   Class<?>[] parameterTypes, Object[] arguments) throwsThrowable {
                return wrapper.invokeMethod(proxy, methodName, parameterTypes, arguments);
           }
       };
   }
4. Consumer
消费的核心是负载均衡,和单nio通道在多线程情况下的实现逻辑。
1) 负载均衡算法
l RandomLoadBalance
先计算是否所有invoker的权重是否相同,相同则直接random一下,否则根据权重加权。主要代码如下:
       if (totalWeight > 0 && ! sameWeight) {
            // 如果权重不相同且权重大于0则按总权重数随机
           int offset = random.nextInt(totalWeight);
            // 并确定随机值落在哪个片断上
           for (int i = 0; i < length; i++) {
               offset-= getWeight(invokers.get(i), invocation);
               if(offset < 0) {
                   return invokers.get(i);
               }
           }
       }
        // 如果权重相同或权重为0则均等随机
       return invokers.get(random.nextInt(length));
l LeastActiveLoadBalance
先计算出一个最少活跃数的invoker集合,然后从这个集合中随机选取一个,然后计算是否所有invoker的权重是否相同,相同则直接random一下,否则根据权重加权取invoker。代码如下:
       int length = invokers.size(); // 总个数
       int leastActive = -1; // 最小的活跃数
       int leastCount = 0; // 相同最小活跃数的个数
       int[] leastIndexs = newint[length];// 相同最小活跃数的下标
       int totalWeight = 0; // 总权重
        int firstWeight = 0; // 第一个权重,用于于计算是否相同
       boolean sameWeight = true;// 是否所有权重相同
       for (int i = 0; i < length; i++) {
           Invoker<T> invoker = invokers.get(i);
           int active = RpcStatus.getStatus(invoker.getUrl(), invocation.getMethodName()).getActive();// 活跃数
           int weight = invoker.getUrl().getMethodParameter(invocation.getMethodName(), Constants.WEIGHT_KEY, Constants.DEFAULT_WEIGHT);// 权重
           if (leastActive == -1 || active< leastActive) { //发现更小的活跃数,重新开始
               leastActive= active; // 记录最小活跃数
               leastCount= 1; // 重新统计相同最小活跃数的个数
               leastIndexs[0]= i; // 重新记录最小活跃数下标
               totalWeight= weight; // 重新累计总权重
               firstWeight= weight; // 记录第一个权重
               sameWeight= true; // 还原权重相同标识
           } else if (active == leastActive) { // 累计相同最小的活跃数
               leastIndexs[leastCount ++] = i;// 累计相同最小活跃数下标
               totalWeight+= weight; // 累计总权重
               //判断所有权重是否一样
               if(sameWeight && i > 0
                      && weight != firstWeight) {
                   sameWeight = false;
               }
           }
       }
        // assert(leastCount> 0)
       if (leastCount == 1) {
            // 如果只有一个最小则直接返回
           return invokers.get(leastIndexs[0]);
       }
       if (! sameWeight && totalWeight> 0) {
            // 如果权重不相同且权重大于0则按总权重数随机
           int offsetWeight = random.nextInt(totalWeight);
            // 并确定随机值落在哪个片断上
           for (int i = 0; i < leastCount;i++) {
               intleastIndex = leastIndexs[i];
               offsetWeight-= getWeight(invokers.get(leastIndex), invocation);
               if(offsetWeight <= 0)
                   return invokers.get(leastIndex);
           }
       }
        // 如果权重相同或权重为0则均等随机
        return invokers.get(leastIndexs[random.nextInt(leastCount)]);
l RoundRobinLoadBalance
记录一个调用次数的数字,然后每次调用时对总invoker取模,并在调用次数基础上自增;权重不同的时候,逻辑稍有不同,具体可以参考远嘛。主要代码如下:
       AtomicPositiveInteger sequence= sequences.get(key);
       if (sequence == null){
           sequences.putIfAbsent(key, newAtomicPositiveInteger());
           sequence= sequences.get(key);
       }
       // 取模轮循
       return invokers.get(sequence.getAndIncrement()% length);
l ConsistentHashLoadBalance
计算一致性hash的值,然后选取invoker。代码如下:
       String key = invokers.get(0).getUrl().getServiceKey() + "." + invocation.getMethodName();
       int identityHashCode = System.identityHashCode(invokers);
       ConsistentHashSelector<T> selector= (ConsistentHashSelector<T>) selectors.get(key);
       if (selector == null|| selector.getIdentityHashCode() != identityHashCode) {
           selectors.put(key, newConsistentHashSelector<T>(invokers, invocation.getMethodName(), identityHashCode));
           selector= (ConsistentHashSelector<T>) selectors.get(key);
       }
       return selector.select(invocation);
2) Invoker
l FactoryBean创建proxy的调用链:
ReferenceBean#getObject–>ReferenceBean#get–>ReferenceConfig#init–>ReferenceBean#createProxy。
在ReferenceBean#createProxy()方法中创建Invoker;通过Invoker创建proxy。
l 创建Invoker,并向zk注册监听的consumer。
RegistryProtocol#doRefer–>RegistryProtocol#doRefer–>FailbackRegistry#register–>FailbackRegistry#doRegister–>ZookeeperRegistry#doRegister–>zkClient#create
在RegistryProtocol#doRefer方法中,除了调用FailbackRegistry#register注册服务以外,还会调用RegistryDirectory#subscribe来订阅此服务,次操作会注册Listener。
Consumer url示例:
consumer://192.168.222.34/com.wzf.funny.service.RpcService?application=weixin&category=consumers&check=false&dubbo=2.5.3&interface=com.wzf.funny.service.RpcService&methods=sayHello&pid=44244&retries=0&revision=0.1.0-SNAPSHOT&side=consumer&timeout=5000×tamp=1502795345908&version=dev
3) InvokerInvocationHandler
示例代码中com.alibaba.dubbo.config.spring.ReferenceBean是一个FactoryBean,通过context.getBean方法获取的是ReferenceBean#getObject方法的返回结果,ReferenceBean#getObject()方法返回的是一个proxy对象,此proxy持有一个InvokerInvocationHandler属性,如下图所示

rpc调用示例代码如下:
rpcService.sayHello()
rpcService是一个proxy对象(ReferenceBean#getObject()返回的对象),当调用sayHello()方法时,最终由InvokerInvocationHandler#invoker处理。
5 多线程下的通信
DubboInvoker#doInvoke方法中,在ExchangeClient#request(inv,timeout)调用时,返回一个DefaultFuture对象,接着会调用DefaultFuture.get()方法(等待返回结果)。
对于consumer端而言,服务器会为每一个请求创建一个线程,因为rpc操作是一个慢动作,为了节省资源,当线程发送rpc请求后,需要让当前线程释放资源、进入等待队列,当获取到返回结果以后,再唤醒这个线程。
RPC请求的过程为:每一个RPC请求都有一个唯一的id,RPC请求的时候,会将此id也发送给provider;provider处理完请求后会将此id和返回结果一同返回给consumer;consumer收到返回信息以后解析出id,然后从FUTURES中找到相对应的DefaultFuture,并通过DefaultFuture.done#signal()唤醒之前等待线程。
下面根据源码详细讨论一下多线程情况下rpc请求的细节,即dubbo多线程模型的实现。
l DefaultFuture#field
这里列出了与多线程相关的几个重要的属性
   private finalLock                           lock = new ReentrantLock();
   private finalCondition                      done = lock.newCondition();
   private staticfinal Map<Long, DefaultFuture> FUTURES   = newConcurrentHashMap<Long, DefaultFuture>();
l DefaultFuture#构造函数
创建好DefaultFuture对象以后,将DefaultFuture存入了FUTURES中。其实每一次请求,多会生成一个唯一的id,即对于每个服务器而言,id唯一。
 public DefaultFuture(Channel channel, Request request,int timeout){
       this.channel = channel;
       this.request = request;
       this.id = request.getId();
       this.timeout = timeout> 0 ? timeout : channel.getUrl().getPositiveParameter(Constants.TIMEOUT_KEY, Constants.DEFAULT_TIMEOUT);
        // put into waitingmap.
       FUTURES.put(id, this);
       CHANNELS.put(id, channel);
   }
l DefaultFuture#get
主要逻辑是:获取锁,调用await方法,此时当前线程进入等待队列,此线程会有两种结果过:要么超时,要么被唤醒;如果被唤醒,则返回rpc的结果。
  public Object get(int timeout) throws RemotingException {
       if (timeout <= 0) {
           timeout =Constants.DEFAULT_TIMEOUT;
       }
       if (! isDone()) {
           long start = System.currentTimeMillis();
           lock.lock();
           try {
               while(! isDone()) {
                   done.await(timeout,TimeUnit.MILLISECONDS);
                   if (isDone() || System.currentTimeMillis() - start > timeout){
                       break;
                   }
               }
           } catch(InterruptedException e) {
               thrownew RuntimeException(e);
           } finally{
               lock.unlock();
           }
           if (!isDone()) {
               thrownew TimeoutException(sent > 0, channel,getTimeoutMessage(false));
           }
       }
       returnreturnFromResponse();
   }
l DefaultFuture#received
收到返回结果时,调用此方法。首先从FUTURES中根据id获取DefaultFuture,如果不存在,打印一条日志;如果存在则通过signal释放一个唤醒信号,将线程从等待队列中唤醒。
    public staticvoid received(Channel channel, Response response){
       try {
           DefaultFuture future= FUTURES.remove(response.getId());
           if (future != null){
               future.doReceived(response);
           } else {
                logger.warn("Thetimeout response finally returned at ")。
           }
       } finally {
           CHANNELS.remove(response.getId());
       }
   }

   private voiddoReceived(Response res) {
       lock.lock();
       try {
           response= res;
           if (done != null) {
               done.signal();
           }
       } finally {
           lock.unlock();
       }
       if (callback != null){
           invokeCallback(callback);
       }
   }
DefaultFuture#received
以下代码是用来从FUTURES清理rpc请求超时的DefaultFuture
   private staticclass RemotingInvocationTimeoutScan implements Runnable {
       public void run() {
           while (true) {
               try{
                   for (DefaultFuture future: FUTURES.values()) {
                       if (future == null || future.isDone()){
                          continue;
                       }
                       if (System.currentTimeMillis() - future.getStartTimestamp() > future.getTimeout()) {
                           // create exception response.
                          Response timeoutResponse = new Response(future.getId());
                          // set timeout status.
                          timeoutResponse.setStatus(future.isSent() ? Response.SERVER_TIMEOUT : Response.CLIENT_TIMEOUT);
                          timeoutResponse.setErrorMessage(future.getTimeoutMessage(true));
                          // handle response.
                          DefaultFuture.received(future.getChannel(),timeoutResponse);
                       }
                   }
                   Thread.sleep(30);
               } catch(Throwable e) {
                   logger.error("Exception when scan the timeoutinvocation of remoting.", e);
               }
           }
       }
   }
   static {
       Thread th = new Thread(newRemotingInvocationTimeoutScan(), "DubboResponseTimeoutScanTimer");
       th.setDaemon(true);
       th.start();
   }
四、 RPC调用流程
1. 简化流程图
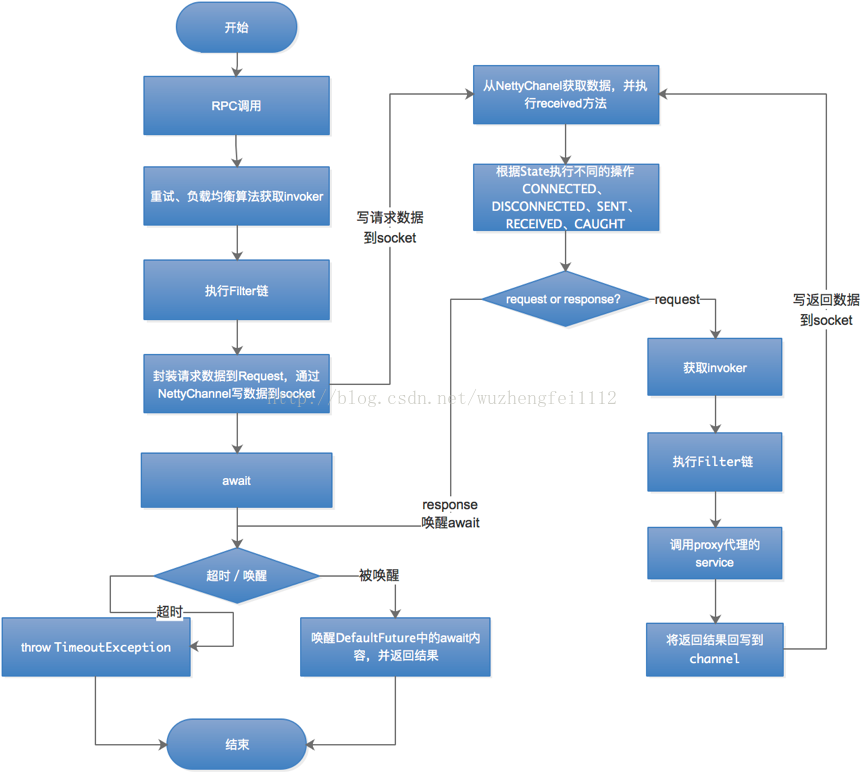
此流程图是一个简化的流程图,主要描述dubbo调用的全过程。
RPC调用时,Consumer根据负载均衡算法获取invoker,在执行完filter链以后,就开始平装数据,发送数据到socket中,consumer这一端通过ReentrantLock进入await状态。
Provider从socket获取数据后,执行receive方法, 接着执行Filter链,接着找到invoker通过代理对象执行Service,最后将返回结果写入socket。
Consumer收到返回结果以后,唤醒之前await的内容,然后将返回结果返回给调用方。
2. 完整流程图
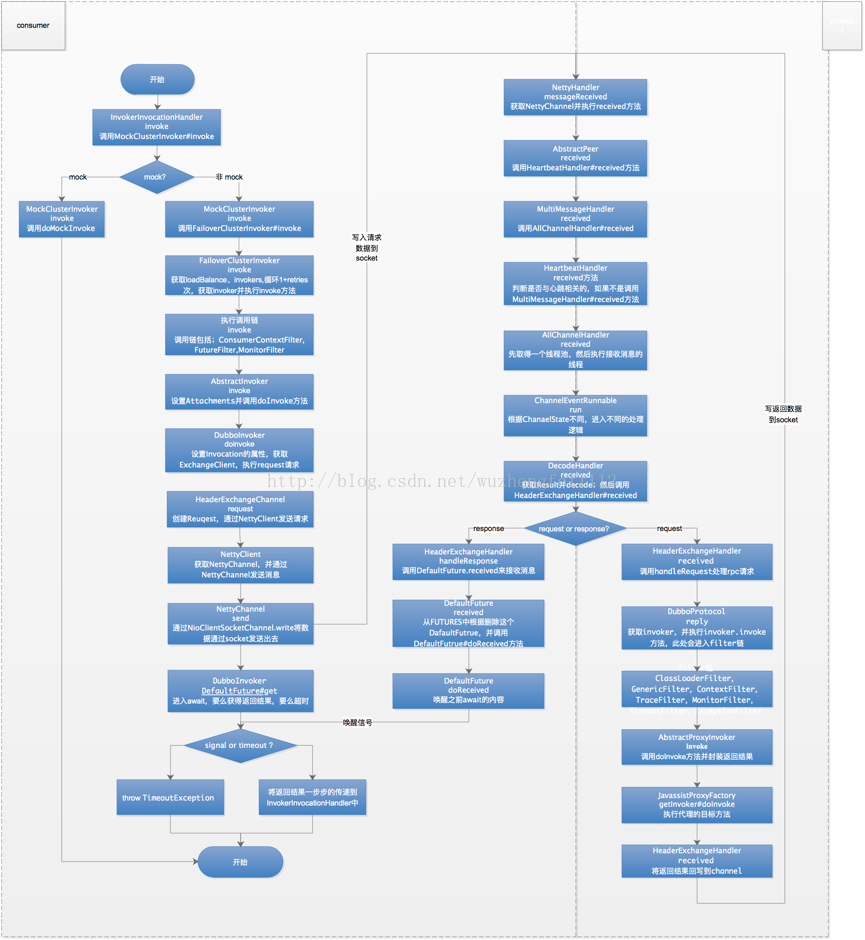
如上图所示,这是一个完整的调用流程图,包括了执行过程中主要的类和方法。
后续内容主要是对次流程图的详细描述,如果次流程图已经完全清晰,可以忽略后面的内容。
五、 consumer端远程调用请求链
对远程方法的调用,其实是对InvokerInvocationHandler#invoke的调用。
1. InvokerHandler
1) InvokerInvocationHandler#invoke
对执行方法做简单处理(toString、hashCode、equals这些方法不调用远程接口)后,执行MockClusterInvoker#invoke方法。
       if (method.getDeclaringClass() == Object.class) {
           return method.invoke(invoker,args);
       }
       if ("toString".equals(methodName) && parameterTypes.length == 0) {
           return invoker.toString();
       }
       if ("hashCode".equals(methodName) && parameterTypes.length == 0) {
           return invoker.hashCode();
       }
       if ("equals".equals(methodName)&& parameterTypes.length == 1) {
           return invoker.equals(args[0]);
       }
        returninvoker.invoke(newRpcInvocation(method, args)).recreate();
3) MockClusterInvoker#invoke
检查是否是mock,如果是,mock返回结果;如果不是的话进入FailoverClusterInvoker#invoke方法。
       String value = directory.getUrl().getMethodParameter(invocation.getMethodName(), Constants.MOCK_KEY, Boolean.FALSE.toString()).trim();
       if (value.length() == 0 || value.equalsIgnoreCase("false")){
       //no mock
       result = this.invoker.invoke(invocation);
       } else if (value.startsWith("force")) {
        //force:directmock
       result = doMockInvoke(invocation,null);
       } else {
        //fail-mock
             result = this.invoker.invoke(invocation);
       }
2. 解析出loadBalance,通过loadBalance算法获取Invoker对象。
1) FailoverClusterInvoker#invoke方法
先执行父类AbstractClusterInvoker#invoke方法,获取List<Invoker<T>> invokers,loadBanlace;然后调用FailoverClusterInvoker#doInvoke方法。
       LoadBalance loadbalance;
       List<Invoker<T>> invokers= list(invocation);
       if (invokers != null&& invokers.size() > 0) {
           loadbalance= ExtensionLoader.getExtensionLoader(LoadBalance.class).getExtension(invokers.get(0).getUrl().getMethodParameter(invocation.getMethodName(),Constants.LOADBALANCE_KEY, Constants.DEFAULT_LOADBALANCE));
       } else {
           loadbalance= ExtensionLoader.getExtensionLoader(LoadBalance.class).getExtension(Constants.DEFAULT_LOADBALANCE);
       }
       RpcUtils.attachInvocationIdIfAsync(getUrl(), invocation);
        return doInvoke(invocation, invokers, loadbalance);
2) FailoverClusterInvoker#doInvoke
循环1+retries次,知道成功或者重试次数耗尽,每次都先通过父类AbstractClusterInvoker#doselect方法获取invoker;然后执行invoker.invoke(),这个方法会进入一个调用链。
其中需要注意的是,重试获取invoker的时候,需要间检查是否有invokers被销毁,invokers是否都可用
checkWheatherDestoried();
copyinvokers = list(invocation);
//重新检查一下
checkInvokers(copyinvokers,invocation);
3) AbstractClusterInvoker#doselect
如果没有可用的invoker,直接返回;如果只有一个invoker,那么直接返回;如果有两个invoker,改成轮询算法,即如果上次使用了invokers.get(0),这次就直接使用invokers.get(1);如果有更多invoker,则通过loadBalance进行选择;如果之前的选中列表中已经包含了此次选中的invoker,那么重新选择。Dubbo默认使用random方式进行负载均衡。
        if (invokers == null|| invokers.size() == 0)
           return null;
       if (invokers.size() == 1)
           return invokers.get(0);
        // 如果只有两个invoker,退化成轮循
       if (invokers.size() == 2 && selected != null&& selected.size() > 0) {
           return selected.get(0) == invokers.get(0)? invokers.get(1) : invokers.get(0);
       }
       Invoker<T> invoker= loadbalance.select(invokers, getUrl(), invocation);

        //如果selected中包含(优先判断) 或者 不可用&&availablecheck=true 则重试.
       if( (selected != null&& selected.contains(invoker))  ||(!invoker.isAvailable()&& getUrl()!=null && availablecheck)){
           try{
               Invoker<T> rinvoker = reselect(loadbalance,invocation, invokers,selected, availablecheck);
               if(rinvoker != null){
                   invoker =  rinvoker;
               }else{
                   //看下第一次选的位置,如果不是最后,选+1位置.
                   int index = invokers.indexOf(invoker);
                   try{
                       //最后在避免碰撞
                       invoker = index<invokers.size()-1?invokers.get(index+1):invoker;
                   }catch (Exception e){
                       logger.warn(e.getMessage()+" maybecause invokers list dynamic change, ignore.",e);
                   }
               }
           }catch(Throwable t){
                logger.error("clustorrelselect fail reason is :"+t.getMessage() +" if can notslove ,you can set cluster.availablecheck=false in url",t);
           }
       }
4) RandomLoadBalance#doSelect
先根据定义的weight(默认为100)对每个invoker进行加权,然后随机取出一个。
       int length = invokers.size(); // 总个数
       int totalWeight = 0; // 总权重
       boolean sameWeight = true;// 权重是否都一样
       for (int i = 0; i < length; i++) {
           int weight = getWeight(invokers.get(i), invocation);
           totalWeight+= weight; // 累计总权重
           if (sameWeight && i> 0
                   && weight != getWeight(invokers.get(i - 1), invocation)){
               sameWeight= false; // 计算所有权重是否一样
           }
       }
       if (totalWeight > 0 && ! sameWeight) {
            // 如果权重不相同且权重大于0则按总权重数随机
           int offset = random.nextInt(totalWeight);
            // 并确定随机值落在哪个片断上
           for (int i = 0; i < length; i++) {
               offset-= getWeight(invokers.get(i), invocation);
               if(offset < 0) {
                   return invokers.get(i);
               }
           }
       }
        // 如果权重相同或权重为0则均等随机
       return invokers.get(random.nextInt(length));
3. 执行invoke的Filter链。
调用链是在xml加载的时候注册进来的;执行时按照以下顺序执行调用链中的invoke方法。
com.alibaba.dubbo.rpc.filter.ConsumerContextFilter,
com.alibaba.dubbo.rpc.protocol.dubbo.filter.FutureFilter,
com.alibaba.dubbo.monitor.support.MonitorFilter
4. 执行invoke逻辑。
1) AbstractInvoker#invoke
设置invocation信息,包括invoker、interface、sync、context等。
       RpcInvocation invocation= (RpcInvocation) inv;
       invocation.setInvoker(this);
       if (attachment != null&& attachment.size() > 0) {
       invocation.addAttachmentsIfAbsent(attachment);
       }
       Map<String, String> context= RpcContext.getContext().getAttachments();
       if (context != null){
       invocation.addAttachmentsIfAbsent(context);
       }
       if(getUrl().getMethodParameter(invocation.getMethodName(),Constants.ASYNC_KEY, false)){
       invocation.setAttachment(Constants.ASYNC_KEY, Boolean.TRUE.toString());
       }
       RpcUtils.attachInvocationIdIfAsync(getUrl(), invocation);
       return doInvoke(invocation);
2) DubboInvoker#doInvoke
设置Invocation的属性,获取ExchangeClient,并执行request请求。
       RpcInvocation inv =(RpcInvocation) invocation;
       final String methodName = RpcUtils.getMethodName(invocation);
       inv.setAttachment(Constants.PATH_KEY, getUrl().getPath());
       inv.setAttachment(Constants.VERSION_KEY, version);

       ExchangeClient currentClient;
       if (clients.length== 1) {
           currentClient= clients[0];
       } else {
           currentClient= clients[index.getAndIncrement()% clients.length];
       }
       RpcContext.getContext().setFuture(null);
       return (Result) currentClient.request(inv,timeout).get();
3) DefaultFuture#get
进入await,等待provider返回结果。
       if (timeout <= 0) {
           timeout =Constants.DEFAULT_TIMEOUT;
       }
       if (! isDone()) {
           long start = System.currentTimeMillis();
           lock.lock();
           try {
               while(! isDone()) {
                   done.await(timeout,TimeUnit.MILLISECONDS);
                   if (isDone() || System.currentTimeMillis() - start > timeout){
                       break;
                   }
               }
           } catch(InterruptedException e) {
               thrownew RuntimeException(e);
           } finally{
               lock.unlock();
           }
           if (!isDone()) {
               thrownew TimeoutException(sent > 0, channel,getTimeoutMessage(false));
           }
       }
       returnreturnFromResponse();
5. request远程数据
1) HeaderExchangeChannel#requst
创建Reuqest,并通过NettyClient发送请求。在创建DefaultFuture时,会将次DefaultFuture放入FUTURES(一个ConcurrentHashMap)中,也会将Channel放入CHANNELS(一个ConcurrentHashMap)中。
       Request req = new Request();
       req.setVersion("2.0.0");
       req.setTwoWay(true);
       req.setData(request);
       DefaultFuture future = new DefaultFuture(channel,req, timeout);
       channel.send(req);
       return future;
2) NettyClient#request
获取NettyChannel,并通过NettyChannel发送消息
       Channel channel =getChannel();
       if (channel == null|| ! channel.isConnected()) {
          throw newRemotingException(this, "message can not send, becausechannel is closed . url:" + getUrl());
       }
        channel.send(message, sent);
3) NettyChannel#send
通过NioClientSocketChannel.write将数据通过socket发送出去。
       boolean success = true;
       int timeout = 0;
       try {
           ChannelFuture future= channel.write(message);
           if (sent) {
               timeout= getUrl().getPositiveParameter(Constants.TIMEOUT_KEY,Constants.DEFAULT_TIMEOUT);
               success= future.await(timeout);
           }
           Throwable cause= future.getCause();
           if (cause != null){
               throwcause;
           }
       } catch (Throwable e) {
           throw new RemotingException(this,"Failed to send message " + message + " to" + getRemoteAddress() + ", cause:" + e.getMessage(), e);
       }
6. 常见消息格式
Request [id=1, version=2.0.0,twoway=true, event=false, broken=false, data=RpcInvocation[methodName=generateArticle, parameterTypes=[long, class java.util.Date],arguments=[1, Sat Jul 29 15:46:46 CST 2017],attachments={path=com.wzf.funny.service.ArticleService,interface=com.wzf.funny.service.ArticleService, version=dev, timeout=500000}]]
六、 consumer端返回结果调用链
1. 处理从channel中获取的数据,执行Received方法
1) SimpleChannelHandler#handleUpstream
位于netty.jar中,是response的入口
       if (e instanceofMessageEvent) {
           messageReceived(ctx,(MessageEvent) e);
       }
2) NettyHandler#messageReceived
获取NettyChannel并执行received方法
        NettyChannel channel =NettyChannel.getOrAddChannel(ctx.getChannel(),url, handler);
       try {
           handler.received(channel, e.getMessage());
       } finally {
           NettyChannel.removeChannelIfDisconnected(ctx.getChannel());
       }
3) AbstractPeer#received
先判断channel是否关闭,然后直接调用HeartbeatHandler#received方法
       setReadTimestamp(channel);
       if (isHeartbeatRequest(message)) {
           Request req= (Request) message;
           if (req.isTwoWay()) {
               Response res = newResponse(req.getId(), req.getVersion());
               res.setEvent(Response.HEARTBEAT_EVENT);
               channel.send(res);
           }
           return;
       }
       if(isHeartbeatResponse(message)) {
           return;
       }
       handler.received(channel, message);
   }
4) HeartbeatHandler#received
判断是否与心跳相关的,如果不是调用MultiMessageHandler#received方法。
       setReadTimestamp(channel);
       if (isHeartbeatRequest(message)) {
           Request req= (Request) message;
           if (req.isTwoWay()) {
               Response res = newResponse(req.getId(), req.getVersion());
               res.setEvent(Response.HEARTBEAT_EVENT);
               channel.send(res);
           }
           return;
       }
       if(isHeartbeatResponse(message)) {
           return;
       }
       handler.received(channel, message);
   }
5) MultiMessageHandler#received
如果是MultiMessage则循环调用AllChannelHandler#received;如果不是直接调用AllChannelHandler#received
       if (message instanceofMultiMessage) {
           MultiMessage list= (MultiMessage)message;
           for(Objectobj : list){
               handler.received(channel, obj);
           }
       } else {
           handler.received(channel, message);
       }
1) AllChannelHandler#received
先取得一个线程池,然后执行接收消息的线程ChannelEventRunnable。
      ExecutorService cexecutor =getExecutorService();
       try {
           cexecutor.execute(new ChannelEventRunnable(channel,handler, ChannelState.RECEIVED, message));
       } catch (Throwable t) {
           throw new ExecutionException(message,channel, getClass() + " error when process received event .", t);
       }
6) ChannelEventRunnable#run
根据ChanaelState不同,进入不同的处理逻辑。
          switch (state) {
           case CONNECTED:
              handler.connected(channel);
               break;
           case DISCONNECTED:
              handler.disconnected(channel);
               break;
           case SENT:
              handler.sent(channel,message);
               break;
           case RECEIVED:
               handler.received(channel, message);
               break;
           case CAUGHT:
               handler.caught(channel, exception);
               break;
           default:
               logger.warn("unknown state: " + state + ",message is " + message);
7) DecodeHandler#received
从message中获取Result,并decode;然后调用HeaderExchangeHandler#received方法。
       if (message instanceofDecodeable) {
           decode(message);
       }
       if (message instanceofRequest) {
           decode(((Request)message).getData());
       }
       if (message instanceofResponse) {
           decode( ((Response)message).getResult());
       }
       handler.received(channel, message);
8) HeaderExchangeHandler#received
根据message的类型,进入不同处理逻辑,这里会进入handleResponse方法。
       channel.setAttribute(KEY_READ_TIMESTAMP, System.currentTimeMillis());
       ExchangeChannel exchangeChannel= HeaderExchangeChannel.getOrAddChannel(channel);
       try {
           if (message instanceofRequest) {
                // handlerequest.
           } else if (message instanceof Response) {
               handleResponse(channel, (Response) message);
           } else if (message instanceof String) {
                // handle string.
           } else {
               handler.received(exchangeChannel, message);
           }
       } finally {
          HeaderExchangeChannel.removeChannelIfDisconnected(channel);
       }
9) HeaderExchangeHandler#handleResponse
如果不是心跳消息,那么通过DefaultFuture.received来接收消息。
        if (response != null&& !response.isHeartbeat()) {
           DefaultFuture.received(channel, response);
       }
2. 唤醒await的内容,继续之前的调用执行
1) DefaultFuture#received
从FUTURES中(一个ConcurrentHasMap)根据删除这个DafaultFutrue,并调用DefaultFutrue#doReceived方法。
  try {
      DefaultFuture future = FUTURES.remove(response.getId());
      if (future != null){
          future.doReceived(response);
      } else {
           logger.warn("Thetimeout response finally returned at 。。。。。" );
      }
  } finally {
      CHANNELS.remove(response.getId());
  }
2) DefaultFuture#doReceived
先上锁,然后唤醒之前await的内容。
       lock.lock();
       try {
           response= res;
           if (done != null) {
               done.signal();
           }
       } finally {
           lock.unlock();
       }
       if (callback != null){
           invokeCallback(callback);
       }
1) DefaultFuture#get
被唤醒后跳出while循环,调用returnFromResponse方法,拿到返回结果以后就可以继续之前DubboInvoker#doInvoke的调用了。
       if (timeout <= 0) {
           timeout =Constants.DEFAULT_TIMEOUT;
       }
       if (! isDone()) {
           long start = System.currentTimeMillis();
           lock.lock();
           try {
               while(! isDone()) {
                   done.await(timeout,TimeUnit.MILLISECONDS);
                   if (isDone() || System.currentTimeMillis() - start > timeout){
                       break;
                   }
               }
           } catch(InterruptedException e) {
               thrownew RuntimeException(e);
           } finally{
               lock.unlock();
           }
           if (!isDone()) {
               thrownew TimeoutException(sent > 0, channel,getTimeoutMessage(false));
           }
       }
       returnreturnFromResponse();
3) DefaultFuture#returnFromResponse
判断返回结果:如果返回结果为空,则返回IllegalStateException;如果成功,则返回result信息;如果客户端/服务端超时,则返回TimeoutException;如果其他错误,返回RemotingException。
       Response res = response;
       if (res == null) {
           throw new IllegalStateException("responsecannot be null");
       }
       if (res.getStatus() == Response.OK) {
           return res.getResult();
       }
       if (res.getStatus() == Response.CLIENT_TIMEOUT || res.getStatus()== Response.SERVER_TIMEOUT) {
           throw new TimeoutException(res.getStatus()== Response.SERVER_TIMEOUT, channel, res.getErrorMessage());
       }
       throw new RemotingException(channel,res.getErrorMessage());
七、 Provider端响应Rpc请求
1. 处理从channel中获取的数据,执行Received方法
此过程和Consumer端收到返回结果后,处理返回结果的流程基本相同,唯一不同的地方是,在最后一步,进入的是HeaderExchangeHandler#handleRequest方法
1) HeaderExchangeHandler#handleRequest
调用通过DubboProtocol#replay来处理rpc请求
       Response res = new Response(req.getId(),req.getVersion());
       Object msg = req.getData();
        // handle data.
       Object result = handler.reply(channel,msg);
       res.setStatus(Response.OK);
       res.setResult(result);
       return res;
2. 获取invoker,执行invoke方法。
1) DubboProtocol#reply
根据message获取invoker对象,然后执行invoke方法,此调用会先进入一个拦截器链。
           if (message instanceofInvocation) {
               Invocation inv = (Invocation) message;
               Invoker<?> invoker = getInvoker(channel,inv);
                //如果是callback需要处理高版本调用低版本的问题
              RpcContext.getContext().setRemoteAddress(channel.getRemoteAddress());
               returninvoker.invoke(inv);
           }
           throw new RemotingException(channel,"Unsupported request: ");
3. 执行Filter链
1) Filter链
l com.alibaba.dubbo.rpc.filter.EchoFilter
methodName中包括$echo时,直接返回结果。
l com.alibaba.dubbo.rpc.filter.ClassLoaderFilter
invoke前将ContextClassLoader设置为接口的ClassLoader,调用结束后将ContextClassLoader为当前线程的ContextClassLoader。
l com.alibaba.dubbo.rpc.filter.GenericFilter
主要是针对泛化接口的实现。
l com.alibaba.dubbo.rpc.filter.ContextFilter
对RpcContext进行赋值。
l com.alibaba.dubbo.rpc.protocol.dubbo.filter.TraceFilter
方法调用的跟踪
l com.alibaba.dubbo.monitor.support.MonitorFilter
监控rpc调用情况。
l com.alibaba.dubbo.rpc.filter.TimeoutFilter
超时后,只是留了一个日志。
l com.alibaba.dubbo.rpc.filter.ExceptionFilter
异常处理
4. Invoker
1) InvokerWrapper#invoke
无业务逻辑,只是一层封装。
   public Result invoke(Invocation invocation) throwsRpcException {
       return invoker.invoke(invocation);
   }
2) AbstractProxyInvoker#invoke
封装返回结果。
 public Result invoke(Invocation invocation) throwsRpcException {
           return new RpcResult(doInvoke(proxy,invocation.getMethodName(), invocation.getParameterTypes(), invocation.getArguments()));
   }
3) JavassistProxyFactory#getInvoker
在之前调用getInvoier的时候,会创建一个内部类,AbstractProxyInvoker# doInvoke方法会触发次内部内的执行。
其中proxy就是Provider中定义的ref,即rpcServiceImpl。
另外除了JavassistProxyFactory以外,还有一个JdkProxyFactory。
   public <T> Invoker<T>getInvoker(T proxy, Class<T> type, URL url){

        // TODO Wrapper类不能正确处理带$的类名

       final Wrapper wrapper = Wrapper.getWrapper(proxy.getClass().getName().indexOf('$') < 0 ? proxy.getClass(): type);

       return new AbstractProxyInvoker<T>(proxy, type, url) {

           @Override

           protectedObject doInvoke(T proxy, String methodName,   Class<?>[] parameterTypes,

                Object[] arguments) throwsThrowable {

                return wrapper.invokeMethod(proxy, methodName, parameterTypes, arguments);

           }

       };

   }