前言
作为一名安卓开发人员,不会搭建框架在工作及面试过程中难免会显得有些low,必定搭建框架要熟悉很多常用的公共库以及封装,设计模式,等等基础知识,并且框架搭建的完善,对于后期项目的维护等等至关重要
首先介绍一下整体架构的流程

app主工程主要是壳工程,用来打包工程和链接各个模块的作用
整体模块分为两个模块 一个是首页 一个是我的模块 还有一个公共模块
homelibrary 主要是首页相关的功能
mylibrary 主要是我的相关的功能
commonlibrary 主要是放一些 项目相关的资源文件,工具类,等等公共的东西 也可以分为多个库进行细分,如第三方,网络请求等等,这里为了方便理解只用一个库来管理
将新建的库引入到项目工程中,
在settings.gradle文件中添加如下
include ':app', ':mylibrary', ':homelibrary', ':commonlibrary'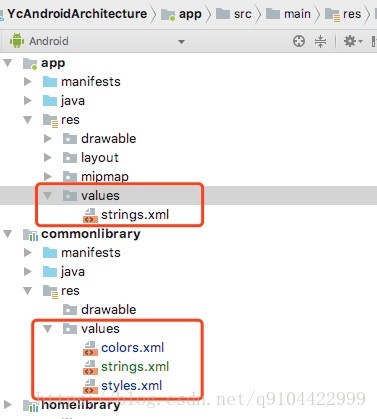
将主工程中的资源等相关资源移动到公共的库中方便管理,这样在首页模块和我的模块可以直接引用即可
gradle基本配置
项目(Project)的build.gradle:
首先在根目录中 创建一个gradle文件 名为config.gradle,主要放置所有的依赖,各个工程模块直接运用即可方便管理
//文件内部使用
def butterknifeLatestReleaseVersion = '8.5.1'
def supportLibraryVersion = '27.1.1'
//外部使用的安卓版本相关
ext {
    applicationId = 'com.yc.androidarchitecture'
    compileSdkVersion = 27
    targetSdkVersion = 27
    minSdkVersion = 19
    buildToolsVersion = "27.1.1"
    versionCode = 0
    versionName = "1.0.0"
}

//compile依赖的第三方库
ext.deps = [
        supportv4          : "com.android.support:support-v4:$supportLibraryVersion",
        supportv7          : "com.android.support:appcompat-v7:$supportLibraryVersion",
        recyclerviewv7     : "com.android.support:recyclerview-v7:$supportLibraryVersion",
        constraintlayout   : 'com.android.support.constraint:constraint-layout:1.1.2',
        butterknife        : "com.jakewharton:butterknife:$butterknifeLatestReleaseVersion",
        butterknifeCompiler: "com.jakewharton:butterknife-compiler:$butterknifeLatestReleaseVersion",
]
记得在根目录中将配置文件引入,否则无效
如:
// Top-level build file where you can add configuration options common to all sub-projects/modules.
//引入配置文件
apply from: "config.gradle"
buildscript {

    repositories {
        google()
        jcenter()
    }
    dependencies {
        classpath 'com.android.tools.build:gradle:3.0.1'

        classpath 'com.jakewharton:butterknife-gradle-plugin:8.5.1'
        // NOTE: Do not place your application dependencies here; they belong
        // in the individual module build.gradle files
    }
}

allprojects {
    repositories {
        google()
        jcenter()
    }
}

task clean(type: Delete) {
    delete rootProject.buildDir
}
工程(Module)的build.gradle:
以下是公共模块的引入
apply plugin: 'com.android.library'
apply plugin: 'com.jakewharton.butterknife'
android {
    compileSdkVersion 27
//将sdk版本修改为
// compileSdkVersion rootProject.ext.compileSdkVersion

    defaultConfig {
        minSdkVersion 15
        targetSdkVersion 27
//可以将上述写死的版本号修改为 如下格式 方便管理
//   minSdkVersion rootProject.ext.minSdkVersion
//   targetSdkVersion rootProject.ext.targetSdkVersion

        versionCode 1
        versionName "1.0"
        testInstrumentationRunner "android.support.test.runner.AndroidJUnitRunner"
    }
    buildTypes {
        release {
            minifyEnabled false
            proguardFiles getDefaultProguardFile('proguard-android.txt'), 'proguard-rules.pro'
        }
    }

}

dependencies {
    implementation fileTree(dir: 'libs', include: ['*.jar'])
//将v7包直接引入公共配置中的文件
    api deps.supportv7
    api deps.constraintlayout
    testImplementation 'junit:junit:4.12'
    androidTestImplementation 'com.android.support.test:runner:1.0.2'
    androidTestImplementation 'com.android.support.test.espresso:espresso-core:3.0.2'
//为什么butterknife不用api方式引入 在下一篇多模块引入第三方插件中详细讲解
    implementation deps.butterknife
    annotationProcessor deps.butterknifeCompiler

}
可能有些人会有因为 为什么引入的库是 api 而不是compile 或者implementation 这是因为在 studio3.0以后 要将compile替换成implementation , 那么implementation是指在本工程中(modle)使用 其他模块即使引入此modle 也无法访问该modle中引入的库 而 api 的形式正好解决了此问题 即 modle中引入 api类型的库 在其他模块中 只要引入该modle 同样也可以使用该模块中引入的库, 这样就不用再 本modle中 在次引入开源库
举例说明
首页模块gradle 配置
apply plugin: 'com.android.library'

android {
    compileSdkVersion rootProject.ext.compileSdkVersion
    defaultConfig {
        minSdkVersion rootProject.ext.minSdkVersion
        targetSdkVersion rootProject.ext.targetSdkVersion

        versionCode rootProject.ext.versionCode
        versionName rootProject.ext.versionName
        testInstrumentationRunner "android.support.test.runner.AndroidJUnitRunner"
    }
    buildTypes {
        release {
            minifyEnabled false
            proguardFiles getDefaultProguardFile('proguard-android.txt'), 'proguard-rules.pro'
        }
    }
}
dependencies {
    implementation fileTree(include: ['*.jar'], dir: 'libs')
//在此值需要引入 公共的库即可  不必在引入其他库 因为公共的库已经用api的形式引入
    api project(':commonlibrary')

}
我的模块 同理首页模块gradle配置 在此 不在做详细说明
以上就是基础框架搭建的全部过程 如有不了解的 可以去github下载源码 基础部分为分支1
或 加入安卓开发交流群:安卓帮595856941
相关链接:
下一篇: