简介
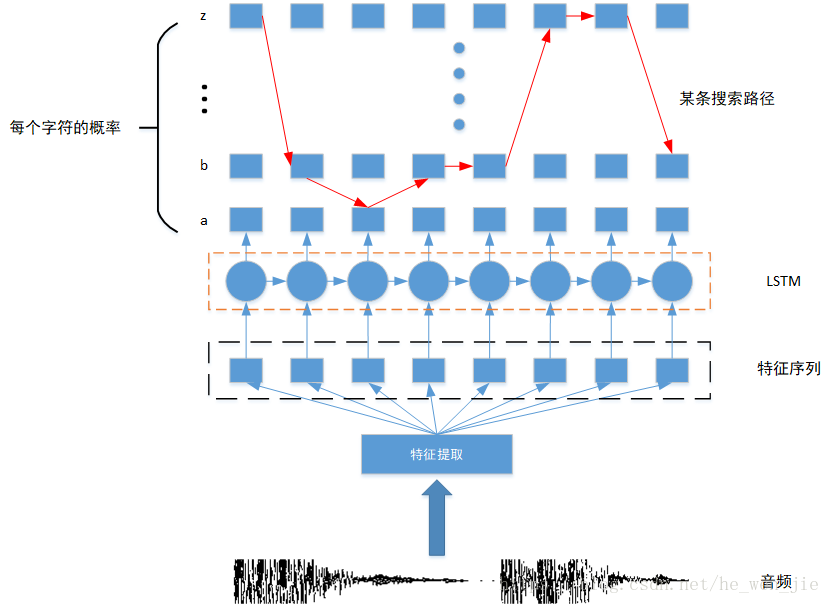
主要就是将一段音频转换成文字。下载一段音频和他的标签,使用库提取MFCC特征,得到这个特征输入到LSTM中,每一步输出所有标签的概率,如果使用Greedy Search就直接去最高概率的字符,如果使用Beam Search就。。。
第一步就是下载数据集了,作者使用的是LDC93S1数据集,一个wav的音频,一个txt的标签。其实只有一句话
0 1 She had your dark suit in greasy wash water all year.前两个数字我也不知道啥意思,反正没有用到。
导入需要的包
from six.moves.urllib.request import urlretrieve
from six.moves import xrange as range

import os
import sys
import numpy as np
首先是下载的代码,输入下载的路径url + filename,保存的文件名filename,如果下载到文件大小和实际大小不一致就抛出异常。
url = 'https://catalog.ldc.upenn.edu/desc/addenda/'
last_percent_reported = None


def maybe_download(filename, expected_bytes, force=False):
    """Download a file if not present, and make sure it's the right size."""
    if force or not os.path.exists(filename):
        print('Attempting to download:', filename)
        filename, _ = urlretrieve(url + filename, filename,
                                  reporthook=download_progress_hook)
        print('\nDownload Complete!')
    statinfo = os.stat(filename)

    if statinfo.st_size == expected_bytes: # 尺寸不一致,抛出异常
        print('Found and verified', filename)
    else:
        raise Exception(
            'Failed to verify ' + filename +
            '. Can you get to it with a browser?')
    return filename
下面这个是钩子函数,就是下载的时候,打印一些东西,这个就是为了好看
def download_progress_hook(count, blockSize, totalSize):
    """A hook to report the progress of a download. This is mostly intended for
    users with slow internet connections. Reports every 1% change in download
    progress.
    """
    global last_percent_reported
    percent = int(count * blockSize * 100 / totalSize)

    if last_percent_reported != percent:
        if percent % 5 == 0:
            sys.stdout.write("%s%%" % percent)
            sys.stdout.flush()
        else:
            sys.stdout.write(".")
            sys.stdout.flush()

        last_percent_reported = percent
上面两个都没啥用,我就是直接在网上找到这个数据集下载的。
然后需要将字符转换成数字(其实我觉得应该是单词,但是作者转的是字符,其实无所谓的,反正只要提取的特征长度大于转为数字后的标签长度ctc就可以运行,只不过解码出来的东西不一样而已)
ctc要求输入的每个标签中插入blank,例如标签是abc de,变成_a_b_c_d_e_。这里定义blank符号为<SPACE>,blank的编码为0。其他字符按照ASIC来表示。
# Constants
SPACE_TOKEN = '<space>'
SPACE_INDEX = 0
FIRST_INDEX = ord('a') - 1  # 字符进行编码

# Some configs
num_features = 13 # 下面使用mfcc提取特征,特征维度固定为13
# Accounting the 0th indice +  space + blank label = 28 characters
num_classes = (ord('z') - ord('a') + 1) + 1 + 1 # 小写字符+空格+blank
接着读取标签,进行转换
# Readings targets
with open(target_filename, 'r') as f:

    # Only the last line is necessary
    line = f.readlines()[-1] # 其实只有一行,假装好多行

    # Get only the words between [a-z] and replace period for none
    original = ' '.join(line.strip().lower().split(' ')[2:]).replace('.', '')
    targets = original.replace(' ', '  ')
    targets = targets.split(' ')
一开始怎么都看不懂作者的猴戏操作,
# 前两个是数字,我们不需要,分割的时候直接舍弃,保留后面的文本,
# 去除一行前后的空格换行等,都转成小写,空格分割,'.'舍弃
original = ' '.join(line.strip().lower().split(' ')[2:]).replace('.', '')
下面是猴戏操作
# 将空格换成空格空格,这是为了保留空格,上面说了空格也是标签,需要保存下来,但是以空格切分的时候,空格会被丢掉,
# 我们再添加一个空格使其保存下来
targets = original.replace(' ', '  ')
# 然后以空格切分
targets = targets.split(' ')
现在标签变成了这样
['she', '', 'had', '', 'your', '', 'dark', '', 'suit', '', 'in', '', 'greasy', '', 'wash', '', 'water', '', 'all', '', 'year']可以看到两个词之间多了一个空字符串,这个就是原来的空格,作者上面的操作真是让我头大啊,说白了就是把空格补成<space>。

我们再将所有的字符包括空格变成数字,这个标签就编码好了
# Adding blank label,如果是''就填入<SPACE>
targets = np.hstack([SPACE_TOKEN if x == '' else list(x) for x in targets])

# Transform char into index 转换成相应的编码
targets = np.asarray([SPACE_INDEX if x == SPACE_TOKEN else ord(x) - FIRST_INDEX
                      for x in targets])

'''
[19  8  5  0  8  1  4  0 25 15 21 18  0  4  1 18 11  0 19 21  9 20  0  9
 14  0  7 18  5  1 19 25  0 23  1 19  8  0 23  1 20  5 18  0  1 12 12  0
 25  5  1 18]
'''
但是CTC要求输入时稀疏矩阵,因此我们还需要将这个序列变成稀疏矩阵(虽然只有一行数据)。简单说一下稀疏矩阵是什么,假如我们有一个矩阵,
[[0, 1, 0, 0, 2],
 [1, 4, 0, 0, 0]]
可以看到有很多个0,只有几个是有值的,我们可以将其表示为稀疏矩阵,分为两部分,一个是值的位置,一个值的大小,讲道理应该还有一个shape
indices=[(0,1),(0,4),(1,0),(1,1)]
values = [ 1,    2,    1,    4  ]
shape = (2,5)
然后作者就猴戏了一个矩阵转稀疏矩阵的函数
def sparse_tuple_from(sequences, dtype=np.int32):
    """Create a sparse representention of x.
    Args:
        sequences: a list of lists of type dtype where each element is a sequence
    Returns:
        A tuple with (indices, values, shape)
    """
    indices = [] # 位置
    values = [] # 具体的值

    for n, seq in enumerate(sequences): # sequences是一个二维list
        indices.extend(zip([n]*len(seq), range(len(seq)))) # 生成所有值的坐标,不管是不是0,都存下来
        values.extend(seq)

    indices = np.asarray(indices, dtype=np.int64)
    values = np.asarray(values, dtype=dtype)
    shape = np.asarray([len(sequences), np.asarray(
        indices).max(0)[1]+1], dtype=np.int64) # shape的行就是seqs的个数,列就是最长的那个seq的长度

    return indices, values, shape
分析一下猴戏操作
indices.extend(zip([n]*len(seq), range(len(seq))))假如有一个序列为
a = [[1,2,3],[4],[5,6,7],[9,8]]那么[5,6,7]的位置如何存储呢?这个序列是第2个,所以n=2,所有的值的行都是2开头的,列的位置是依次增加的,所以
[n]*len(seq) = [2,2,2]
range(len(seq)) = [0,1,2]
zip([n]*len(seq), range(len(seq))) = (2,0),(2,1),(2,2)
就是这个意思。看了好久,发现作者把0也存下来了,一度觉得是错的,后来想想,其实稀疏矩阵就是存储形式不一样,没有说就不能存0,只要形式对了就是稀疏矩阵,就可以输入CTC。
标签总算是搞完了,现在可以看看数据是什么样子的,这里是提取mfcc特征
fs, audio = wav.read(audio_filename)

inputs = mfcc(audio, samplerate=fs) #[291, 13]
# Tranform in 3D array
train_inputs = np.asarray(inputs[np.newaxis, :]) # 添加一个batch的维度,其实只有一个样本
train_inputs = (train_inputs - np.mean(train_inputs))/np.std(train_inputs) # 标准化
train_seq_len = [train_inputs.shape[1]] # 序列长度

'''
shape = (1, 291, 13) # [batch,max_steps,n_features]
'''
接着就是让人喜欢的神经网络搭建了。
graph = tf.Graph()
with graph.as_default():
    # e.g: log filter bank or MFCC features
    # Has size [batch_size, max_stepsize, num_features], but the
    # batch_size and max_stepsize can vary along each step
    inputs = tf.placeholder(tf.float32, [None, None, num_features]) # [batch,max_steps,n_features]

    # Here we use sparse_placeholder that will generate a
    # SparseTensor required by ctc_loss op.
    targets = tf.sparse_placeholder(tf.int32) # ctc要求标签是稀疏矩阵

    # 1d array of size [batch_size]
    seq_len = tf.placeholder(tf.int32, [None]) # CTC要求输入序列长度,但是dynamic_rnn其实不需要的

    # Defining the cell
    # Can be:
    #   tf.nn.rnn_cell.RNNCell
    #   tf.nn.rnn_cell.GRUCell
    cells = []
    for _ in range(num_layers): # stack lstm
        cell = tf.nn.rnn_cell.LSTMCell(num_units)
        cells.append(cell)
    stack = tf.nn.rnn_cell.MultiRNNCell(cells)

    # The second output is the last state and we will no use that
    outputs, _ = tf.nn.dynamic_rnn(stack, inputs, seq_len, dtype=tf.float32)
    # 其实这个seq_len是不需要的,tf会自动补成batch中最长的序列,其实有点奇怪,一个batch中所有的学列长度应该都是一样的,不知道这个参数有什么用

    shape = tf.shape(inputs)
    batch_s, max_timesteps = shape[0], shape[1]

    # Reshaping to apply the same weights over the timesteps
    outputs = tf.reshape(outputs, [-1, num_hidden]) # 为了求logits,需要reshape [batch,max_steps,num_hidden]->[batch*max_steps,num_hidden]

    # Truncated normal with mean 0 and stdev=0.1
    # Tip: Try another initialization

    W = tf.Variable(tf.truncated_normal([num_hidden,
                                         num_classes],
                                        stddev=0.1))
    # Zero initialization
    # Tip: Is tf.zeros_initializer the same?
    b = tf.Variable(tf.constant(0., shape=[num_classes]))

    # Doing the affine projection
    logits = tf.matmul(outputs, W) + b # logits.shape = [batch*max_step, num_classes]

    # Reshaping back to the original shape
    logits = tf.reshape(logits, [batch_s, -1, num_classes])# logits.shape = [batch, max_step, num_classes]

    # Time major
    logits = tf.transpose(logits, (1, 0, 2)) #CTC要求logits.shape = [max_step, batch, num_classes]


    loss = tf.nn.ctc_loss(targets, logits, seq_len)
    cost = tf.reduce_mean(loss)

    optimizer = tf.train.MomentumOptimizer(initial_learning_rate,
                                           0.9).minimize(cost)

    # Option 2: tf.nn.ctc_beam_search_decoder
    # (it's slower but you'll get better results)
    decoded, log_prob = tf.nn.ctc_greedy_decoder(logits, seq_len)

    # Inaccuracy: label error rate
    ler = tf.reduce_mean(tf.edit_distance(tf.cast(decoded[0], tf.int32),
                                          targets))
上面的结构转换让我困惑了好久,后来我发现了简单的一个方法
graph = tf.Graph()
with graph.as_default():
    # e.g: log filter bank or MFCC features
    # Has size [batch_size, max_stepsize, num_features], but the
    # batch_size and max_stepsize can vary along each step
    inputs = tf.placeholder(tf.float32, [None, None, num_features]) # [batch,max_steps,n_features]

    # Here we use sparse_placeholder that will generate a
    # SparseTensor required by ctc_loss op.
    targets = tf.sparse_placeholder(tf.int32) # ctc要求标签是稀疏矩阵

    # 1d array of size [batch_size]
    seq_len = tf.placeholder(tf.int32, [None]) # CTC要求输入序列长度,但是dynamic_rnn其实不需要的

    # Defining the cell
    # Can be:
    #   tf.nn.rnn_cell.RNNCell
    #   tf.nn.rnn_cell.GRUCell
    cells = []
    for _ in range(num_layers): # stack lstm
        cell = tf.nn.rnn_cell.LSTMCell(num_units)
        cells.append(cell)
    stack = tf.nn.rnn_cell.MultiRNNCell(cells)

    # The second output is the last state and we will no use that
    outputs, _ = tf.nn.dynamic_rnn(stack, inputs, seq_len, dtype=tf.float32)
    # 其实这个seq_len是不需要的,tf会自动补成batch中最长的序列,其实有点奇怪,一个batch中所有的学列长度应该都是一样的,不知道这个参数有什么用

    logits = tf.layers.dense(outputs, num_classes)  # 这里是修改的地方,作者说这总方法虽然方便但是更慢,我是不知道为什么可以运行,outputs竟然不需要flatten。。。。。。。,反正我不用这种方法

    # Time major
    logits = tf.transpose(logits, (1, 0, 2)) #CTC要求logits.shape = [max_step, batch, num_classes]


    loss = tf.nn.ctc_loss(targets, logits, seq_len)
    cost = tf.reduce_mean(loss)

    optimizer = tf.train.MomentumOptimizer(initial_learning_rate,
                                           0.9).minimize(cost)

    # Option 2: tf.nn.ctc_beam_search_decoder
    # (it's slower but you'll get better results) 但是我测试的这个例子greedy比beam要好
    decoded, log_prob = tf.nn.ctc_greedy_decoder(logits, seq_len)

    # Inaccuracy: label error rate
    ler = tf.reduce_mean(tf.edit_distance(tf.cast(decoded[0], tf.int32),
                                          targets))
下面是输入
with tf.Session(graph=graph) as session:
    # Initializate the weights and biases
    tf.global_variables_initializer().run()

    for curr_epoch in range(num_epochs):
        train_cost = train_ler = 0
        start = time.time()

        for batch in range(num_batches_per_epoch):

            feed = {inputs: train_inputs,
                    targets: train_targets,
                    seq_len: train_seq_len}

            batch_cost, _ = session.run([cost, optimizer], feed)
            train_cost += batch_cost*batch_size
            train_ler += session.run(ler, feed_dict=feed)*batch_size

        train_cost /= num_examples
        train_ler /= num_examples

        val_feed = {inputs: val_inputs,
                    targets: val_targets,
                    seq_len: val_seq_len}

        val_cost, val_ler = session.run([cost, ler], feed_dict=val_feed)

        log = "Epoch {}/{}, train_cost = {:.3f}, train_ler = {:.3f}, val_cost = {:.3f}, val_ler = {:.3f}, time = {:.3f}"
        print(log.format(curr_epoch+1, num_epochs, train_cost, train_ler,
                         val_cost, val_ler, time.time() - start))
    # Decoding
    d = session.run(decoded[0], feed_dict=feed)
    str_decoded = ''.join([chr(x) for x in np.asarray(d[1]) + FIRST_INDEX])
    # Replacing blank label to none
    str_decoded = str_decoded.replace(chr(ord('z') + 1), '')
    # Replacing space label to space
    str_decoded = str_decoded.replace(chr(ord('a') - 1), ' ')

    print('Original:\n%s' % original)
    print('Decoded:\n%s' % str_decoded)
CTC函数的介绍
tf.nn.ctc_loss(
labels,
inputs,
sequence_length,
preprocess_collapse_repeated=False,
ctc_merge_repeated=True,
ignore_longer_outputs_than_inputs=False,
time_major=True
)
labels:这是一个SparseTensor,所以我们需要先将我们的标签改为稀疏张量。tfrecords返回的就是SparseTensor,我们不需要改变,如果我们直接使用标签,需要自己转换。
inputs:这个就是logits(不是概率)。time_major == False; Tensor shaped: [batch_size, max_time, num_classes]. If time_major == True (default): [max_time, batch_size, num_classes].
sequence_length:这是一个长度为batch_size的向量,向量里的每一个值代表batch中每个序列的长度。
time_major:注意默认是True,一定要好好修改。