01 pymysql模块
首先安装pymysql模块:cmd窗口中 输入pip3 install pymysql
import pymysql

client=pymysql.connect(   #发起连接(ip,port,user,password,database,charset),拿到套接字对象
    host='127.0.0.1',
    port=3306,
    user='root',
    password='123',
    database='db10',
    charset='utf8'
)

cursor=client.cursor()    #产生游标

sql='inser into t1 values(1,"egon");'    #给一条sql语句提交给服务端执行
try:
    res=cursor.execute(sql)    #执行数据处理
    print(res)    #结果显示的是行数(记录条目数)
    #cursor.execute(sql1)    #执行
    #cursor.execute(sql2)    #执行
    #cursor.execute(sql3)    #执行
    client.commit()    #事务知识点,客户端提交sql语句,通过cursor实现
except Exception:
    client.rollback()    #如果执行游标途中出现,可进行回滚操作

cursor.close()    #关闭游标,等同于关闭cmd窗口中输入的quit,断开连接并关闭cmd窗口
client.close()    #关闭客户端连接
02 基于pymysql模块的增、删、改
增:
import pymysql

client=pymysql.connect(
    host='127.0.0.1',
    port=3306,
    user='root',
    password='123',
    database='db4',
    charset='utf8'
)

cursor=client.cursor()

userinfo=[
    (9,"alex"),
    (10,"lxx"),
    (11,"yxx")
]

sql='insert into t1 values(%s,%s);'
cursor.executemany(sql,userinfo)

client.commit()

cursor.close()
client.close()
删:
import pymysql
client=pymysql.connect(
host='127.0.0.1',
port=3306,
user='root',
password='123',
database='db4',
charset='utf8'
)
cursor=client.cursor()
cursor.execute('delete from t1 where id=3;')
client.commit()
cursor.close()
client.close()改:
import pymysql
client=pymysql.connect(
host='127.0.0.1',
port=3306,
user='root',
password='123',
database='db4',
charset='utf8'
)
cursor=client.cursor()
cursor.execute('update t1 set name="egon_dsb" where id=2;')
client.commit()
cursor.close()
client.close()03 基于pymysql模块的查询
用户登陆功能:
import pymysql

client=pymysql.connect(
    host='127.0.0.1',
    port=3306,
    user='root',
    password='123',
    database='db4',
    charset='utf8'
)

cursor=client.cursor()    #创建游标
#查询
inp_user=input('输入账号名: ').strip()
inp_pwd=input('输入密码: ').strip()

# sql='select id from user where name = "%s" and pwd = password("%s");' %(inp_user,inp_pwd)
sql='select id from user where name = "%s" and pwd = "%s";' %(inp_user,inp_pwd)
print(sql)
rows=cursor.execute(sql)
if rows:
    print('\033[45m登陆成功\033[0m')
else:
    print('\033[46m用户名或密码错误\033[0m')

cursor.close()
client.close()
问题点:
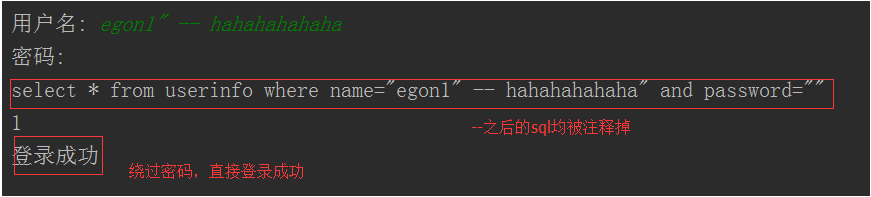
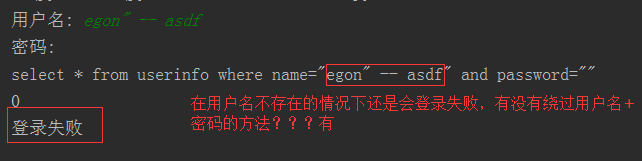
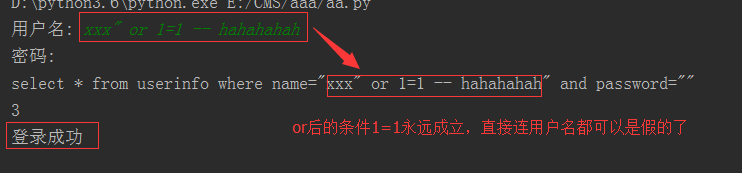
解决方法:
# 原来是我们对sql进行字符串拼接
# sql="select * from userinfo where name='%s' and password='%s'" %(user,pwd)
# print(sql)
# res=cursor.execute(sql)

#改写为(execute帮我们做字符串拼接,我们无需且一定不能再为%s加引号了)
sql="select * from userinfo where name=%s and password=%s" #!!!注意%s需要去掉引号,因为pymysql会自动为我们加上
res=cursor.execute(sql,[user,pwd]) #pymysql模块自动帮我们解决sql注入的问题,只要我们按照pymysql的规矩来。
解决 sql注入问题
pip3 install pymysql
import pymysql

client=pymysql.connect(
    host='127.0.0.1',
    port=3306,
    user='root',
    password='egon123',
    database='db6',
    charset='utf8'
)

cursor=client.cursor()
#查询
inp_user=input('输入账号名: ').strip()
inp_pwd=input('输入密码: ').strip()

sql='select id from user where name = %s and pwd = %s;'
rows=cursor.execute(sql,(inp_user,inp_pwd))
if rows:
    print('\033[45m登陆成功\033[0m')
else:
    print('\033[46m用户名或密码错误\033[0m')

cursor.close()
client.close()
提交查询语句并且拿到查询结果
import pymysql
client=pymysql.connect(
host='127.0.0.1',
port=3306,
user='root',
password='123',
database='db4',
charset='utf8'
)
#
cursor=client.cursor(pymysql.cursors.DictCursor)
# #查询
#
sql='select * from user where id >1'
rows=cursor.execute(sql)
print(rows)
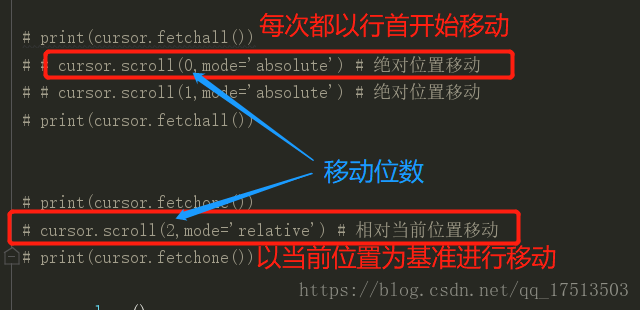
print(cursor.fetchall()) #"fetch all"查看所有记录
# print(cursor.fetchall())
# print(cursor.fetchone()) #"fetch one"查看一个记录
# print(cursor.fetchone())
# print(cursor.fetchone())
print(cursor.fetchmany(2)) #"fetch many" 查看多个记录
# print(cursor.fetchone())结果:

04 视图
视图是一个虚拟表(非真实存在),其本质是【根据SQL语句获取动态的数据集,并为其命名】,用户使用时只需使用【名称】即可获取结果集,可以将该结果集当做表来使用。
使用视图我们可以把查询过程中的临时表摘出来,用视图去实现,这样以后再想操作该临时表的数据时就无需重写复杂的sql了,直接去视图中查找即可,但视图有明显地效率问题,并且视图是存放在数据库中的,如果我们程序中使用的sql过分依赖数据库中的视图,即强耦合,那就意味着扩展sql极为不便,因此并不推荐使用
强调:
1、字段名不能重复
2、视图是为了简化查询的sql语句,不应该修改视图中的记录
create view emp2dep as select emp.*,dep.name as dep_name from emp inner join dep on emp.dep_id = dep.id;

创建视图命令以 create view 开头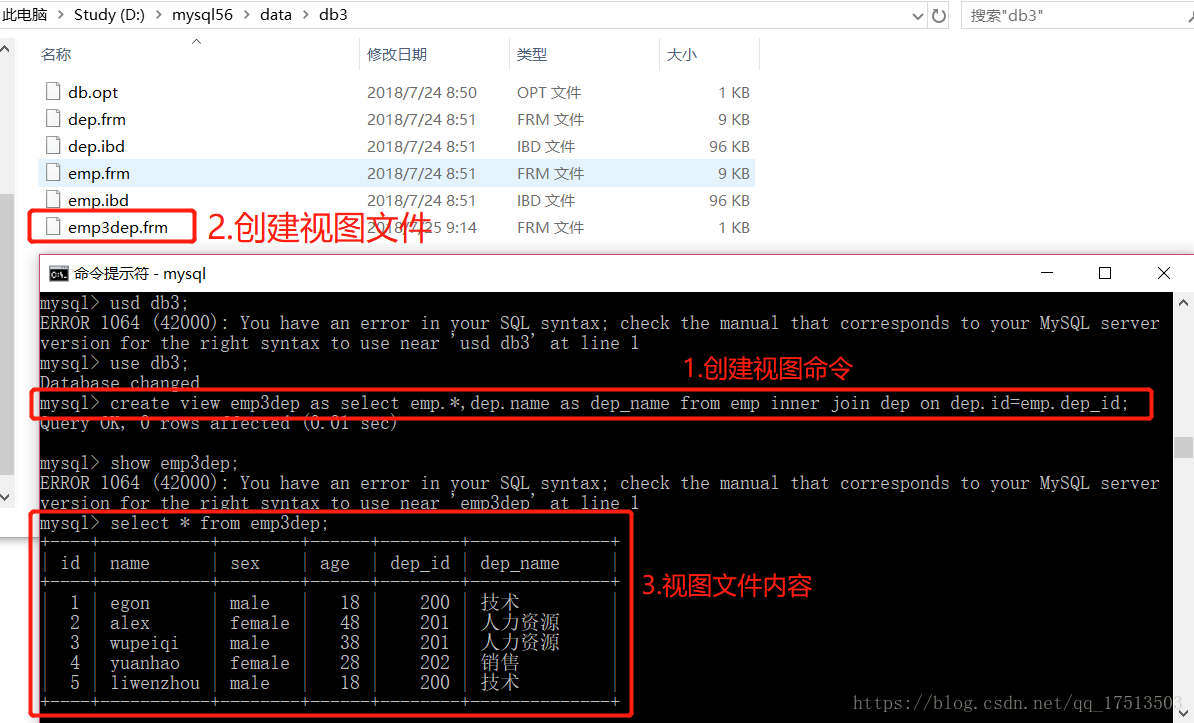
再次强调:
1、字段名不能重复
2、视图是为了简化查询的sql语句,不应该修改视图中的记录
05 触发器
使用触发器可以定制用户对表进行【增、删、改】操作时前后的行为,注意:没有查询
首先创建两表:
CREATE TABLE cmd (
    id INT PRIMARY KEY auto_increment,
    USER CHAR (32),
    priv CHAR (10),
    cmd CHAR (64),
    sub_time datetime, #提交时间
    success enum ('yes', 'no') #0代表执行失败
);

CREATE TABLE errlog (
    id INT PRIMARY KEY auto_increment,
    err_id int
);

其次启动触发器:
delimiter $$    #更改分隔符号,因为在进行触发器后的操作内包含默认分隔符会立即执行运行下面代码
CREATE TRIGGER tri_after_insert_cmd AFTER INSERT ON cmd FOR EACH ROW     #创建触发器,触发器名:tri_after_insert_cmd,AFTER:在之后触发,INSERT:进行插入操作,FOR EACH ROW:针对每一行
BEGIN    #开始触发操作
    if NEW.success = 'no' then    #if(开头)..... then(执行下方条件);NEW:mysql封装的新对象(新记录)
        insert into errlog(err_id) values(NEW.id);
    end if;    #end if(结束)
END $$    #对应上方更改的分隔符
delimiter ;    #结果操作后必需改回默认分隔符号

批量插入记录:
INSERT INTO cmd (
    USER,
    priv,
    cmd,
    sub_time,
    success
)
VALUES
    ('egon','0755','ls -l /etc',NOW(),'yes'),
    ('egon','0755','cat /etc/passwd',NOW(),'no'),
    ('egon','0755','useradd xxx',NOW(),'no'),
    ('egon','0755','ps aux',NOW(),'yes');
06 事务
transaction:事务,交易
事务可以包含一系列的sql语句,事务的执行具有原子性。
1、原子性:
指包含sql语句要么都执行成功,要么都执行不成功
2、回滚(针对原子性问题的解决方案)
创建user表:
create table user(
id int primary key auto_increment,
name char(32),
balance int
);

insert into user(name,balance)
values
('wsb',1000),
('egon',1000),
('ysb',1000);

start transaction;    #执行事务
try:
    update user set balance=900 where id=1;
    update user set balance=1010 where id=2;
    update user set balance=1090 where id=3;
    commit;
except Exception:
    rollback;    #如果更新记录时某一条有问题立即进行回滚操作,保证记录出错
07 存储过程
存储过程包含了一系列可执行的sql语句,存储过程存放于MySQL中,通过调用它的名字可以执行其内部的一堆sql
使用存储过程的优点:
#1. 用于替代程序写的SQL语句,实现程序与sql解耦

#2. 基于网络传输,传别名的数据量小,而直接传sql数据量大
使用存储过程的缺点:
#1. 程序员扩展功能不方便程序与数据库结合使用的三种方式
#方式一:
MySQL:存储过程
程序:调用存储过程
#方式二:
MySQL:
程序:纯SQL语句
#方式三:
MySQL:
程序:类和对象,即ORM(本质还是纯SQL语句)
执行效率:
    方式一 > 方式二 -> 方式三

开发效率:
    方式一 > 方式三 -> 方式二
创建简单存储过程(无参)
delimiter $$
create procedure p1()   #开始创建存储过程,起别名p1
BEGIN
    select * from blog;
END $$
delimiter ;

在mysql中调用命令:call p1();   #直接调用p1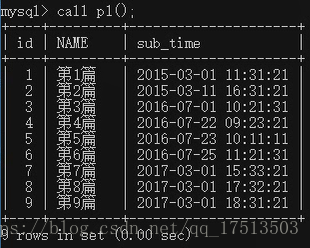
通过存储过程插入n条记录:
delimiter $$
create procedure p2()   #创建存储过程,删除命令:drop procedure p2()
BEGIN
    declare n int default 1;    #declare声明变量,将n转为int
    while (n < 100) do  #while条件
        insert into s1 values(n,concat('egon',n),'male',concat('egon',n,'@163.com'));
        set n=n+1;
    end while;
END $$
delimiter ;

call p2();   #调用p1(类似执行函数命令)命令
创建简单存储过程(有参)
delimiter $$
create procedure p3(
in n int, #in:传入参数
out res int #out:返回值
#inout x int 能传入参数也能返回值
)
BEGIN
select * from blog where id > n;
set res = 0;
END $$
delimiter ;
# 直接在mysql中调用:
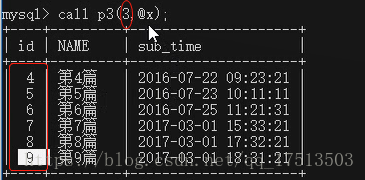
mysql> set @x=111; #设置变量,为p3调用
mysql> call p3(3,@x);结果:
接上上图:
mysql> select @x;
+------+
| @x   |
+------+
|    0 |
+------+
1 row in set (0.00 sec)

原因返回值res>id:
    select * from blog where id > n;
    set res = 0;
在python中调用:
cursor.callproc('p4',(3,111)) #set @_p4_0 = 3; set @_p4_1 = 111 #callproc:调用存储过程
print(cursor.fetchall())
cursor.execute('select @_p4_1;')
print(cursor.fetchone())
13 在python中调用存储过程
#pip3 install pymysql
import pymysql

client=pymysql.connect(
    host='127.0.0.1',
    port=3306,
    user='root',
    password='123',
    database='db4',
    charset='utf8'
)

cursor=client.cursor(pymysql.cursors.DictCursor)
res=cursor.callproc('p4',(3,111)) #set @_p4_0 = 3; set @_p4_1 = 111,callproc:调用存储过程,获取结果从第4条开始取
# print(res)

# print(cursor.fetchall())  #获取查询结果

cursor.execute('select @_p4_1;')    #获取返回值
# print(cursor.fetchone())  #查看返回值结果

cursor.close()
client.close()