nginx正向代理
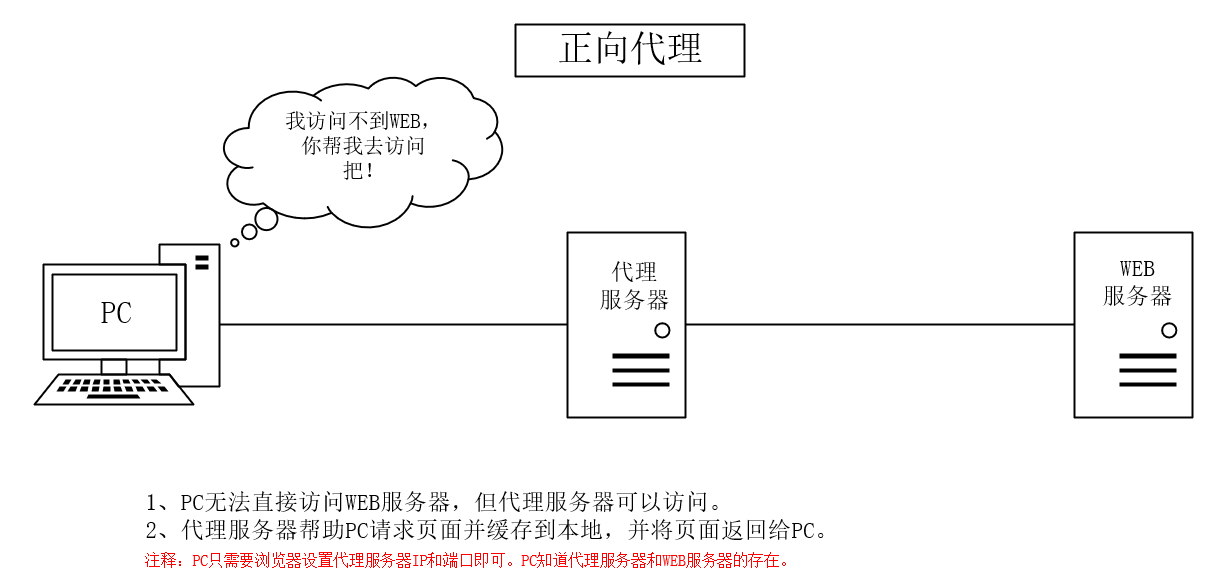


Nginx正向代理使用场景并不多见。 需求场景1: 如果在机房中,只有一台机器可以联网,其他机器只有内网,内网的机器想用使用yum安装软件包,在能能联网的机器上配置一个正向代理即可。
Nginx正向代理配置文件,我们直接访问百度可以访问,我们把百度域名绑定到本地也可以访问,这就是正向代理成功了
- resolver
- 语法:resolver address; address为DNS服务器的地址,国内通用的DNS 119.29
- default_server之所以要设置为默认虚拟主机,是因为这样就不用设置server_name了,任何域名解析过来都可以正常访问。
- proxy_pass该指令用来设置要代理的目标url,正向代理服务器设置就保持该固定值即可。关于该指令的详细解释在反向代理配置中。
[root@centos-03 vhost]# mv default.conf default.conf.bak
[root@centos-03 vhost]# vim zp.conf ^C
[root@centos-03 vhost]# cat zp.conf
server {
    listen 80 default_server;
    resolver 119.29.29.29; (DNS解析访问过来的域名)
    location /
    {
        proxy_pass http://$host$request_uri;
    }
}
[root@centos-03 vhost]# /usr/local/nginx/sbin/nginx -t
nginx: the configuration file /usr/local/nginx/conf/nginx.conf syntax is ok
nginx: configuration file /usr/local/nginx/conf/nginx.conf test is successful
[root@centos-03 vhost]# /usr/local/nginx/sbin/nginx -s reload
[root@centos-03 vhost]# curl www.baidu.com -I
HTTP/1.1 200 OK
Accept-Ranges: bytes
Cache-Control: private, no-cache, no-store, proxy-revalidate, no-transform
Connection: Keep-Alive
Content-Length: 277
Content-Type: text/html
Date: Fri, 27 Jul 2018 03:30:11 GMT
Etag: "575e1f5d-115"
Last-Modified: Mon, 13 Jun 2016 02:50:05 GMT
Pragma: no-cache
Server: bfe/1.0.8.18

[root@centos-03 vhost]# curl -x127.0.0.1:80 www.baidu.com -I
HTTP/1.1 200 OK
Server: nginx/1.14.0
Date: Fri, 27 Jul 2018 10:23:10 GMT
Content-Type: text/html
Content-Length: 277
Connection: keep-alive
Accept-Ranges: bytes
Cache-Control: private, no-cache, no-store, proxy-revalidate, no-transform
Etag: "575e1f5c-115"
Last-Modified: Mon, 13 Jun 2016 02:50:04 GMT
Pragma: no-cache

[root@centos-03 vhost]#
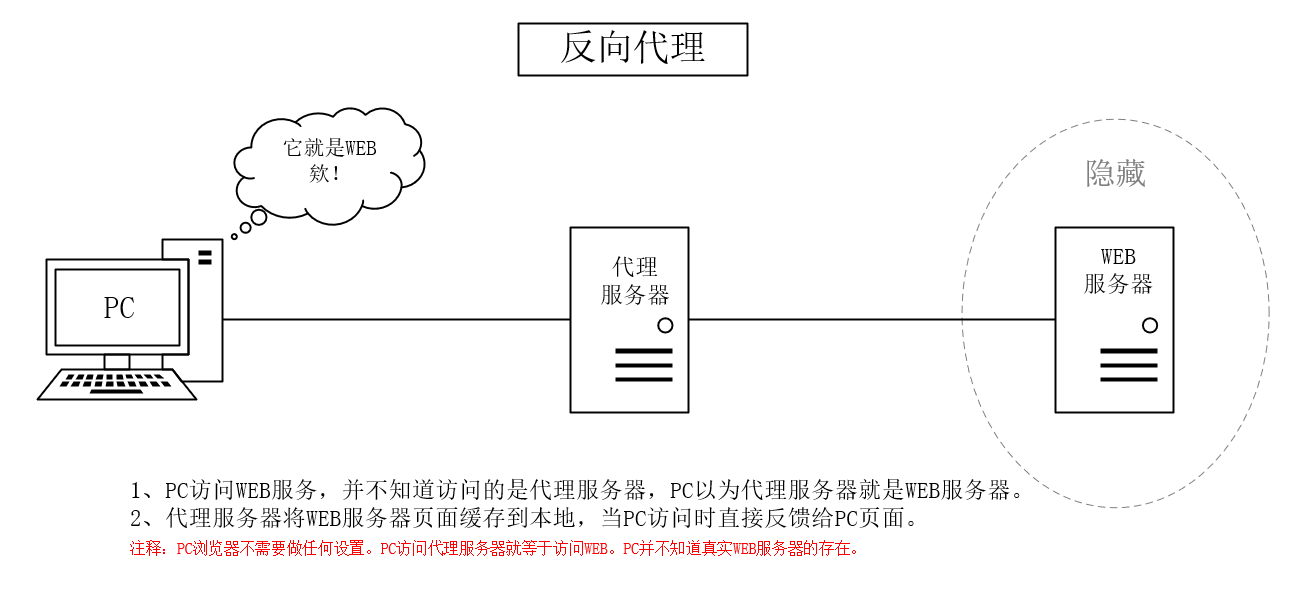
nginx反向代理
Nginx反向代理在生产环境中使用很多的,用的最多的负载均衡。
场景1: 域名没有备案,可以把域名解析到香港一台云主机上,在香港云主机做个代理,而网站数据是在大陆的服务器上。
1.创建反向代理配置文件并创建目录
[root@centos-03 vhost]# vim fp.conf ^C
[root@centos-03 vhost]# cat fp.conf
server
{
    listen 80;
    server_name www.test.com; (被代理的域名)

    location /
    {
        proxy_pass http://127.0.0.1:8080/; (被代理域名的ip)
        proxy_set_header Host   $host;
        proxy_set_header X-Real-IP      $remote_addr;
        proxy_set_header X-Forwarded-For $proxy_add_x_forwarded_for;
    }
}
[root@centos-03 vhost]# vim test.com.conf ^C
[root@centos-03 vhost]# cat test.com.conf
server
{
        listen 8080;
        server_name www.test.com;
        root /data/wwwroot/test.com;
        index index.html;

}
[root@centos-03 vhost]# mkdir /data/wwwroot/test.com
[root@centos-03 vhost]# echo "test.com_8080" > !$/index.html
echo "test.com_8080" > /data/wwwroot/test.com/index.html
[root@centos-03 vhost]#
2.我们再做一个default
[root@centos-03 vhost]# cp test.com.conf default_8080.conf^C                    [root@centos-03 vhost]# vim default_8080.conf ^C
[root@centos-03 vhost]# cat default_8080.conf
server
{
        listen 8080 default_server;
        root /data/wwwroot/test.com;
        index index.html;
        location /
        {
                echo "8080 default";
        }
}
[root@centos-03 vhost]#
[root@centos-03 vhost]# /usr/local/nginx/sbin/nginx -t
nginx: the configuration file /usr/local/nginx/conf/nginx.conf syntax is ok
nginx: configuration file /usr/local/nginx/conf/nginx.conf test is successful
[root@centos-03 vhost]# /usr/local/nginx/sbin/nginx -s reload
[root@centos-03 vhost]#
[root@centos-03 vhost]# curl -x127.0.0.1:8080 www.test.com
test.com_8080
[root@centos-03 vhost]# curl 127.0.0.1:8080
8080 default
[root@centos-03 vhost]#
3.测试80端口已经代理到了8080下
[root@centos-03 vhost]# curl -x127.0.0.1:80 www.test.com
test.com_8080
[root@centos-03 vhost]#