之前写过一篇关于用creat-react-app脚手架构建react项目的博客,也是出于总结一下自己学习react的过程并帮助自己能更好的理解这个框架。接下来我也会不间断的更新react的知识点,今天就先讲讲react的生命周期函数,老规矩,先盗用一张生命周期的流程图,新手估计会有点懵逼,但是在不断的写代码实践的过程中相信会慢慢的熟悉起来的。

接下来通过代码我会把所有的生命周期函数都写出来并配合注释,最后让程序走一遍看看它的执行过程是怎样的?
import React, {Component} from 'react';


class App extends Component {
    /*
    组件初始化函数:
    props接收父组件传递进来的props
    在这个函数中一般定义初始化的state数据
    */
    constructor(props) {
        super(props);
        console.log('~~~~~~~~~~~~~~~~~~~~~~~~~');
        console.log('constructor');
        console.log('~~~~~~~~~~~~~~~~~~~~~~~~~');
        this.state = {
            message: 'hello react'
        }
    }

    /*组件未挂载之前,即页面dom还未生成:*/
    componentWillMount() {
        console.log('~~~~~~~~~~~~~~~~~~~~~~~~~');
        console.log('componentWillMount');
        console.log('~~~~~~~~~~~~~~~~~~~~~~~~~');
    }

    /*组件未挂载结束,元素已经被渲染到dom中:*/
    componentDidMount() {
        console.log('~~~~~~~~~~~~~~~~~~~~~~~~~');
        console.log('componentDidMount');
        console.log('~~~~~~~~~~~~~~~~~~~~~~~~~');
    }

    //组件接收父组件传递进来的props之前,参数为要接收的props
    componentWillReceiveProps(newProps) {
        console.log('~~~~~~~~~~~~~~~~~~~~~~~~~');
        console.log('componentWillReceiveProps');
        console.log('newProps:',newProps);
        console.log('~~~~~~~~~~~~~~~~~~~~~~~~~');
    }

    /*
    组件是否要更新函数:默认返回布尔值true,即只要数据发生改变就重新渲染
      接收两个参数分别为
         newProps:新的props
         newState:改变后的state值
    */
    shouldComponentUpdate(newProps, newState) {
        console.log('~~~~~~~~~~~~~~~~~~~~~~~~~');
        console.log('shouldComponentUpdate');
        console.log('newProps:',newProps);
        console.log('newState:',newState);
        console.log('~~~~~~~~~~~~~~~~~~~~~~~~~');
        return true;
    }


    /*
    组件在被更新之前执行的函数
       参数:nextProps表示新接收的props
       参数:nextState表示改变后的state值
    */
    componentWillUpdate(nextProps, nextState) {
        console.log('~~~~~~~~~~~~~~~~~~~~~~~~~');
        console.log('componentWillUpdate');
        console.log('nextProps:',nextProps);
        console.log('nextState:',nextState);
        console.log('~~~~~~~~~~~~~~~~~~~~~~~~~');
    }

    /*
    组件在被更新之后执行的函数
       参数:prevProps表示改变前的props
       参数:prevState表示改变前的state值
    */
    componentDidUpdate(prevProps, prevState) {
        console.log('~~~~~~~~~~~~~~~~~~~~~~~~~');
        console.log('componentDidUpdate');
        console.log('prevProps:',prevProps);
        console.log('prevState:',prevState);
        console.log('~~~~~~~~~~~~~~~~~~~~~~~~~');
    }

    //组件将要被销毁之前执行的函数
    componentWillUnmount() {
        console.log('~~~~~~~~~~~~~~~~~~~~~~~~~');
        console.log('componentWillUnmount');
        console.log('~~~~~~~~~~~~~~~~~~~~~~~~~');
    }

    //页面渲染函数
    render() {
        console.log('~~~~~~~~~~~~~~~~~~~~~~~~~');
        console.log('render');
        console.log('~~~~~~~~~~~~~~~~~~~~~~~~~');
        return (
            <div className="App">
                <h2>{this.state.message}</h2>
            </div>
        );
    }
}

export default App;
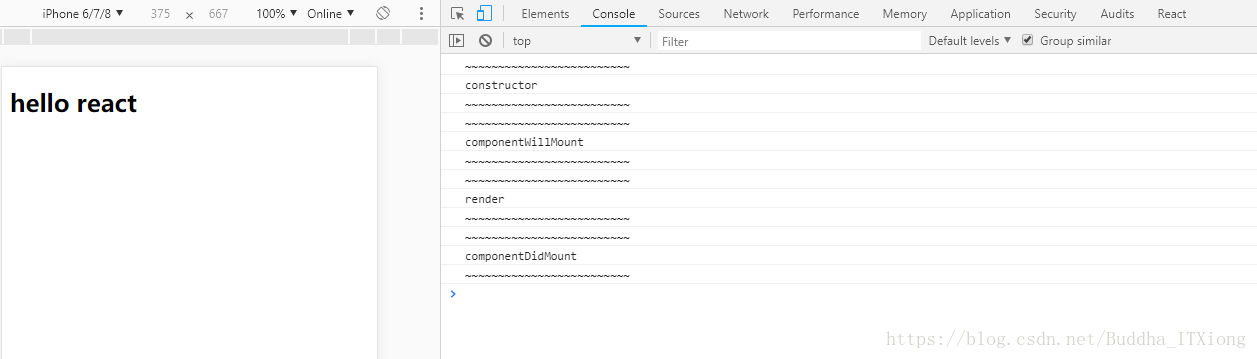
程序执行效果图如下:从中我们可以得知,进入页面一开始就会执行,constructor初始化函数,然后执行componmentWillMount函数即页面挂载之前,之后进入render函数渲染页面,页面然后完成之后进入componentDidMount函数,也就是页面已经完成渲染了,注意:在用户离开页面之前constructor,componmentWillMount以及componentDidMount这三个函数只会执行一遍
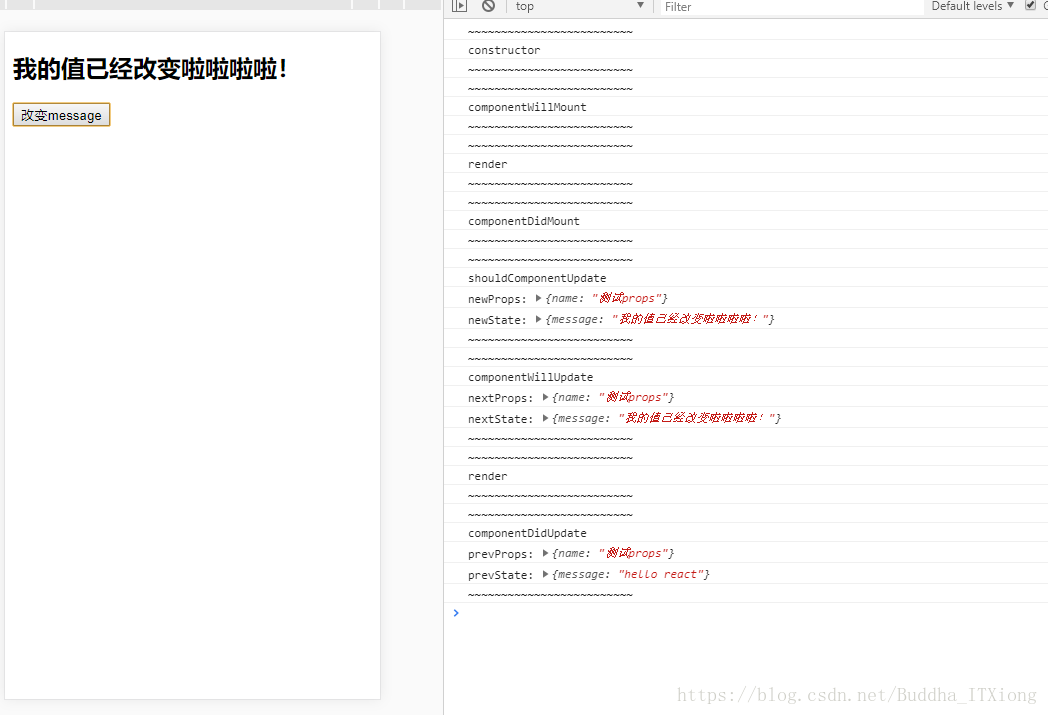
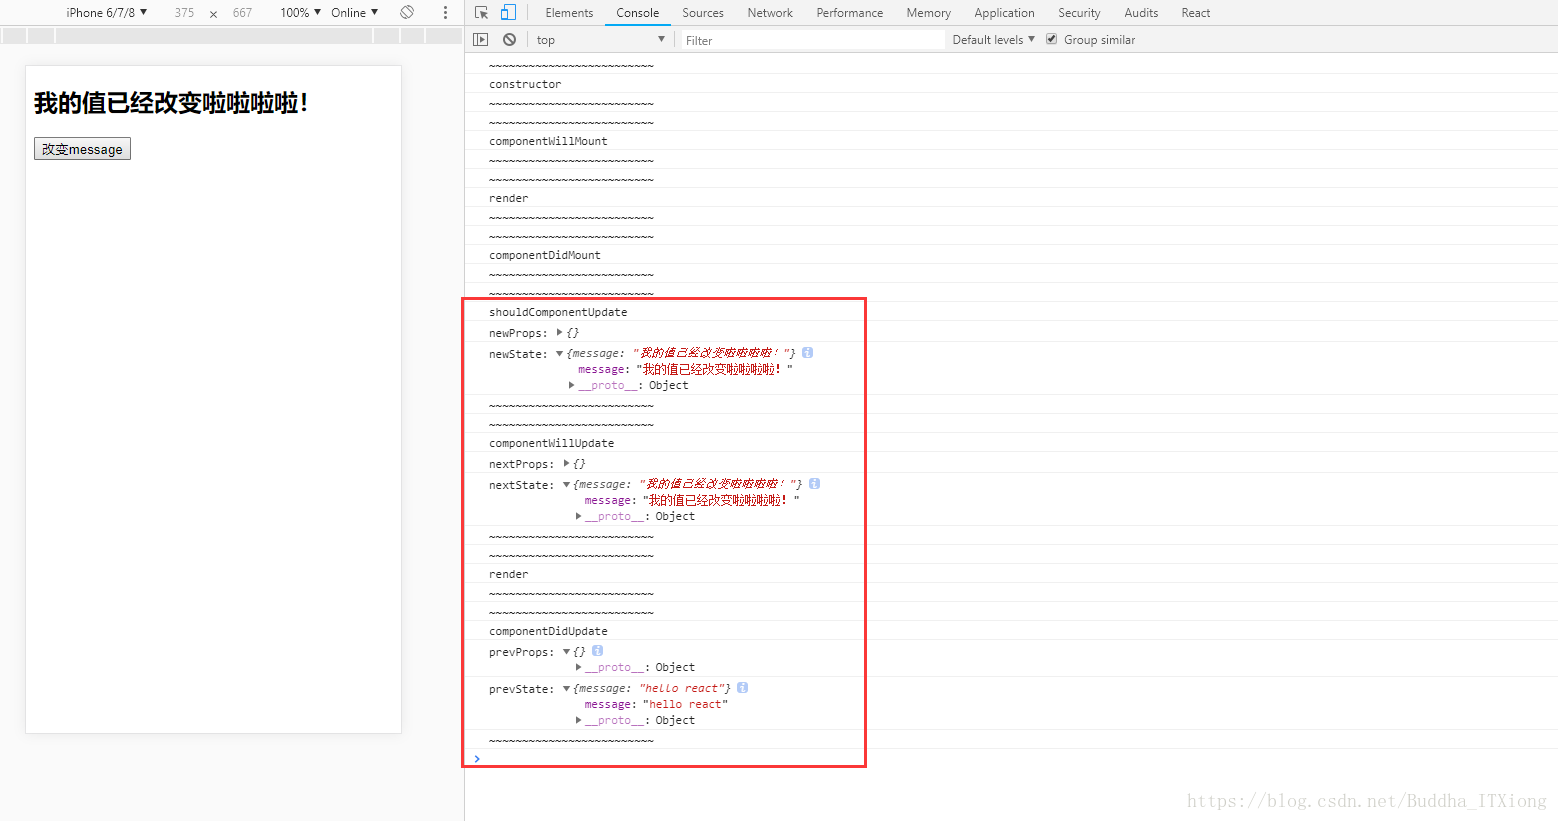
接下来我会在render函数中添加一个按钮并定义一个用于改变state里面的message值的函数用来测试:shouldComponentUpdate,componentWillUpdate以及componentDidUpdate这三个周期函数。代码如下:
   //页面渲染函数
    render() {
        console.log('~~~~~~~~~~~~~~~~~~~~~~~~~');
        console.log('render');
        console.log('~~~~~~~~~~~~~~~~~~~~~~~~~');
        return (
            <div className="App">
                <h2>{this.state.message}</h2>
                <button type='button' onClick={this.changeState.bind(this)}>改变message</button>
            </div>
        );
    }

    //定义改变message值函数
    changeState() {
        this.setState({
            message: '我的值已经改变啦啦啦啦!'
        })
    }
点击页面上的按钮,呵呵,见证奇迹的时候就要来了。从控制台中我们可以得知:
1:程序首先执行的是shouldComponentUpdate函数,因为我们返回的是true所以只要数据发生改变就一定会重新渲染那页面的,newProps为空,因为我们没有接受父组件传递的props值,newState参数把我们改变后的state中的message值打印出来了
2:执行了componentWillupdate函数,newProps和newState参数打印值同上
3:执行了render函数,重新渲染页面,把之前的message数据替换掉
4:执行了componentDidUpdate函数,同样我们组件没有接受父组件传进来的props所以preProps的值为空对象,preState的值即message改变之前的值。
5:最重要的一点事我们发现程序木再次执行constructor,componentWillMount,componentDidMount函数,也就印证我之前说的这三个函数在用户离开页面之前只会执行一次
最后:打开index.js文件找到调用App组件的地方,我们给它传递一个name的props来测试一下componentWillReceiveProps生命周期函数
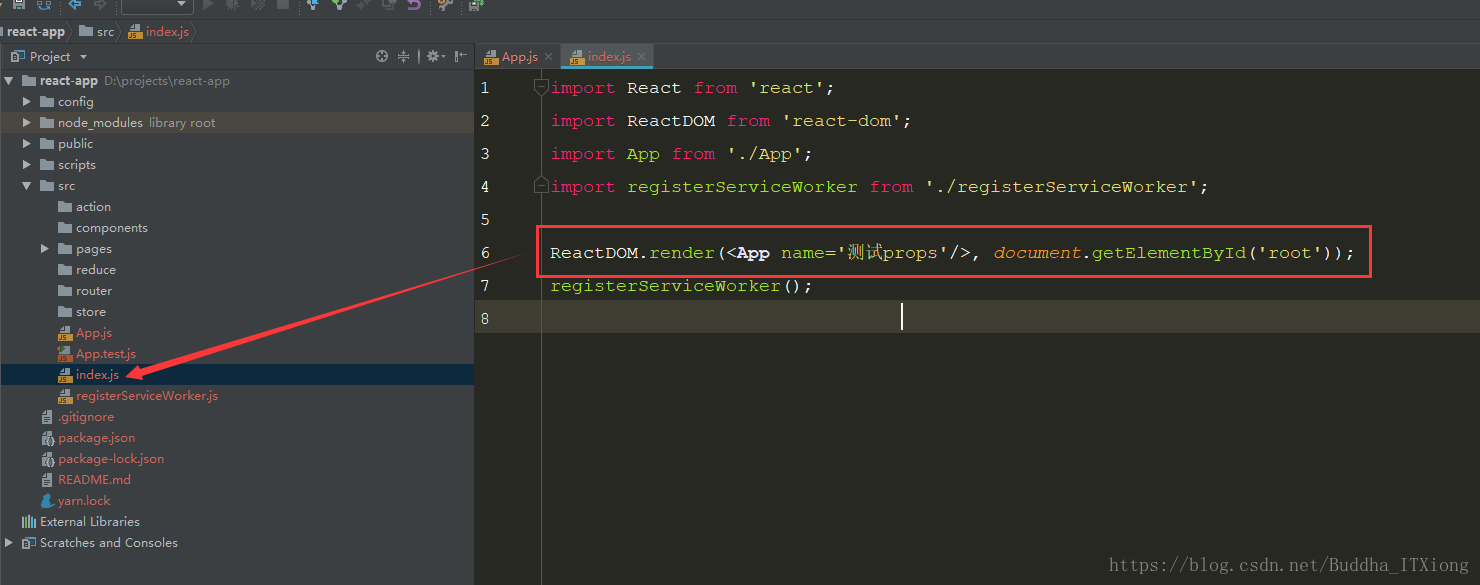
程序执行效果图如下:我们可以看到newProps参数已经有我们之前传入进去的props值了,但是初始化的时候并不会执行此函数,触发改函数的条件是:必须传递进来的props值发生改变