1 先杀掉mysql进程
Killall mysql
Eg:
[root@iZ25odf0bt6Z bin]# killall mysqld
2 判断是否配置环境变量
如果你已经配置,这里可以看出来,第二步可以跳过,没配置的话,继续
echo $PATH
配置环境变量:
echo "PATH=$PATH:/opt/soft/mysql/bin" >>/etc/profile   ## 这个黄色要按照你的安装路径去配置
source /etc/profile
如何查找mysql安装路径,
Ps -ef|grep mysql
可以查看到类似下图,圈上的部分就是你的mysql安装路径,拿着这个去配置环境变量:

3 修改 my.cnf
vim /etc/my.cnf
找到 [mysqld]这个模块,在最后面添加一段代码
skip-grant-tables ##忽略mysql权限问题,直接登录
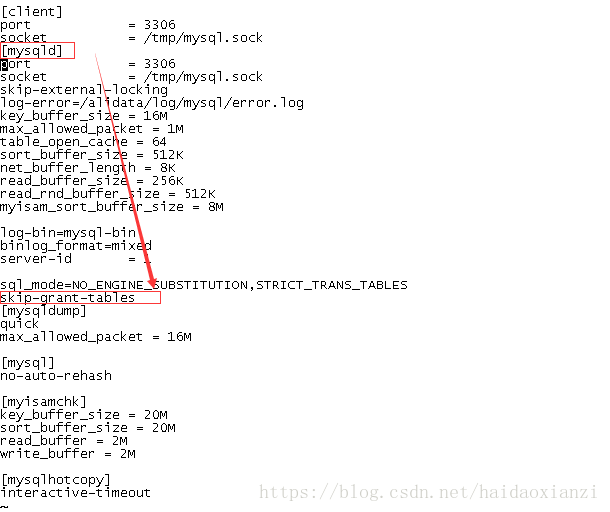
然后保存 :按左上角 esc 退出编辑模式 , 然后 :wq! 表示保存退出。
4 重启
service mysqld start
Eg:
[root@iZ25odf0bt6Z bin]# service mysqld start
Starting MySQL.[  OK  ]
5登陆:
mysql -u root

[root@iZ25odf0bt6Z bin]# mysql -u root
Welcome to the MySQL monitor.  Commands end with ; or \g.
Your MySQL connection id is 1
Server version: 5.6.21-log MySQL Community Server (GPL)

Copyright (c) 2000, 2014, Oracle and/or its affiliates. All rights reserved.

Oracle is a registered trademark of Oracle Corporation and/or its
affiliates. Other names may be trademarks of their respective
owners.

Type 'help;' or '\h' for help. Type '\c' to clear the current input statement.

mysql>
6 修改密码:
use mysql
eg:
mysql> use mysql
Database changed
输入要更新的密码:
update user set password=password("123321") where user="root";##更新密码刷新权限:
flush privileges;退出sql:
quik;最后重新登陆
进入mysql视图:
Mysql
登陆:
Mysql -uroot -p123321
参照:
配置linux下mysql环境变量参考:http://blog.itpub.net/30127122/viewspace-2131030/
配置linux下mysql密码参考:
https://www.jb51.net/article/85494.htm
https://www.cnblogs.com/itor/p/6339505.html