开发环境:
jdk 1.8 tomcat 7 eclipse4.8 spring 4.3 mysql 5.1.29 myBatis 3.4
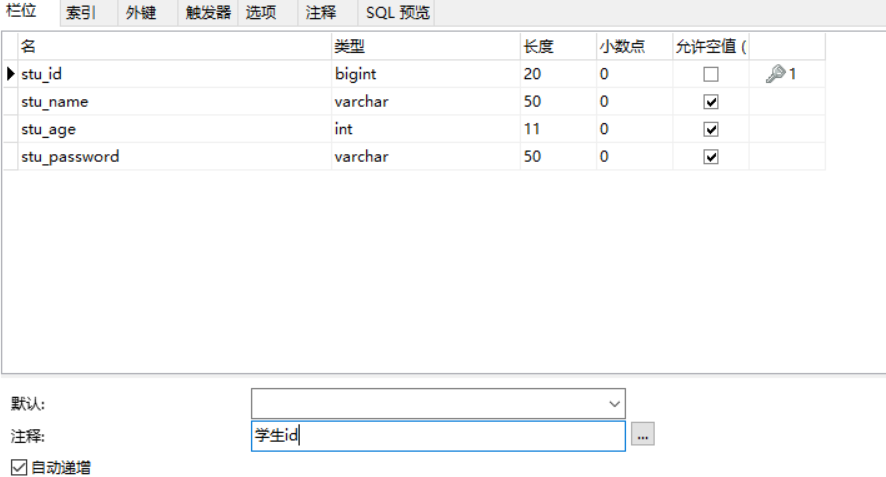
准备工作(创建数据表):
1.先整合springmvc
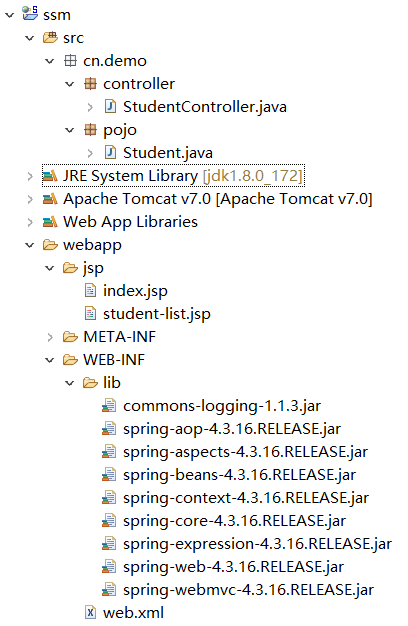
1.1 搭建目录,导入jar包
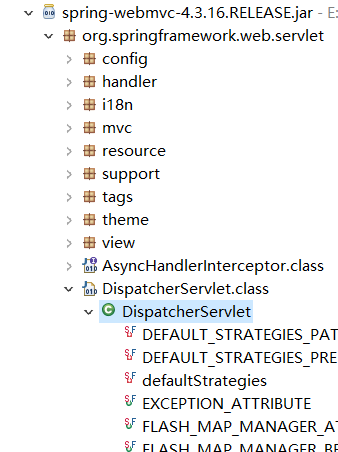
1.2 在 web.xml 中配置核心控制器,在spring-mvc-4.3.16.jar中,找到 DispatcherServlet ,右键复制路径
<?xml version="1.0" encoding="UTF-8"?>
<web-app xmlns:xsi="http://www.w3.org/2001/XMLSchema-instance" xmlns="http://java.sun.com/xml/ns/javaee" xsi:schemaLocation="http://java.sun.com/xml/ns/javaee http://java.sun.com/xml/ns/javaee/web-app_3_0.xsd" id="WebApp_ID" version="3.0">
  <display-name>ssm</display-name>

  <servlet>
      <servlet-name>dispatcherServlet</servlet-name>
      <servlet-class>org.springframework.web.servlet.DispatcherServlet</servlet-class>
  </servlet>

  <servlet-mapping>
      <servlet-name>dispatcherServlet</servlet-name>
      <url-pattern>*.do</url-pattern>
  </servlet-mapping>

</web-app>
1.3 在Student实体类中编写成员属性 Student.java
package cn.demo.pojo;

public class Student {

    private Long stuId;
    private String stuName;
    private String stuPassword;
    private Integer stuAge;

    public Long getStuId() {
        return stuId;
    }
    public void setStuId(Long stuId) {
        this.stuId = stuId;
    }
    public String getStuName() {
        return stuName;
    }
    public void setStuName(String stuName) {
        this.stuName = stuName;
    }
    public String getStuPassword() {
        return stuPassword;
    }
    public void setStuPassword(String stuPassword) {
        this.stuPassword = stuPassword;
    }
    public Integer getStuAge() {
        return stuAge;
    }
    public void setStuAge(Integer stuAge) {
        this.stuAge = stuAge;
    }


}
1.4 StudentController.java
在 insert 方法里接收 Student 对象,为了后面整合 mybatis 。
package cn.demo.controller;

import org.springframework.stereotype.Controller;
import org.springframework.web.bind.annotation.RequestMapping;
import org.springframework.web.bind.annotation.RequestMethod;

import cn.demo.pojo.Student;

@Controller
@RequestMapping(value="/student")     // 作用相当于namespace
public class StudentController {

    @RequestMapping(value="insert.do", method=RequestMethod.POST)    // 只接收post请求
    public String insert(Student student) {
        return "/jsp/student-list.jsp";
    }


}
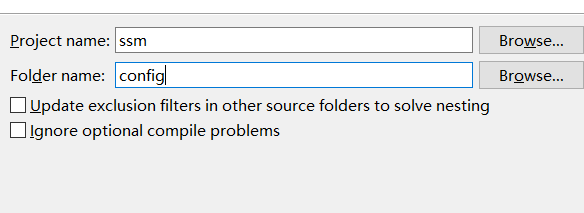
1.5 在项目根目录下创建 source folder 源文件夹 config,作用等同于 src,即classpath路径下。用来存放 spring 等xml配置文件。
1.6 在 config 文件夹下创建 spring-context.xml 和 spring-mvc.xml。在 spring-context.xml 中开启扫描组件扫描指定包下的类。在 spring-mvc-xml 中,需要告知Spring,启用注解驱动,然后Spring会将其注册到bean中。
spring-context.xml
<?xml version="1.0" encoding="UTF-8"?>
<beans xmlns="http://www.springframework.org/schema/beans"
    xmlns:xsi="http://www.w3.org/2001/XMLSchema-instance"
    xmlns:context="http://www.springframework.org/schema/context"
    xsi:schemaLocation="http://www.springframework.org/schema/beans http://www.springframework.org/schema/beans/spring-beans-3.2.xsd
        http://www.springframework.org/schema/context http://www.springframework.org/schema/context/spring-context-4.3.xsd">

    <context:component-scan base-package="cn.demo"></context:component-scan>

</beans>
spring-mvc.xml
<?xml version="1.0" encoding="UTF-8"?>
<beans xmlns="http://www.springframework.org/schema/beans"
    xmlns:xsi="http://www.w3.org/2001/XMLSchema-instance"
    xmlns:mvc="http://www.springframework.org/schema/mvc"
    xsi:schemaLocation="http://www.springframework.org/schema/beans http://www.springframework.org/schema/beans/spring-beans-3.2.xsd
        http://www.springframework.org/schema/mvc http://www.springframework.org/schema/mvc/spring-mvc-4.3.xsd">

    <mvc:annotation-driven></mvc:annotation-driven>

</beans>
1.7 接下来要在 web.xml 中配置 contextConfigLocation 属性,在 web 服务器启动的时候就启动spring容器。
<?xml version="1.0" encoding="UTF-8"?>
<web-app xmlns:xsi="http://www.w3.org/2001/XMLSchema-instance" xmlns="http://java.sun.com/xml/ns/javaee" xsi:schemaLocation="http://java.sun.com/xml/ns/javaee http://java.sun.com/xml/ns/javaee/web-app_3_0.xsd" id="WebApp_ID" version="3.0">
  <display-name>ssm</display-name>

  <servlet>
      <servlet-name>dispatcherServlet</servlet-name>
      <servlet-class>org.springframework.web.servlet.DispatcherServlet</servlet-class>
      <init-param>
          <param-name>contextConfigLocation</param-name>
          <param-value>classpath:spring-*.xml</param-value>
      </init-param>
      <load-on-startup>1</load-on-startup>
  </servlet>

  <servlet-mapping>
      <servlet-name>dispatcherServlet</servlet-name>
      <url-pattern>*.do</url-pattern>
  </servlet-mapping>

</web-app>
contextConfigLocation 属性在 DispatcherServlet 它爹 FrameworkServlet中找到

...FrameworkServlet.java
1.8 在 index.jsp 编写表单,表单里的name属性要跟实体类的成员属性对应,因为spring根据set方法注入。
<%@ page language="java" contentType="text/html; charset=UTF-8"
    pageEncoding="UTF-8"%>
<!DOCTYPE html>
<html>
<head>
<meta charset="UTF-8">
<title>Insert title here</title>
</head>
<body>
    <form action="${pageContext.request.contextPath }/student/insert.do" method="post">
        username: <input type="text" name="stuName"/><br>
        password: <input type="password" name="stuPassword"/><br>
        age: <input type="text" name="stuAge"/><br>
        <input type="submit" value="提交"/>
    </form>
</body>
</html>
1.9 然后在 student-list.jsp 中先随便写点内容(因为我们controller 里 insert 方法跳转的页面是它,现在测试是否成功整合springmvc)
然后开启服务器,访问 index.jsp,成功跳转 student-list.jsp 即整合springmvc成功。
2. 开始整合 mybatis
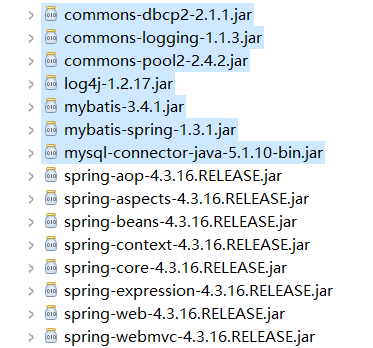
2.1 依旧是导包
2.2 现创建如下目录
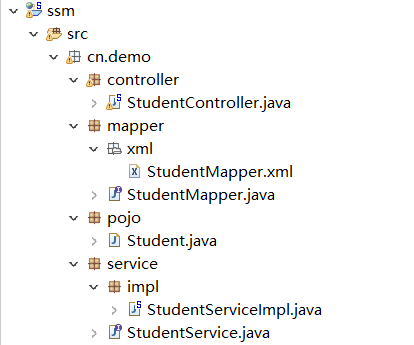
2.3 编写接口文件和映射文件
StudentMapper.java
package cn.demo.mapper;

import cn.demo.pojo.Student;

public interface StudentMapper {

    public Integer insert(Student student);

}
StudentMapper.xml
<?xml version="1.0" encoding="UTF-8"?>
<!DOCTYPE mapper PUBLIC "-//mybatis.org//DTD Mapper 3.0//EN" "mybatis-3-mapper.dtd" >
<mapper namespace="cn.demo.mapper.StudentMapper">

  <insert id="insert">
      insert into tb_student(stu_name,stu_password,stu_age) values(#{stuName},#{stuPassword},#{stuAge})
  </insert>

</mapper>
2.4 在config文件夹下创建 spring-data.xml,这里是 mybatis 相关操作
2.5 spring-data.xml
<?xml version="1.0" encoding="UTF-8"?>
<beans xmlns="http://www.springframework.org/schema/beans"
    xmlns:xsi="http://www.w3.org/2001/XMLSchema-instance"
    xmlns:tx="http://www.springframework.org/schema/tx"
    xsi:schemaLocation="http://www.springframework.org/schema/beans http://www.springframework.org/schema/beans/spring-beans-4.3.xsd
        http://www.springframework.org/schema/tx http://www.springframework.org/schema/tx/spring-tx-4.3.xsd">

    <!-- 1. 配置数据源 -->
    <bean name="dataSource" class="org.apache.commons.dbcp2.BasicDataSource">
        <property name="driverClassName" value="com.mysql.jdbc.Driver"/>
        <property name="url" value="jdbc:mysql://localhost:3306/hibernate"/>
        <property name="username" value="root"/>
        <property name="password" value="root"/>
    </bean>

    <!-- 2. 配置session工厂 -->
    <bean name="sqlSessionFactoryBean" class="org.mybatis.spring.SqlSessionFactoryBean">
        <property name="dataSource" ref="dataSource"/>
        <!-- 如果有映射文件配置映射文件的路径 -->
        <property name="mapperLocations" value="classpath:cn/demo/mapper/xml/*Mapper.xml"/>
        <!-- mybatis参数  -->
        <!-- 别名设置,在这个包下的都可以用别名 -->
        <property name="typeAliasesPackage" value="cn.demo.pojo"/>
        <!-- 驼峰命名 -->
        <property name="configuration">
            <bean class="org.apache.ibatis.session.Configuration">
                <property name="mapUnderscoreToCamelCase" value="true"/>
            </bean>
        </property>
    </bean>

    <!-- 3. 配置映射接口的配置器,用于创建映射接口的动态对象,并注入到spring容器里-->
    <bean class="org.mybatis.spring.mapper.MapperScannerConfigurer">
        <!-- 指定会话工厂 -->
        <property name="sqlSessionFactoryBeanName" value="sqlSessionFactoryBean"></property>
        <!-- 指定扫描映射接口的位置 -->
        <property name="basePackage" value="cn.demo.mapper"></property>
    </bean>

</beans>
2.6 在 config 文件夹下创建 log4j 配置文件 log4j.properties 输出运行日志
log4j.rootLogger=DEBUG, A1
log4j.appender.A1=org.apache.log4j.ConsoleAppender
log4j.appender.A1.layout=org.apache.log4j.PatternLayout
log4j.appender.A1.layout.ConversionPattern=%-4r %-5p [%t] %37c %3x - %m%n

log4j.logger.org.springframework=ERROR
2.7 StudentService.java
package cn.demo.service;

import cn.demo.pojo.Student;

public interface StudentService {

    public Integer insert(Student student);

}
2.8 StudentServiceImpl.java
package cn.demo.service.impl;

import org.springframework.beans.factory.annotation.Autowired;
import org.springframework.stereotype.Service;

import cn.demo.mapper.StudentMapper;
import cn.demo.pojo.Student;
import cn.demo.service.StudentService;

@Service
public class StudentServiceImpl implements StudentService{

    @Autowired
    private StudentMapper studentMapper;

    @Override
    public Integer insert(Student student) {
        Integer count = studentMapper.insert(student);
        return count;
    }

}
2.9 访问index.jsp, 输入内容,会看到 log4j 的输出信息,数据已成功插入数据表中


2.10 乱码问题解决,在 web.xml 中添加编码过滤器(spring内置)
  <!-- 编码过滤器 -->
  <filter>
      <filter-name>characterEncodingFilter</filter-name>
      <filter-class>org.springframework.web.filter.CharacterEncodingFilter</filter-class>
     <!-- 设置编码 -->
     <init-param>
         <param-name>encoding</param-name>
         <param-value>UTF-8</param-value>
     </init-param>
  </filter>

  <filter-mapping>
   <filter-name>characterEncodingFilter</filter-name>
   <url-pattern>/*</url-pattern>
  </filter-mapping>
3. 配置事务
在 web.xml 中添加如下配置
<!-- 4.配置事务代理 -->
    <bean name="tm" class="org.springframework.jdbc.datasource.DataSourceTransactionManager">
        <!-- 指定事务代理的数据源 -->
        <property name="dataSource" ref="dataSource"></property>
    </bean>

    <!-- 5.启动事务代理,声明式事务 -->
    <tx:annotation-driven transaction-manager="tm"/>
完整的 spring-data.xml


<?xml version="1.0" encoding="UTF-8"?>
<beans xmlns="http://www.springframework.org/schema/beans"
    xmlns:xsi="http://www.w3.org/2001/XMLSchema-instance"
    xmlns:aop="http://www.springframework.org/schema/aop"
    xmlns:context="http://www.springframework.org/schema/context"
    xmlns:tx="http://www.springframework.org/schema/tx"
    xsi:schemaLocation="http://www.springframework.org/schema/beans http://www.springframework.org/schema/beans/spring-beans-3.2.xsd
        http://www.springframework.org/schema/aop http://www.springframework.org/schema/aop/spring-aop-4.3.xsd
        http://www.springframework.org/schema/context http://www.springframework.org/schema/context/spring-context-4.3.xsd
        http://www.springframework.org/schema/tx http://www.springframework.org/schema/tx/spring-tx-4.3.xsd">

    <!-- 1. 配置数据源 -->
    <bean name="dataSource" class="org.apache.commons.dbcp2.BasicDataSource">
        <property name="driverClassName" value="com.mysql.jdbc.Driver"/>
        <property name="url" value="jdbc:mysql://localhost:3306/hibernate"/>
        <property name="username" value="root"/>
        <property name="password" value="root"/>
    </bean>

    <!-- 2. 配置session工厂 -->
    <bean name="sqlSessionFactoryBean" class="org.mybatis.spring.SqlSessionFactoryBean">
        <property name="dataSource" ref="dataSource"></property>
        <property name="mapperLocations" value="classpath:cn/lz/mapper/*Mapper.xml"></property>
        <property name="configuration">
            <bean class="org.apache.ibatis.session.Configuration">
                <property name="mapUnderscoreToCamelCase" value="true"></property>
            </bean>
        </property>
    </bean>

    <!-- 3.扫描mapper接口,生成mapper接口代理 -->
    <bean class="org.mybatis.spring.mapper.MapperScannerConfigurer">
        <property name="sqlSessionFactoryBeanName" value="sqlSessionFactoryBean" ></property>
        <property name="basePackage" value="cn.lz.mapper"></property>
    </bean>

    <!-- 4.配置事务代理 -->
    <bean name="tm" class="org.springframework.jdbc.datasource.DataSourceTransactionManager">
        <!-- 指定事务代理的数据源 -->
        <property name="dataSource" ref="dataSource"></property>
    </bean>

    <!-- 5.启动事务代理,声明式事务 -->
    <tx:annotation-driven transaction-manager="tm"/>

</beans>
!关于事务代理的注意事项
Spring 是通过抛出异常来判断事务是否回滚的。
所以事务代理的操作中不可以捕获异常,异常必须要抛到上一层处理。
ok 终于完了……