PathMeasure详解
我们先来几个动态图,吸引下注意力


源码分析
要理解一件事物,我们要观其外,也要观其内,因此我们这里先看看PathMeasure的源码,先知其然,PathMeasure源码的内容不多,只有一百多行,因此这里将其贴了出来:
package android.graphics;

public class PathMeasure {
    private Path mPath;

    /**
     * Create an empty PathMeasure object. To uses this to measure the length
     * of a path, and/or to find the position and tangent along it, call
     * setPath.
     *
     * Note that once a path is associated with the measure object, it is
     * undefined if the path is subsequently modified and the the measure object
     * is used. If the path is modified, you must call setPath with the path.
     */
    public PathMeasure() {
        mPath = null;
        native_instance = native_create(0, false);
    }

    /**
     * Create a PathMeasure object associated with the specified path object
     * (already created and specified). The measure object can now return the
     * path's length, and the position and tangent of any position along the
     * path.
     *
     * Note that once a path is associated with the measure object, it is
     * undefined if the path is subsequently modified and the the measure object
     * is used. If the path is modified, you must call setPath with the path.
     *
     * @param path The path that will be measured by this object
     * @param forceClosed If true, then the path will be considered as "closed"
     *        even if its contour was not explicitly closed.
     */
    public PathMeasure(Path path, boolean forceClosed) {
        // The native implementation does not copy the path, prevent it from being GC'd
        mPath = path;
        native_instance = native_create(path != null ? path.readOnlyNI() : 0,
                                        forceClosed);
    }

    /**
     * Assign a new path, or null to have none.
     */
    public void setPath(Path path, boolean forceClosed) {
        mPath = path;
        native_setPath(native_instance,
                       path != null ? path.readOnlyNI() : 0,
                       forceClosed);
    }

    /**
     * Return the total length of the current contour, or 0 if no path is
     * associated with this measure object.
     */
    public float getLength() {
        return native_getLength(native_instance);
    }

    /**
     * Pins distance to 0 <= distance <= getLength(), and then computes the
     * corresponding position and tangent. Returns false if there is no path,
     * or a zero-length path was specified, in which case position and tangent
     * are unchanged.
     *
     * @param distance The distance along the current contour to sample
     * @param pos If not null, returns the sampled position (x==[0], y==[1])
     * @param tan If not null, returns the sampled tangent (x==[0], y==[1])
     * @return false if there was no path associated with this measure object
    */
    public boolean getPosTan(float distance, float pos[], float tan[]) {
        if (pos != null && pos.length < 2 ||
            tan != null && tan.length < 2) {
            throw new ArrayIndexOutOfBoundsException();
        }
        return native_getPosTan(native_instance, distance, pos, tan);
    }

    public static final int POSITION_MATRIX_FLAG = 0x01;    // must match flags in SkPathMeasure.h
    public static final int TANGENT_MATRIX_FLAG  = 0x02;    // must match flags in SkPathMeasure.h

    /**
     * Pins distance to 0 <= distance <= getLength(), and then computes the
     * corresponding matrix. Returns false if there is no path, or a zero-length
     * path was specified, in which case matrix is unchanged.
     *
     * @param distance The distance along the associated path
     * @param matrix Allocated by the caller, this is set to the transformation
     *        associated with the position and tangent at the specified distance
     * @param flags Specified what aspects should be returned in the matrix.
     */
    public boolean getMatrix(float distance, Matrix matrix, int flags) {
        return native_getMatrix(native_instance, distance, matrix.native_instance, flags);
    }

    /**
     * Given a start and stop distance, return in dst the intervening
     * segment(s). If the segment is zero-length, return false, else return
     * true. startD and stopD are pinned to legal values (0..getLength()).
     * If startD >= stopD then return false (and leave dst untouched).
     * Begin the segment with a moveTo if startWithMoveTo is true.
     *
     * <p>On {@link android.os.Build.VERSION_CODES#KITKAT} and earlier
     * releases, the resulting path may not display on a hardware-accelerated
     * Canvas. A simple workaround is to add a single operation to this path,
     * such as <code>dst.rLineTo(0, 0)</code>.</p>
     */
    public boolean getSegment(float startD, float stopD, Path dst, boolean startWithMoveTo) {
        // Skia used to enforce this as part of it's API, but has since relaxed that restriction
        // so to maintain consistency in our API we enforce the preconditions here.
        float length = getLength();
        if (startD < 0) {
            startD = 0;
        }
        if (stopD > length) {
            stopD = length;
        }
        if (startD >= stopD) {
            return false;
        }

        return native_getSegment(native_instance, startD, stopD, dst.mutateNI(), startWithMoveTo);
    }

    /**
     * Return true if the current contour is closed()
     */
    public boolean isClosed() {
        return native_isClosed(native_instance);
    }

    /**
     * Move to the next contour in the path. Return true if one exists, or
     * false if we're done with the path.
     */
    public boolean nextContour() {
        return native_nextContour(native_instance);
    }

    protected void finalize() throws Throwable {
        native_destroy(native_instance);
        native_instance = 0;  // Other finalizers can still call us.
    }

    private static native long native_create(long native_path, boolean forceClosed);
    private static native void native_setPath(long native_instance, long native_path, boolean forceClosed);
    private static native float native_getLength(long native_instance);
    private static native boolean native_getPosTan(long native_instance, float distance, float pos[], float tan[]);
    private static native boolean native_getMatrix(long native_instance, float distance, long native_matrix, int flags);
    private static native boolean native_getSegment(long native_instance, float startD, float stopD, long native_path, boolean startWithMoveTo);
    private static native boolean native_isClosed(long native_instance);
    private static native boolean native_nextContour(long native_instance);
    private static native void native_destroy(long native_instance);

    /* package */private long native_instance;
}
API说明
我们先看看构造函数1:
PathMeasure():
创建一个空的PathMeasure对象, 但是要使用它来测量路径的长度,或查找位置和切线的时候,必须要先调用setPath函数来指定一个路径,当参数path改变时,需要重新调用setPath来重新指定:
public void setPath(Path path, boolean forceClosed);构造函数2
PathMeasure(Path path, boolean forceClosed)
创建一个与指定的path对象关联的PathMeasure对象,要求path创建完毕,这时PathMeasure对象可以返回path的长度以及沿着路径的任何位置的位置和切线,当参数path改变时,需要重新调用setPath来重新指定。
第二个参数:boolean forceClosed
代表在测量的时候是否闭合,ture闭合,false不闭合。forceCloseed不会对Path本身有任何影响,只是影响PathMeasure的测量
setPath(Path path, boolean forceClosed)
设置一个path,参数与第二个构造函数相同,即
setPath(Path path, boolean forceClosed) == new PathMeasure(Path path, boolean forceClosed)
float getLength()
返回当前测量得到的轮廓的总长度,如果没有setPath(),则返回0
boolean getPosTan(float distance, float pos[], float tan[])
获取path上的点的坐标和该点的正切值
distance:即距离path起点的距离, 值为0 <= distance <= getLength()
pos[]:如果不为null,则返回点坐标(x == [0],y == [1])
tan[]:如果不为null,则返回点的正切值(x == [0],y == [1])
返回值:true表示获取成功,并将值保存到pos和tan中,false表示获取失败,pos和tan不变
boolean getMatrix(float distance, Matrix matrix, int flags)
根据flags获取对应的矩阵
distance:即距离path起点的距离, 值为0 <= distance <= getLength()
matrix:flags指定返回点坐标矩阵/点正切值矩阵
flags:PathMeasure.POSITION_MATRIX_FLAG点坐标矩阵,PathMeasure.POSITION_MATRIX_FLAG点正切值
返回值:true表示获取成功,并将值保存到matrix,false表示获取失败,matrix不变
boolean getSegment(float startD, float stopD, Path dst, boolean startWithMoveTo)
指定其实distance和结束distance,用来截取path,被截取的 Path 片段会添加到 dst 中,而不是替换 dst 中到内容。
float startD 距离path起点开始截取的距离,0 <= startD <= getLength()
float stopD 距离path起点完成截取的距离,0 <= startD < stopD <= getLength()
Path dst 截取到
boolean startWithMove 起始点是否使用moveTo的点,用来设置截取的path的第一个点位置不变
在Build.VERSION_CODES.KITKAT和更早版本上,生成的路径可能不会显示在硬件加速中canvas上。 一个简单的解决方法是向此path添加单个操作,如dst.rLineTo(0,0)。
boolean isClosed()
判断PathMeasure是否闭合
boolean nextContour()
path可由多个轮廓组成,例如通过addRect, addRoundRect, addOval, addCircle, addPath, addArc, arcTo等方法添加的矩形, 圆角矩形, 椭圆, 圆, 路径, 圆弧等轮廓,像 getLength , getgetSegment,getPosTan,getMatrix这些方法,都只是在其中一个轮廓中执行,nextContour 作用就是跳转到下一条轮廓中
如果还有下一条轮廓,返回true,否则返回false。
我们来证明一下,代码如下
    //画两个矩形测试path轮廓的添加顺序对nextContour的影响
        canvas.save();
        canvas.translate(centerX, centerY); //移动canvas坐标系到中心点

        path = new Path();
        path.addRect(-100, -100, 100, 100, Path.Direction.CW);  // 添加周长为800的第一个矩形
        canvas.drawPath(path, paint); //先画一个矩形

        path.addRect(-200, -200, 200, 200, Path.Direction.CW);  // 添加周长为1600的第二个矩形
        canvas.drawPath(path, paint); //再画一个矩形
        canvas.restore();

        //不闭合
        PathMeasure pathMeasure = new PathMeasure(path, false);

        //我们这里添加了两个轮廓,因此打印了两次
        while(pathMeasure.nextContour()){
            Log.e(TAG, "getLength: "+ pathMeasure.getLength());
        }
我们这里添加了两条轮廓,一条为周长为800的矩形,一条为周长为1600的矩形,我们通过while来打印所有的轮廓的长度,得出长度为:

我们看到打印的顺序为先打印第一次添加的矩形轮廓,再打印第二次添加的矩形轮廓,假如我们将添加的位置调换,看看长度打印是什么:

我们可以看到打印的值调换了,证明path添加轮廓的顺序会影响nextContour()的顺序。
Native方法

可以看到PathMeasure还隐藏了身份,即内部还是调用了底层native方法来实现path的测量。
代码效果
我们接下来写代码来看看详细的接口效果,
        //测试闭合/不闭合效果
        canvas.save();
        canvas.translate(centerX, centerY); //移动canvas坐标系到中心点

        path = new Path();
        path.lineTo( - 200, - 200); //画一条线
        path.lineTo(-200, 200); //画第二条线
//        path.close(); //代表path本身闭合

        PathMeasure pathMeasure1 = new PathMeasure(path, false); //不闭合测量
        PathMeasure pathMeasure2 = new PathMeasure(path, true); //闭合测量

        float length1 = pathMeasure1.getLength(); //获取轮廓长度
        float length2 = pathMeasure2.getLength(); //获取轮廓长度

        Log.e(TAG, "pathMeasure1 length: " + length1);
        Log.e(TAG, "pathMeasure2 length: " + length2);

//        canvas.drawPath(path, paint); //绘制原path轮廓

        //画不闭合
//        for (float dis = 0; dis < length1; dis++){
//            float pos[] = new float[2];
//            float tan[] = new float[2];
//
//            pathMeasure1.getPosTan(dis, pos, tan);
//            canvas.drawPoint(pos[0], pos[1], paint);
//        }

        //画闭合
        for (float dis = 0; dis < length2; dis++){
            float pos[] = new float[2];
            float tan[] = new float[2];

            pathMeasure2.getPosTan(dis, pos, tan);
            canvas.drawPoint(pos[0], pos[1], paint);
        }


        canvas.restore();
        //=============================================
        //=============================================
我们可以看到,不闭合的长度和闭合的长度分别为:

我们再看看canvas.drawPath(path, paint)的效果为:
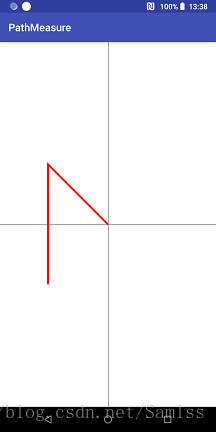
画不闭合轮廓的效果为:
画闭合轮廓的效果为:

可以看到原本的轮廓闭合了,增加了一条使原本轮廓闭合的直线,并且创建PathMeasure并指定闭合的话,是不会影响path自身的,PathMeasure只是通过path来计算以获取坐标和正切值。那么这时候可能会有疑问,如果是一条直线呢,会闭合吗?答案是不会的,path和PathMeasure只会闭合可以闭合的轮廓。
我们上面通过代码
 pathMeasure1.getPosTan(dis, pos, tan);
 pathMeasure2.getPosTan(dis, pos, tan);
再通过canvas.drawPoint()方法来进行画点。
通过上面例子我们可以知道,通过getPosTan()方法根据distance长度来获取对应长度的xy坐标并画到画布上面,我们知道pos记录了该长度的坐标,那么tan又代表什么呢?
正切值
我们先了解一下什么是切线:
几何上,切线指的是一条刚好触碰到曲线上某一点的直线。更准确地说,当切线经过曲线上的某点(即切点)时,切线的方向与曲线上该点的方向是相同的。平面几何中,将和圆只有一个公共交点的直线叫做圆的切线。
圆的切线垂直于经过切点的半径
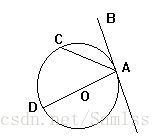
AD直径垂直于AB切线
那么我们这里的正切值是什么?
我们再来回顾一下三角函数,

正切函数
tangent
tan
a/b
∠A的对边比邻边
在Rt△ABC(直角三角形)中,∠C=90°,AB是∠C的对边c,BC是∠A的对边a,AC是∠B的对边b,正切函数就是tanB=b/a,即tanB=AC/BC
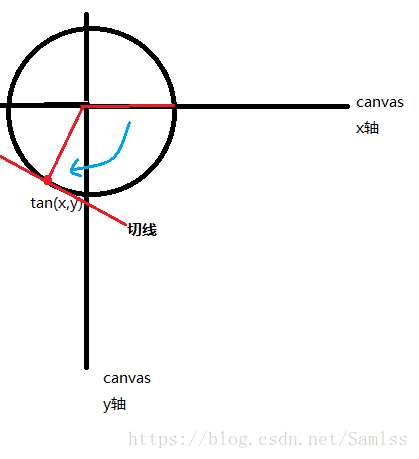
tan[]记录的就是根据distance计算得到的点的正切值的xy值,这里的xy值可当做为对边和邻边
正切函数在直角三角形中,对边与邻边的比值叫做正切。放在直角坐标系中(如图)即 tanθ=y/x。
图中红色线的角度为当前角度,我们可以通过公式即反正切计算:
float degree = (float) (Math.atan2(tan[1], tan[0]) * 180 / Math.PI);来获取红色线角度。
安卓中,Math.atan2(double y, double x),代表根据y(纵坐标),x(横坐标)来获取反正切的值,Math.atan2()函数返回点(x,y)和原点(0,0)之间直线的倾斜角,不过这样我们得到的是一个弧度值,因此还需要 * 180 / Math.PI来获取最终的角度。
getPosTan和getMatrix实现的Loading效果
代码实现:
public class Loading1View extends View {
    private final static float RADIUS = 200; //圆的半径
    private final static float SPEED_RATIO = 0.006f; //控制速度

    private Bitmap carBitmap;

    private float[] pos = new float[2]; //记录位置
    private float[] tan = new float[2]; //记录切点值xy

    private Path path;
    private PathMeasure pathMeasure; //路径计算
    private float distanceRatio = 0;
    private Paint circlePaint; //画圆圈的画笔
    private Paint carPaint; //画小车的画笔
    private Matrix carMatrix; //针对car bitmap图片操作的矩阵


    public Loading1View(Context context) {
        super(context);

        init();
    }

    public Loading1View(Context context, @Nullable AttributeSet attrs) {
        super(context, attrs);

        init();
    }

    public Loading1View(Context context, @Nullable AttributeSet attrs, int defStyleAttr) {
        super(context, attrs, defStyleAttr);

        init();
    }

    private void init(){
        carBitmap = BitmapFactory.decodeResource(getResources(), R.mipmap.icon_car);

        path = new Path();
        path.addCircle(0, 0, RADIUS, Path.Direction.CW);

        pathMeasure = new PathMeasure(path, false);

        circlePaint = new Paint();
        circlePaint.setStrokeWidth(5);
        circlePaint.setStyle(Paint.Style.STROKE);
        circlePaint.setAntiAlias(true);
        circlePaint.setColor(Color.BLACK);

        carPaint = new Paint();
        carPaint.setColor(Color.DKGRAY);
        carPaint.setStrokeWidth(2);
        carPaint.setStyle(Paint.Style.STROKE);

        carMatrix = new Matrix();
    }

    @Override
    protected void onDraw(Canvas canvas) {
        super.onDraw(canvas);

        canvas.drawColor(Color.WHITE);
        int width = canvas.getWidth();
        int height = canvas.getHeight();

        //移动canvas坐标系到中心
        canvas.translate(width / 2, height / 2);
        carMatrix.reset();

        distanceRatio += SPEED_RATIO;
        if(distanceRatio >=1){
            distanceRatio = 0;
        }

        float distance = pathMeasure.getLength() * distanceRatio;


        {
            //使用getPosTan方法
            pathMeasure.getPosTan(distance, pos, tan);
            float degree = (float) (Math.atan2(tan[1], tan[0]) * 180 / Math.PI); //计算小车本身要旋转的角度
            carMatrix.postRotate(degree, carBitmap.getWidth() / 2, carBitmap.getHeight() / 2); //设置旋转角度和旋转中心

            //这里要将设置到小车的中心点
            carMatrix.postTranslate(pos[0] - carBitmap.getWidth() / 2, pos[1] - carBitmap.getHeight() / 2);


            //使用getMatrix方法
            //再次重新计算坐标和正切值
            //该方法内部已帮我们实现实现上面的计算,包括坐标点和正切值获得的角度
//            pathMeasure.getMatrix(distance, carMatrix, PathMeasure.TANGENT_MATRIX_FLAG | PathMeasure.POSITION_MATRIX_FLAG); //获取
//            carMatrix.preTranslate(-carBitmap.getWidth() / 2, -carBitmap.getHeight() / 2);//这里要将设置到小车的中心点

            /*
            这里我们讲一下postTranslate和preTranslate的差别,
            Postconcats the matrix with the specified translation. M' = T(dx, dy) * M  代表指定平移之后再进行矩阵拼接
            Preconcats the matrix with the specified translation. M' = M * T(dx, dy) 代表指定平移之前就要进行矩阵拼接

            我们这里,使用getPosTan方法时,调用的是postTranslate:
            这是因为,在调用postRotate接口的时候,已经指定了旋转中心,然后再调用postTranslate进行平移,若调用
            preTranslate的话,则会导致旋转的时候由于平移使旋转中心发生改变,导致小车旋转角度不正确。

            而在调用getMatrix方法时,调用的是preTranslate,这是由于,
            getMatrix将坐标和角度信息拼接到矩阵carMatrix的时候并没有指定旋转中心,因此这里需要先使用preTranslate进行移动和矩阵拼接,
            然后getMatrix内部对carMatrix矩阵赋值进行角度旋转的时候会以移动后的位置为中心
            */
        }


        canvas.drawPath(path, circlePaint);
        canvas.drawBitmap(carBitmap, carMatrix, carPaint);

        invalidate();
    }
}
这里我们可以将getPosTan 替换为 getMatrix方法,
     pathMeasure.getMatrix(distance, carMatrix, PathMeasure.TANGENT_MATRIX_FLAG | PathMeasure.POSITION_MATRIX_FLAG); //获取
     carMatrix.preTranslate(-carBitmap.getWidth() / 2, -carBitmap.getHeight() / 2);//这里要将设置到小车的中心点
这样就不需要我们自己去计算。
效果图如下:

我们定义的path添加圆圈的时候,调用了如下代码:
path.addCircle(0, 0, RADIUS, Path.Direction.CW);Path.Direction.CW代表顺时针,Path.Direction.CCW代表逆时针,我们现在来看看逆时针的效果:
getSegment实现的Loading效果
我们这里用getSegment来实现,我们先看看他的方法
boolean getSegment(float startD, float stopD, Path dst, boolean startWithMoveTo);api说明可在上面看到,我们这里写代码来实现一下:
代码+说明:
  /**
     * 测试getSegment函数
     *
     * @param canvas 画布
     * @param startWithMoveTo 起始点是否使用moveTo的点
     */
    private void testGetSegment(Canvas canvas, boolean startWithMoveTo) {
        Path path = new Path();
        //添加一个觉醒
        path.addRect(-200, -200, 200, 200, Path.Direction.CW);

        Path dst = new Path();
        //原本存在的轮廓
        dst.lineTo(-300, -300);

        // 将Path 与 PathMeasure 关联
        PathMeasure measure = new PathMeasure(path, false);

        // 截取一部分轮廓存入dst中,并设置moveTo保持截取得到的 Path 第一个点的位置是否不变,取决于startWithMoveTo
        measure.getSegment(300, 600, dst, startWithMoveTo);

        //原图画笔
        Paint srcPaint = new Paint();
        srcPaint.setStyle(Paint.Style.STROKE);
        srcPaint.setStrokeWidth(5);
        srcPaint.setColor(Color.RED);

        //截取后的图的画笔
        Paint dstPaint = new Paint();
        dstPaint.setStyle(Paint.Style.STROKE);
        dstPaint.setStrokeWidth(5);
        dstPaint.setColor(Color.GREEN);

        //绘制原图
        canvas.drawPath(path,srcPaint);
        // 绘制 dst
        canvas.drawPath(dst, dstPaint);
    }
我们来看看testGetSegment(canvas, true)和testGetSegment(canvas, false)的效果分别是怎样的,
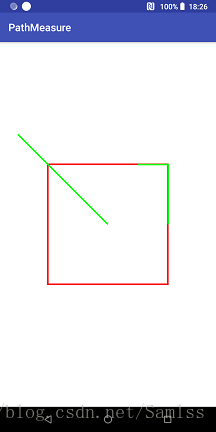

可见被截取的 Path 片段会添加到 dst 中,而不是替换 dst 中到内容。
因此我们可以知道当startWithMoveTo的值为:
true 使截取的内容不会改变
false 使截取的内容和原本的内容连接起来。
接下来我们用getSegment接口来实现一个Loading动画:
代码+说明:
public class Loading2View extends View {
    private final static float RADIUS = 150; //圆的半径

    private Path path;
    private PathMeasure pathMeasure; //路径计算
    private Paint paint; //画笔
    private float pathDistanceRatio; //路径长度的比值 (0 - 1)

    public Loading2View(Context context) {
        super(context);
        init();
    }

    public Loading2View(Context context, @Nullable AttributeSet attrs) {
        super(context, attrs);
        init();
    }

    public Loading2View(Context context, @Nullable AttributeSet attrs, int defStyleAttr) {
        super(context, attrs, defStyleAttr);
        init();
    }

    private void init(){
        path = new Path();
        path.addCircle(0, 0, RADIUS, Path.Direction.CW);

        pathMeasure = new PathMeasure(path, false);

        paint = new Paint();
        paint.setStrokeWidth(10);
        paint.setStyle(Paint.Style.STROKE);
        paint.setAntiAlias(true);
        paint.setColor(Color.BLACK);

        //计算比例的动画
        ValueAnimator ratioAnimator = ValueAnimator.ofFloat(0, 1);
        ratioAnimator.addUpdateListener(new ValueAnimator.AnimatorUpdateListener() {
            @Override
            public void onAnimationUpdate(ValueAnimator valueAnimator) {
                pathDistanceRatio = (float) valueAnimator.getAnimatedValue();
                invalidate();
            }
        });
        ratioAnimator.setDuration(1500);
        ratioAnimator.setRepeatMode(ValueAnimator.RESTART);
        ratioAnimator.setRepeatCount(ValueAnimator.INFINITE);
        ratioAnimator.setInterpolator(new DecelerateInterpolator());
        ratioAnimator.start();
    }

    @Override
    protected void onDraw(Canvas canvas) {
        super.onDraw(canvas);

        canvas.drawColor(Color.WHITE);
        int width = canvas.getWidth();
        int height = canvas.getHeight();

        canvas.translate(width / 2, height / 2); //移动canvas坐标系到中心点

        float stopD = pathMeasure.getLength() * pathDistanceRatio; //当前截取的结束点
        float startD = (float) (stopD - ((0.5 - Math.abs(pathDistanceRatio - 0.5)) * pathMeasure.getLength())); //当前截取的开始点
        Path dst = new Path();
        dst.moveTo(RADIUS, 0); //移动起始点

        pathMeasure.getSegment(startD, stopD, dst, true);
        canvas.drawPath(dst, paint);
//        testGetSegment(canvas, true);
    }

    /**
     * 测试getSegment函数
     *
     * @param canvas 画布
     * @param startWithMoveTo 起始点是否使用moveTo的点
     */
    private void testGetSegment(Canvas canvas, boolean startWithMoveTo) {
        Path path = new Path();
        //添加一个觉醒
        path.addRect(-200, -200, 200, 200, Path.Direction.CW);

        Path dst = new Path();
        //原本存在的轮廓
        dst.lineTo(-300, -300);

        // 将Path 与 PathMeasure 关联
        PathMeasure measure = new PathMeasure(path, false);

        // 截取一部分轮廓存入dst中,并设置moveTo保持截取得到的 Path 第一个点的位置是否不变,取决于startWithMoveTo
        measure.getSegment(300, 600, dst, startWithMoveTo);

        //原图画笔
        Paint srcPaint = new Paint();
        srcPaint.setStyle(Paint.Style.STROKE);
        srcPaint.setStrokeWidth(5);
        srcPaint.setColor(Color.RED);

        //截取后的图的画笔
        Paint dstPaint = new Paint();
        dstPaint.setStyle(Paint.Style.STROKE);
        dstPaint.setStrokeWidth(5);
        dstPaint.setColor(Color.GREEN);

        //绘制原图
        canvas.drawPath(path,srcPaint);
        // 绘制 dst
        canvas.drawPath(dst, dstPaint);
    }
}
效果图:
小车跑道移动效果
代码+说明
public class CarTrackView extends View {
    private static final String TAG = "CarTrackView";
    private final static float SPEED_RATIO = 0.006f; //控制速度

    private Bitmap carBitmap; //小车bitmap
    private Paint contourPaint; //轮廓画笔
    private float distanceRatio = 0; //距离比例
    private Paint carPaint; //画小车的画笔

    public CarTrackView(Context context) {
        super(context);

        init();
    }

    public CarTrackView(Context context, @Nullable AttributeSet attrs) {
        super(context, attrs);

        init();
    }

    public CarTrackView(Context context, @Nullable AttributeSet attrs, int defStyleAttr) {
        super(context, attrs, defStyleAttr);

        init();
    }

    private void init(){
        carBitmap = BitmapFactory.decodeResource(getResources(), R.mipmap.icon_car);

        contourPaint = new Paint();
        contourPaint = new Paint(Paint.ANTI_ALIAS_FLAG);
        contourPaint.setStyle(Paint.Style.STROKE);
        contourPaint.setStrokeWidth(5);

        carPaint = new Paint(Paint.ANTI_ALIAS_FLAG);
    }

    @Override
    protected void onDraw(Canvas canvas) {
        super.onDraw(canvas);

        canvas.drawColor(Color.WHITE);

        int width = canvas.getWidth();
        int height = canvas.getHeight();

        canvas.translate(width / 2, height / 2); //移动canvas坐标系

        Path path = new Path();  //第一段为直线,第二段为曲线,第三段为直线


        path.moveTo(- width / 2, 0);
        path.lineTo(0, 0);

        path.cubicTo(0, 0, 0, -width / 2 / 2, width / 2 / 2, -width / 2 / 2); //画条三阶贝塞尔曲线

        path.lineTo(width / 2, -width / 2 / 2);

        distanceRatio += SPEED_RATIO;
        if(distanceRatio >=1){
            distanceRatio = 0;
        }

        PathMeasure pathMeasure = new PathMeasure(path, false);
        float distance = pathMeasure.getLength() * distanceRatio;

        Matrix carMatrix = new Matrix();
        pathMeasure.getMatrix(distance, carMatrix, PathMeasure.TANGENT_MATRIX_FLAG | PathMeasure.POSITION_MATRIX_FLAG); //获取距离的坐标和旋转角度
        carMatrix.preTranslate(-carBitmap.getWidth() / 2, -carBitmap.getHeight() / 2);//这里要将设置到小车的中心点

        canvas.drawPath(path, contourPaint); //先画轨迹
        canvas.drawBitmap(carBitmap, carMatrix, carPaint);

        invalidate();
    }
}
效果图
Demo地址:https://github.com/samlss/PathMeasure
个人github总结:https://github.com/samlss/AsAndroidDevelop