1、使用Menu类创建一个菜单
2、add_command添加菜单项,如果该菜单是顶层菜单,则添加的菜单项依次向右添加。 如果该菜单时顶层菜单的一个菜单项,则它添加的是下拉 菜单的菜单项。
属性:
label:指定菜单的名称
command:被点击时调用的方法
acceletor:快捷键
underline:是否拥有下划线
3、窗口的menu属性:指定顶级菜单项
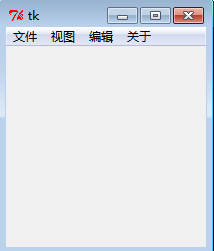
应用场景一:一个最简单的示例,创建一个顶级菜单窗口。
|
1
2
3
4
5
6
7
8
9
10
11
12
13
|
#!/usr/bin/env python
# _*_ coding:utf-8 _*_
from
Tkinter import *
#定义一个顶级大窗口
root = Tk()
#在大窗口下定义一个菜单实例
menubar = Menu(root)
#给菜单实例增加菜单项
for
each
in
[
'文件'
,
'视图'
,
'编辑'
,
'关于'
]:
menubar.add_command(label=each)
#菜单实例应用到大窗口中
root[
'menu'
]=menubar
root.mainloop()
|
效果图:
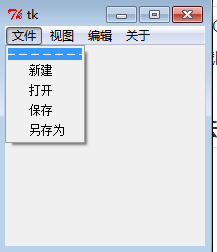
应用场景二、为顶级菜单级联子菜单项
|
1
2
3
4
5
6
7
8
9
10
11
12
13
14
15
16
17
18
19
20
21
22
23
24
25
26
27
28
29
30
31
32
33
34
35
|
#!/usr/bin/env python
# _*_ coding:utf-8 _*_
from
Tkinter import *
#定义一个顶级大窗口
root = Tk()
#在大窗口下定义一个顶级菜单实例
menubar = Menu(root)
#在顶级菜单实例下创建子菜单实例
fmenu = Menu(menubar)
for
each
in
[
'新建'
,
'打开'
,
'保存'
,
'另存为'
]:
fmenu.add_command(label=each)
vmenu = Menu(menubar)
#为每个子菜单实例添加菜单项
for
each
in
[
'复制'
,
'粘贴'
,
'剪切'
]:
vmenu.add_command(label=each)
emenu = Menu(menubar)
for
each
in
[
'默认视图'
,
'新式视图'
]:
emenu.add_command(label=each)
amenu = Menu(menubar)
for
each
in
[
'版权信息'
,
'联系我们'
]:
amenu.add_command(label=each)
#为顶级菜单实例添加菜单,并级联相应的子菜单实例
menubar.add_cascade(label=
'文件'
,menu=fmenu)
menubar.add_cascade(label=
'视图'
,menu=vmenu)
menubar.add_cascade(label=
'编辑'
,menu=emenu)
menubar.add_cascade(label=
'关于'
,menu=amenu)
#顶级菜单实例应用到大窗口中
root[
'menu'
]=menubar
root.mainloop()
|
效果图:
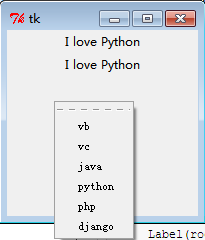
应用场景三、右键菜单
1.Menu 类里面有一个 post 方法,它接收两个参数,即 x 和 y 坐标,它会在相应的位置弹出菜单。
2.利用 Menu 的 post 方法,还有 bind 方法
|
1
2
3
4
5
6
7
8
9
10
11
12
13
14
15
16
17
18
19
20
21
22
|
#!/usr/bin/env python
# _*_ coding:utf-8 _*_
from
Tkinter import *
#在大窗口生成一个标签并布局上去
def kong():
Label(root,text=
'I love Python'
).pack()
#生成一个大窗口实例
root = Tk()
#生成一个顶级菜单实例
menubar = Menu(root)
#生成顶级菜单实例的菜单项
for
x
in
[
'vb'
,
'vc'
,
'java'
,
'python'
,
'php'
]:
menubar.add_command(label=x)
#增加顶级菜单项的同时,绑定一个事件(在root上创建一个标签并布局上去)
menubar.add_command(label=
'django'
,command=kong)
#定义一个事件
def pop(
event
):
menubar.post(
event
.x_root,
event
.y_root)
#在root大窗口绑定一个右键事件(在当前坐标上post出一个菜单)
root.bind(
"<Button-3>"
,pop)
root.mainloop()
|
效果图:
右键时会弹出一个菜单,选择django后,会在root窗口布局一个标签。
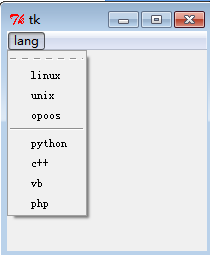
应用场景四:分割线
|
1
|
add_separator():无参数
|
用于对菜单项中的菜单分类
|
1
2
3
4
5
6
7
8
9
10
11
12
13
14
15
16
17
18
19
20
21
22
|
#!/usr/bin/env python
# _*_ coding:utf-8 _*_
from
Tkinter import *
#定义一个root大窗口实例
root = Tk()
#在root大窗口定义一个顶级菜单
menuroot = Menu(root)
#在顶级菜单下定义一个子菜单
menusp = Menu(menuroot)
#给子菜单添加菜单项
for
x
in
[
'linux'
,
'unix'
,
'opoos'
]:
menusp.add_command(label=x)
#给子菜单添加分割线
menusp.add_separator()
#继续给子菜单添加菜单项
for
x
in
[
'python'
,
'c++'
,
'vb'
,
'php'
]:
menusp.add_command(label=x)
#子菜单绑定到顶级菜单
menuroot.add_cascade(label=
'lang'
,menu=menusp)
#root大窗口应用此顶级菜单
root[
'menu'
]=menuroot
root.mainloop()
|
效果图:
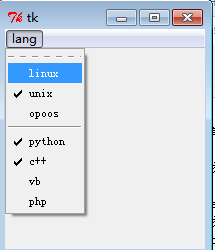
应用场景五:单选框(add_radiobutton)与复选框(add_checkbutton)
代码与上面的分割线类似,只是将add_command改为了add_radiobutton
|
1
2
3
4
5
6
7
8
9
10
11
12
13
14
15
16
17
18
19
20
21
22
|
#!/usr/bin/env python
# _*_ coding:utf-8 _*_
from
Tkinter import *
#定义一个root大窗口实例
root = Tk()
#在root大窗口定义一个顶级菜单
menuroot = Menu(root)
#在顶级菜单下定义一个子菜单
menusp = Menu(menuroot)
#给子菜单添加菜单项
for
x
in
[
'linux'
,
'unix'
,
'opoos'
]:
menusp.add_radiobutton(label=x)
#给子菜单添加分割线
menusp.add_separator()
#继续给子菜单添加菜单项
for
x
in
[
'python'
,
'c++'
,
'vb'
,
'php'
]:
menusp.add_checkbutton(label=x)
#子菜单绑定到顶级菜单
menuroot.add_cascade(label=
'lang'
,menu=menusp)
#root大窗口应用此顶级菜单
root[
'menu'
]=menuroot
root.mainloop()
|
效果图:
上面是单选效果,下面是多选效果
Tkinter Toplevel:顶层部件的工作,直接由窗口管理器管理的窗口。他们不必在它们上面的父widget
顶层部件的工作,直接由窗口管理器管理的窗口。他们不必在它们上面的父widget.
你的应用程序可以使用任意数量的顶层窗口.
语法:
这里是一个简单的语法来创建这个widget:
w = Toplevel ( option, ... )
参数:
options: 下面是这个小工具最常用的选项列表。这些选项可以作为键 - 值对以逗号分隔.
| Option | Description |
|---|---|
| bg | The background color of the window. |
| bd | Border width in pixels; default is 0. |
| cursor | The cursor that appears when the mouse is in this window. |
| class_ | Normally, text selected within a text widget is exported to be the selection in the window manager. Set exportselection=0 if you don't want that behavior. |
| font | The default font for text inserted into the widget. |
| fg | The color used for text (and bitmaps) within the widget. You can change the color for tagged regions; this option is just the default. |
| height | Window height. |
| relief | Normally, a top-level window will have no 3-d borders around it. To get a shaded border, set the bd option larger that its default value of zero, and set the relief option to one of the constants. |
| width | The desired width of the window. |
方法:
量表的对象有这些方法:
| Methods & Description |
|---|
| deiconify() Displays the window, after using either the iconify or the withdraw methods. |
| frame() Returns a system-specific window identifier. |
| group(window) Adds the window to the window group administered by the given window. |
| iconify() Turns the window into an icon, without destroying it. |
| protocol(name, function) Registers a function as a callback which will be called for the given protocol. |
| iconify() Turns the window into an icon, without destroying it. |
| state() Returns the current state of the window. Possible values are normal, iconic, withdrawn, and icon. |
| transient([master]) Turns the window into a temporary(transient) window for the given master, or to the window's parent, when no argument is given. |
| withdraw() Removes the window from the screen, without destroying it. |
| maxsize(width, height) Defines the maximum size for this window. |
| minsize(width, height) Defines the minimum size for this window. |
| positionfrom(who) Defines the position controller. |
| resizable(width, height) Defines the resize flags, which control whether the window can be resized. |
| sizefrom(who) Defines the size controller. |
| title(string) Defines the window title. |
例子:
自行尝试下面的例子:
from Tkinter import *

root = Tk()
top = Toplevel()

top.mainloop()
这将产生以下结果:
