1、安装需求:
操作系统:centos6
两台虚拟机:
bfd01     192.168.55.100  (主)
bfd02     192.168.55.101  (从)
mysql:mysql-5.7.20-linux-glibc2.12-x86_64
2、master端配置修改及操作
2.1、修改主服务master:
#[必须]服务器唯一ID,默认是1,一般取IP最后一段
server-id=100

#[必须]启用二进制日志
log-bin=master-bin
log-bin-index=master-bin.index
2.2、重启master端mysql服务
service mysql.server restart2.3、在主服务器上建立帐户并授权slave:
mysql> GRANT REPLICATION SLAVE ON *.* to 'wyl'@'%' identified by '1234';
Query OK, 0 rows affected, 1 warning (0.00 sec)

mysql> flush privileges;
Query OK, 0 rows affected (0.00 sec)
2.4、登录主服务器的mysql,查询master的状态
mysql> show master status;
+-------------------+----------+--------------+------------------+-------------------+
| File              | Position | Binlog_Do_DB | Binlog_Ignore_DB | Executed_Gtid_Set |
+-------------------+----------+--------------+------------------+-------------------+
| master-bin.000002 |      550 |              |                  |                   |
+-------------------+----------+--------------+------------------+-------------------+
1 row in set (0.00 sec)
3、slave端的配置及操作
3.1、修改从服务器slave:
#[必须]服务器唯一ID,默认是1,一般取IP最后一段
server-id=101

relay-log-index=slave-relay-bin.index
relay-log=slave-relay-bin
3.2、重启slaver端mysql服务
service mysql.server restart3.3、配置从服务器Slave:
mysql> change master to master_host='192.168.55.100',master_port=3306,master_user='wyl',master_password='1234', master_log_file='master-bin.000002',master_log_pos=550;
Query OK, 0 rows affected, 2 warnings (0.56 sec)

mysql> start slave;
Query OK, 0 rows affected (0.07 sec)
3.4、检查从服务复制功能状态:
mysql> show slave status\G
*************************** 1. row ***************************
               Slave_IO_State: Waiting for master to send event
                  Master_Host: 192.168.55.100    # 主服务器地址
                  Master_User: wyl        #授权帐户名,尽量避免使用root
                  Master_Port: 3306       #数据库端口
                Connect_Retry: 60
              Master_Log_File: master-bin.000002
          Read_Master_Log_Pos: 984
               Relay_Log_File: slave-relay-bin.000002
                Relay_Log_Pos: 755
        Relay_Master_Log_File: master-bin.000002
             Slave_IO_Running: Yes    # 此状态必须YES
            Slave_SQL_Running: Yes    # 此状态必须YES
              Replicate_Do_DB:
          Replicate_Ignore_DB:
           Replicate_Do_Table:
       Replicate_Ignore_Table:
      Replicate_Wild_Do_Table:
  Replicate_Wild_Ignore_Table:
                   Last_Errno: 0
                   Last_Error:
                 Skip_Counter: 0
          Exec_Master_Log_Pos: 984
              Relay_Log_Space: 962
              Until_Condition: None
               Until_Log_File:
                Until_Log_Pos: 0
           Master_SSL_Allowed: No
           Master_SSL_CA_File:
           Master_SSL_CA_Path:
              Master_SSL_Cert:
            Master_SSL_Cipher:
               Master_SSL_Key:
        Seconds_Behind_Master: 0
Master_SSL_Verify_Server_Cert: No
                Last_IO_Errno: 0
                Last_IO_Error:
               Last_SQL_Errno: 0
               Last_SQL_Error:
  Replicate_Ignore_Server_Ids:
             Master_Server_Id: 100
                  Master_UUID: 74be77c8-6bed-11e8-ad95-000c29fb2f54
             Master_Info_File: /usr/local/mysql-5.7.20-linux-glibc2.12-x86_64/data/master.info
                    SQL_Delay: 0
          SQL_Remaining_Delay: NULL
      Slave_SQL_Running_State: Slave has read all relay log; waiting for more updates
           Master_Retry_Count: 86400
                  Master_Bind:
      Last_IO_Error_Timestamp:
     Last_SQL_Error_Timestamp:
               Master_SSL_Crl:
           Master_SSL_Crlpath:
           Retrieved_Gtid_Set:
            Executed_Gtid_Set:
                Auto_Position: 0
         Replicate_Rewrite_DB:
                 Channel_Name:
           Master_TLS_Version:
1 row in set (0.00 sec)
当我们看到 Slave_IO_Running: Yes;Slave_SQL_Running: Yes 两个yes的时候,就说明我们的mysql主从复制已经配置成功了,下面我们进行验证。
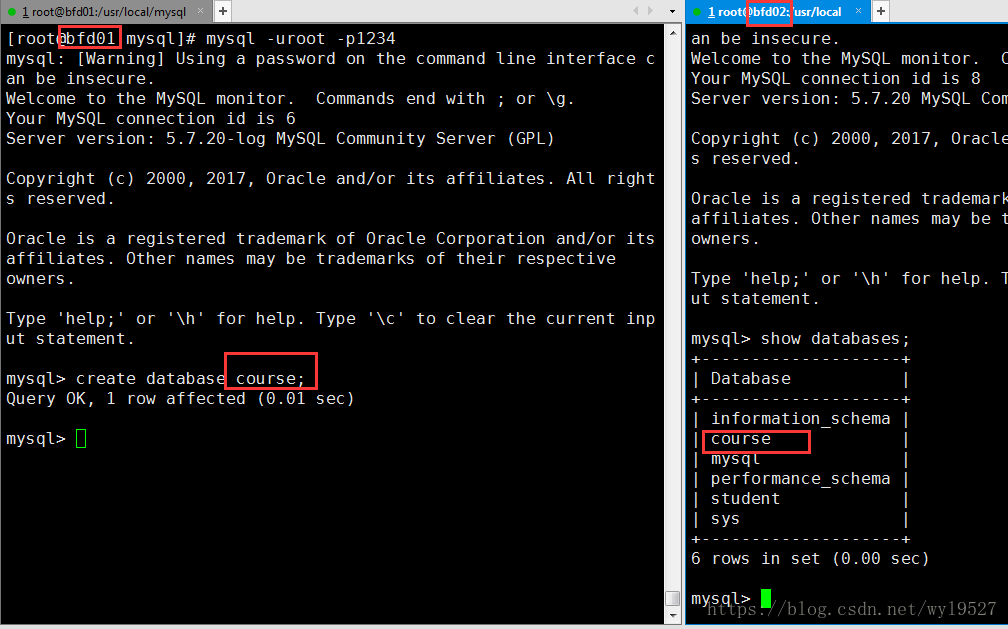
4、验证mysql的主从复制
5、安装过程中的注意事项
5.1、当没有出现两个yes的状态,其中一个为Slave_IO_Running: Connecting状态时。谷歌到一般出现该问题的可能性有以下几个原因
1.网络不通
2.密码不对
3.pos不正确
4.ID问题