Add build dependencies
The Gradle build system in Android Studio makes it easy to include external binaries外部二进制文件 or other library modules to your build as dependencies. The dependencies can be located on your machine or in a remote repository, and any transitive dependencies they declare所声明的传递依赖 are automatically included as well. This page describes how to use dependencies with your Android project, including details about behaviors and configurations that are specific to the Android plugin for Gradle. For a deeper conceptual概念上的 guide to Gradle dependencies, you should also see the Gradle guide for dependency management—but remember that your Android project must use only the dependency configurations defined on this page.
Dependency types
To add a dependency to your project, specify a dependency configuration such as implementation in the dependencies block of your build.gradle file.
For example, the following build.gradle file for an app module includes three different types of dependencies:
apply plugin: 'com.android.application'

android { ... }
dependencies {
    implementation project(":mylibrary") // Dependency on a local library module
    implementation fileTree(dir: 'libs', include: ['*.jar']) // Dependency on local binaries
    implementation 'com.example.android:app-magic:12.3' // Dependency on a remote binary
}apply plugin: 'com.android.application'
android { }
dependencies {
implementation project(":mylibrary") // Dependency on a local library module
implementation fileTree(dir: 'libs', include: ['*.jar']) // Dependency on local binaries
implementation 'com.example.android:app-magic:12.3' // Dependency on a remote binary
}
Each of these request a different kind of dependency as follows:
- Local library module dependency
implementation project(':mylibrary') //implementation project(path: ':mylibrary')implementation project(':mylibrary') //implementation project(path: ':mylibrary')
-
This declares a dependency on an Android library module named "mylibrary" (this name must match the library name defined as an
includein yoursettings.gradlefile). When you build your app, the build system compiles the library module and packages the resulting AAR file in the APK. - Local binary dependency
implementation fileTree(dir: 'libs', include: ['*.jar']) //fileTreeimplementation fileTree(dir: 'libs', include: ['*.jar']) //fileTree
-
Because Gradle reads paths relative to the
build.gradlefile, this tells the build system to add all JAR files inside your project'smodule_name/libs/directory as dependencies.Alternatively或者、作为选择、非此即彼, you specify individual个别的 files as follows:
implementation files('libs/foo.jar', 'libs/bar.jar') //filesimplementation files('libs/foo.jar', 'libs/bar.jar') //files
- Remote binary dependency
implementation 'com.example.android:app-magic:12.3'implementation 'com.example.android:app-magic:12.3'
-
This is actually事实上 shorthand速记 for the following:
implementation group: 'com.example.android', name: 'app-magic', version: '12.3'implementation group: 'com.example.android', name: 'app-magic', version: '12.3'
-
This declares a dependency on version 12.3 of the "app-magic" library, inside the "com.example.android" namespace group.
Note: Remote dependencies like this require that you declare the appropriate适当的 remote repositories仓库 where Gradle should look for the library. If the library does not already exist locally, Gradle pulls it from the remote site when the build requires it (such as when you click Sync Project with Gradle Files
 or when you run a build).
Library dependency configurations
Inside the dependencies block, you can declare a library dependency using one of several different dependency configurations (such as implementation shown above). Each dependency configuration provides Gradle different instructions指令 about how to use the library. The following table describes each of the configurations you can use for a library dependency in your Android project. The table also compares these configurations to those that were deprecated as of Android Gradle Plugin 3.0.0.
implementation[compile]
Gradle adds the dependency to the compilation classpath and packages打包到 the dependency to the build output. However, when your module configures an implementation dependency, it's letting Gradle know that you do not want the module to leak泄露给 the dependency to other modules at compile time. That is, the dependency is available to other modules only at runtime.
Using this dependency configuration instead of api or compile (deprecated) can result insignificant build time improvements because it reduces减少了 the number of modules that the build system needs to recompile.For example, if an implementation dependency changes its API, Gradle recompiles only that dependency and the modules that directly直接 depend on it. Most app and test modules should use this configuration.
result insignificant build time improvements 导致构建时间有微小的提升
这句话里面的 insignificant 原本意思是"无关紧要的、不必要的、无足轻重的"意思,感觉像是否定意思一样,但实际是肯定是意思。
这句话里面的 improvements 的意思并不是"提高"了构建时间,而是"提升"了构建事件,意思也就是"降低"了构建时间。
MLGB的,这句话让我产生了巨大的误解!result insignificant build time improvements 导致构建时间有微小的提升
这句话里面的 insignificant 原本意思是"无关紧要的、不必要的、无足轻重的"意思,感觉像是否定意思一样,但实际是肯定是意思。
这句话里面的 improvements 的意思并不是"提高"了构建时间,而是"提升"了构建事件,意思也就是"降低"了构建时间。
MLGB的,这句话让我产生了巨大的误解!
api[compile]
Gradle adds the dependency to the compilation classpath and build output.When a module includes an api dependency, it's letting Gradle know that the module wants to transitively传递的 export传递、输出 that dependency to other modules, so that it's available to them at both runtime and compile time. This configuration behaves just like compile (which is now deprecated), but you should use it with caution谨慎、小心. You should typically通常的、典型的、代表性的 use api dependencies only in library modules. That's because, if an api dependency changes its external外部 API, Gradle recompiles all modules that have access to有权访问 that dependency at compile time. So, having a large number of api dependencies can significantly显著的 increase build times. Unless you want to expose公开给 a dependency's API to a separate单独的、分开的 test module, app modules should instead use implementation dependencies.
compileOnly[provided]
Gradle adds the dependency to the compilation classpath only (that is, it is not added to the build output).
This is useful when you're creating an Android library module and you need the dependency during compilation, but it's optional to have present可以使用 at runtime. That is, if you use this configuration, then your library module must include a runtime condition条件、情况 to check whether the dependency is available, and then gracefully优雅地 change its behavior so it can still function执行功能 if it's not provided. This helps reduce the size of the final APK by not adding transient瞬态、短时的 dependencies that aren't critical决定性的、不重要的. This configuration behaves just like provided (which is now deprecated).
runtimeOnly[apk]
Gradle adds the dependency to the build output only, for use during runtime. That is, it is not added to the compile classpath. This configuration behaves just like apk (which is now deprecated).
The above configurations apply to your project's main source set, which is applied to all build variants. If you instead want to declare a dependency for only a specific build variant source set or for a testing source set, you must capitalize利用 the configuration name and prefix前缀 it with the name of the build variant or testing source set.
For example, to add an implementation dependency only to your "free" product flavor , it looks like this:
dependencies {
    freeImplementation 'com.google.firebase:firebase-ads:9.8.0' // Implementation 的基础上加 build variant 的前缀
}dependencies {
freeImplementation 'com.google.firebase:firebase-ads:9.8.0' // Implementation 的基础上加 build variant 的前缀
}
However, if you want to add a dependency for a variant that combines a product flavor and a build type, then you must initialize the configuration name in the configurations block. The following sample adds a runtimeOnlydependency to your "freeDebug" build variant:
configurations {
    // Initializes a placeholder for the freeDebugRuntimeOnly dependency configuration.
    freeDebugRuntimeOnly {} // runtimeOnly的基础上加 free(product flavor) 和 Debug(build type) 的前缀
}
dependencies {
    freeDebugRuntimeOnly fileTree(dir: 'libs', include: ['*.jar'])
}configurations {
// Initializes a placeholder for the freeDebugRuntimeOnly dependency configuration.
freeDebugRuntimeOnly {} // runtimeOnly的基础上加 free(product flavor) 和 Debug(build type) 的前缀
}
dependencies {
freeDebugRuntimeOnly fileTree(dir: 'libs', include: ['*.jar'])
}
To add implementation dependencies for your local tests and instrumented仪表花 tests , it looks like this:
dependencies {
    testImplementation 'junit:junit:4.12' // Adds a remote binary dependency only for local tests.
    androidTestImplementation 'com.android.support.test.espresso:espresso-core:3.0.2' // only for the instrumented test APK.
}dependencies {
testImplementation 'junit:junit:4.12' // Adds a remote binary dependency only for local tests.
androidTestImplementation 'com.android.support.test.espresso:espresso-core:3.0.2' // only for the instrumented test APK.
}
However, certain configurations don't make sense in this situation. For example, because other modules can't depend on androidTest, you get the following warning if you use the androidTestApi configuration:
WARNING: Configuration 'androidTestApi' is obsolete废弃 and has been replaced with 'androidTestImplementation'WARNING: Configuration 'androidTestApi' is obsolete废弃 and has been replaced with 'androidTestImplementation'
Android plugin for Gradle 3.0.0 and higher automatically自动 match each variant of your app with corresponding variants of its local library module dependencies其本地库模块依赖项的相应变体 for you. That is, you should no longer target针对 specific variants of local module dependencies本地模块依赖项的特定变体. To learn more, read Use variant-aware dependency management.
For more information on dependency management, see Java Plugin dependency management.
Remote repositories
When your dependency is something other than a local library or file tree, Gradle looks for the files in whichever online repositories仓库 are specified in the repositories block of your build.gradle file.
By default, new Android Studio projects declare JCenter as the repository location in the project's top-level build.gradle file, as shown here:
allprojects {
    repositories {
        jcenter()
    }
}allprojects {
repositories {
jcenter()
}
}
If you want something from the Maven central repository, then add mavenCentral(), or for a local repository use mavenLocal():
allprojects {
    repositories {
        jcenter()
        mavenCentral()
        mavenLocal()
    }
}allprojects {
repositories {
jcenter()
mavenCentral()
mavenLocal()
}
}
Or you can declare specific Maven or Ivy常春藤联盟的 repositories as follows:
allprojects {
    repositories {
        maven {
            url "https://repo.example.com/maven2"
        }
        maven {
            url "file://local/repo/"
        }
        ivy {
            url "https://repo.example.com/ivy"
        }
    }
}allprojects {
repositories {
maven {
url "https://repo.example.com/maven2"
}
maven {
url "file://local/repo/"
}
ivy {
url "https://repo.example.com/ivy"
}
}
}
For more information, see the Gradle Repositories guide.
Google's Maven repository
The most recent versions of the following Android libraries are available from Google's Maven repository:
- Android Support Library
- Architecture Components Library 架构组件库
- Constraint Layout Library 约束布局库
- Android Test
- Databinding Library
- Android Instant App Library
- Wear OS
- Google Play services
- Firebase
You can see all available artifacts上古神器 at Google's Maven repository index (see below for programmatic access).
To add one of these libraries to your build, include Google's Maven repository in your top-level build.gradle file:
allprojects {
    repositories {
        google() // If you're using a version of Gradle lower than 4.1, you must instead use:【maven { url 'https://maven.google.com'}】
    }
}allprojects {
repositories {
google() // If you're using a version of Gradle lower than 4.1, you must instead use:【maven { url 'https://maven.google.com'}】
}
}
Then add the desired library to your module's dependencies block. For example,the appcompat library looks like this:
dependencies {
    implementation 'com.android.support:appcompat-v7:27.1.1'
}dependencies {
implementation 'com.android.support:appcompat-v7:27.1.1'
}
However, if you're trying to use an older version of the above libraries and your dependency fails, then it's not available in the Maven repository and you must instead get the library from the offline repository.
For programmatic access to Google's Maven artifacts, you can get an XML list of artifact groups from maven.google.com/master-index.xml. Then, for any group, you can view its library names and versions at:
【maven.google.com/group_path/group-index.xml】
For example, libraries in the android.arch.lifecycle group are listed at maven.google.com/android/arch/lifecycle/group-index.xml.
You can also download the POM and JAR files at:
【maven.google.com/group_path/library/version /library-version.ext】
For example: maven.google.com/android/arch/lifecycle/compiler/1.0.0/compiler-1. 0.0.pom.
For libraries not available from the Google Maven repository (usually older library versions), you must download the offline Google Repository package from the SDK Manager.
Then you can add these libraries to your dependencies block as usual.
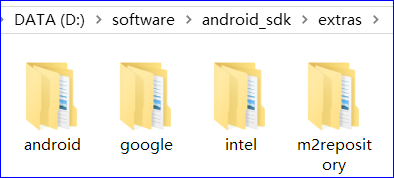
The offline libraries are saved in android_sdk/extras/.
Dependency order
The order in which you list your dependencies indicates the priority for each: the first library is higher priority than the second, the second is higher priority than the third, and so on. This order is important in the event that resources are merged or manifest elements are merged into your app from the libraries.
For example, if your project declares the following:
- Dependency on
LIB_AandLIB_B(in that order) - And
LIB_Adepends onLIB_CandLIB_D(in that order) - And
LIB_Balso depends onLIB_C
Then, the flat dependency order will be as follows:
- LIB_A
- LIB_D
- LIB_B
- LIB_C
This ensures that both LIB_A and LIB_B can override LIB_C; and LIB_D is still higher priority than LIB_B because LIB_A (which depends on it) has higher priority than LIB_B.
For more information about how manifests from different project sources/dependencies are merged, see Merge multiple manifest files.
View the dependency tree
Some direct直接 dependencies may have dependencies of their own. These are called transitive传递 dependencies. Rather than requiring you to manually declare不会要求您手动声明 each transitive dependency, Gradle automatically gathers收集 and adds them for you. To visualize可视化项目 both the direct and transitive dependencies of your project, the Android plugin for Gradle provides a Gradle task that generates a dependency tree依赖树 for each build variant and testing source set.
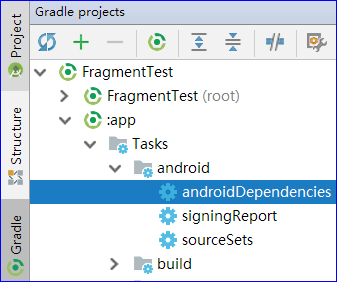
To run the task, proceed as follows:
- Select View > Tool Windows > Gradle (or click Gradle
 in the tool windows bar).
 - Expand AppName > Tasks > android and double-click androidDependencies. After Gradle executes the task, the Run window should open to display the output.
The following sample output shows the dependency tree for the debug build variant, and includes the local library module dependency and remote dependency from the previous example.
Executing tasks: [androidDependencies]
:app:androidDependencies
debug
// Both the library module dependency and remote binary dependency are listed with their transitive dependencies.
+--- MyApp:mylibrary:unspecified
|    \--- com.android.support:appcompat-v7:27.1.1
|         +--- com.android.support:animated-vector-drawable:27.1.1
|         |    \--- com.android.support:support-vector-drawable:27.1.1
|         |         \--- com.android.support:support-v4:27.1.1
|         |              \--- LOCAL: internal_impl-27.1.1.jar
|         +--- com.android.support:support-v4:27.1.1
|         |    \--- LOCAL: internal_impl-27.1.1.jar
|         \--- com.android.support:support-vector-drawable:27.1.1
|              \--- com.android.support:support-v4:27.1.1
|                   \--- LOCAL: internal_impl-27.1.1.jar
\--- com.android.support:appcompat-v7:27.1.1
     +--- com.android.support:animated-vector-drawable:27.1.1
     |    \--- com.android.support:support-vector-drawable:27.1.1
     |         \--- com.android.support:support-v4:27.1.1
     |              \--- LOCAL: internal_impl-27.1.1.jar
     +--- com.android.support:support-v4:27.1.1
     |    \--- LOCAL: internal_impl-27.1.1.jar
     \--- com.android.support:support-vector-drawable:27.1.1
          \--- com.android.support:support-v4:27.1.1
               \--- LOCAL: internal_impl-27.1.1.jar
...
x
Executing tasks: [androidDependencies]
:app:androidDependencies
debug
// Both the library module dependency and remote binary dependency are listed with their transitive dependencies.
+--- MyApp:mylibrary:unspecified
| \--- com.android.support:appcompat-v7:27.1.1
| +--- com.android.support:animated-vector-drawable:27.1.1
| | \--- com.android.support:support-vector-drawable:27.1.1
| | \--- com.android.support:support-v4:27.1.1
| | \--- LOCAL: internal_impl-27.1.1.jar
| +--- com.android.support:support-v4:27.1.1
| | \--- LOCAL: internal_impl-27.1.1.jar
| \--- com.android.support:support-vector-drawable:27.1.1
| \--- com.android.support:support-v4:27.1.1
| \--- LOCAL: internal_impl-27.1.1.jar
\--- com.android.support:appcompat-v7:27.1.1
+--- com.android.support:animated-vector-drawable:27.1.1
| \--- com.android.support:support-vector-drawable:27.1.1
| \--- com.android.support:support-v4:27.1.1
| \--- LOCAL: internal_impl-27.1.1.jar
+--- com.android.support:support-v4:27.1.1
| \--- LOCAL: internal_impl-27.1.1.jar
\--- com.android.support:support-vector-drawable:27.1.1
\--- com.android.support:support-v4:27.1.1
\--- LOCAL: internal_impl-27.1.1.jar
For more information about managing dependencies in Gradle, see Dependency management basics in the Gradle User Guide.
Resolve duplicate class errors
When you add multiple dependencies to your app project, there's a possibility that those direct and transitive dependencies might conflict冲突 with one another, and lead to导致 compile time or runtime errors.
For example, you get the following error if a class appears more than once on the runtime classpath:
Program type already present出现 com.example.MyClassProgram type already present出现 com.example.MyClass
This error typically通常 occurs发生 due to由于 one of the following circumstances情况、环境:
- A binary dependency includes a library that your app also includes as direct dependency. For example, your app declares a direct dependency on Library A and Library B, but Library A already includes Library B in its binary. To resolve this issue, remove Library B as a direct dependency.
- Your app has a local binary dependency and a remote binary dependency on the same library. To resolve this issue, you should remove one of the binary dependencies.
You may also see the following error if different versions of the same transitive dependency appear in the compile time and runtime classpaths:
Conflict with dependency 'com.example.library:some-lib:2.0' in project 'my-library'.
Resolved versions for runtime classpath (1.0) and compile classpath (2.0) differ.Conflict with dependency 'com.example.library:some-lib:2.0' in project 'my-library'.
Resolved versions for runtime classpath (1.0) and compile classpath (2.0) differ.
This can occur when, for example, your app includes a version of a dependency using the【implementationdependency configuration】and a library module includes a different version of the dependency using the runtimeOnlyconfiguration. To resolve this issue, do one of the following:
- Include the desired期望的 version of the dependency as an
apidependency to your library module. That is, only your library module declares the dependency, but the app module will also have access to its API, transitively. - Alternatively作为选择, you can declare the dependency in both modules, but you should make sure that each module uses the same version of the dependency. Consider configuring project-wide properties to ensure versions of each dependency remain保持 consistent一致 throughout贯穿 your project.
To help you investigate探究 which dependencies are contributing to errors, inspect your app's dependency tree and look for dependencies that appear more than once or with conflicting versions.
If you can't easily identify the duplicate dependency, try using Android Studio's UI to search for dependencies that include the duplicate class as follows:
- Select Navigate > Class from the menu bar.
- In the pop-up search dialog, make sure that the box next to Include non-project items is checked.
- Type the class that appeared in the build error.
- Inspect the results for the dependencies that include the class.

implementation、api、compile的区别
implementation 'com.google.code.gson:gson:2.8.2' //testsdk 通过 implementation 依赖于 gsonx
implementation 'com.google.code.gson:gson:2.8.2' //testsdk 通过 implementation 依赖于 gson
implementation project(':testsdk') //app 依赖于 testsdkimplementation project(':testsdk') //app 依赖于 testsdk
api 'com.google.code.gson:gson:2.8.2' //testsdk 通过 api 依赖于 gsonx
api 'com.google.code.gson:gson:2.8.2' //testsdk 通过 api 依赖于 gson