bootargs
参考博客uboot环境变量(设置bootargs向linux内核传递正确的参数)
参考博客start kernel 之后没有任何输出与uboot无法将bootargs传入内核的调查方法与解决之道
参考博客Xlinx-Zedboard使用NFS挂载根文件系统
参考论坛NFS rootfs: mount: only root can mount proc on /proc
arm64的boot option,Default kernel command string是bootargs相关的,

参考第二个博客,内核版本3.14,改版很大了,
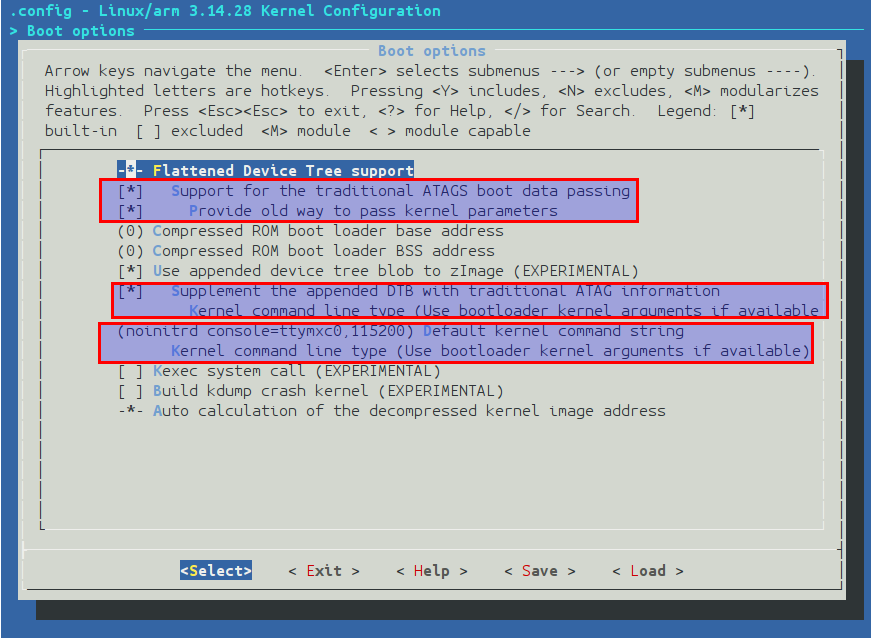
我这里用下面分别用ramdisk和emmc根文件系统,cmd line最终是bootargs字符串。
#ifndef CONFIG_BOOTARGS
#define CONFIG_BOOTARGS "earlycon clk_ignore_unused noinitrd console=ttyPS0,115200 root=/dev/mmcblk0 rw"
#endif
    "qspi_bootargs=earlycon clk_ignore_unused console=ttyPS0,115200\0" \
    "ext4_bootargs=earlycon clk_ignore_unused noinitrd console=ttyPS0,115200 root=${ext4dev_path} rw\0" \
    "bootargs=earlycon clk_ignore_unused console=ttyPS0,115200 root=/dev/mmcblk0 rw\0" \
从打印来看,bootargs已经传进来了,
[    0.000000] Detected VIPT I-cache on CPU0
[    0.000000] CPU features: enabling workaround for ARM erratum 845719
[    0.000000] Built 1 zonelists in Zone order, mobility grouping on.  Total pages: 1034240
[    0.000000] Kernel command line: earlycon clk_ignore_unused noinitrd console=ttyPS0,115200 root=/dev/mmcblk0 rw
[    0.000000] PID hash table entries: 4096 (order: 3, 32768 bytes)
[    0.000000] Dentry cache hash table entries: 524288 (order: 10, 4194304 bytes)
[    0.000000] Inode-cache hash table entries: 262144 (order: 9, 2097152 bytes)
[    0.000000] software IO TLB [mem 0x6bfff000-0x6ffff000] (64MB) mapped at [ffffffc06bfff000-ffffffc06fffefff]
[    0.000000] Memory: 3783000K/4194304K available (9020K kernel code, 584K rwdata, 2824K rodata, 6208K init, 397K bss, 149160K reserved, 262144K cma-reserved)
[    0.000000] Virtual kernel memory layout:
但是挂载的不对,但是也看到了根文件系统,因为ls /有东西,这特么是从什么地方来的呢?udev又重新挂载了一次,是不是这儿的问题呢
[    3.733197] udevd[1585]: starting version 3.2
[    3.744719] udevd[1586]: starting eudev-3.2
[    4.147405] EXT4-fs (mmcblk0): mounted filesystem with ordered data mode. Opts: (null)
如果uboot不定义宏,则kernel从设备树的chosen字段提取cmd line,目前为止没能成功从/dev/mmcblk0加载根文件系统,参考博客Xlinx-Zedboard使用NFS挂载根文件系统,去掉内核的这个选项之后,

可以成功从emmc挂载根文件系统了,但是出现下面的错误,
[    2.789691] EXT4-fs (mmcblk0): couldn't mount as ext3 due to feature incompatibilities
[    2.861774] EXT4-fs (mmcblk0): recovery complete
[    2.870745] EXT4-fs (mmcblk0): mounted filesystem with ordered data mode. Opts: (null)
[    2.878619] VFS: Mounted root (ext4 filesystem) on device 179:0.
[    2.888404] devtmpfs: mounted
[    2.891485] Freeing unused kernel memory: 512K (ffffffc000c20000 - ffffffc000ca0000)
INIT: version 2.88 booting
mount: you must be root
mount: you must be root
grep: /proc/filesystems: No such file or directory
mount: you must be root
grep: /proc/filesystems: No such file or directory
/etc/rcS.d/S37populate-volatile.sh: line 205: /proc/cmdline: No such file or directory
/etc/rcS.d/S38dmesg.sh: line 17: /var/log/dmesg: No such file or directory
Starting internet superserver: inetd.
INIT: Entering runlevel: 5
Configuring network interfaces... /etc/rc5.d/S10dropbear: line 32: /proc/mounts: No such file or directory
Starting Dropbear SSH server: dropbear.
Starting syslogd/klogd: done
Jul  5 17:29:36 mwm syslog.info syslogd started: BusyBox v1.24.1
Jul  5 17:29:36 mwm user.debug kernel: [    0.000000]   DMA zone: 0 pages reserved
Jul  5 17:29:36 mwm user.debug kernel: [    0.000000]   DMA zone: 524288 pages, LIFO batch:31
Jul  5 17:29:36 mwm user.debug kernel: [    0.000000]   Normal zone: 7168 pages used for memmap
Jul  5 17:29:36 mwm user.debug kernel: [    0.000000]   Normal zone: 524288 pages, LIFO batch:31
Jul  5 17:29:36 mwm user.info kernel: [    0.000000] psci: probing for conduit method from DT.
Jul  5 17:29:36 mwm user.info kernel: [    0.000000] psci: PSCIv1.0 detected in firmware.
Jul  5 17:29:36 mwm user.info kernel: [    0.000000] psci: Using standard PSCI v0.2 function IDs
Jul  5 17:29:36 mwm user.info kernel: [    0.000000] psci: MIGRATE_INFO_TYPE not supported.
Jul  5 17:29:36 mwm user.info kernel: [    0.000000] percpu: Embedded 21 pages/cpu @ffffffc87ff79000 s48152 r8192 d29672 u86016
Jul  5 17:29:36 mwm user.debug kernel: [    0.000000] pcpu-alloc: s48152 r8192 d29672 u86016 alloc=21*4096
Jul  5 17:29:36 mwm user.debug kernel: [    0.000000] pcpu-alloc: [0] 0 [0] 1 [0] 2 [0] 3
Jul  5 17:29:36 mwm user.info kernel: [    0.000000] Detected VIPT I-cache on CPU0
Jul  5 17:29:36 mwm user.info kernel: [    0.000000] CPU features: enabling workaround for ARM erratum 845719
Jul  5 17:29:36 mwm user.info kernel: [    0.000000] Built 1 zonelists in Zone order, mobility grouping on.  Total pages: 1034240
Jul 5 17:29:36 mwm user.notice kernel: [ 0.000000] Kernel command line: earlycon clk_ignore_unused console=ttyPS0,115200 root=/dev/mmcblk0 rw参考论坛NFS rootfs: mount: only root can mount proc on /proc,看看老外是怎么说的,错误原因是,

Nero,

Thank you so much for your reply.

I found the root cause.

On NFS server side, I'm using the Yocto to generate the target rootfs.
The UID and GID for my PC account is 1000, thus the UID and GID for all of the files of target rootfs generated by Yocto is 1000,
including bin/mount binary. Also, bin/mount has SUID bit set.

So, what happen is that target boots, NFS mount is done successfully, and mounted rootfs contains bin/mount whose UID and GID are 1000 and SUID set.
Thus, bin/mount is executed as non-root user because of SUID, and resulted in the mount error.
Confirmed either changing SUID of bin/mount to disable or changing UID and GID of roofs to root resolved this issue.

But, I'm curious how the people using Yocto avoid this issue...
I would not like to manually change the UID and GID, or SUID every time whenever build the rootfs.
I also would not like to use root account to generate target rootfs.

Any insights are welcome, everyone.

Kind Regards,
John Rama
这个应该是yocto的锅了,不是用root编译的rootfs,可以手动改变UID和GID,未完待续。。。(2018-07-06 03:27睡的一天比一天晚了,如何是好,太多新东西需要从网上学习,好像不会有尽头,累了,天亮再说吧)。
(2018-07-08 21:13接着来,最近点背,两台电脑都坏了,AVStream开发停下来,继续这个吧)。
看下现在的根文件系统,用户都是编译用户,不是root,对比虚拟机的文件系统都是root。
zc@ubuntu:~/xilinx/image/mwm178/rootfs$ ls -l
total 60
drwxr-xr-x  2 zc zc 4096 Jul  8 05:28 bin
drwxr-xr-x  2 zc zc 4096 Jul  8 05:28 boot
drwxr-xr-x  2 zc zc 4096 Jul  8 05:28 dev
drwxr-xr-x 22 zc zc 4096 Jul  8 05:28 etc
drwxr-xr-x  3 zc zc 4096 Jul  8 05:28 home
lrwxrwxrwx  1 zc zc   10 Jul  8 05:28 init -> /sbin/init
drwxr-xr-x  4 zc zc 4096 Jul  8 05:28 lib
drwxr-xr-x  2 zc zc 4096 Jul  8 05:28 media
drwxr-xr-x  2 zc zc 4096 Jul  8 05:28 mnt
drwxr-xr-x  2 zc zc 4096 Jul  8 05:28 proc
drwxr-xr-x  2 zc zc 4096 Jul  8 05:28 run
drwxr-xr-x  2 zc zc 4096 Jul  8 05:28 sbin
drwxr-xr-x  2 zc zc 4096 Jul  8 05:28 sys
drwxrwxrwt  2 zc zc 4096 Jul  8 05:28 tmp
drwxr-xr-x 10 zc zc 4096 Jul  8 05:28 usr
drwxr-xr-x  7 zc zc 4096 Jul  8 05:28 var
zc@ubuntu:~/xilinx/image/mwm178/rootfs$ ls -l /
total 108
drwxr-xr-x   2 root root  4096 May 28 18:02 bin
drwxr-xr-x   3 root root  4096 Jul  6 00:30 boot
drwxrwxr-x   2 root root  4096 Aug 20  2017 cdrom
drwxr-xr-x  18 root root  4000 Jul  8 03:52 dev
drwxr-xr-x 140 root root 12288 Jul  8 03:52 etc
drwxr-xr-x   3 root root  4096 Aug 20  2017 home
lrwxrwxrwx   1 root root    33 Jul  4 10:33 initrd.img -> boot/initrd.img-4.15.0-24-generic
lrwxrwxrwx   1 root root    33 Jul  4 10:33 initrd.img.old -> boot/initrd.img-4.13.0-45-generic
drwxr-xr-x  24 root root  4096 May 24 07:10 lib
drwxr-xr-x   2 root root  4096 Feb  1 07:21 lib32
drwxr-xr-x   2 root root  4096 Jan 26 06:04 lib64
drwxr-xr-x   2 root root  4096 Jan 26 06:16 libx32
drwx------   2 root root 16384 Aug 20  2017 lost+found
drwxr-xr-x   4 root root  4096 Aug 20  2017 media
drwxr-xr-x   3 root root  4096 Aug 20  2017 mnt
drwxr-xr-x   2 root root  4096 Aug 20  2017 opt
dr-xr-xr-x 270 root root     0 Jul  8 03:52 proc
drwx------   4 root root  4096 Jan 28 06:23 root
drwxr-xr-x  29 root root   920 Jul  8 05:08 run
drwxr-xr-x   2 root root 12288 May 28 18:02 sbin
drwxr-xr-x   2 root root  4096 Jan 14  2017 snap
drwxr-xr-x   2 root root  4096 Feb 15  2017 srv
dr-xr-xr-x  13 root root     0 Jul  8 03:52 sys
drwxrwxrwt  12 root root  4096 Jul  8 05:32 tmp
drwxr-xr-x  13 root root  4096 Jan 26 06:16 usr
drwxr-xr-x  14 root root  4096 Feb 15  2017 var
lrwxrwxrwx   1 root root    30 Jul  4 10:33 vmlinuz -> boot/vmlinuz-4.15.0-24-generic
lrwxrwxrwx 1 root root 30 Jul 4 10:33 vmlinuz.old -> boot/vmlinuz-4.13.0-45-generic看一下rootfs的mount程序属性,上面就是mount出错,mount设置了suid,参考博客UID、GID和权限,博客UID, EUID, SUID, FSUID,博客uid gid euid egid详解,设置了set-user-ID位的可执行程序,执行时,进程的effective user ID与saved set-uesr-ID都为程序文件所属用户的ID。时real user ID与effective user ID就不一定相等了.这类程序称之为SUID程序,这类程序有特殊的用途.典型的例子:passwd程序,ping程序等。可以看到这是方便root所属的程序被普通用户执行时拥有root权限,比如普通用户执行ping。我们这里弄巧成卓了,mount设置了suid,root执行这个程序时变成了zc的权限,这就是导致权限不够的原因。
zc@ubuntu:~/xilinx/image/mwm178/rootfs$ ls -l ./bin/
total 1656
lrwxrwxrwx 1 zc zc     19 Jul  8 05:28 ash -> /bin/busybox.nosuid
-rwxr-xr-x 1 zc zc 864264 Jul  8 05:28 bash
...
lrwxrwxrwx 1 zc zc     19 Jul  8 05:28 chgrp -> /bin/busybox.nosuid
lrwxrwxrwx 1 zc zc     19 Jul  8 05:28 chmod -> /bin/busybox.nosuid
lrwxrwxrwx 1 zc zc     19 Jul  8 05:28 chown -> /bin/busybox.nosuid
lrwxrwxrwx 1 zc zc     19 Jul  8 05:28 cp -> /bin/busybox.nosuid
lrwxrwxrwx 1 zc zc     19 Jul  8 05:28 cpio -> /bin/busybox.nosuid
lrwxrwxrwx 1 zc zc     19 Jul  8 05:28 more -> /bin/busybox.nosuid
lrwxrwxrwx 1 zc zc     17 Jul  8 05:28 mount -> /bin/busybox.suid
lrwxrwxrwx 1 zc zc     24 Jul  8 05:28 mountpoint -> /bin/mountpoint.sysvinit
-rwxr-xr-x 1 zc zc   6760 Jul  8 05:28 mountpoint.sysvinit
...linux下更改uid,sid的是chown和chgrp,这两个命令很眼熟的,一般和chmod一起出现,但一直都是用chmod,参考chown命令

使用chown命令来改变文件所有者。chown命令是change owner(改变拥有者)的缩写。需要要注意的是,用户必须是已经存在系统中的,也就是只能改变为在 /etc/passwd这个文件中有记录的用户名称才可以。
chown命令的用途很多,还可以顺便直接修改用户组的名称。此外,如果要连目录下的所有子目录或文件同时更改文件拥有者的话,直接加上 -R的参数即可。
基本语法:
chown [-R] 账号名称 文件或目录
chown [-R] 账号名称:用户组名称 文件或目录
使用chgrp命令来改变文件所属用户组,该命令就是change group(改变用户组)的缩写。需要注意的是要改变成为的用户组名称,必须在 /etc/group里存在,否则就会显示错误。
基本语法:
chgrp [-R] 用户组名称 dirname/filename …
执行chown -Rf root:root rootfs/*
zc@ubuntu:~/xilinx/image/mwm178/rootfs$ ls -l /bin/
total 13092
-rwxr-xr-x 1 root root 1037528 May 16  2017 bash
-rwxr-xr-x 1 root root   31288 May 19  2015 bunzip2
-rwxr-xr-x 1 root root 1964536 Aug 19  2015 busybox
-rwxr-xr-x 1 root root   31288 May 19  2015 bzcat
lrwxrwxrwx 1 root root       6 Aug 20  2017 bzcmp -> bzdiff
-rwxr-xr-x 1 root root    2140 May 19  2015 bzdiff
lrwxrwxrwx 1 root root       6 Aug 20  2017 bzegrep -> bzgrep
-rwxr-xr-x 1 root root    4877 May 19  2015 bzexe
lrwxrwxrwx 1 root root       6 Aug 20  2017 bzfgrep -> bzgrep
-rwxr-xr-x 1 root root    3642 May 19  2015 bzgrep
-rwxr-xr-x 1 root root   31288 May 19  2015 bzip2
-rwxr-xr-x 1 root root   14616 May 19  2015 bzip2recover
lrwxrwxrwx 1 root root       6 Aug 20  2017 bzless -> bzmore
-rwxr-xr-x 1 root root    1297 May 19  2015 bzmore
-rwxr-xr-x 1 root root   52080 Feb 18  2016 cat
-rwxr-xr-x 1 root root   14752 Feb  7  2016 chacl
-rwxr-xr-x 1 root root   60272 Feb 18  2016 chgrp
-rwxr-xr-x 1 root root   56112 Feb 18  2016 chmod
-rwxr-xr-x 1 root root   64368 Feb 18  2016 chown