之前使用了 HttpURLConnection 与 sae 进行交互,
http://blog.csdn.net/handsonn/article/details/50986775
这里换了 okhttp3,换汤不换药,过程一样的,记录这里以后可以用
这篇添加了上传图片的功能,上传到新浪云然后返回链接,然后可以通过Glide直接显示这个链接的图片,分成两个部分,上传json数据 和 上传图片,注意加上权限
 <uses-permission android:name="android.permission.INTERNET"/>
 <uses-permission android:name="android.permission.WRITE_EXTERNAL_STORAGE"/>
 <uses-permission android:name="android.permission.READ_EXTERNAL_STORAGE"/>
第一部分:上传 json 数据
首先是客户端
实体类User,用as插件GsonFormat生成,在GsonFormat的面板中输入json格式的数据,就会生成get和set方法
public class User
{

    /**
     * name : haha
     * password : aaaa
     */

    private String name;
    private String password;
    public String getName()
    {
        return name;
    }
    public void setName(String name)
    {
        this.name = name;
    }
    public String getPassword()
    {
        return password;
    }
    public void setPassword(String password)
    {
        this.password = password;
    }
}
主类,使用 Gson 将实体类的对象转换成 json 格式字符串
public class MainActivity extends AppCompatActivity
{
    public static MediaType JSON = MediaType.parse("application/json;charset=utf-8");
    User u;
    String json;

    @Override
    protected void onCreate(Bundle savedInstanceState)
    {
        super.onCreate(savedInstanceState);
        setContentView(R.layout.activity_main);
        u = new User();
        u.setName("haha");
        u.setPassword("aaaa");
        Gson gson = new Gson();
        json = gson.toJson(u);
        Log.v("Json", json);
        new Thread(new Runnable()
        {
            @Override
            public void run()
            {
                initData();
            }
        }).start();

    }
    private  void initData()
    {
        OkHttpClient okHttpClient = new OkHttpClient();
        RequestBody requestBody = RequestBody.create(JSON,json);

        Request request = new Request.Builder()
                .url("****")
                .post(requestBody)
                .build();
        try
        {
            Response response = okHttpClient.newCall(request).execute();

            /*
        或者这样
         Call call = okHttpClient.newCall(request);
            call.enqueue(new Callback()
            {
            @Override
            public void onFailure(Call call, IOException e)
            {
            }

            @Override
            public void onResponse(Call call, Response response) throws IOException
            {
            }
        });

        */
            if(response.isSuccessful())
            {
                byte [] data;
                try
                {
                    data = revStream(response.body().byteStream());
                    //response.body().byteStream()获取的是InputStream对象
                    String json = new String(data);//把字符串组转换成字符串
                    Log.v("Json",json);
                }
                catch (Exception e)
                {
                    e.printStackTrace();
                }
            }
        }
        catch(IOException e)
        {
            e.printStackTrace();
        }
    }
    private static byte[] revStream(InputStream inputStream) throws Exception
    {
        ByteArrayOutputStream ba = new ByteArrayOutputStream();
        byte[] b = new byte[1024];
        int len;
        while ((len = inputStream.read(b)) != -1)
        {
            ba.write(b, 0, len);
        }
        ba.close();
        inputStream.close();
        return ba.toByteArray();
    }
}
服务端,代码几乎一样,需要先将获得的json数据转换成数组,通过键名获取对应值
<?php
header("Content-type: text/html; charset=utf-8");
// 连主库
$db = mysql_connect(SAE_MYSQL_HOST_M.':'.SAE_MYSQL_PORT,SAE_MYSQL_USER,SAE_MYSQL_PASS);
mysql_select_db(SAE_MYSQL_DB,$db);
$post_array = file_get_contents('php://input');
var_dump($_REQUEST);
if(empty($post_array))
{
echo "post过来的数据为空";
}
else
{
echo "post过来的数据不是空的"."<br/>";
$obj=json_decode($post_array,TRUE);//true 表示转换成数组
echo $obj['name'];
echo $obj['password'];
$order_id = $obj['name'];
$password = $obj['password'];
$sql4 = "insert into table(name,password) values('$order_id','$password')";
mysql_query($sql4);
}
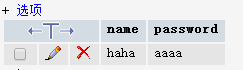
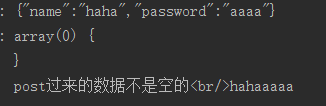
?>结果如下:
sae数据库:
as:
第二部分:上传图片:
呐呐,首先是客户端:
布局文件
<?xml version="1.0" encoding="utf-8"?>
<LinearLayout xmlns:android="http://schemas.android.com/apk/res/android"
    android:layout_width="match_parent"
    android:layout_height="match_parent"
    android:orientation="vertical">

    <Button
        android:layout_width="match_parent"
        android:layout_height="wrap_content"
        android:text="select"
        android:onClick="select"/>

    <ImageView
        android:id="@+id/image"
        android:layout_width="match_parent"
        android:layout_height="0px"
        android:layout_weight="1"/>
</LinearLayout>
主类:
public class MainActivity extends AppCompatActivity
{
    public static MediaType mediaType = MediaType.parse("image/jpeg;charset=utf-8");
    ImageView imageView;
    private final String IMAGE_TYPE = "image/*";
    private final int imageRequestCode = 0;

    @Override
    protected void onCreate(Bundle savedInstanceState)
    {
        super.onCreate(savedInstanceState);
        setContentView(R.layout.activity_main);
        imageView = (ImageView)findViewById(R.id.image);
    }
    @Override
    protected void onActivityResult(int requestCode, int resultCode, Intent data)
    {
        super.onActivityResult(requestCode, resultCode, data);
        if (resultCode != RESULT_OK)
        {
            Log.v("Json", "返回错误");
            return;
        }
        Bitmap bitmap = null;
        ContentResolver resolver = getContentResolver();

        if (requestCode == imageRequestCode)
        {
            try
            {
                Uri contentUri = data.getData();
                bitmap = MediaStore.Images.Media.getBitmap(resolver, contentUri);
                imageView.setImageBitmap(bitmap);

                String[] strings = {MediaStore.Images.Media.DATA};
               // Cursor cursor = managedQuery(contentUri, strings, null, null, null);
                Cursor cursor = resolver.query(contentUri, strings, null, null, null);
                int column_index = cursor.getColumnIndexOrThrow(MediaStore.Images.Media.DATA);
                cursor.moveToFirst();
                final String path = cursor.getString(column_index);
                Log.v("Json", path);

                new Thread(new Runnable()
                {
                    @Override
                    public void run()
                    {
                        Log.v("Json",path);
                        initData(path);
                    }
                }).start();

            }
            catch (IOException e)
            {
                Log.v("Json", e.toString());
            }
        }
    }
    public void select(View view)
    {
        Intent intent = new Intent(Intent.ACTION_GET_CONTENT);
        intent.setType(IMAGE_TYPE);
        startActivityForResult(intent,imageRequestCode);
    }
     private  void initData(String filePath)
    {
        OkHttpClient client = new OkHttpClient();
        MultipartBody.Builder builder = new MultipartBody.Builder().setType(MultipartBody.FORM);
        builder.addFormDataPart("img", filePath, RequestBody.create(mediaType,new File(filePath)));
        //这里的img就是文件的键名,服务器可以根据这个获取
        MultipartBody requestBody = builder.build();
        //构建请求
        Request request = new Request.Builder()
                .url("***")//地址
                .post(requestBody)//添加请求体
                .build();
        client.newCall(request).enqueue(new Callback()
        {
            @Override
            public void onFailure(Call call, IOException e)
            {
                Log.v("Json","上传失败");
            }
            @Override
            public void onResponse(Call call, Response response) throws IOException
            {
                try
                {
                    Log.v("Json","上传成功" + new String(revStream(response.body().byteStream())));
                }
                catch (Exception e)
                {
                    e.printStackTrace();
                }

            }
        });
    }
}
或者使用 client.newCall(request).execute(); 如果response.isSuccessful,则提取返回内容
服务端:
首先需要在新浪云新建一个 storage,建立一个存储,这里名字为“qxmb”,下面会用到,不过我觉得也可以使用七牛,免费
新浪云代码如下,使用 PHP写的:
<?php


    if(empty($_FILES['img']))
    {
        //img是指定键名
        echo "是空的";
    }
    else
    {
        echo "不是空的";
    }


    $i = 1;

    $s2 = new SaeStorage();

    foreach ( $_FILES as $file )
    {

        if ($file ['error'] > 0)
        {
            echo 'Error:', $file ['error'], '<br/>';
        }

        else
        {
            $filename = $file ['name'];

            $s2->upload ( 'qxmb', $file ['name'], $file ['tmp_name'] );
            //这里的qxmb就是刚刚建的
            $url = $s2->getUrl ( "qxmb", $file ['name'] );

            echo "<p>文件 $i</p>";
            if (($file ['type'] == "image/gif") || ($file ['type'] == "image/jpeg") || ($file ['type'] == "image/png"))

            {
                echo "<p><img src=\"$url\" alt=\"\"/></p>";
            }

            else
            {
                echo "<p>文件下载:<a href=\"$url\" download=\"$filename\">$filename</a></p>";
            }

            echo "<hr>";

            $i++;
        }
    }
    echo "haha";
?>注意,如果不是带头文件上传图片,用$_FILES是接收不到的,要使用 file_get_contents('php://input'),可以直接使用 $_FILES获取所有图片文件,或者使用 $_FILES['name'],获取指定的图片
结果如下:

