本文主要介绍CMake中include指令的用法。
1 概述
引用CMake官网对于include指令的介绍,如下:
Load and run CMake code from a file or module.
include指令的用法如下:
include(<file|module> [OPTIONAL] [RESULT_VARIABLE <VAR>] [NO_POLICY_SCOPE])Load and run CMake code from the file given. Variable reads and writes access the scope of the caller (dynamic scoping). If OPTIONAL is present, then no error is raised if the file does not exist. If RESULT_VARIABLE is given, the variable will be set to the full filename which has been included or NOTFOUND if it failed.
If a module is specified instead of a file, the file with name <modulename>.cmake is searched first in CMAKE_MODULE_PATH, then in the CMake module directory. There is one exception to this: if the file which calls include() is located itself in the CMake builtin module directory, then first the CMake builtin module directory is searched and CMAKE_MODULE_PATH afterwards. See also policy CMP0017.
See the cmake_policy() command documentation for discussion of the NO_POLICY_SCOPE option.
2 作用
从前面所述,我们知道了include指令用来载入并运行来自于文件或模块的CMake代码。
在这里我们针对一些具体的问题场景,介绍include指令的用法。
2.1 多C++标准版本指定
有时我们会有这样一种需求,在使用同一个外层 CMakeLists.txt 的前提下,每个源码子目录中要求使用的C++标准版本不同,有的源码要求使用c++98标准编译、有的源码要求使用c++11标准编译,这时我们就可以使用include指令来满足这样的需求了。
2.1.1 项目代码结构及内容
在这里,我们使用《CMake介绍及用法示例》中的项目代码结构,并在其基础上做一些改动,改动后的项目代码结构如下:
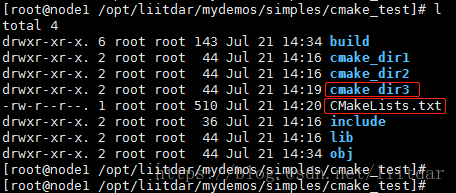
相比于之前的项目代码结构,我们增加了“cmake_dir3”这个源码目录,同时,修改了最外层的CMakeLists.txt。
cmake_dir3中包含的文件列表如下:
[root@node1 /opt/liitdar/mydemos/simples/cmake_test]# l cmake_dir3
total 8
-rw-r--r--. 1 root root 257 Jul 21 14:19 CMakeLists.txt
-rw-r--r--. 1 root root 258 Jul 21 14:19 main.cpp
[root@node1 /opt/liitdar/mydemos/simples/cmake_test]#
其中,CMakeLists.txt内容如下:
# 遍历当前路径下的所有源文件,并将其添加到变量DIR_SRCS中
aux_source_directory(. DIR_SRCS)

# 添加名为cmake_test3的可执行文件,该文件会由变量DIR_SRCS中的源文件构建生成
add_executable(cmake_test3 ${DIR_SRCS})
main.cpp内容如下:
#include <iostream>
#include <string>

using namespace std;

int main()
{
    int a = 100;
    string strTest;

    strTest = to_string(a) + " is a string.";

    cout << "a is: " << a << endl;
    cout << "pszTest is: " << strTest << endl;

    return 0;
}
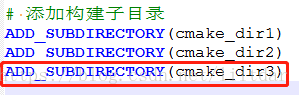
最外层的CMakeLists.txt改动部分(新增了cmake_dir3源码目录)如下:
2.1.2 项目构建
此时,我们对上述项目使用CMake进行构建,如下:
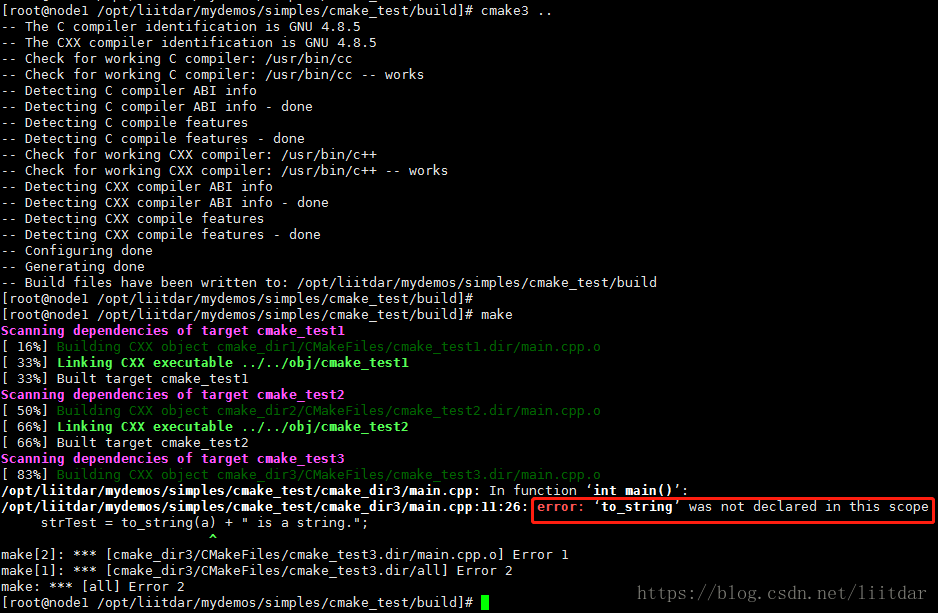
从上图中可以看到,项目构建失败了,因为在cmake_dir3中存在“to_string”函数,该函数需要在c++11标准下进行编译,而默认使用的都是c++98标准。
2.1.3 解决方案
此时,我们就需要为cmake_dir3设置不同的c++标准进行编译了。具体步骤如下:
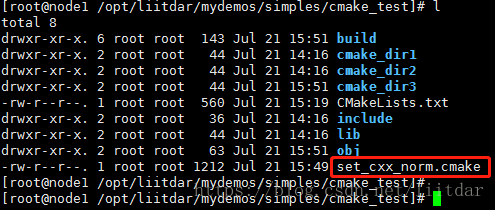
1. 我们在最外层的CMakeList.txt的同级目录下,增加一个文件set_cxx_norm.cmake,如下:
通过在最外层的CMakeLists.txt中使用include指令引入该文件,我们就可以在源码目录中设置想要使用的c++标准了。
set_cxx_norm.cmake的内容如下:
# set c++ norm value, these values will be used for comparision later
set(CXX_NORM_CXX98 1)   # C++98
set(CXX_NORM_CXX03 2)   # C++03
set(CXX_NORM_CXX11 3)   # C++11

# Set the wanted C++ norm
# Adds the good argument to the command line in function of the compiler
macro(set_cxx_norm NORM)
    # Extract c++ compiler --version output
    exec_program(
        ${CMAKE_CXX_COMPILER}
        ARGS --version
        OUTPUT_VARIABLE _compiler_output
    )
    # Keep only the first line
    string(REGEX REPLACE
        "(\n.*$)"
        ""
        cxx_compiler_version "${_compiler_output}"
    )
    # Extract the version number
    string(REGEX REPLACE
        "([^0-9.])|([0-9.][^0-9.])"
        ""
        cxx_compiler_version "${cxx_compiler_version}"
    )

    # Set the specific C++ norm According 'NORM'
    if(${NORM} EQUAL ${CXX_NORM_CXX98})
        add_definitions("-std=c++98")
    elseif(${NORM} EQUAL ${CXX_NORM_CXX03})
        add_definitions("-std=c++03")
    elseif(${NORM} EQUAL ${CXX_NORM_CXX11})
        if(${cxx_compiler_version} VERSION_LESS "4.7.0")
            add_definitions("-std=c++0x")
        else()
            add_definitions("-std=c++11")
        endif()
    endif()

endmacro()
2. 然后,我们需要修改cmake_dir3的CMakeLists.txt文件,新增“要使用c++11标准”的语句,如下:
# 使用c++11标准
set_cxx_norm(${CXX_NORM_CXX11})
完成上述修改后,再次进行项目构建,结果如下:
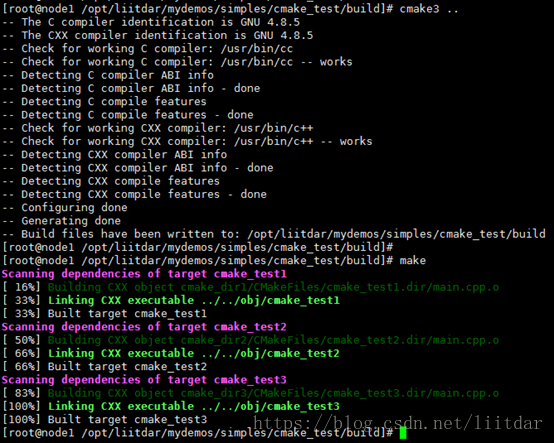
在上图中我们可以看到,项目构建成功了。此时,cmake_test1和cmake_test2使用的是c++98(默认)标准;而cmake_test3使用的是c++11标准。
运行cmake_test3程序,结果如下:

上面的运行结果表明,cmake_test3成功调用了c++11标准的“to_string”函数,将整型转换为字符串类型了。