基本概念
Spring IoC 容器负责 Bean 创建、以及其生命周期的管理等。想要使用 IoC容器的前提是创建该容器。
创建 Spring IoC 容器大致有两种:
- 在应用程序中创建。
- 在 WEB 程序中创建。
实例探究
1.应用程序创建容器
这里以 Application 为例,介绍下在普通的应用程序中如何创建 Spring 的 IoC容器:
public static void main(String [ ] args) {
    // 指定配置文件 String configLocation = ... // 创建容器 ApplicationContext factory = new FileSystemXmlApplicationContext(configLocation); // 调用 Bean Animals animal = factory.getBean(Animals.class); }
容器的创建其实与普通类的创建无异,同样需要通过 new 来完成类的实例化。
观察它的构造参数 —configLocation,该参数表示 Spring IoC容器的配置文件。
在配置文件中我们定义了各种各样的 Bean,好比列了一个单子告诉 Spring ,容器中将要盛放哪些东西。
下面介绍下常见的 xml 类型的配置文件:
<?xml version="1.0" encoding="UTF-8"?>

<beans xmlns="http://www.springframework.org/schema/beans" xmlns:xsi="http://www.w3.org/2001/XMLSchema-instance" xsi:schemaLocation=" http://www.springframework.org/schema/beans http://www.springframework.org/schema/beans/spring-beans-3.1.xsd"> <!-- 定义一个 Bean --> <bean id="animals" class="com.demo.Animals" /> </beans>
观察代码,该配置中定义了一个名为 Animals 的 Bean(具体的配置过程这里不再阐述)。在 Spring IoC容器被创建后,其初始化过程会通过该配置文件加载里面定义的 Bean 。
在创建容器之后(这里包含容器的初始化过程),我们就可以通过 getBean 方法取得 Bean 实例,而不用再手动地去一个个通过 new 实例化 Bean,这也就是所谓的 Ioc(控制反转),由 IoC容器负责 Bean 的创建,并管理 Bean 的生命周期。
2.在 WEB 程序创建容器
想要在 Web 程序中实现 Spring IoC容器的创建,需要在项目的 web.xml 中进行相关的配置。
对于 Spring 容器的创建(启用)有以下两种方式:
// ① 利用 Servlet 启动
org.springframework.web.context.ContextLoaderServlet

// ② 利用 Listener 启动
org.springframework.web.context.ContextLoaderListener
这里以 ContextLoaderListener 为例,它在 web.xmlr 中的配置如下:
<!-- ①指定配置文件路径 -->
<!-- 也可以不指定配置文件的位置,默认为 WEB-INF 下 ApplicationContext.xml 文件-->
<!-- 多个文件路径中间用 "," 或 ";" 隔开-->
<context-param> <param-name>contextConfigLocation</param-name> <param-value>/WEB-INF/spring-bean.xml</param-value> </context-param> <!-- ②配置监听器--> <listener> <listener-class>org.springframework.web.context.ContextLoaderListener</listener-class> </listener>
观察代码,发现在 Web 程序想要实现容器的创建同样具备两个条件:配置文件、创建容器类。
在 web.xml 中并没有找到创建容器的方法,这里只配置了一个监听器,所以可以推断定容器的创建是在监听器启动过程中实现。
原理分析
通过上面的分析,我们已经了解到 ContextLoaderListener 是创建 Spring IoC容器的入口。 下面具体探究下 Spring IoC 容器的创建过程。
首先来看 ContextLoaderListener 类的的签名,该类实现了 ServletContextListener 接口,表明自己是一个监听器。
public class ContextLoaderListener extends ContextLoader implements ServletContextListener既然是监听器,那么就要从它的初始化开始分析。而监听器的初始化在 contextInitialized
方法中定义:
@Override
public void contextInitialized(ServletContextEvent event) {
    initWebApplicationContext(event.getServletContext());
}
继续追踪到 initWebApplicationContext 方法,该方法通过继承 ContextLoader 类得到:
// Spring 容器
private WebApplicationContext context;

// 线程类加载器
private static volatile WebApplicationContext currentContext; // 代表 Spring 容器 // 因为 Spring 的容器被创建后,会被保存到 ServeltContext 的属性中,方便访问。 String ROOT_WEB_APPLICATION_CONTEXT_ATTRIBUTE = WebApplicationContext.class.getName() + ".ROOT"; public WebApplicationContext initWebApplicationContext(ServletContext servletContext) { // 1.1.判断 sc 中是否存在 Spring 容器 if (servletContext.getAttribute( WebApplicationContext.ROOT_WEB_APPLICATION_CONTEXT_ATTRIBUTE) != null) { // 抛出异常... } // 省略部分代码... try { // 1.2.判断 Srping 容器是否已经被创建 if (this.context == null) { // 2.创建容器,并赋值给 context this.context = createWebApplicationContext(servletContext); } if (this.context instanceof ConfigurableWebApplicationContext) { ConfigurableWebApplicationContext cwac = (ConfigurableWebApplicationContext) this.context; // 判断容器是否被激活,刚创建的容器默认 isActive 返回 false if (!cwac.isActive()) { // 3.设置父容器 if (cwac.getParent() == null) { ApplicationContext parent = loadParentContext(servletContext); cwac.setParent(parent); } // 4.容器初始化,配置并刷新 configureAndRefreshWebApplicationContext(cwac, servletContext); } } // 5.添加容器到 sc servletContext.setAttribute( WebApplicationContext.ROOT_WEB_APPLICATION_CONTEXT_ATTRIBUTE, this.context); // 设置线程类加载器 ClassLoader ccl = Thread.currentThread().getContextClassLoader(); if (ccl == ContextLoader.class.getClassLoader()) { currentContext = this.context; }else if (ccl != null) { currentContextPerThread.put(ccl, this.context); } return this.context; }catch (RuntimeException ex) { // 抛出异常... }catch (Error err) { // 抛出异常... } }
观察上面的代码,可以发现该方法的工作流程可以分为:
- 1.判断容器是否存在
- 2.创建容器
- 3.设置父容器
- 4.容器初始化
- 5.添加到 ServletContext
流程详解
1.判断容器是否存在
判断容器是否存在的步骤如下:
-
程序先从 ServletContext 的属性中去寻找 Spring 容器,存在说明容器已经被创建并完成一系列的初始化工作。因为容器在初始化后被添加到 ServletContext 的属性。
-
若 ServletContext 中不存在,容器再从成员变量 context 中去寻找,不为空,说明容器已经被创建,那么直接进入初始化的相关工作。因为容器在被创建后会赋值给 context 。
2.创建容器
创建容器,这里创建的容器实现了 WebApplicationContext 接口,该接口属于 Spring 容器的一种。具体的继承关系如下:
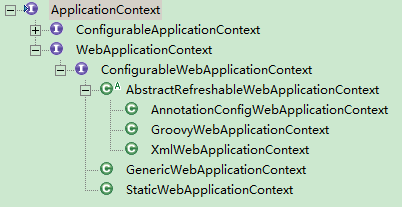
再来探究具体的创建过程:
protected WebApplicationContext createWebApplicationContext(ServletContext sc) {

    // 1.取得容器类型
    Class<?> contextClass = determineContextClass(sc);

    // 检验容器类型是否实现 ConfigurableWebApplicationContext 接口
if (!ConfigurableWebApplicationContext.class.isAssignableFrom(contextClass)) { // 抛出异常... } // 2.利用反射创建容器 return (ConfigurableWebApplicationContext) BeanUtils.instantiateClass(contextClass); }-
取得容器类型,默认为容器类行为 XmlWebApplicationContext。
// 容器类型
// 指代 web.xml 中定义的 <context-param> 标签
public static final String CONTEXT_CLASS_PARAM = "contextClass"; protected Class<?> determineContextClass(ServletContext servletContext) { // 从 sc 的初始化参数中获取,即取得 <context-param> 标签的内容 String contextClassName = servletContext.getInitParameter(CONTEXT_CLASS_PARAM); if (contextClassName != null) { try { // 取得类对象 return ClassUtils.forName(contextClassName, ClassUtils.getDefaultClassLoader()); }catch (ClassNotFoundException ex) { // 抛出异常... } }else { // 从 Spring 默认策略(属性文件)中取得容器类型 XmlWebApplicationContext contextClassName = defaultStrategies.getProperty(WebApplicationContext.class.getName()); try { return ClassUtils.forName(contextClassName, ContextLoader.class.getClassLoader()); }catch (ClassNotFoundException ex) { // 抛出异常... } } } // 关于默认策略,即属性文件的内容定义如下 org.springframework.web.context.WebApplicationContext = org.springframework.web.context.support.XmlWebApplicationContext
-
利用反射创建容器
public static <T> T instantiateClass(Class<T> clazz) throws BeanInstantiationException {
    // 省略代码... if (clazz.isInterface()) { // 抛出异常... } try { // 通过构造方法实例化该类 return instantiateClass(clazz.getDeclaredConstructor()); }catch (NoSuchMethodException ex) { //抛出异常... } } public static <T> T instantiateClass(Constructor<T> ctor, Object... args) throws BeanInstantiationException { // 省略代码... try { // 设置访问权限 ReflectionUtils.makeAccessible(ctor); // 利用构造函数完成实例化 return ctor.newInstance(args); }catch (InstantiationException ex) { //抛出异常... }catch (IllegalAccessException ex) { //抛出异常... }catch (IllegalArgumentException ex) { //抛出异常... }catch (InvocationTargetException ex) { //抛出异常... } }
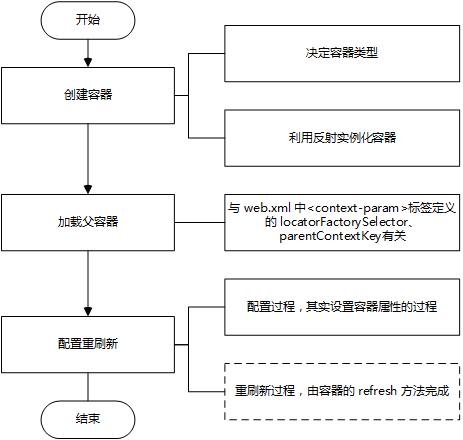
分析代码,容器的创建过程:
- 决定容器类型。
- 通过反射利用类的构造器实例化对象。
3.设置父容器
设置父容器,分为加载、设置两个步骤,重点来看加载父容器的过程,即 loadParentContext 方法的具体实现:
protected ApplicationContext loadParentContext(ServletContext servletContext) {
    ApplicationContext parentContext = null;

    // 取得 web.xml 中 <context-param> 属性名为
    // locatorFactorySelector、parentContextKey 的值 String locatorFactorySelector = servletContext.getInitParameter(LOCATOR_FACTORY_SELECTOR_PARAM); String parentContextKey = servletContext.getInitParameter(LOCATOR_FACTORY_KEY_PARAM); // 取得父容器 if (parentContextKey != null) { BeanFactoryLocator locator = ContextSingletonBeanFactoryLocator.getInstance(locatorFactorySelector); // 省略代码... this.parentContextRef = locator.useBeanFactory(parentContextKey); parentContext = (ApplicationContext) this.parentContextRef.getFactory(); } return parentContext; }
4.容器初始化
容器的初始化指的是容器的配置刷新过程,该过程包含了两个动作:配置、刷新。
具体流程下一篇再来详细分析。
总结
最后来看下 Spring 容器的创建过程: