需求:如题目所意,未登录用户不能浏览访问项目内部的资源,对访问的请求和响应进行拦截,且一个用户只能在一台设备登录。
权限访问控制功能可以通过过滤器或者拦截器去实现,在这里我用的是过滤器,过滤器可以过滤全部action请求,拦截器则更有针对性,对某一请求进行特定处理。
filter过滤器知识梳理:
Filter也称之为过滤器,它是Servlet三大器之一(另外两个为监听器和拦截器)。通过Filter技术,可以对web服务器管理的所有web资源:例如Jsp, Servlet, 静态图片文件或静态 html 文件等进行拦截,从而实现一些特殊的功能。例如实现URL级别的权限访问控制、过滤敏感词汇(聊天室经常用到的,一些骂人的话)、压缩响应信息等一些高级功能。
Servlet API中提供了一个Filter接口,开发web应用时,如果编写的Java类实现了这个接口,则把这个java类称之为过滤器Filter。通过Filter技术,可以实现用户在访问某个目标资源之前,对访问的请求和响应进行拦截,如图所示:
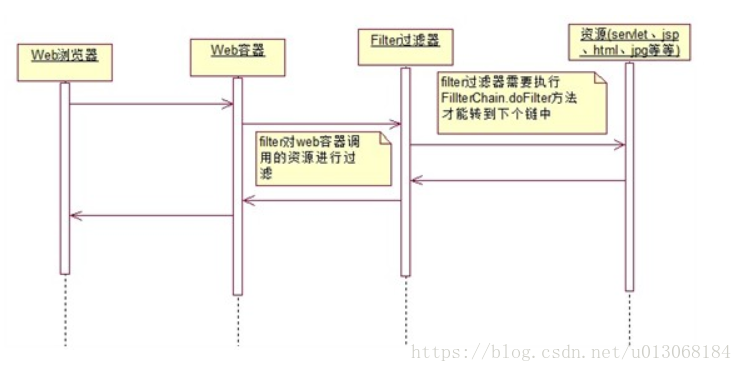
Filter拦截的实现
Filter接口中有一个doFilter方法,当我们编写好Filter,并配置对哪个web资源进行拦截后,WEB服务器每次在调用web资源的service方法之前,都会先调用一下filter的doFilter方法,因此,在该方法内编写代码可达到如下目的:
调用目标资源之前,让一段代码执行。
是否调用目标资源(即是否让用户访问web资源)。
调用目标资源之后,让一段代码执行。
web服务器在调用doFilter方法时,会传递一个filterChain对象进来,filterChain对象是filter接口中最重要的一个对 象,它也提供了一个doFilter方法,开发人员可以根据需求决定是否调用此方法,调用该方法,则web服务器就会调用web资源的service方 法,即web资源就会被访问,否则web资源不会被访问。
Filter开发分为二个步骤:
编写java类实现Filter接口,并实现其doFilter方法。
在 web.xml 文件中使用和配对元素对编写的filter类进行注册,并设置它所能拦截的资源。
项目案例:
1、数据库
对于确保一个账号只在一台设备登录,先登录用户会被后登录用户挤掉,所以在用户表设计了一个sessionId字段,用来保存浏览器分配的sessionId。即用同一浏览器浏览器登录访问网站时,假如在不关闭浏览器的情况下,访问登录同一网站,生成的sessionId是一样的。
2、登录权限过滤器类
/**
 * 用户权限校验过滤器,针对URL进行权限校验
 */
public class AuthorityFilter implements Filter {// 所有自定义的过滤器都需实现filter接口

    // 不需要校验权限的URL  容器启动 过滤器初始化时会先加载web.xml文件中配置的不需要校验权限的URL
    String[] noCheckPaths = null;
    // 访问的工程名  同上,假如是访问localhost:8080/user   得到的是/user
    String contextPath = null;

    // 用redis缓存sessionId  每次请求时直接缓存数据库中查找,优化速度
    private RedisTemplate redisTemplate;

    // 销毁
    public void destroy() {
    }

    // 过滤执行的逻辑代码
    public void doFilter(ServletRequest servletRequest, ServletResponse servletResponse, FilterChain chain)
            throws IOException, ServletException {
        HttpServletRequest request = (HttpServletRequest) servletRequest;
        HttpServletResponse response = (HttpServletResponse) servletResponse;
        String path = request.getServletPath();
        // 获取当前浏览器访问网站生成的sessionId
        String currentSessionId = request.getSession().getId();

        ServletContext sc = request.getSession().getServletContext();
        XmlWebApplicationContext cxt = (XmlWebApplicationContext) WebApplicationContextUtils.getWebApplicationContext(sc);
        // 从容器中获取redisTemplate  bean
        // if(cxt != null && cxt.getBean("redisTemplate") != null)
        redisTemplate = (RedisTemplate) cxt.getBean("redisTemplate");

        // 从session取得登录用户信息
        User user = (User) request.getSession().getAttribute("User");

        if(user != null ){// 用户信息不为空
            // 从redis缓存数据库取出该用户的sessionId
            String dbSessionId = (String) redisTemplate.opsForValue().get(user.getUserId());
            if(currentSessionId.endsWith(dbSessionId)){// 作比较,相等则放行
                chain.doFilter(servletRequest, servletResponse);
            }else{
                if (this.isVerification(path)) {// sessionId不相等则判断请求url是否要验证  为true则跳转到登录页面
                    String toPath = "/login";
                    response.setContentType("text/html; charset=utf-8"); // 防止出现乱码
                    response.getWriter().write("<script>alert('"+"该账号已在别的设备登录,如非本人操作,请及时修改密码,确保资金安全!"+"')</script>");
                    // 因为项目中用到iframe,故需要在顶层窗口跳转
                    response.getWriter().write("<script>top.location.href='" + contextPath + toPath + "'</script>");
                    return;
                } else {
                    chain.doFilter(servletRequest, servletResponse);
                }
            }

        } else {// 用户信息为空
            // 判断url是否验证
            if (this.isVerification(path)) {//  为true则跳转到登录页面
                String toPath = "/login";
                // 顶层窗口即浏览器窗口框打开  应对frame嵌套
                response.getWriter().write("<script>top.location.href='" + contextPath + toPath + "'</script>");
                // response.getWriter().write("<script>window.parent.location.href='" + contextPath + toPath + "'</script>");// 在父窗口打开
                // response.sendRedirect(contextPath + toPath);  // 重定向
                //response.getWriter().write("<script>window.location.href='" + contextPath + toPath + "'</script>"); // 在当前窗口打开
                return;
            } else {// 放行
                chain.doFilter(servletRequest, servletResponse);
            }
        }
    }


    /**
     *
     * isVerification(判断指定的url是否需要验证,默认是需要验证的) (这里描述这个方法适用条件 – 可选)
     * @param path
     * @return false代表不用验证 true 代表需要进行验证 Boolean
     * @exception
     */
    private Boolean isVerification(String path) {
        // 默认需要验证url
        boolean isVerification = true;

        if ("/".equals(path)) { // 防止无限重定向
            return false;
        }
        for (String p : noCheckPaths) {// 判断该请求url是否需要验证
            if (path.indexOf(p) == 0) {
                isVerification = false;
                break;
            }
        }
        // "/view/" 路径下的js css,不校验
        if (path.indexOf("/view/") == 0
                && (path.indexOf(".js") > 0 || path.indexOf(".js?") > 0 || path.indexOf(".css") > 0)) {
            isVerification = false;
        }
        return isVerification;
    }


    /**
     *  服务器启动是过滤器初始化的参数  加载不需要验证的url
     */
    public void init(FilterConfig config) throws ServletException {
        // 获取web.xml文件的unCheckPaths元素的内容,即配置的不需要验证的url
        String unCheckPath = config.getInitParameter("unCheckPaths");
        this.noCheckPaths = unCheckPath.split(",");
        // 获取工程名
        contextPath = config.getServletContext().getContextPath();
    }
}
3、登录controller
@Controller
@RequestMapping("/login")
public class LoginController extends BaseController {

    @Resource
    private UserService userService;

    /**
     * 用户登录
     */
    @RequestMapping(value = "/login", method = RequestMethod.POST)
    @ResponseBody
    public String login(HttpServletRequest request,
            HttpServletResponse response) throws Exception {
        try {
            String userId = request.getparameter("userId");
            String userPwd = request.getparameter("userPwd");
            // 根据用户名到数据库查找此用户
            User user = this.userService.queryUser(userId);
            if (user == null) {
                return JsonUtils.getJsonCom("1", "该用户不存在", "");
            } else {
                if (!userPwd.equals(user.getUserPwd())) {
                    return JsonUtils.getJsonCom("2", "帐号或者密码错误", "");
                }
                if (user.getValidStatus() == 1) {
                    return JsonUtils.getJsonCom("3", "该帐号已被停用", "");
                }
            }

            HttpSession session = request.getSession(true);
            // 获取新会话的sessionId
            String sessionId = session.getId();
            // 与数据库的sessionId作比较
            if (!sessionId.equals(user.getSessionId())) {
                // 不相同则同步缓存到redis
                redisTemplate.opsForValue().set(user.getUserId(),sessionId);
            }
            // 缓存用户信息到session
            session.setAttribute("User", user);

            return JsonUtils.getJsonCom("0", "成功", "");
        } catch (Exception e) {
            // log.info("登陆数据出现异常...");// 日志输出
            // e.printStackTrace();
            return JsonUtils.getJsonCom("4", "登录请求出错,请重试!", "");
        }
    }
4、web.xml配置文件
<?xml version="1.0" encoding="UTF-8"?>
<web-app xmlns:xsi="http://www.w3.org/2001/XMLSchema-instance"
    xmlns="http://java.sun.com/xml/ns/javaee" xmlns:web="http://java.sun.com/xml/ns/javaee/web-app_2_5.xsd"
    xsi:schemaLocation="http://java.sun.com/xml/ns/javaee http://java.sun.com/xml/ns/javaee/web-app_2_5.xsd"
    version="2.5">
    <context-param>
        <!-- 加载spring配置文件 -->
        <param-name>contextConfigLocation</param-name>
        <param-value>
            /WEB-INF/spring/applicationContext.xml
        </param-value>
    </context-param>

    <!-- spring mvc DispatcherServlet -->
    <servlet>
        <servlet-name>spring</servlet-name>
        <servlet-class>org.springframework.web.servlet.DispatcherServlet</servlet-class>
        <init-param>
            <param-name>contextConfigLocation</param-name>
            <param-value>/WEB-INF/spring/spring-mvc.xml</param-value>
        </init-param>
        <!-- 表示容器在启动时就加载并初始化这个servlet -->
        <load-on-startup>1</load-on-startup>
    </servlet>
    <servlet-mapping>
        <servlet-name>spring</servlet-name>
        <url-pattern>/</url-pattern>
    </servlet-mapping>

    <!-- URL权限过滤 -->
    <filter>
        <filter-name>authorityFilter</filter-name>
        <!-- 注册过滤器类 -->
        <filter-class>com.qly.b2b.web.common.AuthorityFilter</filter-class>
        <init-param>
            <!-- 设置编码 -->
            <param-name>encoding</param-name>
            <param-value>UTF-8</param-value>
        </init-param>
        <init-param>
            <!-- 设置不需要验证的url路径包括js css 图片等信息  根据自己需要增减 -->
            <param-name>unCheckPaths</param-name>
            <param-value>/images,/queryinfo,/js,/css,/login,/desklogin,/index/images</param-value>
        </init-param>
    </filter>
    <filter-mapping>
        <filter-name>authorityFilter</filter-name>
        <!-- 对所有路径过滤 -->
        <url-pattern>/*</url-pattern>
    </filter-mapping>

    <welcome-file-list>
        <welcome-file>/view/login/index.jsp</welcome-file>
    </welcome-file-list>
</web-app>
5、登录页面jsp
<%@ page language="java" contentType="text/html; charset=UTF-8" pageEncoding="UTF-8"%>
<!DOCTYPE>
<html>
<head>
<meta name="viewport" content="user-scalable=yes, width=1225, target-densityDpi=device-dpi" />
<script src="<%=basePath%>js/jquery.js"></script>
<link rel="stylesheet" type="text/css" href="<%=basePath%>css/iconfont/iconfont.css">
<script src="<%=basePath%>js/jquery-1.11.3.min.js"></script>

<link rel="stylesheet" href="<%=basePath%>css/jquery-ui.css">
<link rel="stylesheet" href="<%=basePath%>css/stylesheet.css">
<link rel="stylesheet" href="<%=basePath%>css/initial.css">
<link rel="stylesheet" href="<%=basePath%>css/style.css">
<script type="text/javascript" src="<%=basePath%>js/jquery-ui.js"></script>
<script type="text/javascript" src="<%=basePath%>js/dialog.js"></script>
<script type="text/javascript" src="<%=basePath%>js/libs.js"></script>


</head>
<body id="bodyid" huaban_collector_injected="true" onkeydown="loginByEnter(event)">

<div class="main">

    <div class="new_login_cover"></div>
    <div class="new_login">
        <div class="new_user new_input">
            <input type="text" id="userId" placeholder="输入会员账号" tabindex="1" onfocus="this.placeholder=''" onblur="this.placeholder='请输入会员账号'">
        </div>
        <div class="new_password new_input">
            <input type="password" id="password" placeholder="输入密码" tabindex="2" onfocus="this.placeholder=''" onblur="this.placeholder='输入密码'">
        </div>
        <div class="new_logins new_input ">
            <button type="button" id="btnlogin" class="btn" tabindex="4">登录</button>
        </div>
    </div>
</div>

<script type="text/javascript">

$(function(){
    $("#btnlogin").click(function(){
        var userId=$("#userId").val();
        var userPwd=$("#password").val();

        if(userId == "" || userId == null){
            alert("请填写登录帐号");
            return;
        }
        if(userPwd == "" || userPwd == null){
            alert("请填写登录密码");
            return;
        }

        var param = "userId=" + userId + "&userPwd=" + userPwd;
        $.ajax({
             url: '<%=basePath%>login/login',
             data:param,
             dataType:"json",
             type: 'POST',
             async: false,
             success: function(data){
                 if(data.code == 0){
                    alert("登录成功");;
                 }else{
                     alert(data.reason);
                 }
             }
        });
    });
})
</script>
</body>
</html>
6、redis、mysql数据库的b2bconfig.properties属性文件
# mysql settings
db.jdbc.driverClass=com.mysql.jdbc.Driver
db.jdbc.url=jdbc:mysql://127.0.0.1:3306/test?useUnicode=true&characterEncoding=utf-8
db.jdbc.username=root
db.jdbc.password=123
db.initialPoolSize=5
db.minPoolSize=5
db.maxPoolSize=30
db.maxStatements=100
db.maxIdleTime=3600
db.acquireIncrement=2
db.acquireRetryAttempts=10
db.acquireRetryDelay=600
db.checkoutTimeout=100000


# Redis settings
redis.host=127.0.0.1
redis.port=6379
# 若没有设置可注释忽略
redis.password=PingPing
redis.maxIdle=300
redis.maxTotal=600
redis.maxWaitMillis=1000
redis.testOnBorrow=true
7、spring配置文件
applicationContext.xml
<?xml version="1.0" encoding="UTF-8"?>
<beans xmlns="http://www.springframework.org/schema/beans"
    xmlns:xsi="http://www.w3.org/2001/XMLSchema-instance"
    xmlns:context="http://www.springframework.org/schema/context"
    xmlns:aop="http://www.springframework.org/schema/aop"
    xmlns:tx="http://www.springframework.org/schema/tx"
    xsi:schemaLocation="http://www.springframework.org/schema/beans
    http://www.springframework.org/schema/beans/spring-beans-3.0.xsd
    http://www.springframework.org/schema/context
    http://www.springframework.org/schema/context/spring-context-3.0.xsd
    http://www.springframework.org/schema/tx
    http://www.springframework.org/schema/tx/spring-tx-3.0.xsd
    http://www.springframework.org/schema/aop
    http://www.springframework.org/schema/aop/spring-aop-3.0.xsd">

    <!-- 父容器中移除Controller注解,在子容器中扫描注入 -->
    <context:component-scan base-package="com.qly.b2b">
        <context:exclude-filter type="annotation" expression="org.springframework.stereotype.Controller" />
    </context:component-scan>

    <context:property-placeholder ignore-unresolvable="true" location="classpath:b2bconfig.properties" />

    <bean id="dataSource" class="com.mchange.v2.c3p0.ComboPooledDataSource"
        > <!--  destroy-method="close"> -->
        <property name="driverClass">
            <value>${db.jdbc.driverClass}</value>
        </property>
        <property name="jdbcUrl">
            <value>${db.jdbc.url}</value>
        </property>
        <property name="user">
            <value>${db.jdbc.username}</value>
        </property>
        <property name="password">
            <value>${db.jdbc.password}</value>
        </property>
        <property name="initialPoolSize">
            <value>${db.initialPoolSize}</value>
        </property>
        <property name="minPoolSize">
            <value>${db.minPoolSize}</value>
        </property>
        <property name="maxPoolSize">
            <value>${db.maxPoolSize}</value>
        </property>
        <property name="maxStatements">
            <value>${db.maxStatements}</value>
        </property>
        <property name="maxIdleTime">
            <value>${db.maxIdleTime}</value>
        </property>
        <property name="acquireIncrement">
            <value>${db.acquireIncrement}</value>
        </property>
        <property name="acquireRetryAttempts">
            <value>${db.acquireRetryAttempts}</value>
        </property>
        <property name="acquireRetryDelay">
            <value>${db.acquireRetryDelay}</value>
        </property>
        <property name="checkoutTimeout">
            <value>${db.checkoutTimeout}</value>
        </property>
    </bean>


    <!--  dao层用到mybatis框架  mybatis文件配置,扫描所有mapper文件 -->
    <bean id="sqlSessionFactory" class="org.mybatis.spring.SqlSessionFactoryBean">
        <property name="dataSource" ref="dataSource" />
        <!-- <property name="typeAliasesPackage" value="com.szkingdom.warren.bean,com.szkingdom.iagroup.bean"
            /> -->
        <!-- <property name="configLocation" value="classpath:b2bconfig.xml"/> -->
        <property name="mapperLocations" value="classpath*:com/test/b2b/dao/*/*.xml" />
    </bean>

    <!-- 配置sqlSessionTemplate -->
    <bean id="sqlSessionTemplate" class="org.mybatis.spring.SqlSessionTemplate">
        <constructor-arg name="sqlSessionFactory" ref="sqlSessionFactory" />
    </bean>


    <!-- 映射Mapper -->
    <bean class="org.mybatis.spring.mapper.MapperScannerConfigurer">
        <property name="basePackage" value="com.qly.b2b.dao,com.qly.b2b.dao.config" />
    </bean>

    <!--事务管理数据库连接池 -->
    <bean id="transactionManager"
        class="org.springframework.jdbc.datasource.DataSourceTransactionManager">
        <property name="dataSource" ref="dataSource" />
    </bean>

    <!--数据库事务配置 -->
    <tx:annotation-driven transaction-manager="transactionManager"/>


    <!-- 1.创建jedis连接池配置对象 -->
    <bean id="poolConfig" class="redis.clients.jedis.JedisPoolConfig">
        <!--最大空闲数-->
        <property name="maxIdle" value="${redis.maxIdle}" />
        <!-- 最大连接数 -->
        <property name="maxTotal" value="${redis.maxTotal}" />
        <!-- 最大建立连接等待时间 -->
        <property name="maxWaitMillis" value="${redis.maxWaitMillis}" />
         <!--是否在从池中取出连接前进行检验,如果检验失败,则从池中去除连接并尝试取出另一个-->
        <property name="testOnBorrow" value="${redis.testOnBorrow}" />
    </bean>
    <!-- 2.创建连接工厂对象 (类似:LocalSessionFactoryBean) -->
    <bean id="connectionFactory"
        class="org.springframework.data.redis.connection.jedis.JedisConnectionFactory">
        <!-- 关联 连接池配置对象 -->
        <property name="poolConfig" ref="poolConfig" />
        <!-- redis的主机 -->
        <property name="hostName" value="${redis.host}" />
        <!-- redis的端口 -->
        <property name="port" value="${redis.port}" />
        <property name="password" value="${redis.password}" />
        <!-- 指定操作数据库索引,从0开始 -->
        <property name="database" value="1" />
    </bean>
    <!-- 3.创建RedisTemlate(类似:HibernateTemplate) -->
    <bean id="redisTemplate" class="org.springframework.data.redis.core.RedisTemplate">
        <!-- 关联连接工厂 -->
        <property name="connectionFactory" ref="connectionFactory" />
        <!--spring data redis提供序列化器 -->
        <!--key的序列化器 -->
        <property name="keySerializer">
            <bean
                class="org.springframework.data.redis.serializer.StringRedisSerializer" />
        </property><!-- value的序列化器 -->
        <property name="valueSerializer">
            <bean
                class="org.springframework.data.redis.serializer.StringRedisSerializer" />
        </property>
    </bean>

</beans>
8、springmvc配置文件
<?xml version="1.0" encoding="UTF-8"?>
<beans xmlns="http://www.springframework.org/schema/beans"
    xmlns:xsi="http://www.w3.org/2001/XMLSchema-instance"
    xmlns:p="http://www.springframework.org/schema/p"
    xmlns:mvc="http://www.springframework.org/schema/mvc"
    xmlns:context="http://www.springframework.org/schema/context"
    xsi:schemaLocation="http://www.springframework.org/schema/beans
       http://www.springframework.org/schema/beans/spring-beans-3.0.xsd
       http://www.springframework.org/schema/mvc
       http://www.springframework.org/schema/mvc/spring-mvc-3.0.xsd
       http://www.springframework.org/schema/context
       http://www.springframework.org/schema/context/spring-context-3.0.xsd">

    <context:annotation-config />
    <!-- 把标记了@Controller注解的类转换为bean -->
    <context:component-scan base-package="com.test.b2b.controller" />

    <!-- 对模型视图名称的解析,即在模型视图名称添加前后缀 -->
    <mvc:annotation-driven />
    <bean
        class="org.springframework.web.servlet.view.InternalResourceViewResolver">
        <property name="viewClass" value="org.springframework.web.servlet.view.JstlView" />
        <property name="prefix" value="/view/" />
        <property name="suffix" value=".jsp" />
    </bean>

    <mvc:view-controller path="/" view-name="index/index" />


    <!-- 处理返回中文乱码情况 -->
    <bean class="org.springframework.web.servlet.mvc.method.annotation.RequestMappingHandlerAdapter">
        <property name="messageConverters">
            <list>
                <bean
                    class="org.springframework.http.converter.StringHttpMessageConverter">
                    <property name="supportedMediaTypes">
                        <list>
                            <value>text/html;charset=UTF-8</value>
                            <value>text/plain;charset=UTF-8</value>
                            <value>application/json;charset=UTF-8</value>
                        </list>
                    </property>
                </bean>
            </list>
        </property>
    </bean>
</beans>
9、service层 dao层代码省略。。。。
若有更好的解决方案,欢迎讨论!谢谢