java图像处理-(指定区域内)灰度化、透明化(alpha通道)处理
近日在一家小公司实习,老板要求我写一个图形编辑器,其中涉及到用java处理图像。一般图像处理python用的比较多,感觉网上关于java处理图像的资料不是很多(也许是因为我没有认真的去翻吧……)所以想把自己处理的一些想法记录一下。
灰度化
图片的rgb通道alpha通道什么的我暂时就不细讲了,网上资料很多。先说一下怎么读一个图片。
private BufferedImage initBufferedImage(String imagePath) {
        File file = new File(imagePath);
        BufferedImage image = null;
        try {
            image = ImageIO.read(file);
        } catch (IOException e) {
            e.printStackTrace();
        }
        return image;
}- 1
- 2
- 3
- 4
- 5
- 6
- 7
- 8
- 9
- 10
将图片灰度化其实很简单
private BufferedImage grayProcess(BufferedImage sourceImage){
    int width = sourceImage.getWidth();
    int height = sourceImage.getHeight();
    BufferedImage grayImage = new BufferedImage(width, height, BufferedImage.TYPE_BYTE_GRAY);// BufferedImage.TYPE_BYTE_GRAY指定了这是一个灰度图片
    for(int i= 0 ; i < width ; i++){
            for(int j = 0 ; j < height; j++){
                int rgb = image.getRGB(i, j);
                grayImage.setRGB(i, j, rgb);
        }
    }
}- 1
- 2
- 3
- 4
- 5
- 6
- 7
- 8
- 9
- 10
- 11
接下来当然是要将图片写成文件
private void writeBufferedImage(BufferedImage img,String filePath){
        String format = filePath.substring(filePath.indexOf('.')+1);
        //获取图片格式
        System.out.println(format);
        try {
            ImageIO.write(img,format,new File(filePath));
        } catch (IOException e) {
            e.printStackTrace();
        }
}- 1
- 2
- 3
- 4
- 5
- 6
- 7
- 8
- 9
- 10
设置图片透明度
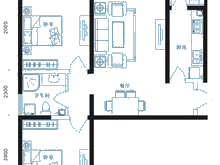
下面这段代码可以将图片的背景色设为透明,当然图片不能太复杂,而且背景色要比轮廓的颜色浅。给个例子,左边原图,右边处理过的图。 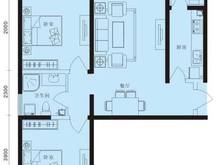
/**
简单介绍一下思路,首先遍历所有像素,计算一下整张图的灰度的平均值(grayMean),轮廓颜色较深,灰度值比较小,背景颜色较浅,灰度值较大,加权平均之后总的平均值会比背景的灰度值略低,然后再次遍历所有像素,并计算每个像素点的灰度,如果其灰度值比grayMean大,则将其alpha值设为0,即完全透明,否则不做处理。
*/
package imageprocess;

import java.awt.image.BufferedImage;

/**
 * Created by alex on 7/24/16.
 */
public class AlphaProcessor {
    /**
     * 处理透明度
     */
    public BufferedImage alphaProcess(BufferedImage bufferedImage) {
        //获取源图像的宽高
        int width = bufferedImage.getWidth();
        int height = bufferedImage.getHeight();
        System.out.println(width+" "+height);
    //实例化一个同样大小的图片,并将type设为 BufferedImage.TYPE_4BYTE_ABGR,支持alpha通道的rgb图像
        BufferedImage resImage = new BufferedImage(width, height, BufferedImage.TYPE_4BYTE_ABGR);

        double grayMean = 0;
        for (int i = 0; i < width; i++) {
            for (int j = 0; j < height; j++) {
                int rgb = bufferedImage.getRGB(i,j);
                int r = (0xff&rgb);
                int g = (0xff&(rgb>>8));
                int b = (0xff&(rgb>>16));
                //这是灰度值的计算公式
                grayMean += (r*0.299+g*0.587+b*0.114);
            }
        }
        //计算平均灰度
        grayMean = grayMean/(width*height);

        for (int i = 0; i < width; i++) {
            for (int j = 0; j < height; j++) {
                int rgb = bufferedImage.getRGB(i,j);
                //一个int是32位,java中按abgr的顺序存储,即前8位是alpha,最后8位是r,所以可以通过下面的方式获取到rgb的值
                int r = (0xff&rgb);
                int g = (0xff&(rgb>>8));
                int b = (0xff&(rgb>>16));
                double gray = (r*0.299+g*0.587+b*0.114);
                //如果灰度值大于之前求的平均灰度值,则将其alpha设为0,下面准确写应该是rgb = r + (g << 8) + (b << 16) + (0 << 24);
                if (gray>grayMean){
                    rgb = r + (g << 8) + (b << 16);
                }
                resImage.setRGB(i,j,rgb);
            }
        }
        //ok,返回的就是将浅色背景设为透明的BufferedImage了,可以用灰度化里提到的方式写成文件
        return resImage;
    }
}
- 1
- 2
- 3
- 4
- 5
- 6
- 7
- 8
- 9
- 10
- 11
- 12
- 13
- 14
- 15
- 16
- 17
- 18
- 19
- 20
- 21
- 22
- 23
- 24
- 25
- 26
- 27
- 28
- 29
- 30
- 31
- 32
- 33
- 34
- 35
- 36
- 37
- 38
- 39
- 40
- 41
- 42
- 43
- 44
- 45
- 46
- 47
- 48
- 49
- 50
- 51
- 52
- 53
- 54
- 55
- 56
在指定区域内进行处理
想必看到这篇博客的人都接触过photoshop,photoshop可以在一个先用选框工具选中一个区域,然后在这个区域内进行一系列操作,比如之前提到的设置透明度和灰度处理。
先说一下我大致是怎么实现的,首先是将图片放到一个JLabel上,然后为这个JLabel加listener监听鼠标的点击事件,获取鼠标点击的坐标,然后将这些点连起来就围成一个选框,然后设置一个掩码,以确定哪些点在选框内,然后就可以只针对选框内的像素点或者选框外的像素点操作。Talk is cheap, show me the code.
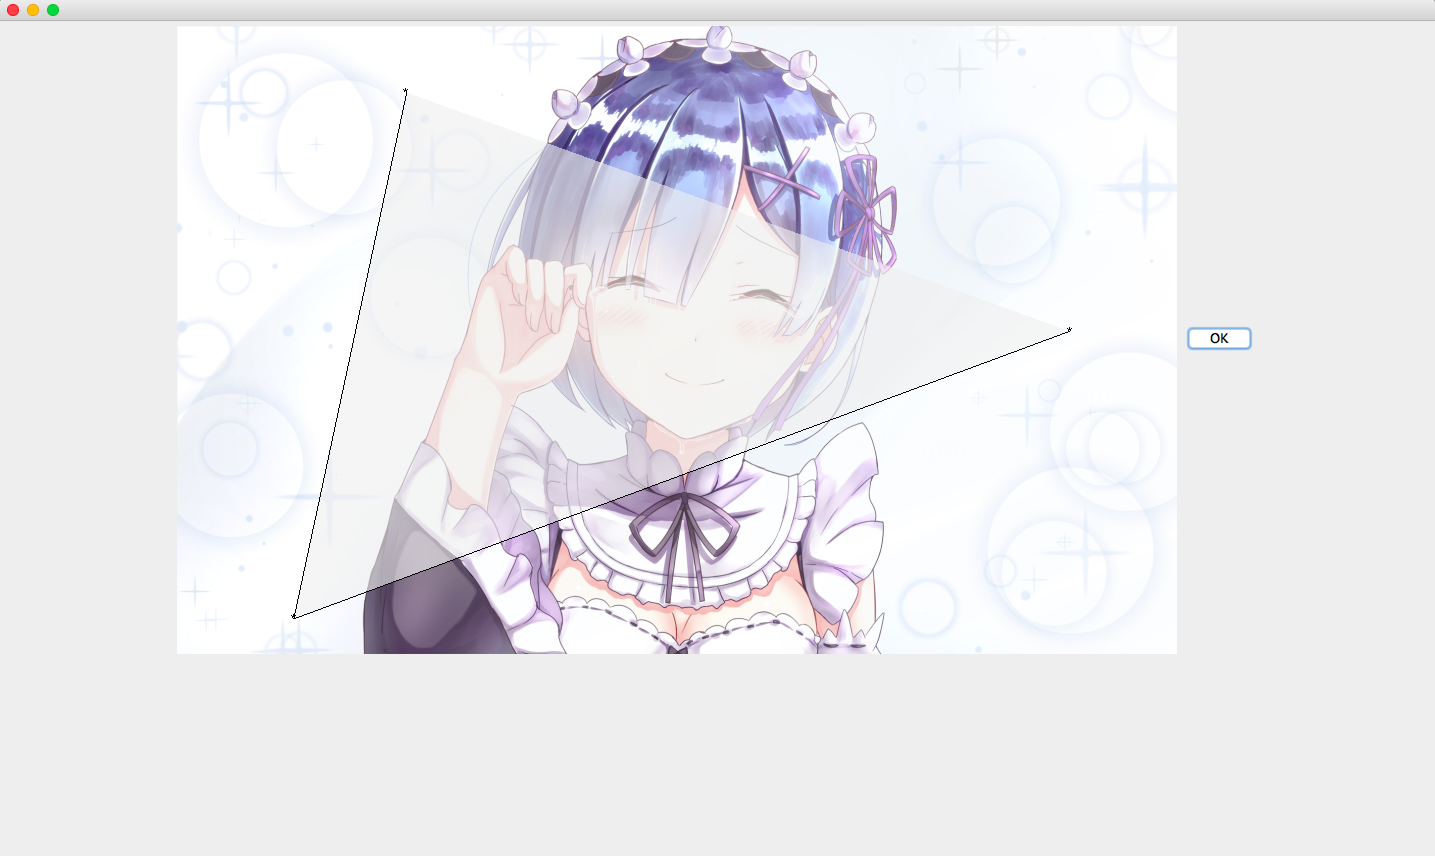
先上这个demo跑完之后的图吧
我点了三个点,然后点击ok,之后程序就会将这三个点围出的区域内图像的透明度设为100,当然你也可以在这个区域内对这块像素点做一些别的操作。
比较重要的一块是getMask() 这个方法
package view;

import javax.swing.*;
import java.awt.*;
import java.awt.event.MouseAdapter;
import java.awt.event.MouseEvent;
import java.awt.geom.GeneralPath;
import java.awt.image.BufferedImage;
import java.util.ArrayList;
import java.util.List;

/**
 * Created by alex on 7/25/16.
 */
public class FrameForBlog extends JFrame {

    JPanel contentPanel;
    LabelForBlog labelForBlog;//这是自己新写的类,在后面
    Button okButton;

    FrameForBlog() {
        contentPanel = new JPanel();
        contentPanel.setLayout(new FlowLayout());
         //我把图片放在这个相对路径下,使用前请自行更改
        ImageIcon icon = new ImageIcon("src/data/cartoon.jpg");
        icon.setImage(icon.getImage().getScaledInstance(1000, icon.getIconHeight() * 1000 / icon.getIconWidth(), Image.SCALE_AREA_AVERAGING));//将图片等比例缩放一下,不然界面显示不全

        labelForBlog = new LabelForBlog(icon);
        labelForBlog.setBounds(0, 0, icon.getIconWidth(), icon.getIconHeight());
        contentPanel.add(labelForBlog);

        okButton = new Button("OK");
        contentPanel.add(okButton);
        okButton.addMouseListener(new MouseAdapter() {
            @Override
            public void mouseClicked(MouseEvent e) {
                super.mouseClicked(e);
                labelForBlog.process();
            }
        });


        add(contentPanel);
        this.setExtendedState(JFrame.MAXIMIZED_BOTH);
        this.setVisible(true);
        this.setDefaultCloseOperation(EXIT_ON_CLOSE);
    }

    public static void main(String[] args) {
        new FrameForBlog();
    }
}

class LabelForBlog extends JLabel {
    //to record the coordinates
    List<int[]> coordinates;

    LabelForBlog() {
        super();
        coordinates = new ArrayList<>();
    }

    LabelForBlog(ImageIcon imageIcon) {
        super(imageIcon);
        coordinates = new ArrayList<>();

        addMouseListener(new MouseAdapter() {
            @Override
            public void mouseClicked(MouseEvent e) {
                super.mouseClicked(e);
                System.out.println(e.getX() + " " + e.getY());
                int[] coor = new int[]{e.getX(), e.getY()};
                boolean contain = false;
                //如果点击的点重复就不加进去了
                for (int[] c : coordinates) {
                    if (c[0] == coor[0] && c[1] == coor[1]) {
                        contain = true;
                        break;
                    }
                }
                if (!contain) {
                    coordinates.add(coor);
                    System.out.println("not contain");
                    repaint();
                }
            }
        });
    }

    @Override
    protected void paintComponent(Graphics g) {
        super.paintComponent(g);

        System.out.println("paint comComponent");
        if (coordinates.size() > 0) {
            int x0 = coordinates.get(0)[0];
            int y0 = coordinates.get(0)[1];
            int x1 = 0;
            int y1 = 0;

            //如果不加这个-3 和 +5 * 和线就没有完全重合,应该是drawString的原因
            g.drawString("*", x0 - 3, y0 + 5);
            for (int i = 1; i < coordinates.size(); i++) {
                x1 = coordinates.get(i)[0];
                y1 = coordinates.get(i)[1];
                g.drawString("*", x1 - 3, y1 + 5);
                g.drawLine(x0, y0, x1, y1);
                x0 = x1;
                y0 = y1;
            }
        }
    }

//获取掩码,这块比较重要
    private int[][] getMask() {
        int x = this.getX();
        int y = this.getY();

        int[][] points = new int[coordinates.size()][2];
        for (int i = 0; i < coordinates.size(); i++) {
            points[i][0] = coordinates.get(i)[0];
            points[i][1] = coordinates.get(i)[1];
        }
    //用了GeneralPath去判断像素点是否在选框内
        GeneralPath path = new GeneralPath();
        path.moveTo(points[0][0], points[0][1]);

        for (int i = 1; i < points.length; i++) {
            path.lineTo(points[i][0], points[i][1]);
        }

        int[][] mask = new int[this.getIcon().getIconHeight()][this.getIcon().getIconWidth()];
        for (int i = 0; i < this.getIcon().getIconHeight(); i++) {
            for (int j = 0; j < this.getIcon().getIconWidth(); j++) {
                //值得注意的是contains(j,i)
                mask[i][j] = path.contains(j, i) ? 1 : 0;
            }
        }
        return mask;
    }

    public void process(){
        int[][] mask = getMask();
         //下面是将Bufferedimage转为Image的方法
        BufferedImage img = new BufferedImage(this.getIcon().getIconWidth(), this.getIcon().getIconHeight(), BufferedImage.TYPE_4BYTE_ABGR);
        Graphics2D g = img.createGraphics();
        g.drawImage(((ImageIcon) this.getIcon()).getImage(),0,0,null);
        g.dispose();

        //根据mask进行透明度处理
        BufferedImage resImage = alphaProcess(mask,img);
        this.setIcon(new ImageIcon(resImage));

    }

//在之前的alphaProcess上略有改动,删除了根据平均灰度值判断这一步,增加一句mask的判断,如果mask为1则改变透明度,否则不改变

    private BufferedImage alphaProcess(int[][] mask, BufferedImage bufferedImage) {
        int width = bufferedImage.getWidth();
        int height = bufferedImage.getHeight();
        System.out.println(width + " " + height);

        BufferedImage resImage = new BufferedImage(width, height, BufferedImage.TYPE_4BYTE_ABGR);

       for (int i = 0; i < width; i++) {
            for (int j = 0; j < height; j++) {
                int rgb = bufferedImage.getRGB(i, j);
                int r = (0xff & rgb);
                int g = (0xff & (rgb >> 8));
                int b = (0xff & (rgb >> 16));
                //根据mask设置透明度
                if (mask[j][i] == 1)
                    rgb = r + (g << 8) + (b << 16) + (100 << 24);
                else{
                    rgb = r + (g<<8) + (b<<16)+(255<<24);
                }
                resImage.setRGB(i, j, rgb);
            }
        }
        return resImage;
    }
}
- 1
- 2
- 3
- 4
- 5
- 6
- 7
- 8
- 9
- 10
- 11
- 12
- 13
- 14
- 15
- 16
- 17
- 18
- 19
- 20
- 21
- 22
- 23
- 24
- 25
- 26
- 27
- 28
- 29
- 30
- 31
- 32
- 33
- 34
- 35
- 36
- 37
- 38
- 39
- 40
- 41
- 42
- 43
- 44
- 45
- 46
- 47
- 48
- 49
- 50
- 51
- 52
- 53
- 54
- 55
- 56
- 57
- 58
- 59
- 60
- 61
- 62
- 63
- 64
- 65
- 66
- 67
- 68
- 69
- 70
- 71
- 72
- 73
- 74
- 75
- 76
- 77
- 78
- 79
- 80
- 81
- 82
- 83
- 84
- 85
- 86
- 87
- 88
- 89
- 90
- 91
- 92
- 93
- 94
- 95
- 96
- 97
- 98
- 99
- 100
- 101
- 102
- 103
- 104
- 105
- 106
- 107
- 108
- 109
- 110
- 111
- 112
- 113
- 114
- 115
- 116
- 117
- 118
- 119
- 120
- 121
- 122
- 123
- 124
- 125
- 126
- 127
- 128
- 129
- 130
- 131
- 132
- 133
- 134
- 135
- 136
- 137
- 138
- 139
- 140
- 141
- 142
- 143
- 144
- 145
- 146
- 147
- 148
- 149
- 150
- 151
- 152
- 153
- 154
- 155
- 156
- 157
- 158
- 159
- 160
- 161
- 162
- 163
- 164
- 165
- 166
- 167
- 168
- 169
- 170
- 171
- 172
- 173
- 174
- 175
- 176
- 177
- 178
- 179
- 180
- 181
- 182
- 183
近日在一家小公司实习,老板要求我写一个图形编辑器,其中涉及到用java处理图像。一般图像处理python用的比较多,感觉网上关于java处理图像的资料不是很多(也许是因为我没有认真的去翻吧……)所以想把自己处理的一些想法记录一下。
灰度化
图片的rgb通道alpha通道什么的我暂时就不细讲了,网上资料很多。先说一下怎么读一个图片。
private BufferedImage initBufferedImage(String imagePath) {
        File file = new File(imagePath);
        BufferedImage image = null;
        try {
            image = ImageIO.read(file);
        } catch (IOException e) {
            e.printStackTrace();
        }
        return image;
}- 1
- 2
- 3
- 4
- 5
- 6
- 7
- 8
- 9
- 10
将图片灰度化其实很简单
private BufferedImage grayProcess(BufferedImage sourceImage){
    int width = sourceImage.getWidth();
    int height = sourceImage.getHeight();
    BufferedImage grayImage = new BufferedImage(width, height, BufferedImage.TYPE_BYTE_GRAY);// BufferedImage.TYPE_BYTE_GRAY指定了这是一个灰度图片
    for(int i= 0 ; i < width ; i++){
            for(int j = 0 ; j < height; j++){
                int rgb = image.getRGB(i, j);
                grayImage.setRGB(i, j, rgb);
        }
    }
}- 1
- 2
- 3
- 4
- 5
- 6
- 7
- 8
- 9
- 10
- 11
接下来当然是要将图片写成文件
private void writeBufferedImage(BufferedImage img,String filePath){
        String format = filePath.substring(filePath.indexOf('.')+1);
        //获取图片格式
        System.out.println(format);
        try {
            ImageIO.write(img,format,new File(filePath));
        } catch (IOException e) {
            e.printStackTrace();
        }
}- 1
- 2
- 3
- 4
- 5
- 6
- 7
- 8
- 9
- 10
设置图片透明度
下面这段代码可以将图片的背景色设为透明,当然图片不能太复杂,而且背景色要比轮廓的颜色浅。给个例子,左边原图,右边处理过的图。
/**
简单介绍一下思路,首先遍历所有像素,计算一下整张图的灰度的平均值(grayMean),轮廓颜色较深,灰度值比较小,背景颜色较浅,灰度值较大,加权平均之后总的平均值会比背景的灰度值略低,然后再次遍历所有像素,并计算每个像素点的灰度,如果其灰度值比grayMean大,则将其alpha值设为0,即完全透明,否则不做处理。
*/
package imageprocess;

import java.awt.image.BufferedImage;

/**
 * Created by alex on 7/24/16.
 */
public class AlphaProcessor {
    /**
     * 处理透明度
     */
    public BufferedImage alphaProcess(BufferedImage bufferedImage) {
        //获取源图像的宽高
        int width = bufferedImage.getWidth();
        int height = bufferedImage.getHeight();
        System.out.println(width+" "+height);
    //实例化一个同样大小的图片,并将type设为 BufferedImage.TYPE_4BYTE_ABGR,支持alpha通道的rgb图像
        BufferedImage resImage = new BufferedImage(width, height, BufferedImage.TYPE_4BYTE_ABGR);

        double grayMean = 0;
        for (int i = 0; i < width; i++) {
            for (int j = 0; j < height; j++) {
                int rgb = bufferedImage.getRGB(i,j);
                int r = (0xff&rgb);
                int g = (0xff&(rgb>>8));
                int b = (0xff&(rgb>>16));
                //这是灰度值的计算公式
                grayMean += (r*0.299+g*0.587+b*0.114);
            }
        }
        //计算平均灰度
        grayMean = grayMean/(width*height);

        for (int i = 0; i < width; i++) {
            for (int j = 0; j < height; j++) {
                int rgb = bufferedImage.getRGB(i,j);
                //一个int是32位,java中按abgr的顺序存储,即前8位是alpha,最后8位是r,所以可以通过下面的方式获取到rgb的值
                int r = (0xff&rgb);
                int g = (0xff&(rgb>>8));
                int b = (0xff&(rgb>>16));
                double gray = (r*0.299+g*0.587+b*0.114);
                //如果灰度值大于之前求的平均灰度值,则将其alpha设为0,下面准确写应该是rgb = r + (g << 8) + (b << 16) + (0 << 24);
                if (gray>grayMean){
                    rgb = r + (g << 8) + (b << 16);
                }
                resImage.setRGB(i,j,rgb);
            }
        }
        //ok,返回的就是将浅色背景设为透明的BufferedImage了,可以用灰度化里提到的方式写成文件
        return resImage;
    }
}
- 1
- 2
- 3
- 4
- 5
- 6
- 7
- 8
- 9
- 10
- 11
- 12
- 13
- 14
- 15
- 16
- 17
- 18
- 19
- 20
- 21
- 22
- 23
- 24
- 25
- 26
- 27
- 28
- 29
- 30
- 31
- 32
- 33
- 34
- 35
- 36
- 37
- 38
- 39
- 40
- 41
- 42
- 43
- 44
- 45
- 46
- 47
- 48
- 49
- 50
- 51
- 52
- 53
- 54
- 55
- 56
在指定区域内进行处理
想必看到这篇博客的人都接触过photoshop,photoshop可以在一个先用选框工具选中一个区域,然后在这个区域内进行一系列操作,比如之前提到的设置透明度和灰度处理。
先说一下我大致是怎么实现的,首先是将图片放到一个JLabel上,然后为这个JLabel加listener监听鼠标的点击事件,获取鼠标点击的坐标,然后将这些点连起来就围成一个选框,然后设置一个掩码,以确定哪些点在选框内,然后就可以只针对选框内的像素点或者选框外的像素点操作。Talk is cheap, show me the code.
先上这个demo跑完之后的图吧
我点了三个点,然后点击ok,之后程序就会将这三个点围出的区域内图像的透明度设为100,当然你也可以在这个区域内对这块像素点做一些别的操作。
比较重要的一块是getMask() 这个方法
package view;

import javax.swing.*;
import java.awt.*;
import java.awt.event.MouseAdapter;
import java.awt.event.MouseEvent;
import java.awt.geom.GeneralPath;
import java.awt.image.BufferedImage;
import java.util.ArrayList;
import java.util.List;

/**
 * Created by alex on 7/25/16.
 */
public class FrameForBlog extends JFrame {

    JPanel contentPanel;
    LabelForBlog labelForBlog;//这是自己新写的类,在后面
    Button okButton;

    FrameForBlog() {
        contentPanel = new JPanel();
        contentPanel.setLayout(new FlowLayout());
         //我把图片放在这个相对路径下,使用前请自行更改
        ImageIcon icon = new ImageIcon("src/data/cartoon.jpg");
        icon.setImage(icon.getImage().getScaledInstance(1000, icon.getIconHeight() * 1000 / icon.getIconWidth(), Image.SCALE_AREA_AVERAGING));//将图片等比例缩放一下,不然界面显示不全

        labelForBlog = new LabelForBlog(icon);
        labelForBlog.setBounds(0, 0, icon.getIconWidth(), icon.getIconHeight());
        contentPanel.add(labelForBlog);

        okButton = new Button("OK");
        contentPanel.add(okButton);
        okButton.addMouseListener(new MouseAdapter() {
            @Override
            public void mouseClicked(MouseEvent e) {
                super.mouseClicked(e);
                labelForBlog.process();
            }
        });


        add(contentPanel);
        this.setExtendedState(JFrame.MAXIMIZED_BOTH);
        this.setVisible(true);
        this.setDefaultCloseOperation(EXIT_ON_CLOSE);
    }

    public static void main(String[] args) {
        new FrameForBlog();
    }
}

class LabelForBlog extends JLabel {
    //to record the coordinates
    List<int[]> coordinates;

    LabelForBlog() {
        super();
        coordinates = new ArrayList<>();
    }

    LabelForBlog(ImageIcon imageIcon) {
        super(imageIcon);
        coordinates = new ArrayList<>();

        addMouseListener(new MouseAdapter() {
            @Override
            public void mouseClicked(MouseEvent e) {
                super.mouseClicked(e);
                System.out.println(e.getX() + " " + e.getY());
                int[] coor = new int[]{e.getX(), e.getY()};
                boolean contain = false;
                //如果点击的点重复就不加进去了
                for (int[] c : coordinates) {
                    if (c[0] == coor[0] && c[1] == coor[1]) {
                        contain = true;
                        break;
                    }
                }
                if (!contain) {
                    coordinates.add(coor);
                    System.out.println("not contain");
                    repaint();
                }
            }
        });
    }

    @Override
    protected void paintComponent(Graphics g) {
        super.paintComponent(g);

        System.out.println("paint comComponent");
        if (coordinates.size() > 0) {
            int x0 = coordinates.get(0)[0];
            int y0 = coordinates.get(0)[1];
            int x1 = 0;
            int y1 = 0;

            //如果不加这个-3 和 +5 * 和线就没有完全重合,应该是drawString的原因
            g.drawString("*", x0 - 3, y0 + 5);
            for (int i = 1; i < coordinates.size(); i++) {
                x1 = coordinates.get(i)[0];
                y1 = coordinates.get(i)[1];
                g.drawString("*", x1 - 3, y1 + 5);
                g.drawLine(x0, y0, x1, y1);
                x0 = x1;
                y0 = y1;
            }
        }
    }

//获取掩码,这块比较重要
    private int[][] getMask() {
        int x = this.getX();
        int y = this.getY();

        int[][] points = new int[coordinates.size()][2];
        for (int i = 0; i < coordinates.size(); i++) {
            points[i][0] = coordinates.get(i)[0];
            points[i][1] = coordinates.get(i)[1];
        }
    //用了GeneralPath去判断像素点是否在选框内
        GeneralPath path = new GeneralPath();
        path.moveTo(points[0][0], points[0][1]);

        for (int i = 1; i < points.length; i++) {
            path.lineTo(points[i][0], points[i][1]);
        }

        int[][] mask = new int[this.getIcon().getIconHeight()][this.getIcon().getIconWidth()];
        for (int i = 0; i < this.getIcon().getIconHeight(); i++) {
            for (int j = 0; j < this.getIcon().getIconWidth(); j++) {
                //值得注意的是contains(j,i)
                mask[i][j] = path.contains(j, i) ? 1 : 0;
            }
        }
        return mask;
    }

    public void process(){
        int[][] mask = getMask();
         //下面是将Bufferedimage转为Image的方法
        BufferedImage img = new BufferedImage(this.getIcon().getIconWidth(), this.getIcon().getIconHeight(), BufferedImage.TYPE_4BYTE_ABGR);
        Graphics2D g = img.createGraphics();
        g.drawImage(((ImageIcon) this.getIcon()).getImage(),0,0,null);
        g.dispose();

        //根据mask进行透明度处理
        BufferedImage resImage = alphaProcess(mask,img);
        this.setIcon(new ImageIcon(resImage));

    }

//在之前的alphaProcess上略有改动,删除了根据平均灰度值判断这一步,增加一句mask的判断,如果mask为1则改变透明度,否则不改变

    private BufferedImage alphaProcess(int[][] mask, BufferedImage bufferedImage) {
        int width = bufferedImage.getWidth();
        int height = bufferedImage.getHeight();
        System.out.println(width + " " + height);

        BufferedImage resImage = new BufferedImage(width, height, BufferedImage.TYPE_4BYTE_ABGR);

       for (int i = 0; i < width; i++) {
            for (int j = 0; j < height; j++) {
                int rgb = bufferedImage.getRGB(i, j);
                int r = (0xff & rgb);
                int g = (0xff & (rgb >> 8));
                int b = (0xff & (rgb >> 16));
                //根据mask设置透明度
                if (mask[j][i] == 1)
                    rgb = r + (g << 8) + (b << 16) + (100 << 24);
                else{
                    rgb = r + (g<<8) + (b<<16)+(255<<24);
                }
                resImage.setRGB(i, j, rgb);
            }
        }
        return resImage;
    }
}
- 1
- 2
- 3
- 4
- 5
- 6
- 7
- 8
- 9
- 10
- 11
- 12
- 13
- 14
- 15
- 16
- 17
- 18
- 19
- 20
- 21
- 22
- 23
- 24
- 25
- 26
- 27
- 28
- 29
- 30
- 31
- 32
- 33
- 34
- 35
- 36
- 37
- 38
- 39
- 40
- 41
- 42
- 43
- 44
- 45
- 46
- 47
- 48
- 49
- 50
- 51
- 52
- 53
- 54
- 55
- 56
- 57
- 58
- 59
- 60
- 61
- 62
- 63
- 64
- 65
- 66
- 67
- 68
- 69
- 70
- 71
- 72
- 73
- 74
- 75
- 76
- 77
- 78
- 79
- 80
- 81
- 82
- 83
- 84
- 85
- 86
- 87
- 88
- 89
- 90
- 91
- 92
- 93
- 94
- 95
- 96
- 97
- 98
- 99
- 100
- 101
- 102
- 103
- 104
- 105
- 106
- 107
- 108
- 109
- 110
- 111
- 112
- 113
- 114
- 115
- 116
- 117
- 118
- 119
- 120
- 121
- 122
- 123
- 124
- 125
- 126
- 127
- 128
- 129
- 130
- 131
- 132
- 133
- 134
- 135
- 136
- 137
- 138
- 139
- 140
- 141
- 142
- 143
- 144
- 145
- 146
- 147
- 148
- 149
- 150
- 151
- 152
- 153
- 154
- 155
- 156
- 157
- 158
- 159
- 160
- 161
- 162
- 163
- 164
- 165
- 166
- 167
- 168
- 169
- 170
- 171
- 172
- 173
- 174
- 175
- 176
- 177
- 178
- 179
- 180
- 181
- 182
- 183